Importing Images Into Capture One
Importing your images into Capture One is the first step of your workflow. Capture One offers an extensive set of options to customize this process to your needs. Understanding what you do and can do is crucial for an efficient workflow with Capture One.
Importing Images Into Capture One
The basic concept of importing images into Capture One is that you bring your images from A to B, from source to target location. There are a number of variations possible to this theme.
One important difference is whether you import into a Session or a Catalog. We will look into that. Other variables are the possibility to rename, copy to a backup location, add metadata, or make adjustments along the way.
But whatever variables you choose in the process, it always boils done to the from A to B concept.
Session Or Catalog
There are a few aspects where the process of importing images differs depending on whether you import into a Session or a Catalog. Let’s take a quick overview first, and dive into details next.
Import to Session
With a Session, the import is technically optional as you can always browse the System Folders from the Library tool. The exception is the memory card from your camera in the card reader. Don’t work on that disk but import it first.
Nevertheless, using the import feature of Capture One is still very convenient when you work with Sessions.
Import to Catalog
With a Catalog import is mandatory. A Catalog is database driven and in that database, the location of each imported image is stored. This gives you enormous flexibility where to store your images like on different drives, both internal and external.
And although there is no direct equivalent to the concept of Session Folders you can import images inside the Catalog. This is convenient when you need to transfer the original images with their adjustments, selections, ratings, and Albums as a whole to another computer.
Other than that I will stick to the common practice of storing outside the Catalog, also known as referenced.
Special Imports For Catalog
With a Catalog, you have even more options when importing. I do not discuss them in this post but it is important to know.
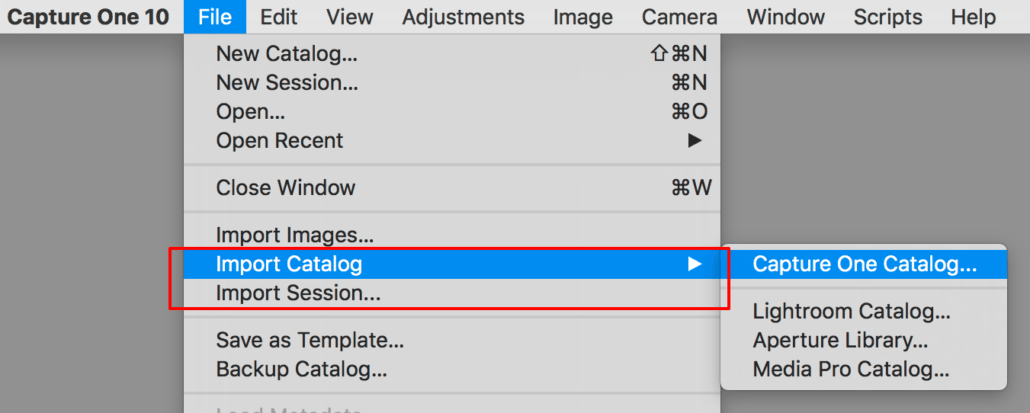
Apart from importing images from drive or folder into a Catalog, you can import an entire Capture One Session or Catalog, a Media Pro catalog, a Lightroom catalog, or an Aperture library.
The main difference is that you also import the organization structure plus adjustments along with the images. You find these options under the File menu > Import Catalog and File menu > Import Session.
Starting The Import Dialog
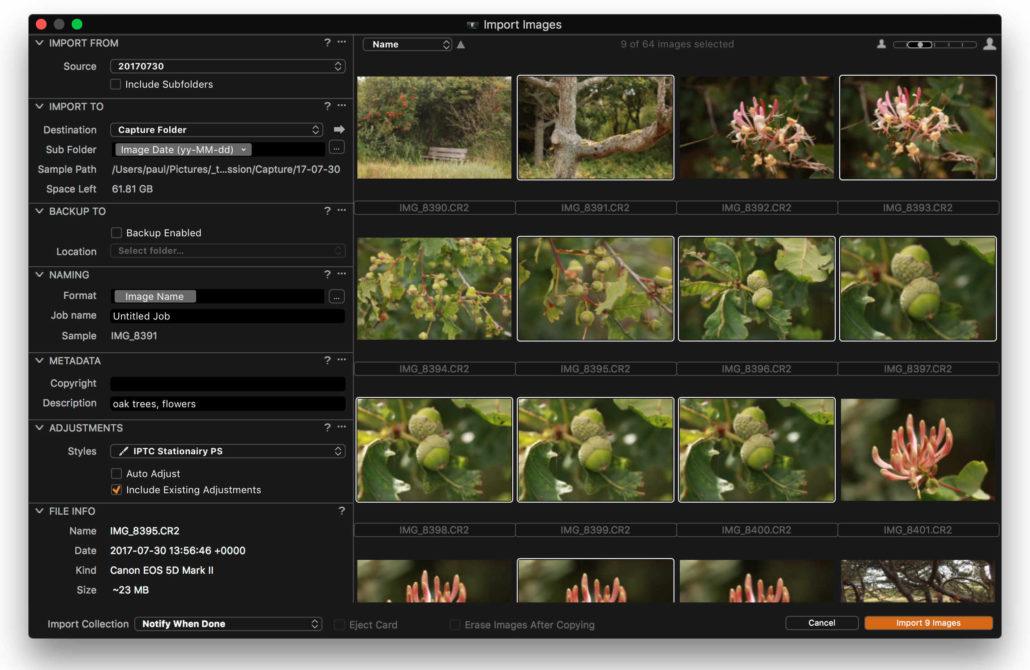
The Import Images dialog is where it all happens and we obviously will go over all the details.
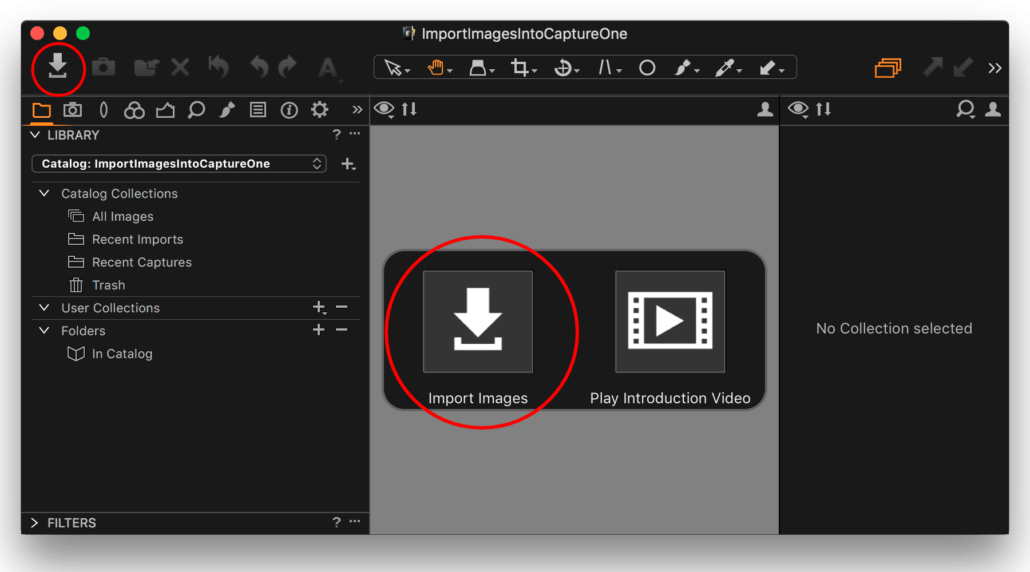
How does the dialog start? You can start the dialog from the File menu, the arrow symbol on the Toolbar pointing downwards, or the same arrow but much bigger from an empty Viewer assuming you opened an empty Catalog.
But the Import Images dialog may also start automatically when you connect a card reader with a memory card. You can control this behavior from the Preferences > General tab > Importing section.
There is no keyboard shortcut assigned to the command by default, but you can change the Keyboard Shortcuts in Capture One.
Import From
In the Import Images dialog, the Import From section is located at the top. Here you define the source location of your images to import. There are a few options here.
When you connect a memory card from your camera, Capture One recognizes the DCIM parent folder on the card and opens the image folder inside it. It does automatically select a DCIM source when one is available.
Of course, you can select any other image location. Click on Choose Folder in the drop-down list and browse to the folder to import. The last ten import folders are remembered.
If you have a nested folder structure or a single parent folder with multiple adjacent subfolders, you can import the images from all subfolders together when you check the box for Include Subfolders. With many subfolders and images give Capture One sufficient time to enumerate them.
Select Images
When you have opened a folder in the Source field and the thumbnails are displayed, you can manually select images if you do not want to import all images in that folder. You can use the Shift-key to select a range and the Command-key (Mac) or Control-key (Windows) to add individual images to the selection.
To further help you select images, you can change the sort order from the drop-down list at the top. There are fifteen sorting options. You can change the sort order with the triangle symbol next to the drop-down list from ascending to descending and vice versa.
Import To
In the Import To section, you have more options and here you see a difference between importing into a Session or a Catalog.
Note that if you work with different documents, Sessions or Catalogs, the settings in the Import From section are persistent for the same type of documents only. It always opens with last settings for Session or Catalogs respectively.
Import To Session
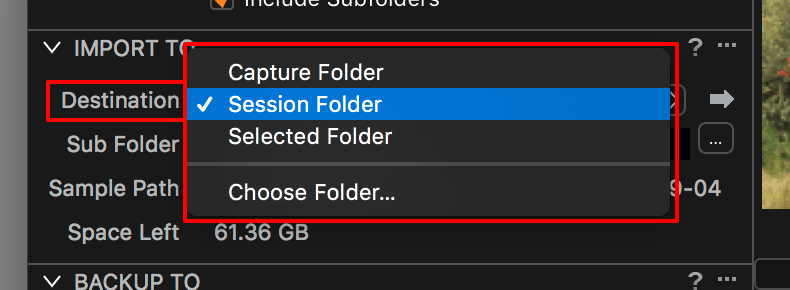
When you import into a Session you set the target location with the Destination field.
This is a drop-down list. The standard options provided are:
- Capture Folder
this is the Capture Folder of the Session - Session Folder
this default option is the parent folder of the Session; the Session Folder is added to the Session Favorites after import - Selected Folder
this is the folder you selected in the Library tool before you opened the Import Images dialog; the selected folder is added to the Session Favorites after import
Note that adding a folder with images to the Session Favorites is not for the fun of convenience only. It makes the folder searchable. This is necessary for Smart Albums and the Filter and Advanced Search features.
In addition to the three standard options, you can click on Choose Folder from the drop-down list and browse to any folder on your system. You can also make a new folder from the browse dialog. The chosen folder is added to the Session Favorites after import. Note that the last 10 folder names are remembered for future use.
Also note the arrow at the right of the Destination field. Click on it and it opens the selected folder in the Finder (Mac) or Explorer (Windows).
Sub Folder (Session)
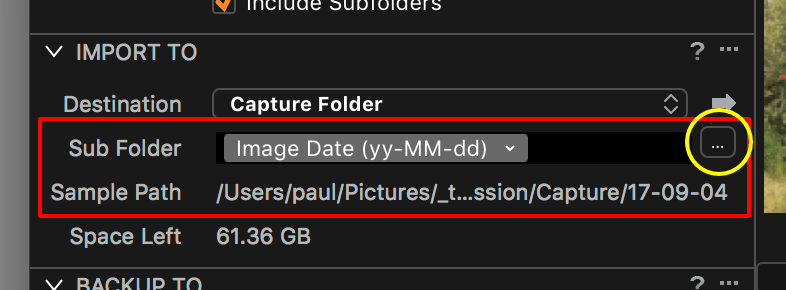
Now that you have your Destination folder set, you also might want to use the Sub Folder feature, which is the next field. You can fill in the Sub Folder in different ways. It is a very powerful feature and often overlooked.
Assume you come back from a city trip and you have images from the park, the zoo, street live, some museums and castles. Just fill in zoo in the Sub Folder field, select the images from the zoo and a subfolder with that name is created and the images are imported into it, all under the same parent folder that you selected in Destination. Repeat the process with a different Sub Folder name and select related images.
Another way to use this field is by using tokens. Click on the three-dot symbol at the right to open the Location Sub Folder Tokens dialog. You can also combine text with tokens and you can nest subfolder multiple levels deep. In my example, and because I have visited city parks on several occasions during my trip, I created a Sub Folder entry of park/[Image Date (yy-MM-dd)] with the token between square brackets.
All images of different parks are under the same ../parks/.. folder but in consecutive folder with their date of creation.
Information
The last part of the Import To section is filled with information and Sample Path below it shows the full path including both Destination and Sub Folder fields.
The Space Left refers to the selected volume you intent you import to.
Import To Catalog
The Import To section for a Catalog is clearly different from its Session sibling.
From the Destination field drop-down list the three default options are:
- Current Location
this is for images that you have stored on your (internal/external) drive and need to stay there; you just need a reference to the image location in the Catalog; hence they are called referenced images - Inside Catalog
this is for images you copy to your Catalog folder to store them with your adjustments and previews - Choose Folder
this is for images that you copy from one location to another and import a reference to their new location into the Catalog
The Choose Folder option is similar to Current Location with an additional copy step in advance. This is the best option when importing from your camera’s memory card. It also opens the Sub Folder field, which is hidden otherwise. Note that the last ten folders are listed for convenience.
Sub Folder (Catalog)
The Choose Folder option in the Destination field opens the Sub Folder option and displays the Sample Path. The possibilities are identical to what I explained for Sessions above. Therefore I kindly advise you to browse back a bit to Sub Folder (Session) section and continue here afterward.
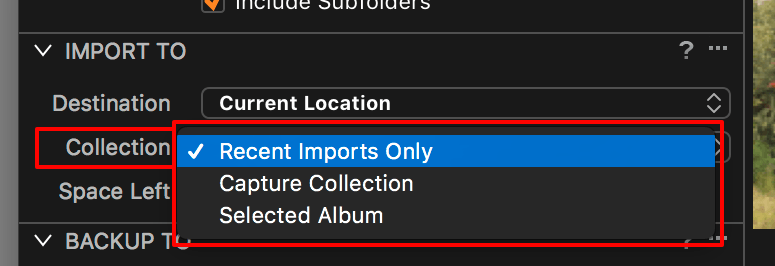
Collection
Where the chosen Destination controls what happens outside the catalog, on your drives, the Collection option is what happens inside the Catalog’s organization.
Again, three pre-defined options:
- Recent Imports Only
this default option refers to the Recent Imports collections in Library > Catalog Collections; remembering the last ten imports it is a convenient way to work on your recent imports - Capture Collection
this option also stores your import into the Capture Collection, in addition to the Recent Imports collections - Selected Album
this option also stores your import into an Album of your choice, in addition to the Recent Imports collections
A Capture Collection is an Album you made and that you set as the Capture Collection; tethered images show up in the Capture Collection and you can add your import to it; convenient for a mixed tethered/non-tethered shoot.
Note that any import will show up in the Recent Imports collection. The other two options are optional and additional. With regard to these last two options please be aware that you have to set them before you open the Import Images dialog. You can not make an Album, select one or make it the Capture Collection from the Import Images dialog, unfortunately.
Backup To
In the Backup To section you can instruct Capture One to make a backup copy of the imported images to a defined location. First enable the backup feature with the Backup Enabled checkbox.
Next, select a folder in the Location field. You can not use a subfolder option here, which would be a nice to have feature by the way.
Naming
In the Naming section you find options to rename images during import. This feature works the same for Session and Catalog import with one exception. When you import into a Catalog with the option Import To > Current Location no files are actually copied. As a result, renaming is not possible.
The Format field lets you use fixed text and tokens in any combination. A simple format could be Summer2017-001, where -001 is an automatically counting sequence number. You can use a token for that.
But maybe you are more interested in a generic file naming format like what I use: PS20170830-001, where PS is fixed text as they are my initials, 20170830 is the YYYYMMDD creation date format and set by a token, as is the -001 the sequence number.
In case you use a generic file format, make sure you save it as a Preset in the Naming Format dialog.
The Job name field under the Format field refers to the Job Name token. Here you fill in the text for that token.
Metadata
The Metadata section let you add some very basic IPTC metadata to the images that you import:
- Copyright
- Description
You could set the copyright field once or leave it blank and go for a better option with a Preset or Style. See the Adjustments section below.
The Description field makes more sense to me. Even a brief description can be a great help later on. If you use it, make sure to make a habit of updating it with each import, otherwise you apply the wrong description to future imports.
Adjustments
The Adjustments section is very interesting.
You have three options, which you can use both separately or combined:
- Styles
by default set to None, you can link multiple Styles and Presets here; a Preset with all your stationary metadata is my favorite here - Auto Adjust
by default disabled, it runs the Auto Adjust feature to each image that is imported; note that Auto Adjust is configurable in Capture One via Adjustments menu > Auto Adjustments before importing - Include Existing Adjustments
by default enabled; it includes Capture One adjustments that were made earlier; applies to images adjusted in a Session or exported as original (File menu > Export Images > Originals)
Tip: as an example, you can combine Include Existing Adjustments with a Style or Preset with metadata.
File Info
When you do not select any thumbnail in the right pane of the Import Images dialog, you only can import all images.
When you do select one or more images, the File Info section shows the file name, when it was shot, the camera it was shot with and its size.
Open Collection & More
At the bottom of the Import Images dialog, you find a drop-down list and two checkboxes. These options control how the program behaves during and after import.
- Import Collection
- Never Open Import Collection
- Notify When Done
- Open Collection When Import Starts (default)
- Eject Card checkbox
this will eject or unmount a memory card after import - Erase Images After Copying
the text says it all; makes sense if you need to continue shooting right after import; better format the card in your camera before next use
Tip: if you import a large collection of images, choose Never Open Import Collection because you save your computer resources for import and import will be quicker. Showing the new images means preview generation immediately starts during import.
The Notify When Done is similar but you get a notification when the import is ready. I much prefer this option.
Thank you
For reading. Please feel free to leave a comment. Like us on Facebook or subscribe to our newsletter to stay informed about new blogs.
Best Regards,
Image Alchemist








Hello, thanks for this article..is there any limit of images recommendation for the session mode? Someone told me, that for performance wise, I should split my event gallery to several sessions…I mean I came from a wedding and have 1000 images…all will be on internal .m2 ssd imported…do I need to split the images into 3 sessions with 333 images?
Hi Peter, with sessions the 300-500 images per folder limit has long been advertised. However, with faster hardware and SSD drives, you can stretch to 1000 images per folder. There will be some delay. Optional, split images in 2 or 3 folders within a single session and make all folders a session favorite. That might help as well.
While using capture one, if l want to outsource my editing process.. do you know a good company that offer the editing/color correction using capture one?
As most editing companies only use lightroom!
I scanned BW film negatives saved as TIF and imported them into my Mac. The scanned files do not import into Capture One10. I changed the Tif file to a psd but still no import. btw PS and LR can see the files as tif or psd
thanks. david
Hi David, most likely that the B&W scans are greyscale images and not RGB images. Capture One can not open or import greyscale images.
Best, Paul Steunebrink / Image Alchemist
Is there any way to customize the import window tools. As in, I would like to add the ‘keywords’ tool, but for some reason, all tools are greyed out.
Hi Maarten,
Unfortunately, the Import Images dialog is not customisable. You can technically add keywords during import, via a preset or style, but otherwise this is considered done after import.
Best, Paul Steunebrink / Image Alchemist
Is there any way to not generate thumbnails? My set of images is too large to scan through them. I want to import all so it just wastes rendering time–for an already tediously slow process–to generate them.
Hi Lewis,
I suggest to look at the setting at the bottom of the Import Images dialog named Import Collection and set it to Never Open Import Collection. Might speed up import and postpone thumbnail generation.
Best, Paul Steunebrink / Image Alchemist
Why are all newly imported images in a new catalogue black?
Just after importing, it looked like CapOne was building previews, then
all the images went completely black in the strip
I’m running CapOne 11 trial and this is day one, running on
Mac OS Mavericks, files are uncompressed raw files from Sony A7II.
Thank you so much,
Stephen
Hi Stephen, if you are really on OS X Mavericks I wonder how you got CO Pro 11 working: it is not supported. Please check your OS version and update if possible (macOS 10.11.6, 10.12.6, 10.13.x are supported). Also: in Preferences set Hardware Acceleration to Never.
Best, Paul Steunebrink / Image Alchemist
Hello, when importing into Capture One, I like to rename the photos based on date and an automated sequence. However, it is importing (and renaming) them all out of order, even though I have sorted by the original file name. Why is this happening?
Hi Joseph, there seems to be a bug in CO 11.0. Workaround is to import without renaming and batch rename afterwards. For further assistance please contact per e-mail.
Best, Paul Steunebrink / Image Alchemist
Sounds all good… thanks much –
however, as I am writing right now, Capture1 -11 is importing (‘at current location’) my Lightroom catalog and it takes between 4 to 7 seconds for each single image to progress into the newly-created C1-catalogue… thus, I’ll be waiting for at least 5 days or so for the 70.000 pics in my LR catalog to be added to C1-catalog ?? correct ? or did I miss some settings ?
Hi Peter, during import the preview generation is often the bottleneck. To postpone preview generation, set in the Import Images dialog ‘Import Collection’ > ‘Never Open Import Collection’. This option is at the bottom of the dialog.
Best, Paul Steunebrink / Image Alchemist
New to Capture One Pro and I want to know how to import my pictures so they stay organized the same way I have them on my hard drive; YEAR/MONTH/SUBJECT. When I import a YEAR in to a new catalogue I get all 6,000+ pictures from that year in one place. No folders or sub folders. Too many pictures to ever sort through, find or work with. What am I doing wrong?
Thank you, Brian
Hi Brian, when using a catalog, in the Import Images dialog, Import To section, make sure you set Destination to Current Location. This will leave the images (no copying) and the folder structure is maintained in the catalog. Please contact me directly if you need further assistance.
Best, Paul Steunebrink / Image Alchemist
Hi Brian, I realize it’s a long time since your post but I have recently discovered a possible flaw with COP12 import process. I had the same problem when I made a fresh start after upgrading to v12. It turned out that a parent folder that contains child/sub-folders of images, but no image files in the parent folder, is considered to be empty and therefore overlooked during import – even though the child folders are imported! After the import is completed you need to go back and add those “empty” folders manually. At that point all the child folders automatically scurry back to where they belong!!
Alternatively you can place a dummy image in the “empty” parent folders and the import will retain your folder structure correctly. It worked for my catalogue so it might have worked for yours.
Hi John, maybe this is recently fixed as I can not reproduce the issue on Capture One 12.0.3 both Mac and Windows.
Best regards, Paul Steunebrink / Image Alchemist
A friend of mine has a problem importing files into Capture One 11 Pro, the software recognizes tiff files but won´t even see the nef files, Mac software.
What do you think about this?
Hi Silvano,
Maybe your friend has new NEF files then his version of Capture One supports. Check for updates and check the release notes for supported cameras. If your friend still encounters issues, contact me directly via mail.
Best, Paul Steunebrink / Image Alchemist
Jerry
Hi great info.
I am new to Pro 11 with a High Serra on a 27″ iMac
I have been importing images from my catalog that was set up with Lightroom.
I have one image a psd file that I can import one virent of and not another.
Tried everything a new can think of including renaming and rebooting
Any ideas?
Hi Jerry, hard to say why you can import a PSD to one computer and not to another. If you like contact me direct (contact form), or you contact Phase One support from their website.
Best, Paul Steunebrink / Image Alchemist
How can I only import JPEG files?
Hi Juan,
Before you import, from View menu, Global Filter, hide all types you do not want to see in the Import Images dialog.
Best, Paul Steunebrink / Image Alchemist
I would like to turn off the adjustments that Capture One appears to automatically apply to all images – not talking about the “auto adjustments” that you can turn on or off, but rather the adjustments that the software is automatically making. I purposefully shoot with a flat file so as to capture as much visual information as possible. I want to maintain that flat file and develop the image myself. Upon import to Capture 1, the program automatically adds contrast and saturation (not sure what else) that dramatically changes my raw file, thus defeating the whole purpose of using a flat picture mode. I assume there is a way to STOP the program from making any adjustments to the file, but I can’t find where these adjustment settings are located.
Thanks,
Greg
Apart from auto lens correction, which you can shot off, the Standard Filmcurve (Base Characteristics tool) is what you’re after. Change to Linear Response and set that as default. Done. Contact me directly for details if needed.
Best, Paul Steunebrink / Image Alchemist
I’d like to import my MediaPro catalogue into a Capture One cataloge, and have found no relevant import option in the File menu. Will the images be referenced, or kept in the catalogue? Or is it possible to choose between those alternatives also when importing a MediaPro catalogue?
Hi Tellef,
You can import the Media Pro catalog into a Capture One catalog via File menu > Import Catalog > Media Pro catalog. Please reference: https://www.phaseone.com/products/software/capture-one-pro/mediapro-discontinue
Best, Paul Steunebrink / Image Alchemist
Hello,
I’m having troubles with importing my images. Whenever I want to import images from my harddrive it seems like I can’t open any images. They are there, but I can’t select and import them. Why is this? Thanks
This issue can have many causes. Please contact me via the contact form. Thank you.
Best, Paul Steunebrink / Image Alchemist
Is there a way to preview a fuller sized single image, much like that on Lightroom, when importing images. Often times I will only want certain shots imported, but judging based off smaller thumbnails is impossible.
Hi Matt,
You could set a larger thumbnail size in the import dialog, and you can expand the size of the entire dialog as well to host sufficient larger thumbnails.
Best, Paul Steunebrink / Image Alchemist
On a recent trip I imported each day’s images as referenced (in current location) except one day where I inadvertently imported them as managed inside the catalog. How can I moved them along with their edits outside the catalog into the referenced folder with the other images?
OK, maybe I figured it out. Select all “managed images” in the browser, go to FILE > EXPORT IMAGES > ORIGINALS, select desired referenced folder, make sure INCLUDE ADJUSTMENTS is checked, then EXPORT XX ORIGINALS.
Hi Larry,
Yes, you could do that but then still your images are managed inside your catalog and you have to import them again, resulting in double images. My approach: in the Library tool, Folders section, click the + symbol and add the folder for the managed images to the catalog. If necessary create it. Next, select your managed images and drag them to the folder. Tip: I always do a verify catalog before and after such actions.
Best, Paul Steunebrink / Image Alchemist
Hi Paul,
Thanks, however, I am missing something.
All of 422 photos from this trip, referenced and managed, are physically in the folder “2019/09 Colorado,” on my hard drive. This shows up as follows in the Folder section of CO12:
Folders
In Catalog 34
Hard Drive
2019/09 Colorado 388
So I am uncertain just what to do to “add the folder for the managed images to the catalog. If necessary create it.” I would have said the managed images already have a folder…it is the same folder as the referenced images, namely 2019/09 Colorado. But I cannot drag the managed images from the “In catalog” folder to the “2019/09 Colorado” folder (which I think would work in CO7.}
I could highlight the “In catalog” line and click on the + sign, but then it’s unclear where I should browse to in order to add the folder.
I guess I need more explicit directions.
OK. Select the IN CATALOG folder in the LIBRARY, go to browser and select all images, drag to folder containing the referenced images (2019/09 Colorado in this case).