Stacking Capture One Presets
Stacking Capture One Presets is probably one of the most underestimated features. Stacking gives Capture One Presets its magic. Learn the two benefits of stacking and put your presets on steroids.
Stacking Capture One Presets
I have written quite a lot about Capture One Presets and also Styles at Image Alchemist. In addition, I created the largest collections of presets on the globe of over 3.500 in total, of which over 700 are free. You find them in the Webshop.
Today I zoom in on one specific feature: Stacking Capture One Presets. But before we dig into this, first a quick recap on what the main benefits of presets are.
Presets Main Benefits
Using presets as a way to adjust your images has several benefits. I recap the top 3:
- preview before apply or remove
- adjust multiple images simultaneously
- adjustment history per tool
You find a more extended description in my post on Capture One Presets. The adjustment history is a benefit of stacking. But as you will learn now, stacking can do more.
Install Free Presets Now
Maybe you do not have made custom presets. To get into stacking I advise you to download and install the Preset Collection Free Trials now. This is a collection that covers almost all tools and contains over 700 presets for free.
Introduction To Stacking
A preset is a predefined adjustment and a preset is tool-related. For example, presets for the Exposure tool are separate from those for the Clarity tool. They are also stored in distinct folders, one for each tool, as described in Installing Presets And Styles.
What happens when you apply multiple presets for the same tool on an image?
Preset Replaces Adjustment
By default, without stacking, each preset replaces its predecessor. Any previous adjustment, either manual or through a preset, is wiped out. Removing the preset does not bring the former adjustment back. Note that this works per tool. An Exposure preset does not affect a Clarity adjustment.
Now, let’s start stacking. Stacking presets adds two options, depending on the tool and the preset. The options are:
- Adjustments History
- Combining Adjustments
In the next paragraphs, I will look into these options in more detail. At the end of this post, I will also highlight the Stack Styles feature. It works similar to Stack Presets but with a twist.
Enable Stacking
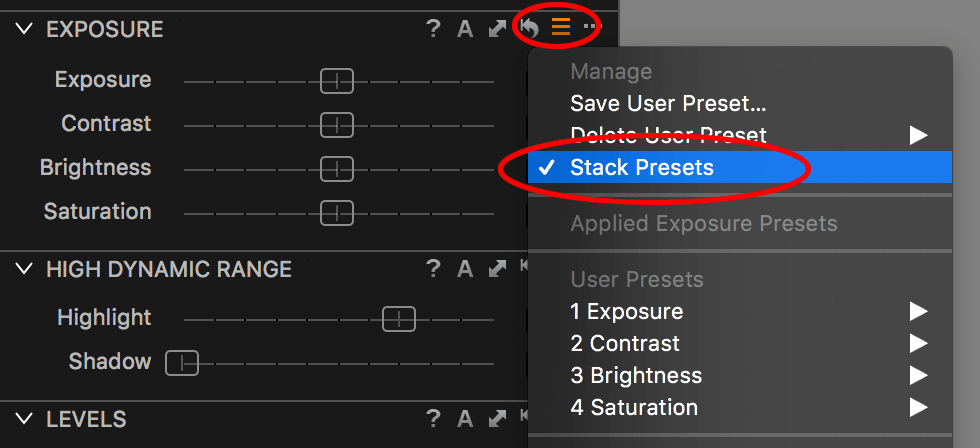
Each tool that uses presets has its own Stack Presets switch, that you can enable or disable. This setting is program-related, so you switch it on independent from the image you are editing.
You find the switch in the action menu of each tool. When enabled you see a checkmark in front of the Stack Presets label.
Without stacking the first applied preset is removed and replaced with the second preset. If you regret your step you can undo immediately but other then that you can not go back.
Adjustments History
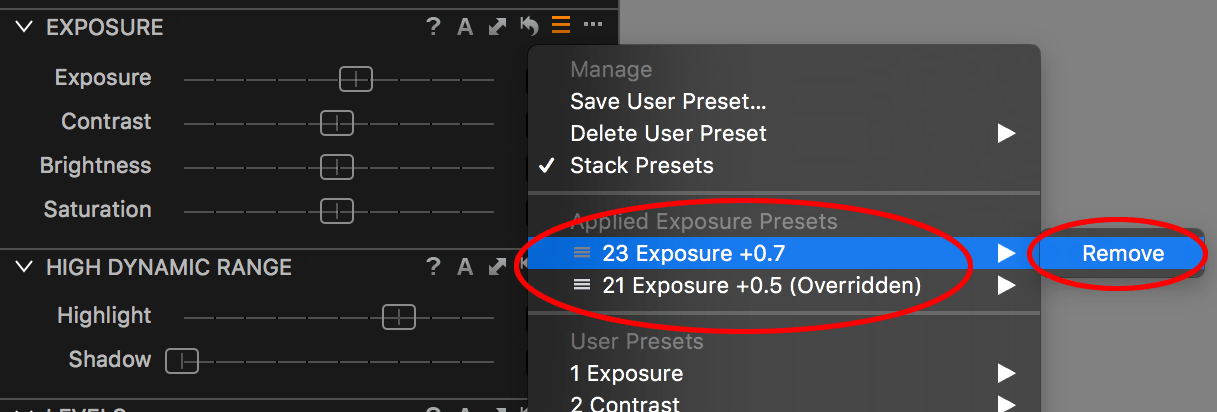
With Stack Presets enabled, the second preset overrides the first, which means that the first preset is still there. Removing the second preset will reinstate the first preset.
This gives you effectively an adjustment history per image per tool. This is a feature many asked for but only very few know about!
You can remove the applied preset by hovering your mouse over it. Start with the preset at the top of the stack. This will show the Remove label. Hover your mouse over that label.
Notice that the image preview adapts immediately to the new status. Click Remove to really remove the preset. Now the previous preset is in charge and no longer overridden.
Combining Adjustments
Some tools allow you to selectively save adjustments in a preset. Take the High Dynamic Range tool for example, with its two sliders, Highlight and Shadow. In the Preset Collection Free Trials, which I advise you to install, you find 4 presets for both sliders and 4 for them combined for the High Dynamic Range tool.
It is easy to create these from the action menu > Save User Preset. In the Save Preset dialog, you can uncheck Highlight Recovery and/or Shadow Recovery or leave them both checked.
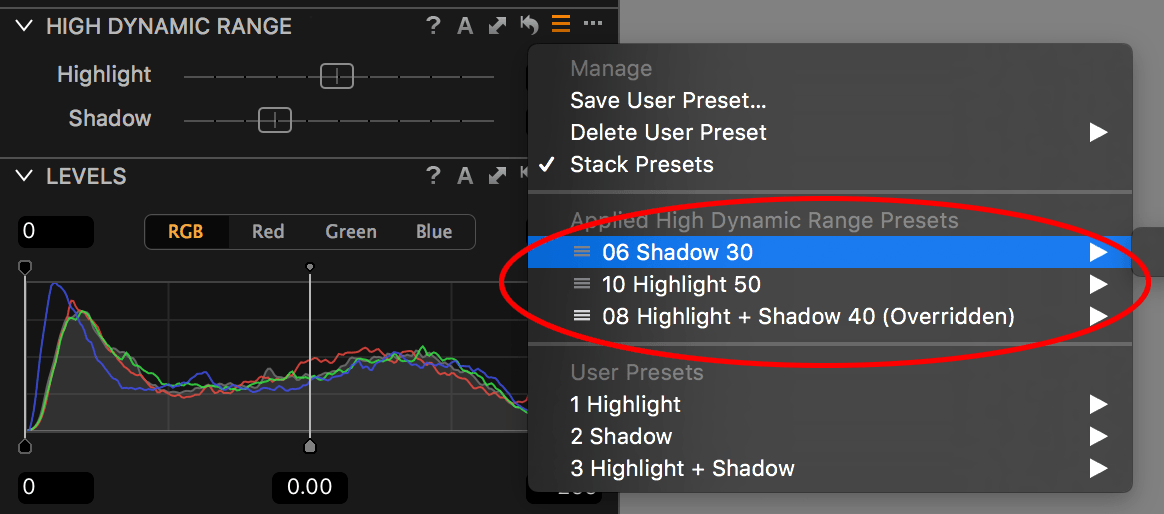
I suggest you enable Stack Presets and play with the presets. Apply as many as you like from each group, the Highlight, Shadow, and Highlight + Shadow group, and look at the position of the sliders and your image of course.
In the screenshot above you see that I first applied to combined Highlight + Shadow 40, next I applied to Highlight 50 because 40 was not enough. The first preset was overridden for the Highlight adjustment only. Last, I applied the Shadow 30 as 40 was to strong, now fully overriding the original preset.
However, notice that both Highlight only and Shadow only presets do not affect each other.
You can now play with removing Presets if you like, just like I explained above. Only removing the top of the stack has an immediate effect on the image.
Put It To Work
How this works for me in day-to-day practice is that I often start with a combined preset, say 20+20, and alter one to say Highlight 30 or Shadow 10 for example.
You have now discovered that for tools like High Dynamic Range in Capture One enabling Stack Presets gives you both the power of an adjustment history and the flexibility of combining presets.
Both options enhance the preset’s versatility and flexibility enormously. However, not all tools in Capture One are that flexible in combining adjustments.
I will now look at the limitations Capture One Pro induces here and shows you how the Image Alchemist Presets have mitigated them to retain maximum versatility. I introduce a 3-way classification for the awesomeness of tools regarding the power to use presets:
- out of the box awesome
- need tweaking awesome
- need programming awesome
As you can see, all the tools are awesome in some way!
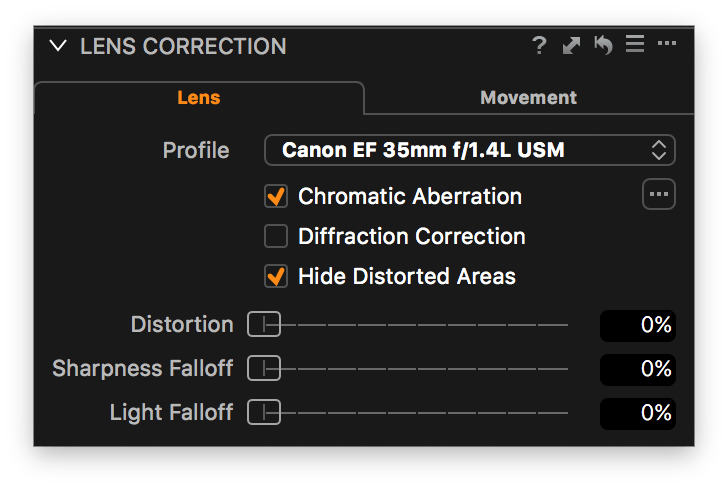
Let us dive deeper into the intricacies of the tools with multiple controls like sliders, drop-down lists, and checkboxes like the Lens Correction tool above.
Multiple Control Tools
Almost all tools in Capture One that can save presets have multiple controls like sliders, checkboxes or a drop-down list. The only exception here is the Purple Fringing tool as it has a single slider.
Out Of The Box Awesome
Like for the High Dynamic Range tool, the following tools give you the option to selectively save individual adjustment per control. In other words, take the Exposure tool for example, you can choose which of the four sliders – Exposure, Contrast, Brightness, Saturation – is stored in the preset. These tools are out-of-the-box-awesome:
- Base Characteristics
- Exposure
- High Dynamic Range
- Clarity
- Lens Correction
- LCC
- Keystone
- Sharpening
- Noise Reduction
- Keywords
- Metadata
The Save Preset options fully mimic the controls of the tools. Look for example at the Save Preset dialog of the Lens Correction tool.
For some tools, you can selectively save a part of the controls. Other tools do not provide any option. See for details the next two paragraphs.
Need Tweaking Awesome
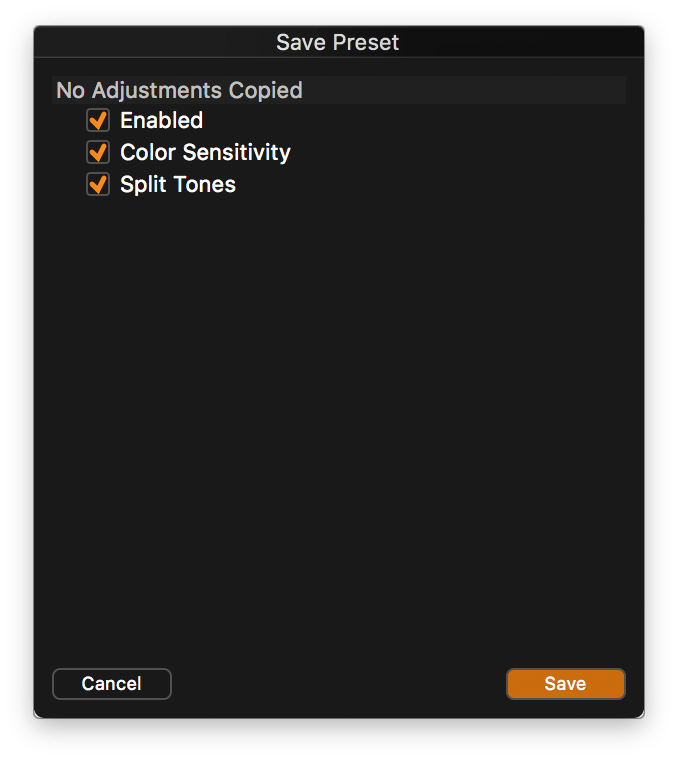
Look up the Black & White tool from the Color tool tab. It has two tabs with a total of eleven controls (ten sliders and a checkbox).
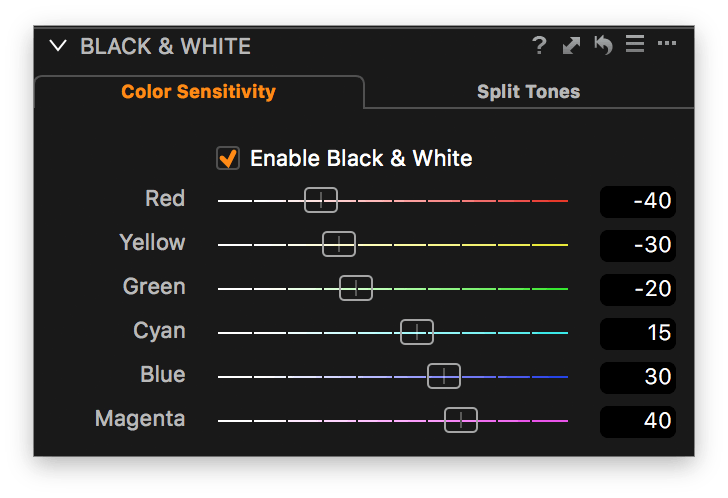
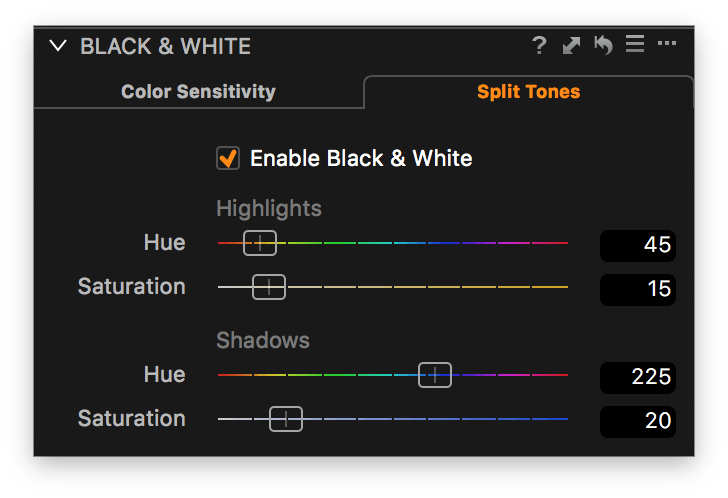
In the Save Preset dialog, you see three checkboxes. So there is some selective control possible when saving, but not for the six Color Sensitivity and four Split Tones sliders.
If you installed the Preset Collection Free Trials and played with the presets for the Black & White tool, you might have noticed that you can change all 11 controls of the tool independently.
In the pair of images below, I have first converted the image to black & white with six different presets that control each of the color sensitivities. In the second image, I have applied split toning with four different presets. All presets stack and are effective at the same time.
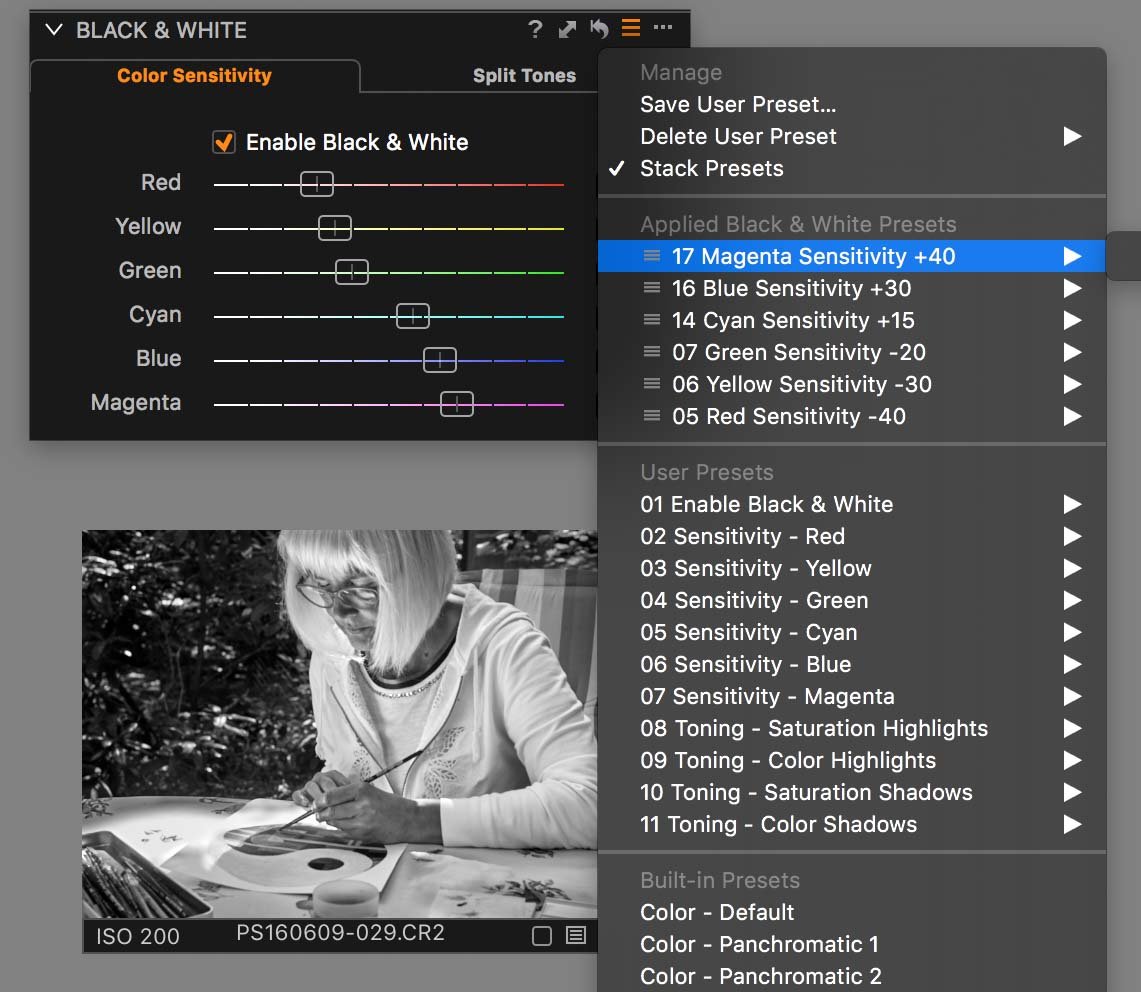
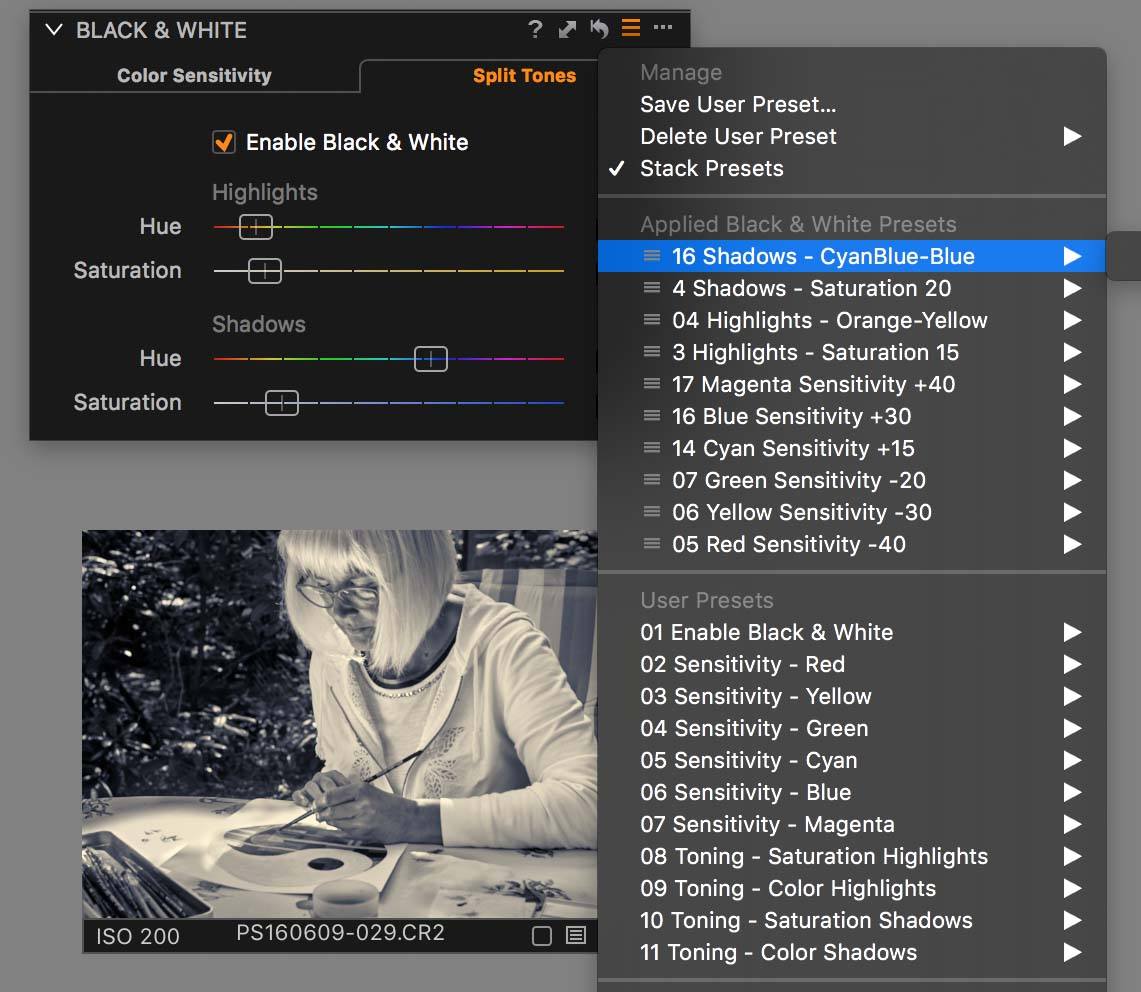
To summarise: the tool is awesome, but saving presets needs some serious tweaking.
These tools are need-tweaking-awesome:
- Color Balance
- Black & White
- Levels
- Curve
- Film Grain
All presets from the Image Alchemist for these tools are individually tweaked to gain maximum flexibility and control through presets over the tool. A prerequisite is that you enable Stack Presets for these tools.
Note that most of these enhancements currently do not work on the Windows version of Capture One.
Need Programming Awesome
Last, even the Image Alchemist is limited due to constraints caused by the program and how it stores adjustment values in the preset file.
Take the White Balance tool, for example. There is no way to achieve selective control over either slider. Here some programming needs to be done. As a result, the following tools are need-programming-awesome:
- White Balance
- Color Editor
- Vignetting
- Moire
Stacking presets with these tools still gives you the benefit of the adjustments history, but combining presets with selective adjustments is impossible.
Stack Styles
Stacking styles works similar to stacking presets but with a twist. To demonstrate the effect, I suggest you download and install the free Phase One Exclusive Styles.
Next, enable Stack Styles. You find the Stack Styles feature via Adjustments menu > Styles > Stack Styles or from the Styles And Presets tool on the Adjustments tool tab. Note that enabling this affects stacking for all the styles you apply from now on until you disable Stack Styles.
Now, for example, apply the Color > Landscape Faded style. View the Exposure tool adjustments and notice that Contrast is set to 11 and Saturation to -30. Next, apply the Color > Wash Out style. This style changes the Contrast to 30 but does not affect Saturation.
In the screenshot above you see both styles I mentioned applied and stacked. You also see a bunch of presets that are applied to this image. Some Presets are overridden by the Styles.
Without stacking only the last applied style exist. Earlier applied styles are replaced, just like with presets.
Thank you
For reading. Please feel free to leave a comment. Like us on Facebook or subscribe to our newsletter to stay informed about new blogs.
Best Regards,
Image Alchemist








A very good article. I was hoping Stacking meant that you could double up on the effect of a tool. I am always wanting more Highlight Recovery and thought I could apply this tool twice using stacking, producing twice the recovery. It seems you cannot do this. Am I right?
D. Harvard.
Hi Daniel,
You can add up adjustments through adjustments layers. In case you use presets (or styles) for that purpose, you can create the layer with the preset from the Styles & Presets tool. Right-click on the preset and select Apply to New Layer. The new layer will carry the name of the preset.
Best, Paul Steunebrink / Image Alchemist