
Capture One Layers In-Depth (part 2)
In Capture One Layers In-Depth (part 2) you learn how you combine both Presets and Styles with Layers. Understanding Selection Points is another topic. And last but not least, some thoughts regarding a workflow with Layers.
Capture One Layers In-Depth (part 2)
Capture One Layers In-Depth (part 2) continues by highlighting how to handle Presets and Styles with Layers. Understanding Selection Points and how to use them is another topic. The post concludes the series on Layers with some general remarks on a workflow with Layers.
This is the fourth and last post on Layers, preceded by Layers Explained, Layers Continued and Layers In-Depth (part 1).
Preset And Styles
You like Presets or Styles and you love to use Layers, right? Then there is some very good news: in Capture One Pro 11 you can combine Preset/Styles with Layers. To really enjoy this feature, however, there are a few aspects to be aware of. I will guide you through all of them.
But before we jump into it I offer you a brief reminder of what Presets and Styles in Capture One are.
Brief Reminder
A Preset in Capture One is a saved adjustment of a specific tool. You can have an Exposure Preset or a White Balance Preset. A Preset is therefore tool-specific. A Preset that you make with a certain tool, is only used with that tool.
A Style is a collection of saved adjustments from different tools combined. Therefore, a Style is often regarded as a collection of Presets. Hence, Style is not tool-specific.
Both Preset and Style have specific characteristics. You can stack them and they are applied to all selected variants. You also can review their effect on the images before they are applied. If interested please refer to Capture One Presets and Capture One Styles respectively to learn more about it.
Note that you can download countless Presets and Styles from the Webshop.
Apply From Layers Tool
The new Layers tool introduced in Capture One Pro 11 offers an option Apple Settings From in the action menu. It looks similar to the Styles and Presets tool.
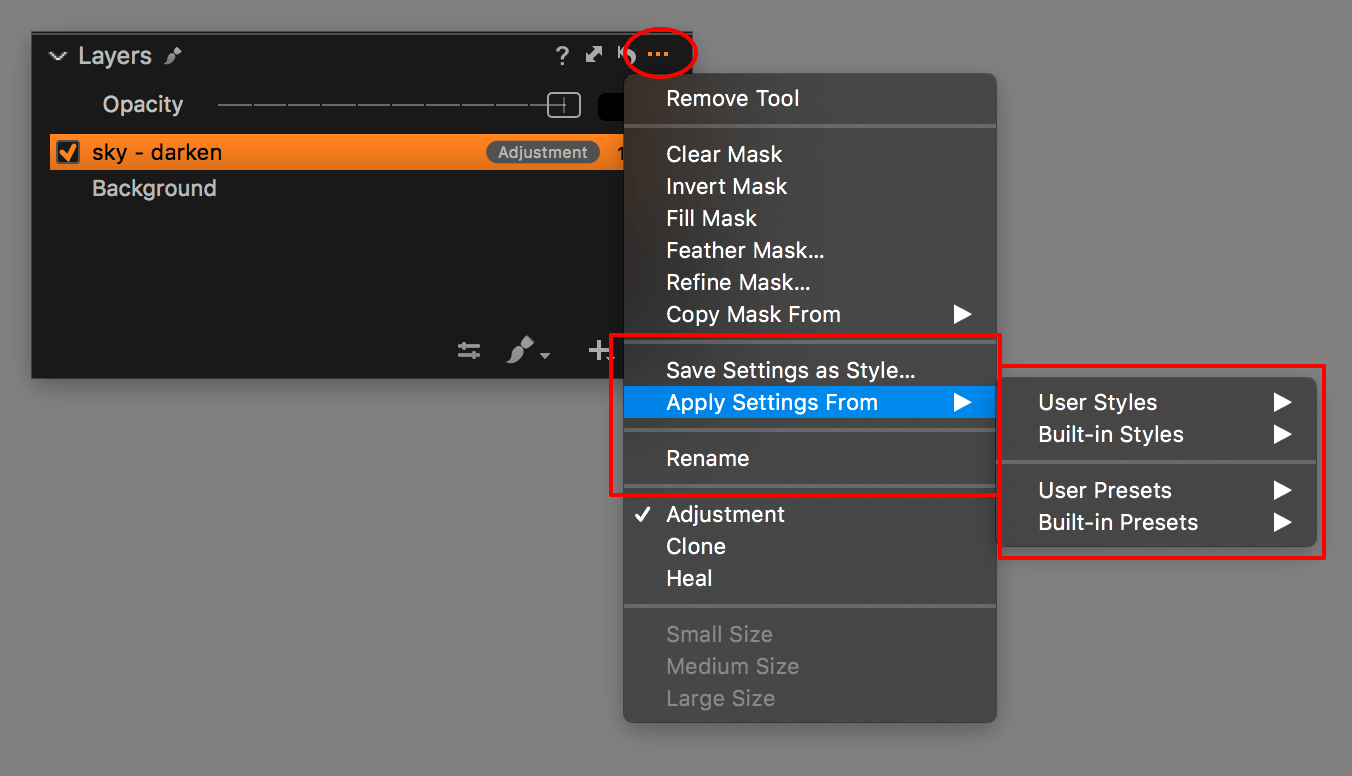
You need to use this tool to apply a Style to a Layer. You can use it for Presets as well, but if you prefer to apply a Preset to a Layer from the tool the Preset belongs to, please do so as this works as well.
Warning 1: if you apply a Style from the regular Styles and Presets tool, the toolbar, or the Adjustments menu, the Style will always be applied to the Background Layer, not the selected Adjustment Layer.
Warning 2: in Capture One Pro 11 you can not see which Preset or Style is applied to a Layer like when you apply it to the Background Layer.
Presets On Layers
Some tools do not work on Layers, like Vignetting or Film Grain. What happens if you accidentally use a Preset for that tool on a Layer? Easy, you can’t.
For example, look at the built-in Film Grain Presets while you selected a Layer. From the Layers tool, the Presets are not accessible. They are greyed out as shown in the screenshot below.

Go to the Film Grain tool instead and apply the Preset. The good news is that the Film Grain Preset is always applied to the Background Layer, even when another Layer is selected.
Styles On Layers
With Styles, it is a slightly different story. A Style is always available from the Layers tool as long there are no Black & White adjustments included in the Style. When you apply the Style from the Layers tool and it includes incompatible adjustments, you get a warning message.
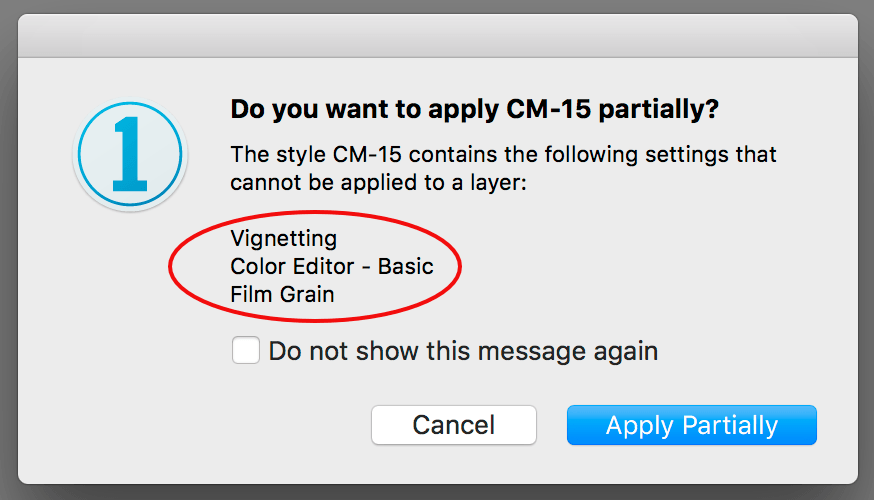
The warning informs you of the adjustments in the Style that Capture One can not apply to the Layer. You are offered the choice to apply the Style partially (without the listed adjustments of course) or cancel it.
To summarize a Style on a Layer can be either
- fully applied
- partially applied; Style contains adjustments from specific tools (see list below)
- not applied; Style contains adjustments from the Black & White tool
The tools whose adjustments in a Preset/Style you can not apply to a Layer are:
- Base Characteristics
- Black & White
- Color Editor – Basic
- Vignetting
- Lens Correction
- LCC
- Keystone
- Film Grain
- Keywords
- Metadata
- Rotation & Flip (Style)
- Crop (Style)
Note that only the Black & White adjustments in a Style entirely blocks the Style on a Layer. The other tools in the list generate the Apply Partially message.
Filled Layer And Styles
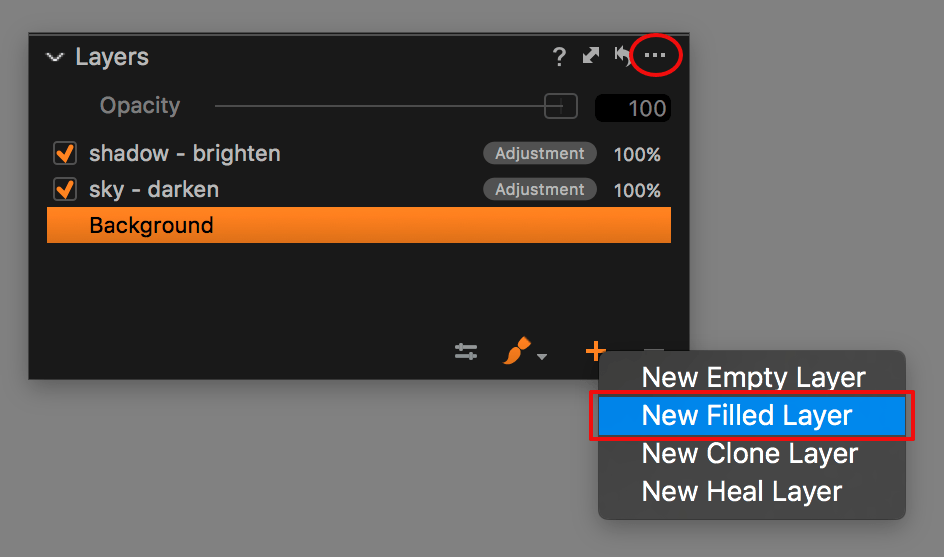
Filling a new Layer was already possible but Capture One Pro 11 let you create a new Filled Layer instantly. Ever considered to apply a Style that you wish to apply to the entire image, to a Filled Layer instead of the Background Layer? This has two advantages.
First, you can toggle the Layer on/off to review the effect of the Style on that Layer on the entire image. This is easier than temporarily disabling the Style. You can easily process the image with or without the Style. You can also apply different Styles to respective Layers to easily review their effect.
Second, with the Master Opacity slider (Capture One Pro 11) you can gradually control the effect of the Style to an image. This mitigates the fact that a Style as a set of adjustments is not easily controlled in terms of less/more.
Save Settings As Style From Layers Tool
If you are familiar with creating Styles, here is one new trick. Let’s say you made some adjustments on a Layer and like to save them as a Style. No problem, but you need to do this from the Layers tool, just like you do when applying a Style.
Do not forget to select the proper Layer first before you start saving the Style. Also note that the Style you create from a Layer is a regular Style and you can apply it to any Layer, including the Background Layer.
Apply Style To Multiple Images
This is again another scenario Capture One Pro 11 takes care of neatly. Assume you have multiple images selected. On the Primary Variant, you have a Layer, and you apply a Preset or Style to that Layer. As you might know, a Preset or Style is automatically applied to all selected variants.
When you apply a Preset/Style to a Layer and you have more variants selected, Capture One assumes you want to apply it to a Layer on the other variants (not the Background Layer).
The question is now to which Layer should Capture One apply the Style on the other selected variants? At this point that are two options:
- the other selected variant(s) has no Layers; you are asked to create a new Layer
- the other selected variant(s) has one or more Layers; you are asked to use the Topmost Layer or create a new Layer
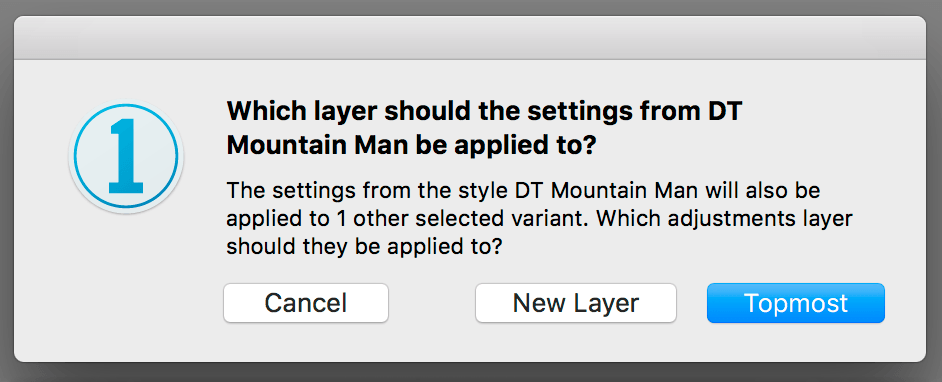
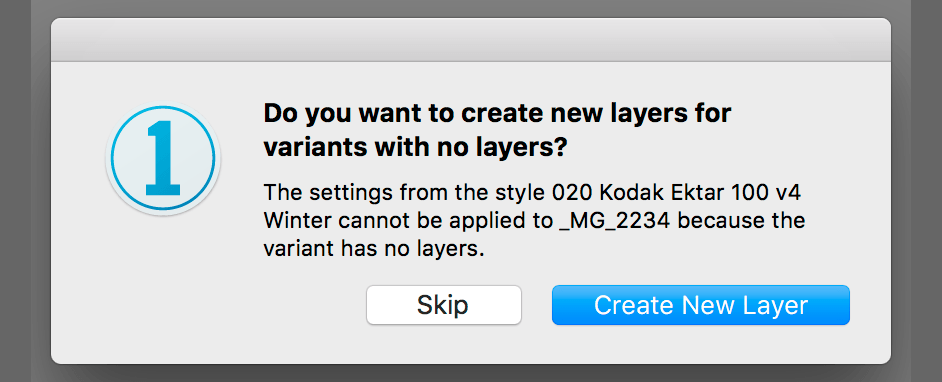
I stacked both screen messages above. Note that there is a small difference in the Windows dialogs versus the macOS version but the end result is the same.
Understanding Selection Points
Each Mask you make has a Selection Point. You might not be aware of it, let alone understanding its purpose, because Selection Points are hidden by default. So let’s start by showing the Selection Points.
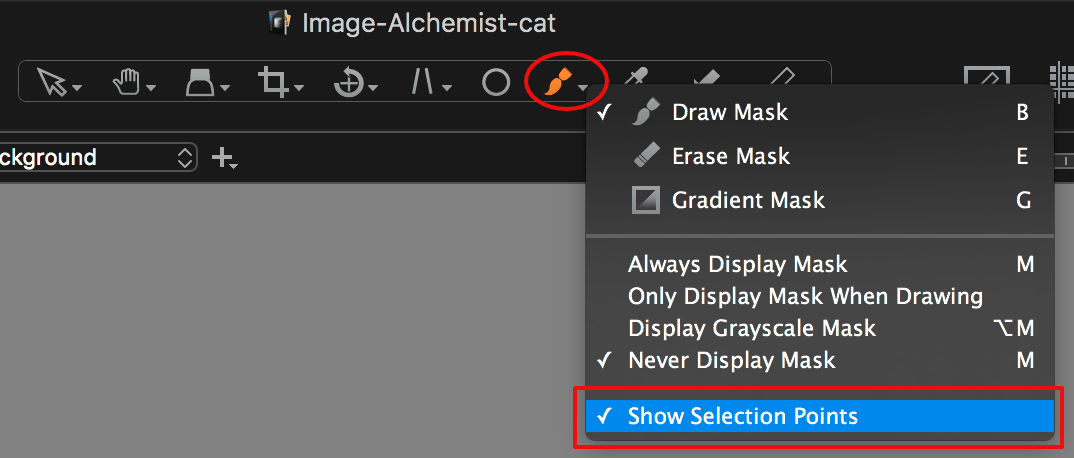
From the Cursor Tools on the Toolbar open the Brush section by a long-press of the mouse. See the option Show Selection Points at the bottom (on Windows: Display Selection Points). Select it if it does not have a checkmark in front of it. This enables the Selection Points in the Viewer. Since this is a toggle, you can turn it off the same way you turn it on.
To be able to see the Selection Points in your Viewer all conditions below must be met:
- enable Show Selection Points from the cursor tools (explained above)
- select the cursor tool Brush, Eraser or Gradient
- you have at least one Layer with a Mask
- move cursor to the Viewer area
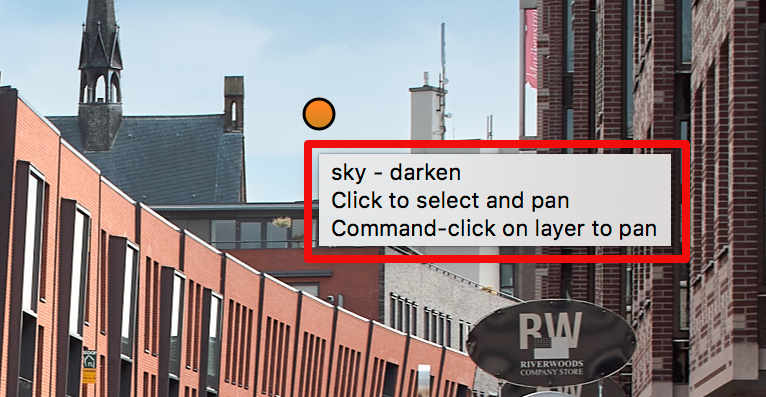
And this is how Selection Points look like.
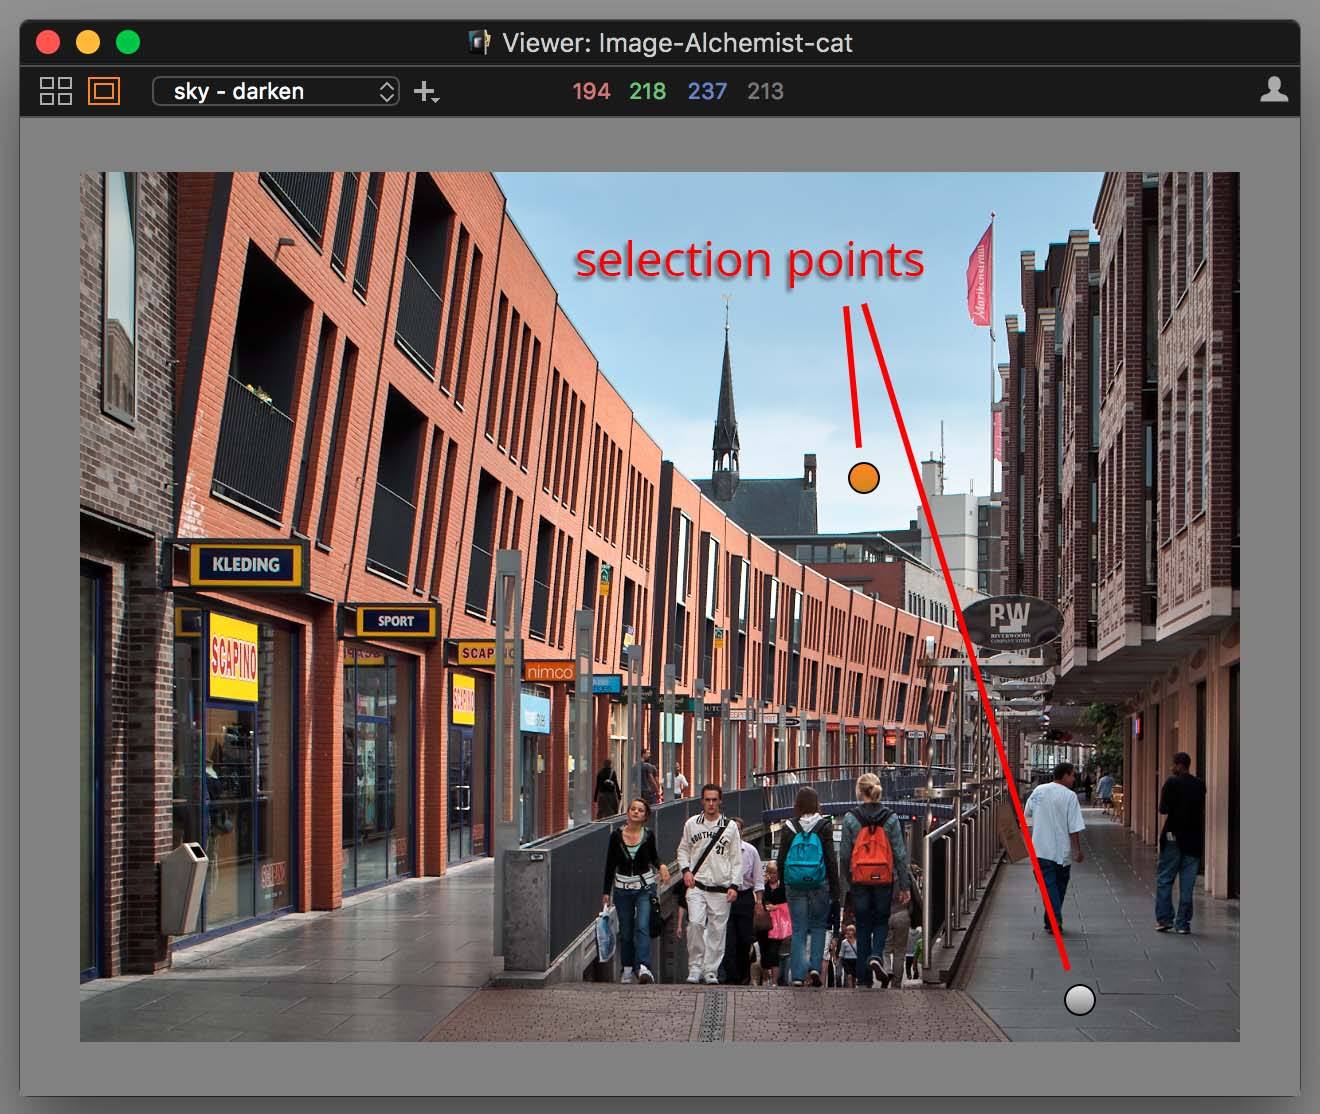
With a Selection Point you can do the following:
- select a Layer from any other Layer including the Background Layer
- move a Mask on a Layer
Select Layer
You see either orange or light grey dot. In the sample image, the orange dot belongs to the selected Layer named sky – darken. When I click on a light grey Selection Point like in the lower right corner, the Layer and Mask it belongs to is selected and becomes orange and the current orange dot becomes grey. Okay, you get that but there is more.
Move Mask
With Capture One Pro you can move the Mask on a Layer. This, for example, makes sense if you have a series of almost similar shots where you have applied Layers, Masks and corresponding adjustments.
You copy and apply the Layers including Masks and adjustments to the other images in the series. However, the objects are slightly in a different location in the frame. Moving a Mask – and optionally editing it – is sometimes faster than starting from scratch.
There are two ways to move the Mask on an Adjustment Layer. First, with Selection Points enabled, just click on it and drag it around. Second, press and hold the Command-key pressed (macOS) while you drag the mouse around. Note that the second option also works when Selection Points are disabled.
Note On Selection Point
It is easy to confuse a Selection Point with the Source and Destination Points of a Clone or Heal Layer. See for an explanation of Source/Destination Points the post Capture One Layers In-Depth (part 1).
Workflow With Layers
Before you start using Layers you should ask yourself whether that is a good idea. Simply put, Layers are great but time-consuming to make and not appropriate for high volume shoots (unless there is no time-money limit). Next, consider whether you prefer to use Layers in Capture One, in Photoshop (or another image editor) or both. That depends on what you know and what you need.
I make this comparison on purpose because users often do that. But they shouldn’t. Layers in Capture One serve a different purpose compared to Photoshop. In Capture One it allows you to do selective adjustments in RAW. That advantage plus the expanding capabilities make it an attractive proposition.
Please find my workflow priority list below. I prefer to pick the first options. If that does not create satisfactory results I go to the next and so on.
- Only Capture One, no Layers
- Only Capture One, with Layers
- Capture One with Layers, next Photoshop without Layers
- Capture One with Layers, next Photoshop with Layers
A list with different options, different orders or other editors then Photoshop is obviously possible. Make your own priority list!
Thank you
For reading. Please feel free to leave a comment. Like us on Facebook or subscribe to our newsletter to stay informed about new blogs.
Want to try Capture One? Or would you like to buy it?
Best Regards,
Image Alchemist


Thanks for the very interesting presentations. Nicely done.
Is it possible to open Capture One Pro 11 as Smart Object? In so doing one can return to the adjustments in Capture One with the PS layers intact.
Elliot
Hi Elliot,
Thank you for the nice remarks. Regarding Smart Objects: Capture One does not know about it, as far as I know.
Best regards, Paul Steunebrink / Image Alchemist
All of a sudden while working with Capture One 11.1.1 I am no longer to invoke styles or presets. They are all greyed out. How do I fix that little problem?
Hey,
I was wondering if there is no way to save all adjustment layers created as an instant. Like if for some reason you create different type of layers to separate adjustments like colors change\light and so on, and to apply them to multiple images (like the copy paste all parameters they already offer in the app). Saving it will create an amazing workflow ..
Amir.
Hi Amir, thank you for your suggestions, which make perfect sense by the way. Currently this is not possible in Capture One Pro 11.
Best, Paul Steunebrink / Image Alchemist
Useful article, thanks.
However there is a better way of adding styles using layers that circumvents both of your warnings 1 and 2 even in Capture One 11. In the Styles and Presets tool right-click on the style you wish to use then in the pop-up menu choose Apply to New Layer. This creates a new layer, applies the style to it and gives the layer the name of the style. This method is also quicker because you do not have to create a new layer first and it avoids having to navigate all those flyout menus from the Layers tool that, unless you have an really large monitor, also obscure the image whilst scrolling through the styles to see their effects.
David
Hi David,
Thank you for your useful additions, which came in version 11.1 and later, a month after this blog was posted. It shows how Capture One evolves and it also shows that I could update my posts ;-).
Best regards, Paul Steunebrink / Image Alchemist
Is there a way to combine different color selections into one mask?
Hi Steve,
Do you refer to color sections from the Color Editor, that you can use to create a mask? If so, the answer is no. Each section translates into its own mask.
Best, Paul Steunebrink / Image Alchemist
Hi Paul
Just trying out Capture One 20. Have 2 layers with styles applied. The background layer has no adjustments. How does one save this look as a preset? Each time I try ‘Save User Style’, it draws up a blank. Is the ‘Save User Style’ applicable only to Background layer? How does one include adjustments of all layers collectively and save as a style/ preset, to be used for other images over time?
Thanks
Hi Peter,
You can only save as a style per layer. On a layer you must check the adjustments yourself, in contrast to the background layer.
Best, Paul Steunebrink / Image Alchemist