Capture One Layers Continued
In Capture One Layers Continued I lead you into the hidden secrets of Layers, Masks, and Brush settings. Layers Continued is the second post in a serie of three, preceded by Layers Explained and followed by a third post Layers In-Depth (part 1).
Image by Brian Muntz – LiefdePhotography.com
Capture One Layers Continued
Now that I covered the basics of Layers in Layers Explained, it is time to dig deeper. In this episode, I take you for a spin in several directions.
First, I explore the many Layer options. Layers and Masks are strongly interconnected and I show you the options and how to master them. Besides adding and removing Layers and toggle show/hide, you can change the order and a Layer’s opacity. You can also copy Masks between Layers.
Next, I show you how you can optimize your Mask. For best results, the shape of the Mask is crucial and the art of masking is a combination of how to get the best result with as little effort as possible.
Capture One Pro 11 has been greatly enhanced in this respect and offers the best tools for creating layers and masks.
Layer Options
When working with Layers Capture One offers several Layer options to streamline your workflow.
- create/remove Layer
- show/hide Layer
- create filled Layer
- change Layer order
- change Layer Opacity
Remove And Hide Layer
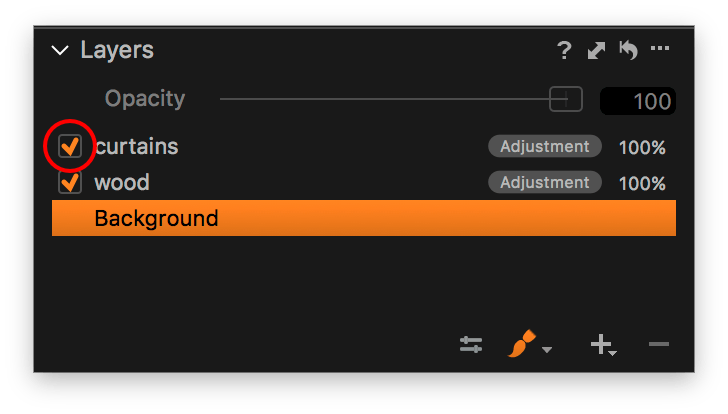
One of the big advantages of working with Layers is that it is easy to do a before/after comparison. Use the checkbox in front of the Layer name in the Layers tool to show or hide it.
This is great to review the effect of a local adjustment you made and whether it needs some tweaking on the Mask or the adjustment. But some users take it to the next level.
They use Layers for generic (non-local) adjustments as well. I explain this in the next section and show how Capture One Pro 11 makes this easier than before.
Create Filled Layer
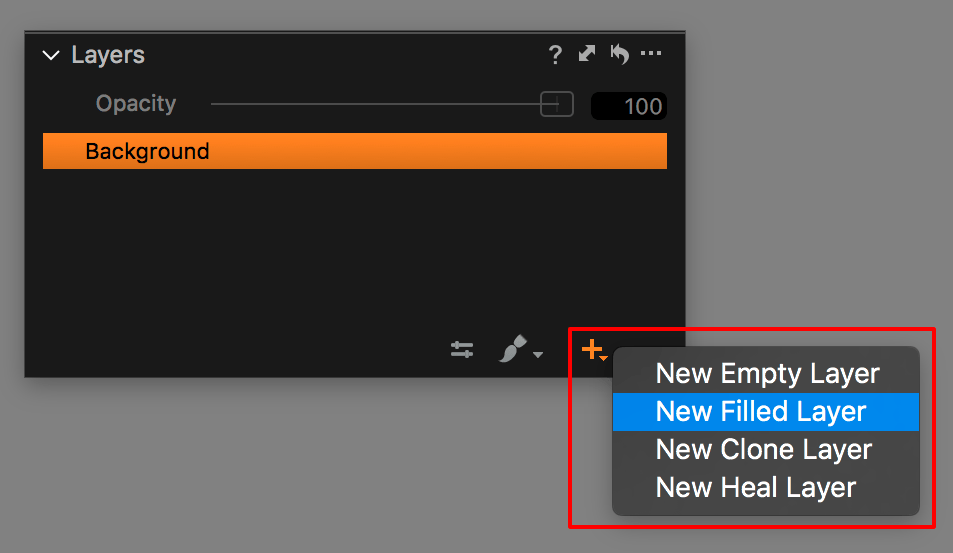
Some users even use Layers for adjustments that must affect the entire image. I call this the Fully Layered Workflow. To support this Capture One Pro 11 got a new option: New Filled Layer. This option creates a new Adjustments Layer filled with a Mask that covers the entire image.
Because in Capture One Pro 11 now the Levels and Color Balance tool also operate on Layers, almost all adjustments can be made on a Layer. Another reason for this is you need extreme adjustments, like a Highlight adjustment form the High Dynamic Range tool above 100 that you already applied in the Background layer. In an additional Adjustments Layer, you can apply another 100 adjustments, up to a total of 200 for that image.
Also for local adjustments the Create Filled Layer option is sometimes a better starting point than an empty Layer, which is still the default by the way. If you only need to exclude a small part of the image, or it is easier to erase the mask then to draw around a shape, the Create Filled Layer option is a winner.
Change Layer Order
When you add Layers, each new layer is stacked on top of the other. You can change the order of Layers any time, for example, to organize them in a logical way.
But does the order of Layers also affect the end result? Yes, that might sometimes be the case because Capture One processes Layers from the bottom up, starting with the Background Layer.
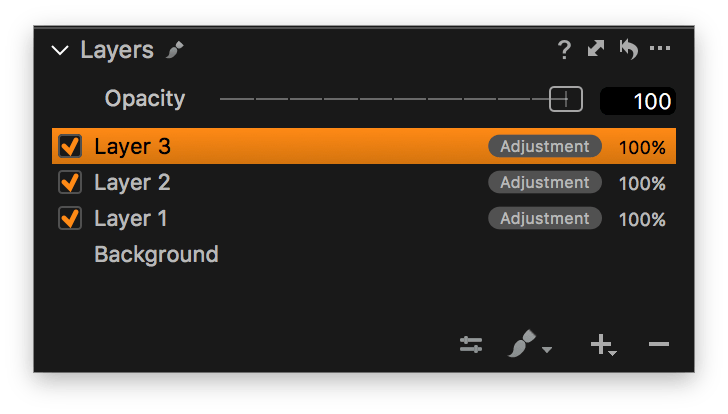
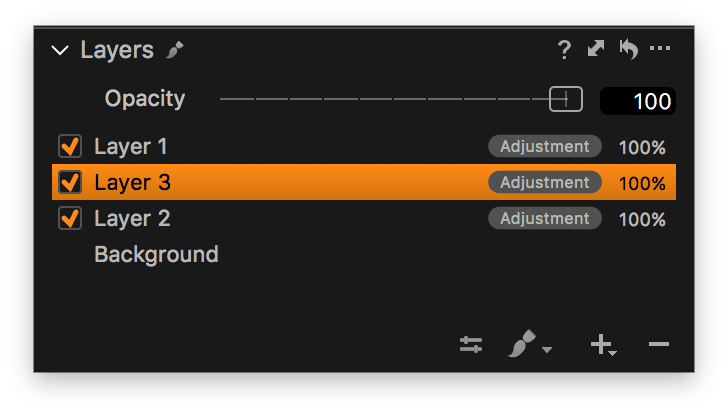
On most occasions, you do not have to bother about the order of Layers. Masks on their respective Layers often cover different areas of the image so there is no influence at all. And if they do, adjustments are added, going from bottom to top.
For example, a -1 EV Exposure adjustments in Layer 1 and a +0.5 EV in Layer 2, will result in a -0.5 EV adjustment for any part of the image that is masked in both Layers.
The Layer order affects the end result when two conditions apply:
- two or more Layers have Masks that cover the same area, and:
- the order of adjustments that are applied on the Layer Masks in the processing pipeline
Not much is known about the processing pipeline in Capture One but I plan to publish a post on this later this year (2018) thanks to reverse engineering.
Master Opacity Slider
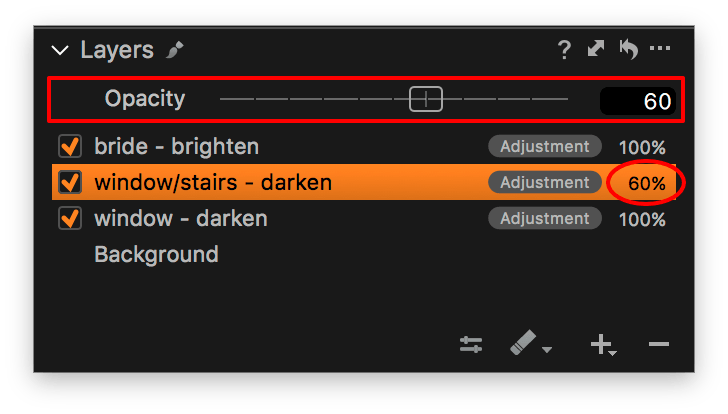
Apart from hiding a Layer and its adjustments Capture One Pro 11 now offers a more subtle approach, the Master Opacity Slider.
This slider controls the Opacity of a Layer, for each layer independently. The default is 100 and any adjustment on that Layer has its maximum effect. By lowering the Opacity of a Layer the effect of its adjustments is reduced accordingly. An Opacity of 0 (zero) is identical to hiding the Layer.
This is a great new feature if you applied a Style to a Layer and wish to lower its effect on the image. A Style often contains many (unknown and complex) adjustments so it is not feasible to change them in conjunction with each other. The Opacity slider is a real time saver here.
Note: do not confuse this with the Brush Opacity, which I will discuss in a minute.
This concludes the section on Layer options. I continue Capture One Layers Continued with more on masking.
More On Masking
After the previous section, you are totally fluent in Layer management. But how about Masks? Are there any bells and whistles to make masking a snap? Absolutely, check this out!
- alternate between Brush and Eraser
- Brush settings like Opacity and Flow
- Airbrush, Pen Pressure, Link Brush and Eraser settings
- copy Mask from other Layer, invert Mask, fill Mask, clear Mask
The different settings for the Brush also apply to the Eraser. For easy reading, I only mention the Brush most of the time but it refers to both Brush and Eraser.
Alternate Brush And Eraser
When I create a Mask, I often switch between the Brush and Eraser before I am satisfied with the result. I almost always use the keyboard shortcuts for that, ‘b’ and ‘e’ respectively.
Both Brush and Eraser store their own settings like Size, Hardness and more. In about 50% I prefer to synchronize the settings for the Brush and Eraser. How?
Easy! In the Brush Settings, there is an option at the bottom Link Brush and Eraser Settings. Enable it and you are set. Disable it when you do not need to synchronize it anymore.
Brush Opacity And Flow
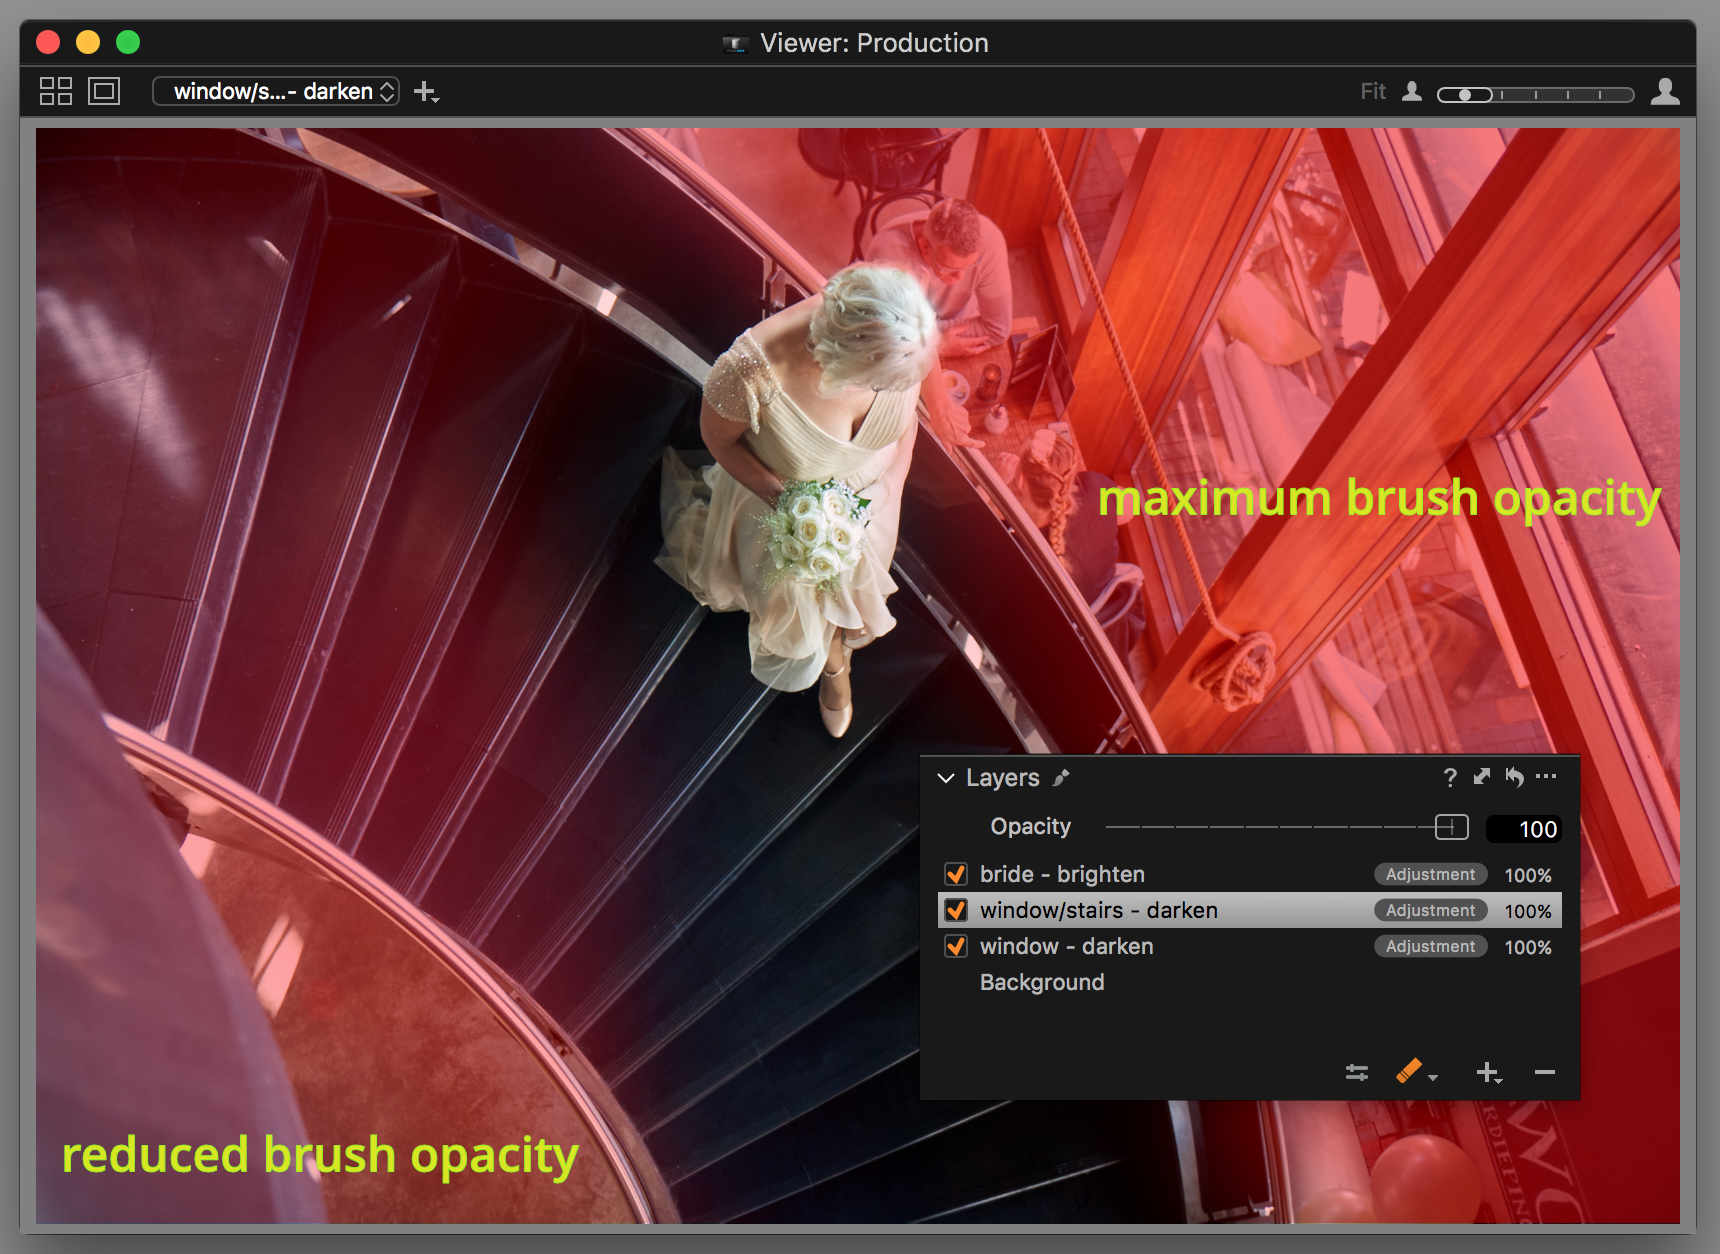
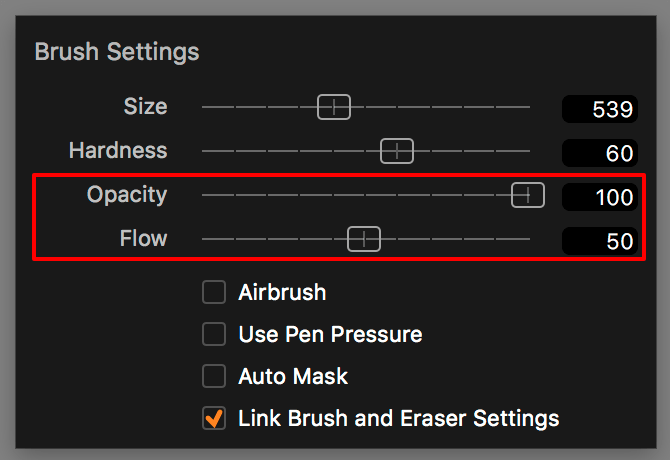
The Opacity and Flow sliders in the Brush Settings determine how effective a Brush is. By using different opacities for different areas of your Mask you can apply your adjustment(s) to a different degree in your image.
For example, some areas in my image need a +1 EV exposure adjustments, where other areas will suffice with a +0.5 EV adjustment. Without the Brush Opacity, I had to make two Layers. Now I can do it with one.
For the area that only needs a +0.5 EV adjustment, I set the Opacity in the Brush settings to 50 (I call this 50%). The +1.0 EV adjustment is just half as effective.
So you get the Opacity, but how about the Flow slider, introduced in Capture One 9 by the way. The Flow setting determines how quickly you reach your Opacity level.
With Flow set to 100, only a single click or stroke is required to Brush the Mask to the Opacity setting. Flow is a percentage of the Opacity in a single stroke. Repeated brushstrokes built up your Mask’s opacity.
For example, you set Flow to 25 and Opacity to 100 and start brushing on a Layer. You might have preset the Exposure to -1.0 EV for the sky. The first stroke will darken the sky slightly, while consecutive strokes will add to the effect because the Opacity of the Mask increases. Some areas need more, some less and this way you are fully in control
To adjust the Opacity for your Mask afterward to balance your adjustments you can start brushing with Opacity and Flow both at 100. Next, select the Eraser and set the Flow to 25. Move the Eraser repeatedly over the Mask and notice that Opacity decreases and the adjustment become less effective for that area.
Airbrush And Pen Pressure
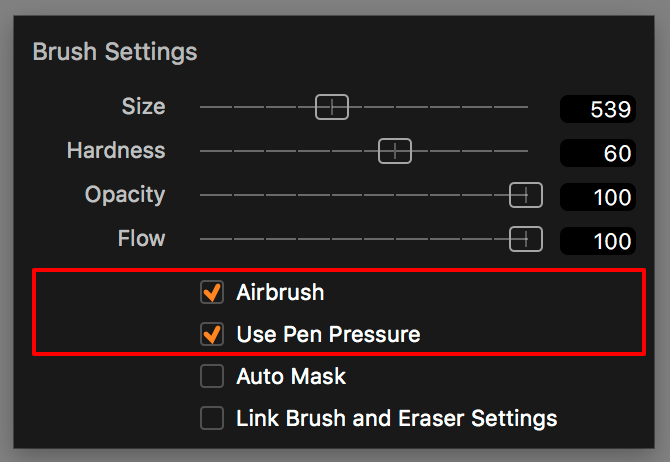
The Airbrush checkbox affects the inner-to-outer circle area of the Brush and in a time-related manner. Ouch, sounds complicated, but it’s not! Without Airbrush enabled the Hardness setting controls the Brush falloff from the maximum to minimum Opacity.
With Airbrush enabled the falloff to the edge becomes slowly filled when you press and hold the Brush in one location. Just like a real airbrush!
Pen Pressure is for Wacom digitizer tablets and links to the Size of the Brush. More pressure, bigger Brush. For more tips on using the Wacom with Capture One, you might want to check out this blog by David Grover (Capture One) Shortcuts to a faster workflow with your Wacom tablet.
Miscellaneous Mask Options
We are almost at the end of Capture One Layers Continued. We have just a few more options to discover.
When you open the action menu of the Layer tool, preferably with an Adjustment Layer selected, you see a number of options that streamlines your masking workflow considerably.
I skip a few options for later and will now look into the following items:
- Clear Mask
- Invert Mask
- Fill Mask
- Copy Mask From
The Clear Mask option is rather self-explanatory. It removes or clears the mask of a Layer but leaves the Layer and any adjustments you made untouched. Great if you want to try again with a new Mask.
The Invert Mask option is also not hard to understand. Masked areas become unmasked and vice versa. It can come in handy as you can use this in several ways.
Sometimes it is easier to mask the area you do not want to mask. No problem! Just mask the easy part and invert it when done. On another occasion, you like to have a Mask of both the main topic as well as from the background. Mask one, copy the mask to another Layer (see below) and invert it.
The Fill Mask option also has several applications. When you brush the edges of a larger area and choose Fill Mask, the Mask is filled inside the surrounding. Quick and easy and with the proper Opacity.
When you used Clear Mask or just created an Empty Layer the Fill Mask option masks the entire image.
The Copy Mask From > select other layer option is one of my favorites. When adding Layers during an image edit, I often continue and extend on a Mask from another Layer. Or, I like to invert the Mask I made on another Layer. Either way, copying a Mask from a Layer to the selected Layer is really great help and speeds up your workflow.
Next Steps
Amazing, you made it till the end of Capture One Layers Continued! This concludes my second episode on Layers. Local adjustments are an incredibly powerful and creative tool. It does not come as a surprise that this is a very popular feature in Capture One Pro.
The saga continues in Capture One Layers In-Depth (part 1).
Thank you
For reading. Please feel free to leave a comment. Like us on Facebook or subscribe to our newsletter to stay informed about new blogs.
Best Regards,
Image Alchemist







How do you simply remove a layer you made by mistake?
Hi Ludek,
In the Layers tool, bottom right, is a minus (-) symbol. This will remove the selected layer.
Best, Paul Steunebrink / Image Alchemist
Hello,
I find that sometimes I would find it useful not to see the circles indicating the brush size and hardness and just draw having the mask on because I can’t see the image details clearly. Is it possible to hide them?
Thanks
Hi Claudio,
Unfortunately, you can not hide the circles of the brush or eraser.
Best, Paul Steunebrink / Image Alchemist
very useful and informative! many thanks!
I use Capture One and an XPPen Deco Pro graphic tablet.