Capture One Levels (part 1)
The Capture One Levels tool is the next stop in your adjustments workflow after you have set exposure and contrast. But what does the Levels tool actually do and why is it so important to use this tool in Capture One? We’ll get at the bottom of it here. Read on.
A Look At Capture One Levels
We start with a brief look at the tool and its controls and demonstrate the effect with a before/after image.
At the top, you see four tabs – RGB, Red, Green, and Blue. Those are the channels you can select. Let us concentrate on the RGB channel now. This means that adjustments will affect all three channels equally. As a result, the adjustments will not result in a color shift as might happen when you adjust the color channels individually.
In the screenshot above I marked the black point, mid-tone and white point controls plus the pickers for the black and white points, also known as Shadow Level and Highlight Level pickers in Capture One.
The screenshot represents the RGB channel tab as you can see at the top.
Black Point
Let us look at the effect of the black point adjustment in a low dynamic range image. The left (before) image has no Levels adjustments.


The right (after) image has a correction for black point only. As you can see the darkest areas in the image have changed from dark grey to black. It increases the contrast in a natural pleasing way.
White Point
While I let the black point as set in the example above, I now adjust the white point too. The left (before) image is where it is with the black point correction I just made.


The right (after image) now has a white point adjustment. As a result, the light grey parts are now bright up to white, instead of light grey.
The final result is an image that has a longer tone scale as the original, which is more appealing to the eye. Due to the richness of data in the raw file the histogram is still continuous, in contrast to level adjustments in an image editor on your processed TIFF or JPEG file. See for an explanation in the Capture One or Photoshop section below.
Mid Tone
Adjustments of either or both the black and white points affect the overall brightness of the image. You can correct this with the Mid Tone control.
The Mid Tone control effectively rearranges the distribution of levels in your image. The default value is 0 (zero). By moving it to the left or shadows it shows a positive value. It relatively increases the number of pixels in your image that belong to the brighter half of the image.
Dragging the mid-tone handle to the right obviously reverses the impact and makes the image darker.
Photoshop or Capture One
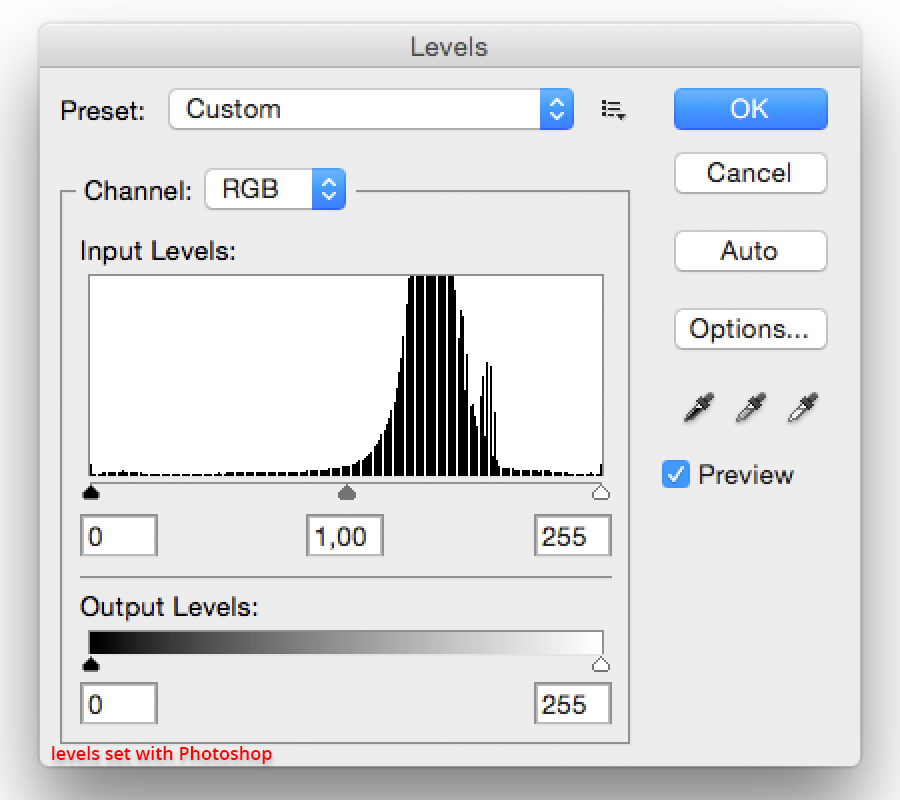
In the two overlapping screenshots below I show you the Levels tool in Photoshop of the same image of the beach. I processed both the non-corrected and corrected with Capture One Levels image to a JPEG and opened them in Photoshop. Next, I gave the non-corrected image a Levels adjustment in Photoshop to make it similar to the Capture One corrected image.
The left (before) screenshot is from the non-corrected original that got its Levels treatment in Photoshop. You see a non-continuos histogram with the risk of banding.
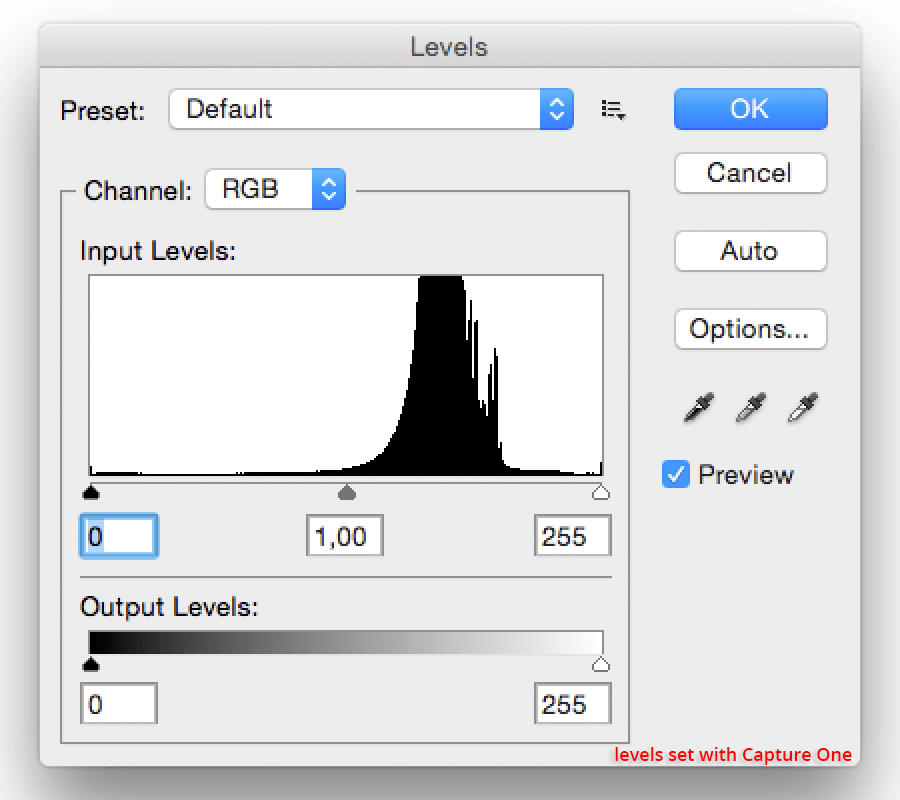
The right (after) screenshot is how the histogram in Photoshop Levels look like the image that I corrected with Levels in Capture One Pro 9. You see a continuous histogram. How is that possible?
The explanation for Capture One providing a continuous histogram comes from the simple fact that it has the raw data available. Raw data is so rich that even after cutting big corners your output shines.
This should convince you of the purpose and need to use the Levels tool in Capture One.
Cursor Tools
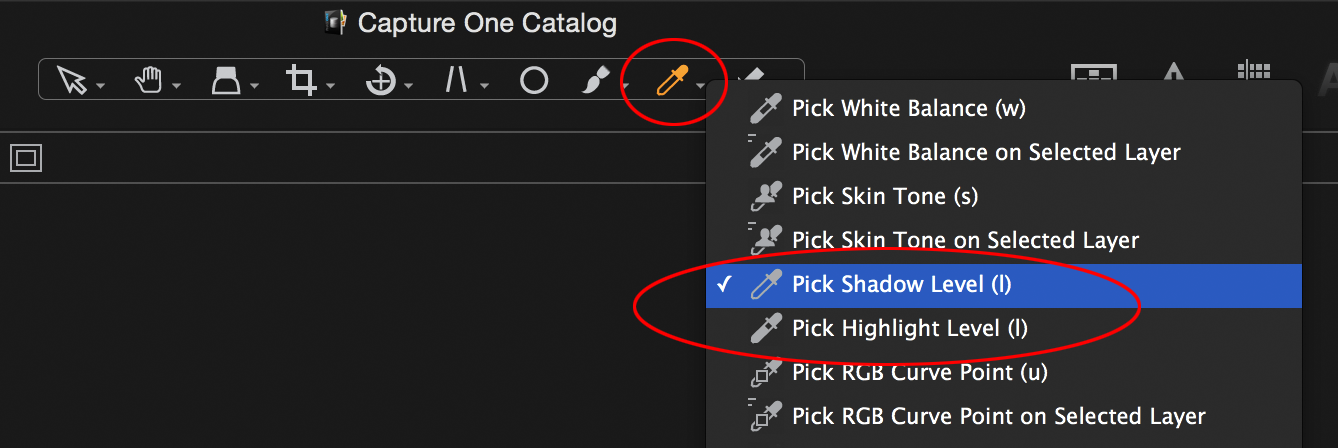
There a different ways to work with the Levels tool. First, you can manually drag the controls at the bottom (or top) of the histogram in the tool, or you can enter values. However, the tool also comes with two cursor tools:
- Pick Shadow Level
- Pick Highlight Level
They are for setting the black point and white point respectively. You can select your cursor tool both from the tool (marked in screenshot above) as well as from the toolbar above the preview window. The keyboard shortcut is ‘l’ (from Leo) and ‘shift+l’ to toggle between both pickers.
After you selected the cursor tool you go to the preview and sample an area with a mouse click that you like to be the black or white point respectively.
Auto-Adjust
Another way to use the Levels tool is through Auto Adjust. This makes an automatic adjustment of the black and white points only. There are two ways to invoke the automatic adjustment:
- Generic Auto Adjust from the Adjustments menu > Auto Adjust or from the capital letter ‘A’ on the toolbar
- Auto-Adjust from the Levels tool (the capital letter ‘A’ in the top-right corner)
The Auto-Adjust from the tool affects either the RGB channel or the respective three color channels Red, Green, and Blue, depending on a setting in Preferences. The generic Auto Adjust always affects the RGB channel only, not depending on your Preferences.
Some Guidelines
It is best to have the exposure-related tools set before you work with Levels in Capture One as these tools have a major impact on the histogram the Levels tool is working on. The tools are Exposure, High Dynamic Range, Clarity (except for Classic Clarity) and Vignetting. Note that cropping has an impact too when you crop bright or dark areas in your image.
For low and medium dynamic range images set the black and white point first. Next, set the general impression of brightness with the Mid Tone level. The Mid Tone levels handle has a great similarity with the Brightness slider of the Exposure tool and the mid curve adjustments of the Curve tool. Which you prefer depends on your workflow and personal preference.
Wrap Up And More
We now covered the basics of the Levels tool in Capture One Pro. You discovered a part of its power. There is much more to share on this, however. Therefore, this blog continuous in part 2, so let’s keep on reading.
Thank you
For reading. Please feel free to leave a comment. Like us on Facebook or subscribe to our newsletter to stay informed about new blogs.
Best Regards,
Image Alchemist







Thanks for these tutorials, they clarifying the basics!