Your Guide to Capture One
The ‘Photographer’s guide to Capture One 20’ is a thorough and comprehensive reference guide for every user of Capture One. It is one of the best resources on the market today. And it is also frequently kept up to date with all changes in Capture One. Hence, your guide to Capture One.
Your Guide to Capture One
Within a month of Capture One 20’s release, Nils Wille Christoffersen released an updated version of his already well-known Capture One guide, the Photographer’s Guide to Capture One 20. I highly recommend this e-book as a reference guide for all users of Capture One 20 and earlier versions.
The e-book sells for US$ 19 and comes in PDF, ePub, Mobi for Kindle formats. With discount code alchemist4 this book is yours for US$ 15. You can get your copy here (affiliate link to Capture One 21 guide).
High Dynamic Range Chapter
Nils Christoffersen allowed me to publish a part of his book in a post on the Image Alchemist. I am very happy to share that with you. This way you can experience first hand what this book has to offer.
I chose the chapter that covers the High Dynamic Range tool that is fundamentally renewed in Capture One 20. Now, let’s start reading the book…
Recovering details and adding contrast with High Dynamic Range
The High Dynamic Range tool has received a substantial overhaul in Capture One 20. Not only is it now even more useful for recovering details in the shadows or highlights, but you can also control the brightness of four different tone ranges, making it an awesome tool for adjusting contrast with ease and creating a look for your images.
The tool works best with raw files because of their large dynamic range where you can retrieve unseen image detail. This is especially true in the highlighted area where the detail in for example a bride’s white dress might look burned out at first sight, but actually has plenty of image information to work with.
The tool has four sliders – Highlight, Shadow, White, and Black – that each cover a specific tonal range. The White slider concentrates on the topmost highlights of the image, while Highlight covers a broader range of the bright tones that reaches somewhat into the midtones. Likewise, the Black slider concentrates on the deepest shadows of the image, while Shadow covers a wider range of the dark tones as its effect reaches up into the midtones.
When you move any of the sliders to the left (negative values), you will darken that range, and when you move a slider to the right (positive values), you will brighten that range.
In most cases, you will want to move the Highlight and White sliders to the left (negative values) to recover details in the brightest parts of the image, and move the Shadow and Black sliders to the right (positive values) to reveal more details in the darkest areas of the image.
If you instead move the Highlight and White sliders to the right (positive values) and the Shadow and Black sliders to the left (negative values), you will brighten the highlights and darken the shadows, respectively. This will increase the contrast of the image and can be a great and easy way to achieve a desired look or style.
Do note, however, that this can crush the blacks or blow out the highlights, but more on that a bit later.
Recovering details
On most images you should start with using the new White and Black sliders to see whether they can recover the desired details in the highlights and shadows. This is recommended instead of just using the Highlight and Shadow sliders (known from Capture One 12 and earlier) as these reach more into the midtones and can result in a washed-out looking image when used alone.
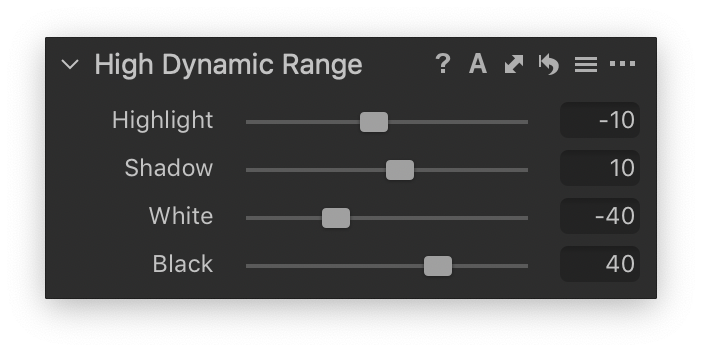
Usually the new White and Black sliders will do the job perfectly, but there will be times when you need to add the effect of the Highlight and Shadow sliders too. It is often a good combination to use a larger amount of White (or Black) and add a touch of Highlight (or Shadow) to that, like setting White to -40 and Highlight to -10 (or Black to 40 and Shadow to 10), as an example. This will give a balanced tone mapping on many images with high dynamic content like landscapes.
In the image below I used the new High Dynamic Range tool to create the right look for the shades. At the left you see the Capture One 12 version and at the right the Capture One 20 version.
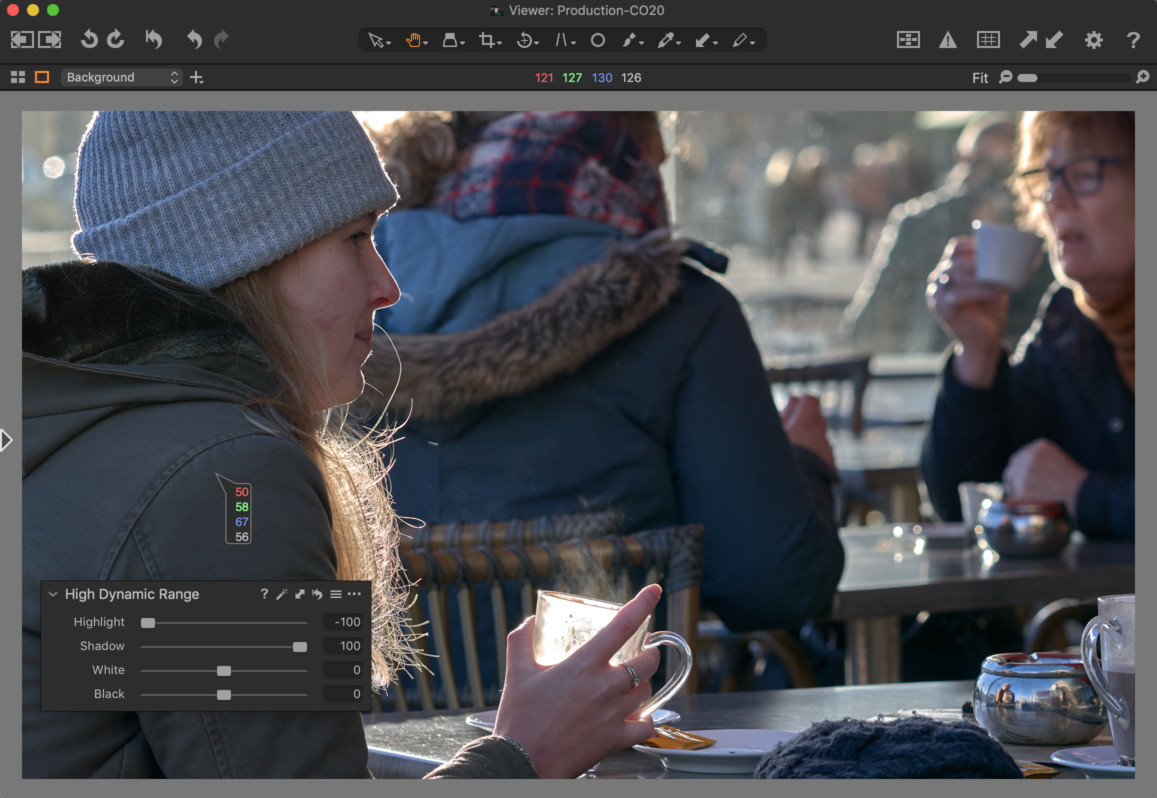
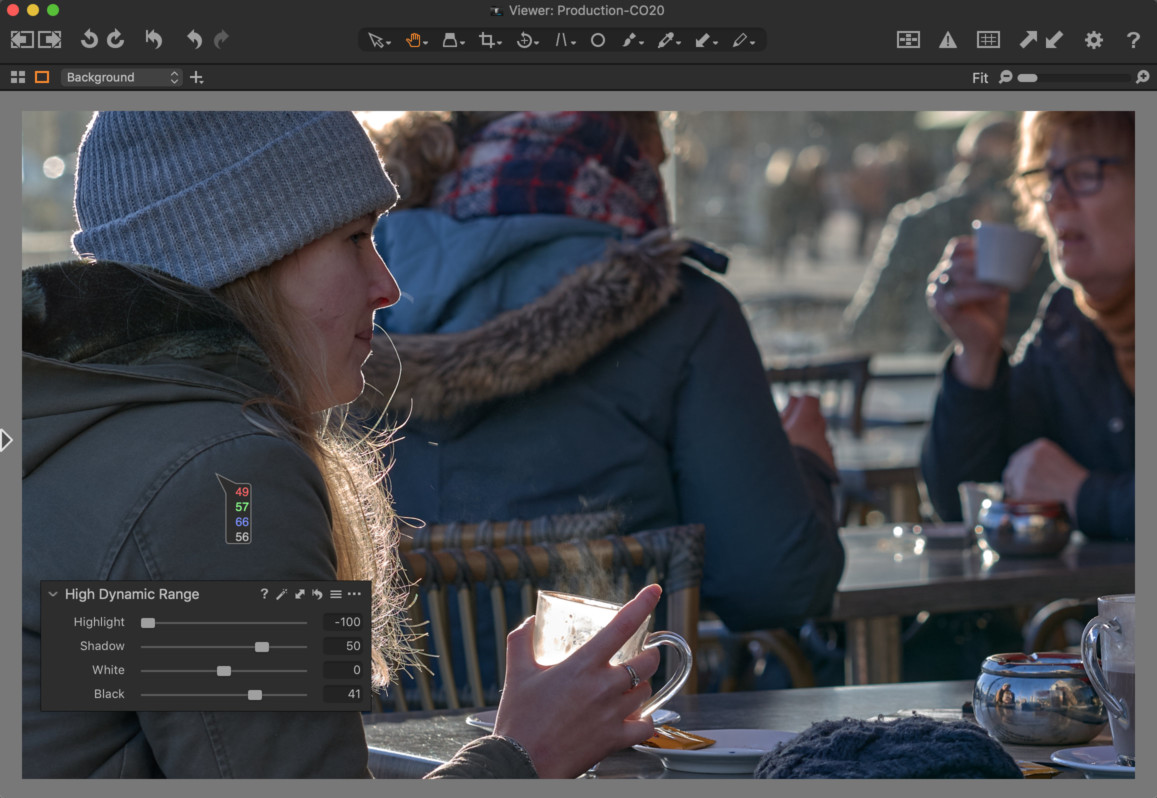
As you can see, in Capture One 20 I used less Shadow adjustment but added a bit of Black adjustment. As a result, the midtones are less affected compared to the Capture One 12 version. To my taste the Capture One 20 version better retained the mood of the backlit scene.
In the book, the chapter on the High Dynamic Range tool continues. It includes some tips on light balancing tips and increasing contrast using all four sliders. We skip those, for now, and continue with a few more parts.
Levels and Black and White Point
As you have learned in the previous chapter, the Levels tool is a great and easy way to adjust the black and white point to obtain a good base contrast. So how does that workflow fit in with the new White and the Black sliders in the High Dynamic Range tool? It turns out that they work nicely together as they don’t serve quite the same purpose.
The main difference is that the Black and White sliders will compress the shadow and highlight areas whereas using the Levels to set the black and white points will merely remap the image data distribution to fit the whole histogram. In other words, you can still rely on the Levels tool to set the black and white points and then darken the deeper shadows with the Black slider (using negative values) and brighten the topmost highlights with the White slider (using positive values). Just be aware that while the Black slider is somewhat lenient, the White slider will quickly burn out the highlights when used to increase the contrast.
Getting help from Exposure Warning
The Exposure Warning feature is very helpful when you are using the sliders and need to determine when the image data is no longer clipped. You turn it on by using the keyboard shortcut Command + E (Ctrl + E on Windows). Note that the Exposure Warning will show you a warning even if just one of the color channels is clipped. As long as at least one of the color channels contains data in the highlights, you will be able to recover some detail in that area. The reason being that the human brain isn’t very sensitive to colors in the highlights, so even some shade of gray will often do fine.
Things are different in the shadow areas, but the dynamic range captured by the image sensors on modern cameras has improved a lot. Today you can brighten the shadow areas about three stops of light without running into problems with noise. Moving the Shadow slider all the way to the max value of +100 is close to adding two stops of exposure to the shadow area.
Coming from Lightroom
The High Dynamic Range tool works similar to the comparable four sliders in Lightroom (Highlights, Shadows, Whites and Blacks) but their effect is not exactly the same. As an example, the Highlight and Shadow sliders in Capture One will apply a heavier effect than those in Lightroom if you set the sliders to 100 in both programs. This means that you might want to stop around +50 in Capture One to get a similar effect as in Lightroom at +100.
Another difference concerns the Black and White sliders. In Lightroom, they are often used to set the black and white point in images that lack contrast (as a result of missing image data at the ends of the histogram). In Capture One, you would normally use the Levels tool (mentioned earlier) to set the black and white point.
As a consequence, the Black and White sliders in Capture One will have less of a tendency to crush the blacks or blow out the highlights than in Lightroom. This means that you often can use them more generously in Capture One than you are used to – this is especially true for the Black slider.
There’s More
In the book, the chapter on the High Dynamic Range tool continues, plus much more. In case you like to buy the Photographer’s Guide to Capture One 20, don’t forget the alchemist4 discount code to save almost 20%.
Thank you
For reading. Please feel free to leave a comment. Like us on Facebook or subscribe to our newsletter to stay informed about new blogs.
Want to try Capture One? Or would you like to buy it?
Best Regards,
Image Alchemist







Leave a Reply
Want to join the discussion?Feel free to contribute!