Catalogs In-Depth (part 2)
In this third and last post in the serie on catalogs, we will cover some not-so-everyday topics, but are considered nice- or need-to-know anyway. In case you are not sure you touched base in this topic sufficiently, two earlier posts will get you started before you jump into deep water: Catalogs Explained and Catalogs Continued are ready for you to digest first. Please note this is part 2 of Catalogs In-Depth. You’ll find part 1 here.

Catalogs In-Depth
If you frequently make new catalogs you will love the template function. Did you know you can lock the catalog or that it could happen unintentionally? How about special imports like sessions, catalogs or libraries, or export a part of your catalog as a new catalog?
You know about referenced and fully managed images, but can you change one into the other? When you move your images to another drive, you can relocate them in Capture One. You can sync a folder with imported images with your Catalog. And last but not least, how about tethering to a catalog, using a hot folder and some special collection properties?
Catalogs In-Depth Part 1 and Part 2
Due to the number of topics, I decided to split the post into two parts. Part 2 you’ll find below, part 1 you’ll find here. Ready for Catalogs In-Depth? Go!
Let’s Move Some Images
In an earlier post Catalogs Continued I discussed two ways to physically store images in a catalog: inside the catalog folder, or outside that folder on either an internal or external disk. I like to make a few remarks on this concept.
First, you can have both types of storage in one catalog. Maybe confusing to manage, and for sure not an everyday purpose, but it is possible. I will discuss some scenarios in a moment.
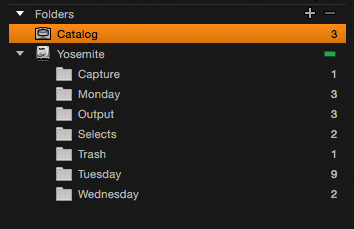
If you take a look at the screenshot above, you see three images inside the Catalog folder (highlighted) and several images in their respective seven folders on my internal disk.
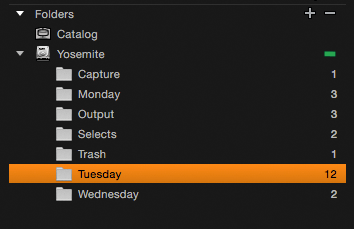
Second, you can change an image’s location in the opposite direction: moving internal images out, moving external images in. In the screenshot above I moved (just dragging the thumbnails) the three images from the Catalog folder into the Tuesday folder (highlighted).
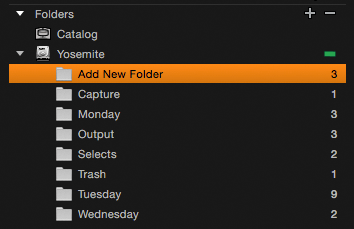
Third and last, you can move images from one external location to another external location. In the screenshot above I moved the three images from the Tuesday folder to a new folder I added for the occasion, named Add New Folder (highlighted). You add a (new) folder to the catalog by clicking on the + sign at the top right of the Folders section. Note that you move images from the Library tool, Folders section.
Some Scenarios
Assume you have your images stored referenced, on external or network storage. Next, you tether to your catalog. It makes sense to store the tethered shoot to the internal disk first, as the tethering process is vulnerable to disruptions to the storage location. Storing the tethered captures on your internal disk means that it can be either inside or outside the catalog folder (assuming the catalog folder is on your internal disk).
Taking it a step further, why not store your shoot inside the catalog folder (while on location) to a separate catalog? After you are back to base, connected to your mass storage devices, you move the images from the shoot from internal to an external location.
Two Workstations Scenario
Taking another step, you maybe use a different workstation for tethering as you do for editing. A catalog with images inside is easier to move around from one system to another. After importing your catalog with internal images to your editing workstation, move the images to their final destination.
Moving images in or out the catalog folder, or from one disk to another, is just a matter of dragging them around. In case you need to move images to a folder which is not yet part of the catalog, add that folder first with the plus sign of the Library’s Folders section. I discussed this above.
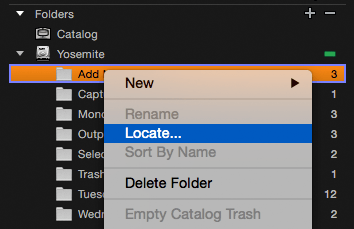
Another scenario is that you (accidentally or intentionally) moved images from Finder (Mac) or Explorer (Windows) to another location. Capture One will mark these images as Offline. Select either the image thumbnail in the browser (for a few images) or the folder in the Library > Folders section (for an entire folder of moved images) and select Locate. In the Open dialog browse to the new location and click the Open button.
Synchronize Your Folders
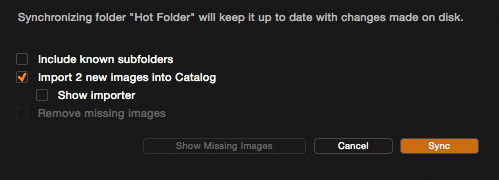
Another in-depth view of Catalogs is the File > Synchronize Folder feature. With this feature, you keep your Catalog in sync with a folder with imported images.
You imported all images from a folder into your Catalog. Later, you add images to that folder. With synchronization, Capture One will include the new images in the Catalog.
Synchronizing is a manual process, you can not make folder sync automatically. You can, however, sync a parent folder and enable the Include known subfolders checkbox in the synchronize folder dialog, and sync all folders under their parent folder in one go.
Optionally you can have Capture One display the Import Images dialog for detailed control over the new images that will be synchronized. See the checkbox for Show importer in the dialog above.
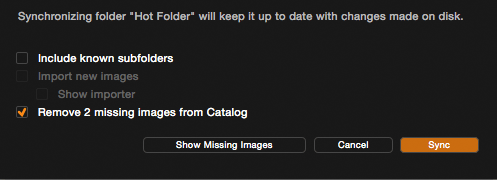
The same is true for images that have been removed from a folder, and which were imported earlier. By synchronizing that folder, the images are also removed from the catalog.
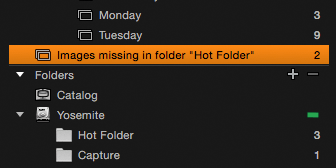
Before you remove missing images, you can review them first. Click on the button Show Missing Images in the Sync dialog above. Capture One Pro 8 will create an album with the missing images for that folder for you instantly.
Tether To Catalog
“Sessions are for tethering” still seems to be a common belief among Capture One tethered shooters. However, with Capture One Pro 8, a catalog is as fully featured as a session can be, where tethering is involved. Due to some differences between sessions and catalogs, there are a few new tricks to learn.
Where sessions are entirely folder based, catalogs rely on collections for their internal organization and on folders for storing the image, their external organization. Like with importing images from a card or disk to a catalog, you can set both when tethering.
When you take a look at the Next Capture Location tool while running a catalog, you see familiar settings as in the Import Images dialog (discussed in Catalogs Continued).
Managed or Referenced
The Store Files field allows you to determine whether incoming images are stored Inside Catalog (the Catalog folder, known as fully managed images) or to a selected folder outside the catalog (referenced images). The Collection field allows you to determine whether images show up only in the Recent Captures section of the Catalog Collections, similar to the Recent Imports section for imported images, or else too. What else, or better: where? Introducing the Capture Collection.
Each session has a Capture Folder to store incoming images. A catalog can have a Capture Collection. This is a special property you can assign to an Album. Only one album in a catalog can be the Capture Collection.
You can assign it to another album as often as you like, automatically removing it from the previous album carrying that flag. Incoming images will show up in the Capture Collection when you set this in the Next Capture Location tool, Collection field drop-down list.
To summarise your catalog tether preparation: in the Library tool create an album, and set it as the Capture Collection and set the capture location to the Capture Collection in the Next Capture Location tool.
About the Hot Folder
The Hot Folder feature is used when regular tethering does not apply. Capture One actively monitors one specific folder and will automatically import new images that come into that folder. Additionally, it will display the last incoming image in the Viewer, like with tethering. Capture One Pro 8 now supports the Hot Folder with Catalogs, which Capture One Pro 7 did not.
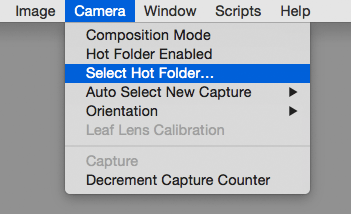
Setting up a Hot Folder is a three-step process. First and second, you select a folder as Hot Folder from the Camera menu. Note that the Folder must already be linked to the catalog. In other words, known in the Library > Folders section. Capture One does not check for this, so you have to do it. If this is not the case, add the folder to the catalog as described earlier on this page.
Third, you enable the Hot Folder from the Camera menu. When you are ready with the Hot Folder, you can disable it. Notice the checked mark on the menu, indicating it is enabled.
Note that the Library has no indicator that shows that a folder is a Hot Folder, which folder it is, whether it is enabled or not.
Tip
Another in-depth tip for Catalogs is that the Hot Folder feature is actually an automatic sync feature, at least sort of. In the section ‘Synchronize Your Folders’ I stated that syncing is a manual process. Creative minds can abuse the Hot Folder feature for automatic syncing a specific folder. Note, however, that Hot Folder works on dynamic changes, that are updating added images in real-time, while Capture One is running. Synchronize Your Folders also works on images added earlier to the folder, after the fact. Just a thought.
To Wrap Up: Selects Collection
Like the Capture Collection mimics the Capture Folder of a session, the Selects Collection reflects the working of the Selects Folder of a session. The function in Capture One that the Selects Collection (and Selects Folder of a session) supports is known as the Add to Selects Collection action, shortcut Cmd+J (Mac) or Ctrl+J (Windows). It is a predefined action that allows you to set apart the best images with minimal effort. Using the Selects Collections is a two-step process.
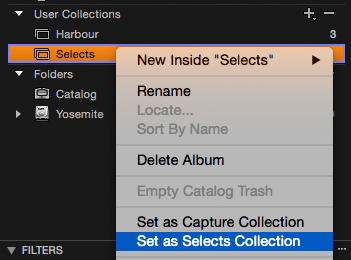
First, you make your album the Selects Collection. Right-click on the album, and choose Set as Selects Collection.
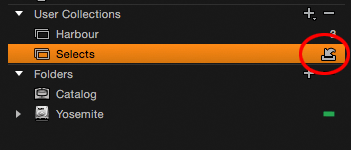
Note the special icon on the album’s name after you assigned the property.
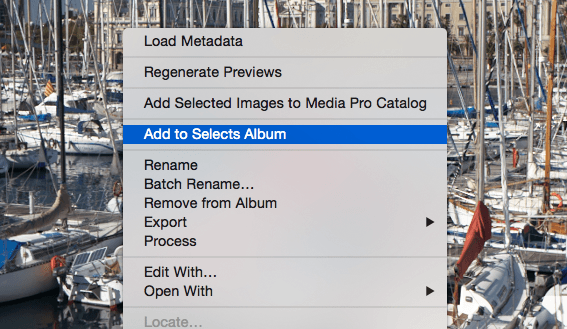
Second, add images to the Selects Collection. Right-click on images on the browser and choose to Add to Selects Album.
In contrast to its Session sibling, the Selects Collection in a Catalog is a special property that you assign to an album, not a folder. Note, that you add images to the Selects album, in contrast to images that you move to the Selects Folder of a Session.
Here ends the last and second part of Catalogs In-Depth.
Thank you
For reading. Please feel free to leave a comment. Like us on Facebook or subscribe to our newsletter to stay informed about new blogs.
Best Regards,
Image Alchemist








Thanks very much for this excellent series on Capture One catalogs. I’ve been looking for a lucid explanation like this for some time. It brought me from “totally confused” to “makes perfect sense”! Excellent job!
Thank you too, Bob, for leaving this comment. Very glad it helped you.
Best, Paul Steunebrink / Image Alchemist
Great article.
Any insight or methodology for splitting a single large catalog into two or more catalogs?
The objective is to move a number of projects from one catalog into another and of course include all adjustments, etc, with it.
Currently (version 11.3) it looks like the workflow would be tedious:
1. Open the Catalog you want to split.
2. Select a Project/Album, etc. in the Library panel.
3. Export that project to a new Catalog.
4. Repeat step 2 and 3 for each Project that you want to move to a new Catalog. Once done, then…
5. Create a new Catalog.
6. With the new Catalog created in step 5 open, Import each of the Catalogs created in step 3.
7. Open the original catalog from step 1, delete each Project/Album exported in steps 2 and 3.
8. Delete each of the intermediate catalogs created in step 3.
Thanks.
Yes, this is the right workflow.
Best, Paul Steunebrink / Image Alchemist