Capture One Pro 10 Review
In this Capture One Pro 10 review you read about 3-step Sharpening, Camera Focus tool, support for Tangent hardware. Many improvements and optimizations for speed and compatibility. New filter and search for Orientation. Changed default workspace and arrangement of tools.
New, Optimized, Improved
For recent software upgrades, Capture One included, the time of big and radical changes are over. That is for several reasons.
One, Two, Three
First, the software we love and use every day has matured over the years. Big changes are for new products, still in their infancies.
Second, creating and rewriting large chunks of code is bad for performance and stability. Again, Capture One is no exception to that. Incremental changes and optimizations are much better for your sanity. That is why Phase One let each point update contribute to the total of changes for a specific major release during its life span.
Third, big changes confuse users. We want the software to grow with us, guide us and lead us to new areas, step by step. Incremental changes provide this to us.
So the exciting news is that there is none. That said, this 10.0 release is full of new, optimized, and improved features that may excite you after all.
Engine 10
Capture One Pro 10 comes with Engine 10, the heart of the machine that is doing all the work. Engine 10 does not bring image quality improvement like you have seen in the past with newer engines.
Instead, the optimizations and improvements are part of the new engine. So be sure to upgrade the Engine when adjusting older images. New images will be treated with Engine 10 by default.
Sharpening
By far the biggest change in the 10.0 release is sharpening. There is a whole lot to explain here, but before I dig into details, one remark first.
If you are the type of user that does not bother much about sharpening, and always left the default as is, just go on as all-new features must be enabled first. You are not forced into a new workflow. All other users, read on…
There are a few big changes to sharpening in Capture One Pro 10. Phase One calls it 3-step sharpening. The steps are:
- Input Sharpening with Lens Correction tool
- Creative Sharpening with the Sharpening tool
- Output Sharpening within each Process Recipe
I go into more detail in the sections below.
Input Sharpening
A new concept is that of Input Sharpening. The idea is to correct for diffraction caused by the lens, mainly due to smaller apertures. As a result, the Lens Correction tool – not the Sharpening tool – has a new on/off checkbox named Diffraction Correction. The kind of sharpening is called deconvolution sharpening. It is off by default.
Two remarks here:
- there is no preference (yet) to enable Diffraction Correction by default
- enabling Diffraction Correction increases processing time
Tip: to automatically apply Diffraction Correction, you can use a preset and use it always on import or capture. Better yet, I made the preset for you and you can download it for free as part of the upgraded Lens Correction presets and the larger Presets Collection Lens Composition.
Creative Sharpening
The Sharpening tool as we know it is for Creative Sharpening, as Capture One now calls it. User input is dependent on content. The Sharpening tool has two new features in 10.0.
First, next to the well known three sliders, you will find a fourth: Halo Suppression. This allows you to counter the negative effects of sharpening known as a halo.
The new Halo Suppression slider is added to the Sharpening Presets and the Preset Collection Details.
Second, when using Sharpening on an adjustment layer, you can now use all four sliders (instead of only the Amount slider) on each layer, independent from other layers and the Background layer. This gives you much more control over the end result. This requires Engine 10, as discussed above.
Output Sharpening
Last but not least, Output Sharpening is added. This relates to what you can do in addition to input and creative sharpening and depends on the kind and purpose of your output. To dive into Output Sharpening go to the Process Recipes tool, not the Sharpening tool.
I put two screenshots on top of each other, drag the line with your mouse to see either of them.
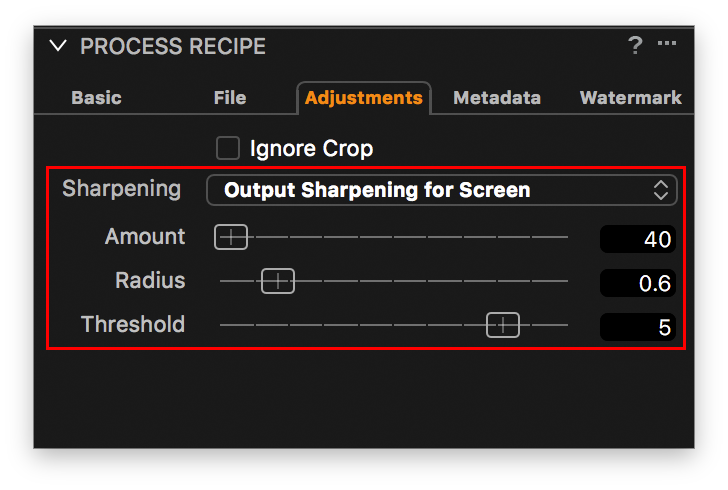
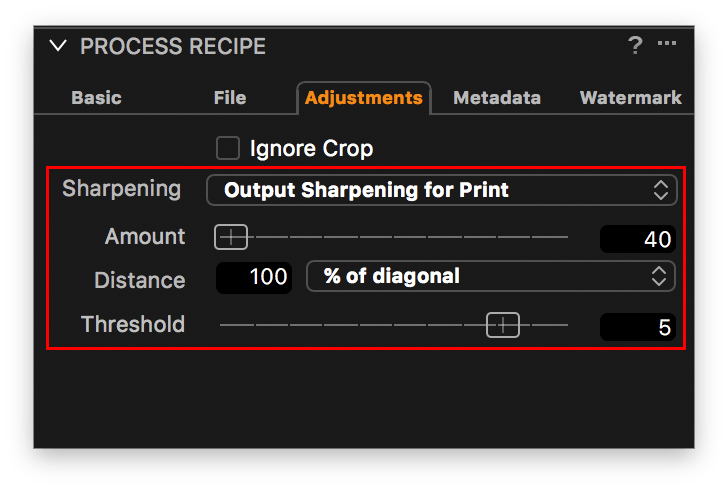
When you look into a Process Recipe on the Adjustments tab, you see a Sharpening label with a drop-down list. Your options are:
- No Output Sharpening (default)
- Output Sharpening for Screen (3 sliders)
- Output Sharpening for Print (2 sliders and value field with drop-down list)
- Disable all (effectively the old setting from Capture One 9)
I will now go through all the different settings below.
Disable All Or Not All
- The Disable all option is what we had before in a single/simple checkbox. No sharpening whatsoever is applied and it now includes all 3-phases mentioned above. This is a great option when sharpening is applied in post-processing.
- The No Output Sharpening option leaves both Input and Creative Sharpening unaffected but Output Sharpening is disabled. In other words, what you have set in the Lens Correction tool (Diffraction Correction checkbox) and in the Sharpening tool works as expected with this option. It sounds right that this is the new default.
For Screen Or For Print
That leaves both Output Sharpening options open. The option Output Sharpening for Screen is in particular useful for smaller (downscaled) images for the web. The option Output Sharpening for Print option is obviously the right choice for making prints.
- Output Sharpening for Screen allows you to set additional sharpening via three sliders – Amount, Radius and Threshold – just as in the Sharpening tool. To review the result of these adjustments enable the new Recipe Proofing feature from the View menu or the toolbar (spectacles icon). The new default toolbar contains the icon.
As always with pixel peeping zoom in to 100%. A Proofing label at the top of the image preview remembers that you are in recipe proofing mode. - Output Sharpening for Print allows you to set additional sharpening via two sliders – Amount and Threshold – and a distance value.
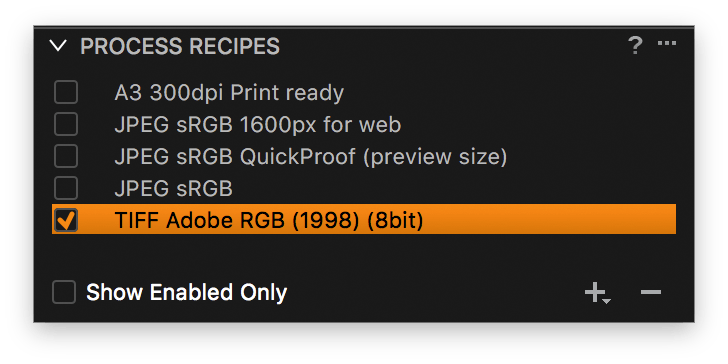
In the image above you see the new default Process Recipes. The two at the top include Output Sharpening. Note however that you might not see them when you upgrade to prevent overwriting existing recipes. They show up on new installations of Capture One Pro 10.
Recipe Proofing
Output Sharpening is great but how do you check for the right settings? The answer to this is Recipe Proofing.
You can find this new option in the View menu or by clicking on the new Spectacles icon on the toolbar. When enabled you see a Proofing label at the top of the Viewer. The screenshot above shows all the ingredients, from Process Recipe with Output Sharpening to Recipe Proofing.
User Interface
In the area of the user interface, there are two additions. First, the is a new default Workspace layout. Second, advanced high-speed, high-volume editing is now within reach with additional Tangent input devices.
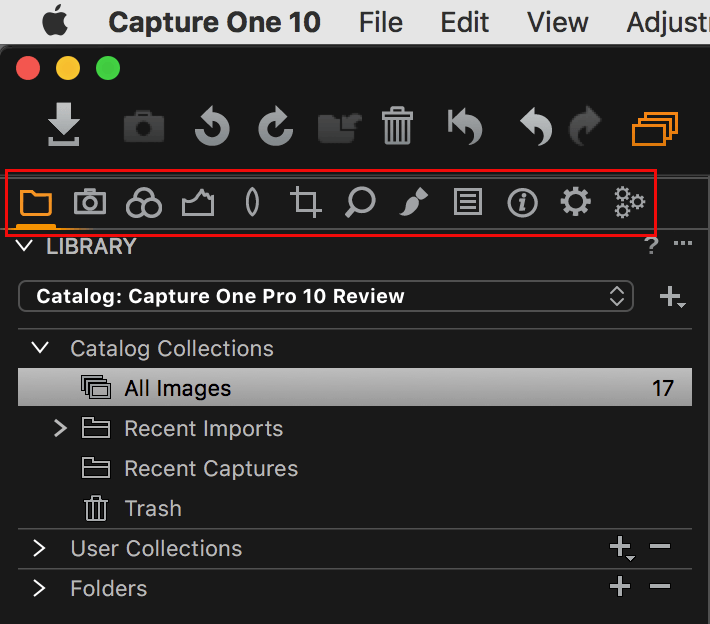
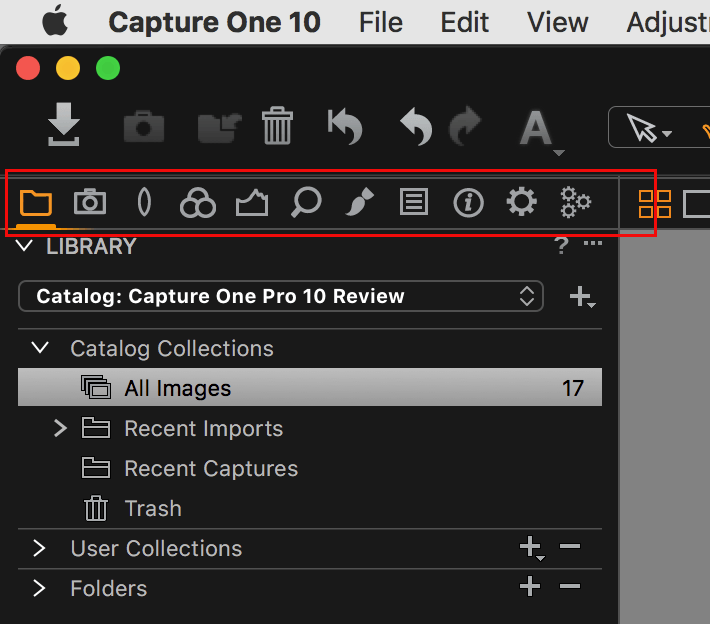
The tool tabs are reordered as well as the tools on the tabs. Most noticeably the Composition tool tab is gone but you can revive it manually as it is still there. You also can bring the Capture One 9 default back from the built-in workspaces.
Another addition is the use of a dedicated hardware interface tool that is much more advanced than a mouse or digitizer tablet. Enter a range of Tangent devices. Created for correcting videos, Capture One now includes support with the mapping of over 460 properties. It sounds like a lot to me. I have no experience yet with the tool, but I sure will let you know when that happens.
In my post Using Tangent with Capture One Pro, I share my experience with this combination.
Camera Focus Tool
In earlier versions of Capture One Pro, you had the ability to remotely control the focus in smaller or bigger steps during Live View. These controls were part of the Live View Controls tool.
In Capture One Pro 10 there is now a separate Camera Focus tool. It contains the focus control plus an AF button for autofocus.
Another new is that this new tool not only works during Live View but also when tethering without Live View. This, however, is exclusive for Phase One XF + IQ and Sony cameras. For Nikon and Canon cameras you need Live View to make it work.
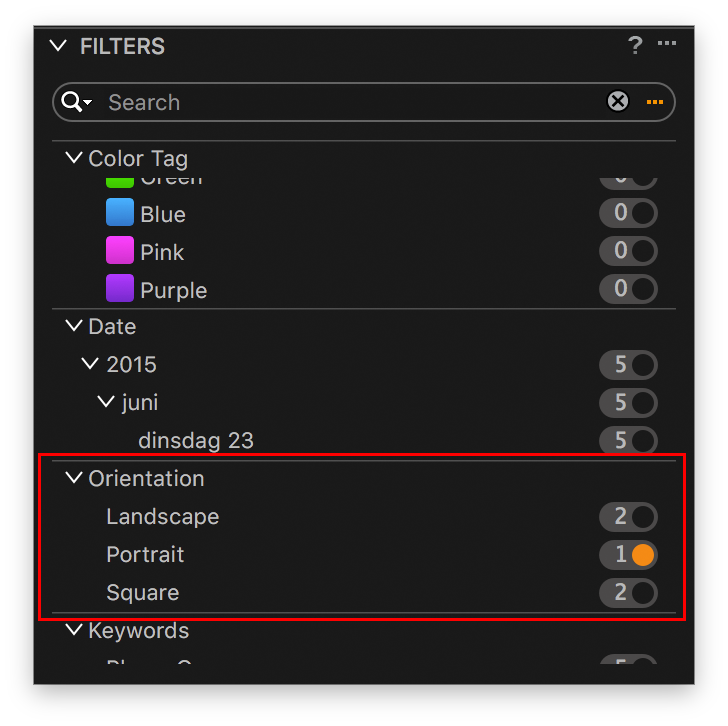
Filter For Orientation
This is really a no-brainer from the user’s point of view: filter your images based on Orientation. The Filters tool now contains an Orientation filter. Possible values are:
- Landscape
- Portrait
- Square
The filter takes any cropping and rotation into account and any change in that area is immediately effective in the filtering. It is now easy as pie to filter Landscape, Portrait, or Square images. Note that you can use orientation in search and Smart Albums as well.
Performance
In general, and for 99% under the hood, Capture One Pro 10 carries tons of performance and stability enhancements resulting – among others – in reduced drawing latency and snappier performance overall.
Optimizations
- JPEG output is optimized to provide the best quality at the smallest possible size. The size estimate is more accurate compared to earlier versions of Capture One.
- LCC (Lens Cast Calibration) generation is about 20% faster. Striping due to extreme shifting on 100-megapixel Phase One IQ1 and IQ3 backs is handled better.
Improvements
- Catalog
- move folders into other folders for better asset management
- Compressed raw file formats
- limitations are removed for Lens Correction, Chromatic Aberration Analysis and LCC generation
- you now can shoot the Canon mRAW and sRAW as well as Nikon RAW M and RAW S without drawbacks
- Auto Masking
- is now available for any editable file format, including X-Trans from Fujifilm cameras
- Hardware acceleration (OpenCL)
- is now set to Auto by default
- Activation management
- shows the computer ID in the online license manager
- for enterprise clients offline activation available
System Requirements
On Windows, requirements are similar to Capture One 9.3 (64-bit versions Windows 7, 8 and 10 (build 1607)), although a newer version of .NET Framework is necessary (4.6.2). This will be installed with Capture One Pro 10 through an additional download. The minimum RAM requirement is 8 GB.
On Mac, you need OS X 10.11.6 or macOS 10.12.x. There is no support for OS X 10.10. The minimum RAM requirement is 8 GB.
Localizations
Capture One Pro 10 is available in 14 languages. Translations (from English) were a bit behind as they were not updated with the new features since 8.0. In addition, translations were sometimes hard to understand.
This release is making a big step forwards. I do not know for all translation but for some I am sure. Check it out.
The Dutch translation was treated by yours truly, the Image Alchemist, since that is my mother tongue. Hope you like it!
One-Stop Shopping
This release is sold as an optimization step and for the right reason. I think its aim is to make Capture One more and more an endpoint solution for a large group of users. Importing, organizing, adjusting, printing and exporting now can be done from a single application on both raw and processed images.
And if you have specific needs, a roundtrip to Photoshop, Helicon Focus or other dedicated tool and back to Capture One Pro is just a no-brainer.
Videos By Phase One
Phase One comes well prepared at the party. Check out some of the videos below to get inspiration or learn all about the program. Excellent source for novices too!
- Capture One Pro 10 Tutorials
- Simple Adjustments Guides
- Capture One Pro 10 – What’s New?
- Studio photography – Capture One Pro – Capture Pilot
- Split personality with Chris Davis -studio photography
Future Updates And Trial
New features will be added to point updates like 10.1 and 10.2. To convince you in trying and buying each major and point update reset the 30-day trial counter.
This ends the Capture One Pro 10 review. Stay tuned for my next review of point update 1: now available Capture One Pro 10.1 Review.
Thank you
For reading. Please feel free to leave a comment. Like us on Facebook or subscribe to our newsletter to stay informed about new blogs.
Best Regards,
Image Alchemist












Thanks for those reviews, really handy.
I’m new to CaptureOne Pro, using version 10 now and I’m kind of getting used to it. “Coming from Lightroom”
After one week or so with C1 I can say that the software is really capable, a bit more complicated to work with than LR though.
One thing I’ve noticed that us bothering me is that the output files differ in IQ than the image I see in Capture One! The image I export is brighter, less saturated. Unless i activate the proofing option, what I see in captureOne does not match what i see in the final exported image. Is proofing a must do step overtime I want to edit an image?
No, proofing is not a must. There are several potential causes for differences between Capture One preview and output. Depends much on the program you view the output with. Is it color managed?
Best, Paul Steunebrink / Image Alchemist
I am currently using LR but thinking about moving to another software. Is it possible to do Panorama Stitching in C1 as easily as in LR ?
Hi Fred,
If you are on Mac Capture One has a script to stitch the output automatically in Photoshop. If you do not have Photoshop, or are on Windows, Affinity Photo is a good alternative. Hope you give Capture One a spin and like it. And visit the Ambassador page here before you buy, saves you money!
Best, Paul Steunebrink / Image Alchemist
Thank you for your quick answer 🙂