
Capture One Pro 9 Review
Capture One Pro 9 is an improvement in five areas: image quality, local adjustments, keywords, user interface, and workflow. So far for facts. How does it feel? Smoother handling, unsurpassed image quality, and faster workflow. Bottom-line: seeing is believing. Enjoy this Capture One Pro 9 review.
Capture One Pro 9 Review
This new release is an evolutionary upgrade. With this release you can achieve significantly better image quality, you get refined local adjustments tools, experience some user interface and workflow improvements, and last but not least you now have good keyword handling.
Like 8? Love 9!
The moment I started beta testing this release I was immediately hooked, reluctant to go back to Capture One Pro 8. The new version felt more smooth to operate. Image quality seems initially just a little improved until I discovered what is under the hood.
The results you can achieve with this release are so breathtaking that all previous versions pale by comparison and look dated. This product is aimed at the high-end and everybody who feels attached to that goal.
New Core
The new core Engine 9 is literally at the heart of the machine. Half of the new features are unlocked through this new engine. So when you open older images, adjusted with an earlier version, do not forget to upgrade the engine in the Base Characteristics tool.

Of course, you can select multiple images and upgrade them all at once. If you forget to take this step, you will be running in “Capture One Pro 8 mode”. New images automatically use the new Engine 9.
Contrast – Luma Curve
Before Capture One Pro 9 I seldom used the Contrast slider of the Exposure tool because I preferred the better tonality of the Curve tool for Brightness and Contrast adjustments. But the Curve tool is a bit cumbersome to use.
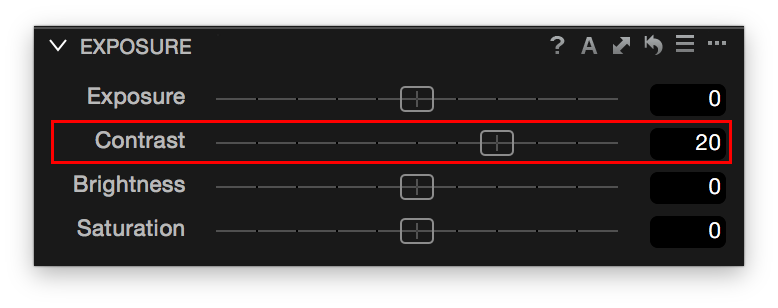
Due to the renewed Contrast engine in Capture One Pro 9, I will certainly use it more often. High contrast settings now have less effect on color which tended to oversaturate, in particular in dark areas (dark skin tones for example).
That does not mean I will leave the Curve tool alone. I am a big fan of the Curve tool (see also Create your Atmosphere with Curves) and was very curious to try the new Luma curve in this tool. All the work that is done for the improved Contrast engine does also apply to the new Luma curve tool.

For me, the Luma curve replaces the RGB curve most of the time. The RGB curve affects all three color channels simultaneously and equally but that does not mean that colors are not affected. A high contrast RGB curve increases color contrast as well. The Luma curve does not.
The Luma curve adjusts luminance, not color. As a result, the colors stay natural and balanced when adjusting the Luma curve. I am stunned by the results. It really shows how flexible the Capture One Pro engine is.
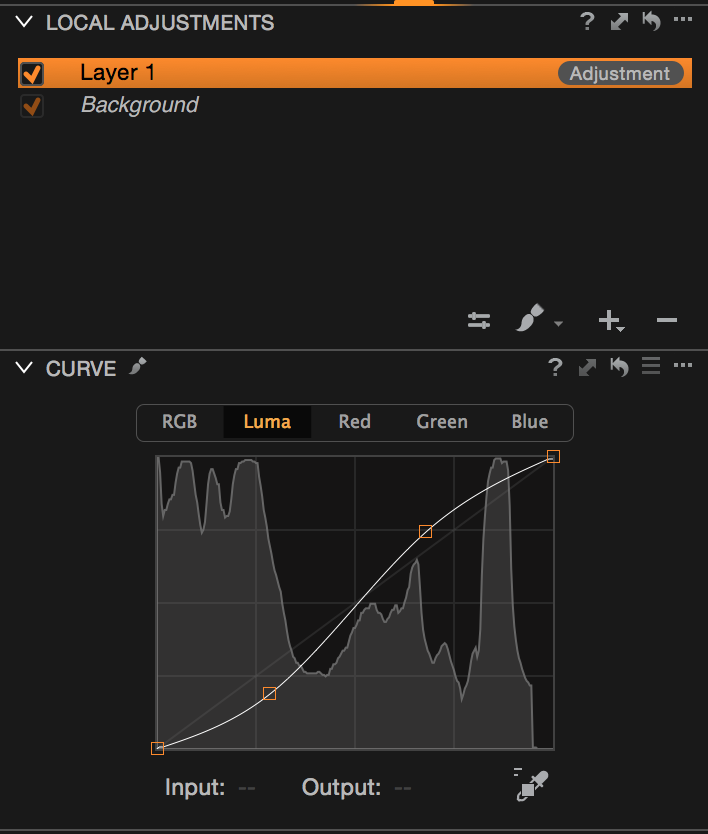
If you liked the curve tool already, you will love it even more! For me, this feature alone is worth the upgrade.
But hold on, there is more: the Curve tool can be used on an adjustment layer for local adjustments!
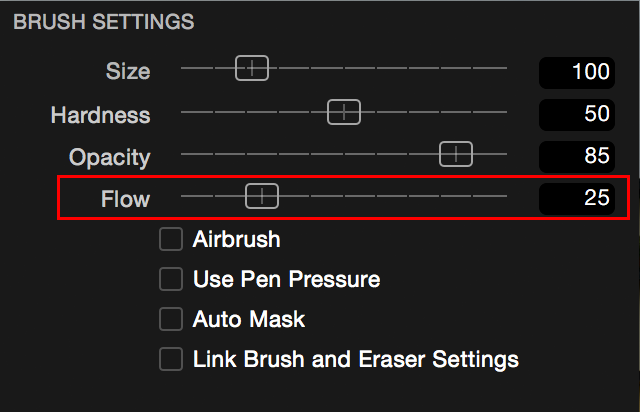
New Brush Settings
To improve your workflow while doing local adjustments, Capture One Pro 9 has some interesting enhancements. Note that all new features affect both the brush and the eraser. Listed for an overview the features are:
- Link Brush and Eraser Settings
- Airbrush setting
- Flow setting
- Straight-line aid
First, if you alternate between both brush and eraser to create your mask, you will no doubt like the Link Brush and Eraser Settings option in the brush settings.

This will link all the properties on the settings dialog for both brush and eraser. Changing a setting for the brush will update the same setting for the eraser and vice versa. Deselect it when you do not need it anymore and brush and eraser each save their own settings again.
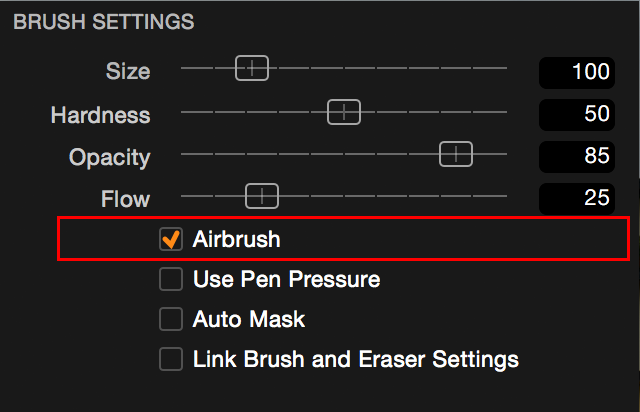
Second, you have an Airbrush checkbox setting. This is handy when you have a soft brush (or eraser). Such a brush has a halo with an inner circle, fading out to the outer circle. With the Airbrush option set, the mask will grow towards the outer circle depending on how long you keep it in one place. In other words, the airbrush setting is time-related.
Go With The Flow
Third, you see a Flow setting and it is a slider (0-100%), not a checkbox. This means you can control how Flow operates. Flow is related to the opacity of the brush. With Flow set to 100%, your brush will perform at the opacity setting in one stroke. Brushing the same location will not increase the opacity of the mask. Actually, this is how it was up to Capture One Pro 8.
With Flow set to a lower value, you need more brush strokes to get to the opacity value you did set. This way you can build up your mask in multiple strokes till you get the desired result. Or, you use this with an eraser and shave off the mask stroke by stroke. Set the Flow slider for example to 10% to use this technique. In other words, Flow is movement-based, where Airbrush is a time-based option for your brush.
Note that you can combine Airbrush and Flow to totally configure your brush and eraser.
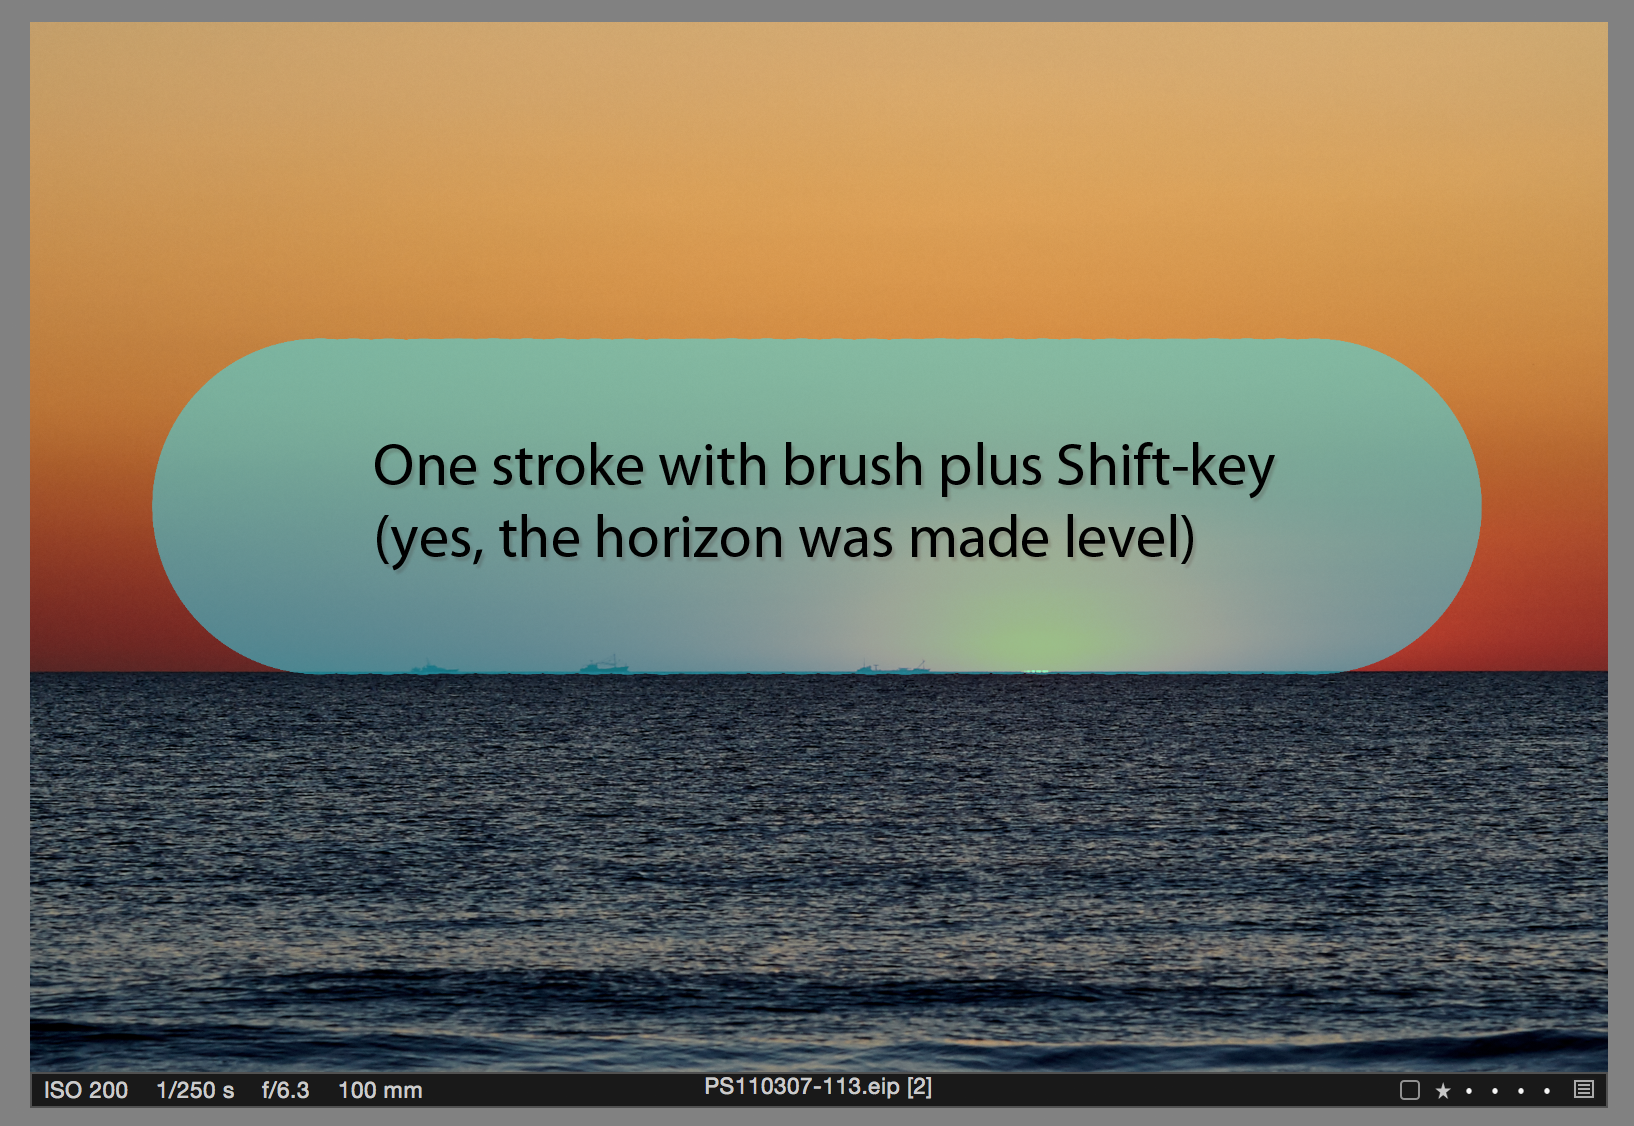
Fourth and last, you now can easily mask straight lines by holding the Shift key while using the brush or eraser. Just as a reminder, the gradient brush already had the horizontal, vertical and 45-degree diagonal guidance from the Shift-key.
Color Editor Renewed
The Color Editor has a new look, similar to the Color Balance tool. This makes it easier to drag the control handles of the sampled color in the circle. When floating you can enlarge the tool for making precise adjustments, just like with the Color Balance and Curve tools.

A new feature called Create Masked Layer from Selection allows you to create a mask in a new layer from a color sample. A color is now a selection tool for masking! After you made the masked layer, you can adjust it to include or exclude parts of the image as you would do with any layer mask.

The advantage is that you now can use a range of local adjustment tools (Exposure, HDR, Curve, Clarity and so on) to a mask that was created based on a color! This opens enormous creative possibilities with little time and effort.
Metadata Is Key
So far you might have read something you liked. But what this upgrade is really all about is keywords. Keyword handling needed an overhaul for sure, and this release shows Phase One’s commitment to the case. Before we dive in, one remark: these tools are so full of usability features, that I can only scratch the surface in this review.
You can find the new tools on the Metadata tool tab, next to the Metadata tool. This is the Keywords tool with a few keywords linked to a single image.
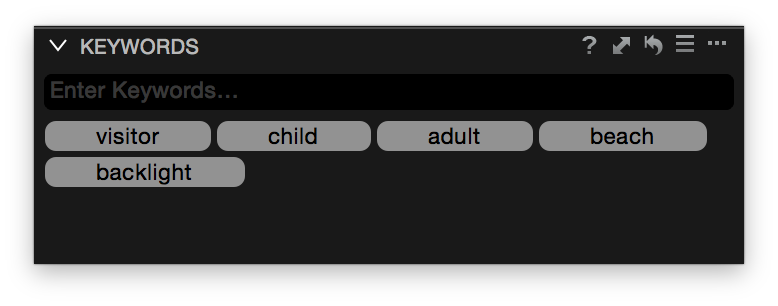
With this tool, you can easily add, delete, and manage your keywords for one or multiple images at the same time. You can also sort keywords when a single variant is selected. With multiple variants selected the tool looks like this.
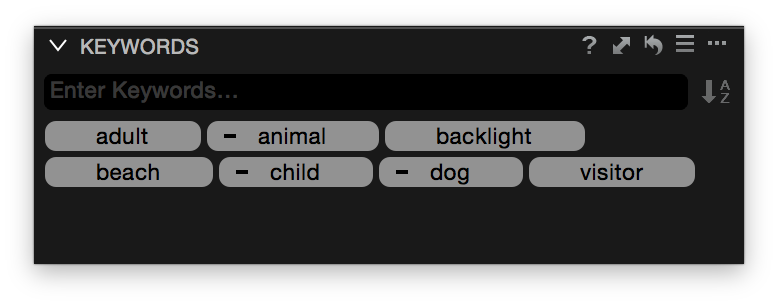
As you may notice some keywords that do not apply to all selected variants get a dash on the left side.
Below you can see the Keyword Library tool. In this screenshot I had the same variants selected.
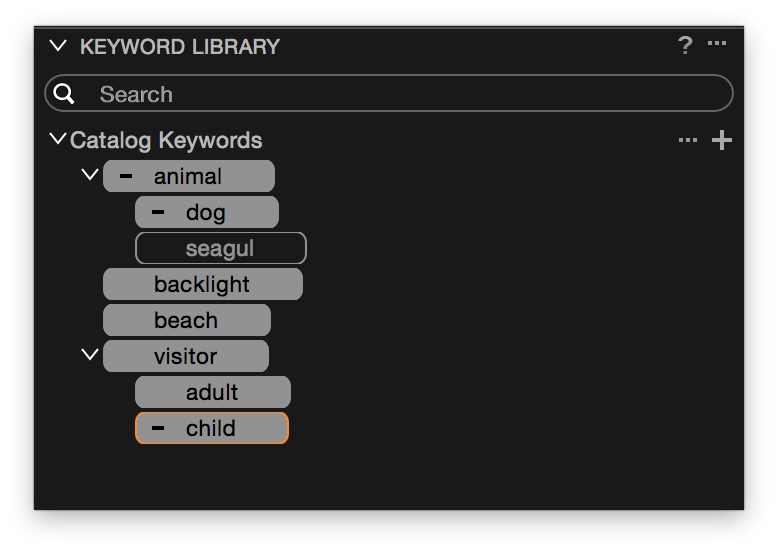
Like the name says, you can manage your keyword libraries here. A keyword library is a repository for your keywords. Each session and catalog (=document) comes with its own library. In addition, you can create your own libraries independent of the document you work in. You can have different libraries for different topics. By clicking on keywords in the library you can add them to your images and vice versa.
Keywords are additive meaning you can add keywords from libraries, presets and manually without having to fear one will replace the other.
Lightroom And DNG Fans
Capture One Pro 9 has a new DNG trick on its sleeve, named Capture One Colors for DNG. It is an improvement for converted DNG files, from a Nikon NEF or Canon CR2 raw file for example. Now, with Engine 9, when the original raw file is embedded in the converted DNG file, and that original format is supported by Capture One Pro 9, you will get the same colors as if it was the original, not converted raw file.
In case the original raw file is not included in the converted DNG file, you still get better colors, but not as good as with the original file included. Initial testing showed it works just as good. You really have to try out yourself if you have a lot of converted DNG files.
No doubt that this was a popular request and Phase One might try to win over a bunch of Lightroom users.
Workflow Enhancements
To conclude this review I like to mention three enhancements that should not go unnoticed.

In the toolbar, you can have a battery indicator, which shows you when a camera is connected. This indicator can help you in diagnosing connectivity issues during tethered shooting.
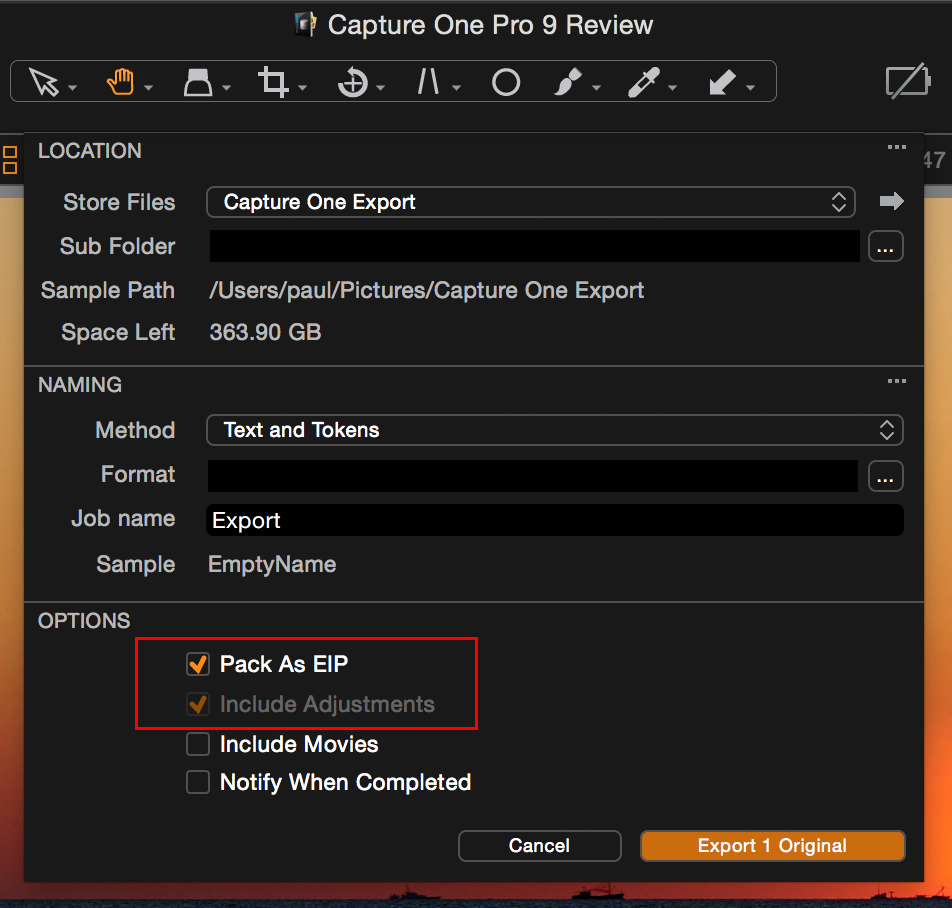
Another enhancement is the ability to export as an EIP file. This is particularly handy for catalogs where there is no EIP file. This makes a lot of sense as the Export > Originals option is specifically interesting for transferring images. The EIP file format makes it easy to include the Capture One settings.
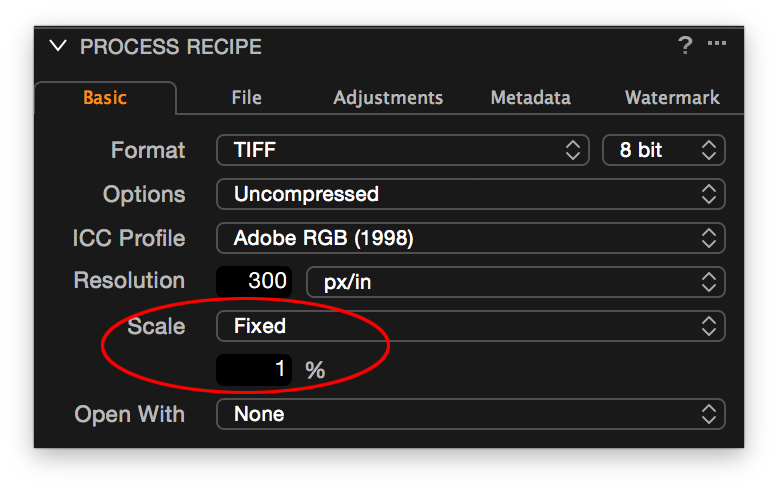
Scaling on output and in particular downscaling was not Capture One best feature. And the 10% minimum value was not helping to make a small JPEG from an 80-megapixel image. Now the minimum is 1% and the scaling algorithm has been much improved with Engine 9.
License
The standard single-user license now is 3-seats compared to 2-seats as before, which means that you can activate 3 systems with one license. Upgrading for a reduced price is possible from a Capture One 7 or 8 licenses.
Regarding operating system support Mac users please note that you need OS X 10.10.5 Yosemite or later for Capture One 9.
Updates
There are follow-up reviews on what is new in Capture One Pro 9.1 and one on Capture One Pro 9.2.
Summary
Since Capture One Pro 8, Phase One has chosen an incremental approach to software development. This means smaller steps per update, better performance, and new features a few times a year. Capture One Pro 9 continues in that tradition. That is a hopeful development. This upgrade is solid in performance, has interesting new features, and holds a promise of more to come during its lifecycle.
Upgrading is highly recommended.
Thank you
For reading. Please feel free to leave a comment. Like us on Facebook or subscribe to our newsletter to stay informed about new blogs.
Best Regards,
Image Alchemist


Thank you for the thorough review. I almost made up my mind to upgrade. Then I saw that my “ancient” two year old Mavericks is not supported. Does it really not work or has it just not been tested?
Thanks
Thomas
Hi Thomas. Thank you for your nice comment. Capture One 9 does not start on OS X 10.9 Mavericks. Any plans on updating to Yosemite or El Capitan in the near future?
Very impressed with Capture One Pro 9, I have been using Aperture and NIK and am totally satisfied with the results. I don’t use nor ever intend to use Photoshop. Can Capture One achieve the same results as Aperture with or without NIK. If I must use Photoshop with Capture One then I will have to look elsewhere for an Aperture replacement.
You can only use NIK outside Capture One, there is no NIK plug-in for Capture One. Do you still need NIK with Capture One? Don’t know. Only you can tell and I suggest to use the 30-day trial to figure that out.