Capture One Process
The Capture One Process feature gives you maximum control over your output workflow. Here you read about the parts that are involved in the process. In a follow-up blog I will dig deeper into Process Recipes and will uncover how these tools interact in real-life.

Capture One Process
You can find the Process command in the File menu, on the toolbar (cogwheel) or you can use the shortcut (Cmd+D or Ctrl+D for Mac/Win). The Process option is an alternative to the Export option. I recently discussed the ins-and-outs of Capture One Export, which you can find in the File menu next to the Process option.
When you use the Process command, you do not get any dialog. Capture One will process your selected image(s) directly. But don’t be fooled. Processing is an advanced way of export. No, the image quality is the same as with Export but the processing has all the options Export does have, and some more.
Process Recipes and Process Recipe Tools
Let’s shift gear now and open the Output tool tab by clicking the cogwheel icon in the tools section. Wow, that’s a lot of fun going on here! And a bit overwhelming too! There are no less than five tools on this tool tab.
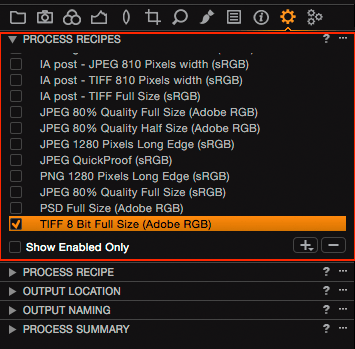
First, you have the Process Recipes tool, a.k.a. the list of recipes. Next, you have the Process Recipe tool (without the plural -s), which shows details of the selected recipe in the list of recipes above. Each recipe has many options and is spread over five tabs:
- Basic
- File
- Adjustments
- Metadata
- Watermark.
The idea of recipes is that you might want different processing parameters for different occasions. Horses for courses, you know the drill. Storing all parameters in one package, the recipe makes it easier to reuse it whenever needed.
You can make as many recipes as you like. Select and enable the recipe for the task and hit the Process button.
Next, enable more recipes at the same time for fast processing of different tasks simultaneously, as shown in the image above (2 checkboxes in the recipes list).
For a detailed exploration of the Process Recipes, please read Capture One Process Recipes.
Output Location Tool
This tool determines where Capture One saves your processed images. You can easily go from the tool to the selected folder in Finder (Mac) or Explorer (Windows) by clicking on the arrow.
Sessions have the Session Output folder selected as default. Catalogs do not have a folder assigned but this is mandatory before you can process.
In addition to the main folder for your output in the Store Files field, you can assign a subfolder or a longer path of folders in the Sub Folder field. You can use text, tokens or a combination of both to create Dynamic Locations, as Phase One calls it. Just click on the three-dots button to unleash its potential.
The Sample Path below the Sub Folder field shows the end result of all settings for you to review.
Some users noticed that the images go to another location than specified here. The cause is that you can define the location in the recipe as well and that setting can take precedence. I will discuss this in the blog Capture One Process Recipes into more detail.
Output Naming Tool
Now you have figured out the file format and location for your output files. Your next consideration is the name you give to your output. You use the Output Naming tool for this purpose. A name identical to the original, apart from its extension, is one option, obviously.
However, a plethora of options are available from both a huge list of tokens, fixed text, or a combination of both, similar to the output location. You can also fill in a sub name that comes from the process recipe and a job name, that is not recipe specific.
Tip
Use the Group field to open a list of grouped items for easy access to the token you are looking for, as I did in the image below.
A popular token is the sequence number with 1 up to 6 digits. You can set and reset the counter from the tool’s action menu. And again, the Sample below the Job Name field shows you what direction you are heading.
Process Summary Tool
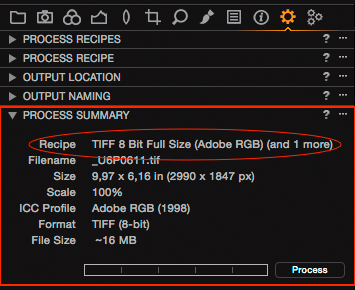
This tool seems pretty static but it’s not. First, you find a Process button as one of the options to get the ball rolling. It also has a progress indicator. Fine. And as you expected, it gives a summary of what you have set and can expect as output.
What you perhaps accidentally might have experienced, is that sometimes text is displayed in red, instead of the regular white. That is a warning about the recipe selected and size settings. I will explain it right below.
What the Process Summary Told Me Today
There is something I have not told you but what I should not keep as a secret. The Summary tool can show its true colors so every now and then. It has to do with the Process Recipe. Here is.
In the list of recipes, you can select one at a time. On the other hand, you can tick the checkbox of one or multiple recipes effective to enable or disable it during processing. And the Summary tool knows that.
What happens when the enabled recipe is not the selected recipe? The Recipe in the Process Summary tool turns red. Why?
Because the single selected recipe is used for color managing the screen. The RGB values you can monitor in the Viewer are based on the profile of the selected recipe. When you, however, enable another recipe for processing, there is (potentially) a mismatch, hence the red (alert!) color.
As you probably understand, this is pretty intimate knowledge, so I like to keep it between us. Right? Thanks!
Batch Tool
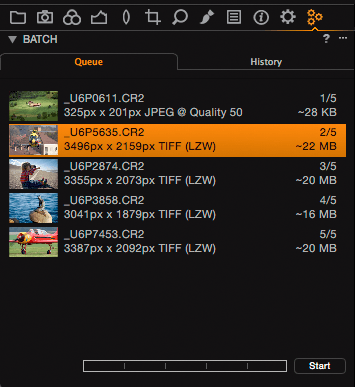
The Batch tool on the tab with the three cogwheels is a sleeping beauty. Nothing seems to happen until you hit the Process command. Images ready for processing are placed in a batch queue here, and the program starts to process the queue.
You can stop (and start) the queue at any moment if you have second thoughts. Or perhaps you need all the resources for editing your images and let the computer process when you take a break.
Once stopped you can delete images from the queue, reorder and put other images at the top of the queue.
Export Or Process?
If you want to create TIFF, JPEG or similar files from your raws including adjustments, you have two options in the File menu: Export > Variants or Process. What is best for your workflow?
The Export > Variants route is easy and fast but can store only a single recipe. If you change parameters often, consider using the Process feature instead.
Processing has some more extras like executing multiple recipes simultaneously, a batch queue that gives you more control over processing (start/stop), and the watermark feature. In addition to that, Process Recipes are linked to other functions like Proof Profile, Crop tool, Output Naming tool, Output Location tool, and Process Summary tool.
More of these details will be revealed in the blog Capture One Process Recipes.
Thank you
For reading. Please feel free to leave a comment. Like us on Facebook or subscribe to our newsletter to stay informed about new blogs.
Best Regards,
Image Alchemist


Hi – because of the way I prefer to work I don’t want to loose the original file name during tethered capture. However, it seems to be impossible to leave the file unaltered – C1 forces me to either use a preset or it substitutes ‘EmptyName1/2/3 etc. Do you have any ideas about this?
Hi Nick,
If a name changes during output, I would check the Output Naming tool > Format field. Make sure you see the Image Name token, as I showed in this blog.
Hi – im wondering if there is a way to instantly start processing as the image arrives in the capture folder? Is there something built in or is it possible with some kind of workaround?
This is not a feature in Capture One. I have seen scripts doing this in the past. I suggest to ask Phase One in a support case.
Best, Paul Steunebrink / Image Alchemist
It would be useful to have a ‘Limit File Size’ option for JPEG, as in Lightroom. Is there a way of doing this?
Hi,
Unfortunately, such an option is not available in Capture One Pro. I am not aware of a workaround for that.
Best regards, Paul Steunebrink / Image Alchemist
Have you come across processed files looking darker than the raw file?
Hi Edward, yes and this can have several causes. For example different applications, or worse, different background colors in different applications, color management issues and so on.
Best, Paul Steunebrink / Image Alchemist