Capture One Export
Creating great output is what Capture One is all about. The images coming out of Capture One are either your end-result or a pre-stage for further processing. The Capture One Export feature gives you a huge amount of control for almost any task, although it is not Capture One’s only option. Export is also the fastest and easiest way to create output.
Capture One Export
Sometimes I compare working with Capture One to a launderette. The uncorrected raws – dirty laundry – goes in, the washing machine does its magic with me pushing some buttons – the adjustments -, and the exported images – your clean laundry – are ready to take home.
This blog focuses on the Capture One Export feature. You find this feature in all modes of Capture One, from the full Pro version to the restricted Express (for Sony).
In the Pro version, you can also use similar but more extensive Process and Process Recipes features. I explore these in two separate blogs: Capture One Process and Capture One Process Recipes.
Export Originals or Variants
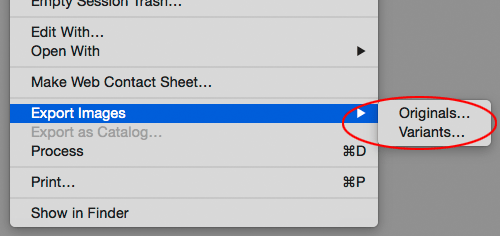
After import, select and adjust, it is time for export. In the File menu, you can find Export Images, but then you are confronted with a potentially confusing choice: Original or Variants.
I will discuss both options below. Please note that there are obvious differences between the two Export dialogs (Originals versus Variants), and that there are small differences between the same dialog for either Session and Catalog.
Export Originals
The first Capture One Export option is to export Originals means that you export the uncorrected (raw) image file from your catalog or session into a designated folder. Simply put, Capture One creates a copy of the original for you. This is great for exporting one or more images from a larger collection, ready for distribution or transfer to another system.
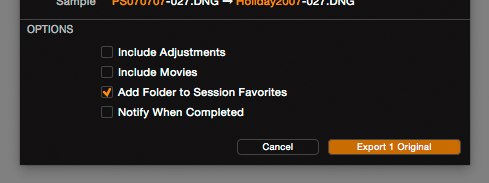
Optionally, you can have Capture One add the adjustments in adjacent sidecar files like it does when working with sessions. Note that these adjustments are only readable in Capture One. The image below shows the Export Originals dialog for a session in full swing.
As you can see the dialog has three sections, Location, Naming and Options. I will discuss them in that order. Fortunately, there are very minor differences here between whether you use a session or catalog.
Note: although the Export and the Process functions have many similarities, only the Export Originals function allows you to export originals. The Process function does not provide any of that.
Originals > Location
In the Location fields, you select the destination folder for export. With a Session, the Session Output folder is the default in the Store Files field, but you can override this. Select any folder you like. Additionally, you can use a subfolder inside the selected folder. Just type in the name of the subfolder or an entire path in the Sub Folder field and the Sample Path area below it will show you the result.
But there is more. Now magic kicks in when you open the dialog with the three dots at the right of the Sub Folder field. You can fill in all kind of tokens, and mix it with characters like a dash (-) and text. In particular, under Group > General you can find some very useful tokens to get you started.
Originals > Naming
Leave this setting to the default Image Name token if you want to keep the name on export the same as the original. If not, again you have the tokens at your disposal for renaming. The Job Name field corresponds with the token with the same name. What you type in here is filled in on export.
In addition to tokens you have another renaming method at your disposal: Find and Replace. For example, when your images start with IMG_ you can rename them to YourInitials- on export. I have my images renamed on import starting with my initials (PS) and creation date (YYMMDD) but can give it a more descriptive name on export.
Note: the Location and Naming settings are program-related, not session or catalog related. In addition, they are unique to either the Export Originals and Export Variants dialogs. In other words, the program stores these settings for both dialogs independently to improve your workflow.
Originals > Options
I think the Options are rather self-explaining. Set-and-forget but take notice at least once. Do you like to save adjustments, including movies, and like to be notified when done? Check your boxes!
When working with a session you have the option to include the export folder to the Session Favorites. This will include the folder in the search function, which is also used for Smart Albums.
Export Variants
The second Export option in Capture One you probably will use most: Export Variants. This will export your original plus adjustments into a new TIFF, PSD, PNG or JPEG file. For this purpose you take a slightly different route from File menu > Export Images > Variants to get into the proper dialog.
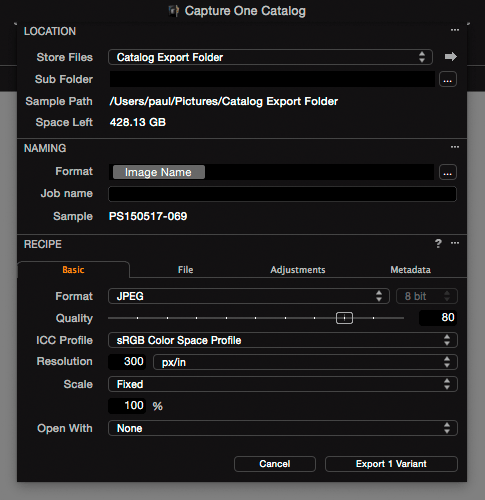
You see a dialog similar to the Export Originals dialog, but with a new section Recipe, and with fewer (session) or no (catalog) options.
Variants > Location
The Location section works identical to the one discussed under Originals > Location above, so please refer to that description.
Variants > Naming
The Naming section works almost identical to the one discussed under Originals > Naming, so please refer to that description. The minor difference is that – up to Capture One 8.3.4 – the Find and Replace feature is missing in the Mac version.
Variants > Recipe
The Recipe section is unique for the Export Variants option, in contrast to Export Originals, for obvious reasons. After all, you are going to create a new file from your original image and you need to tell Capture One exactly what you want.
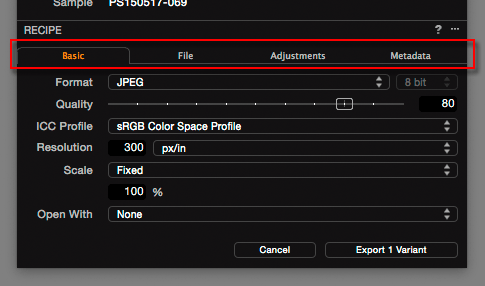
The Recipe section has four tabs, but I will only discuss the first Basic tab here. I discuss the remaining tabs in a blog on Process Recipes. Now you can also see the main distinction between Export Variants and Process in Capture One Pro. The Export Variants feature has only one recipe while the Process feature is virtually limitless in their amount.
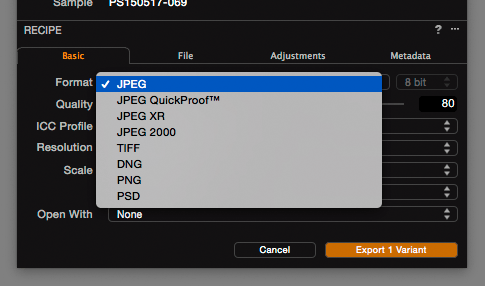
First, you decide what Format you want the exported file to be: JPEG and TIFF are the most common, but there is more to get from the drop-down list. Depending on your selection Capture One will set the bit-depth to 8 or 16 bit or allow you to select it. In general, 8-bits are sufficient except for the most demanding assignments or heavy post-processing. On these occasions you select 16-bits. For web choose JPEG.
Quality, Profile, Resolution, and Scale
Next, you may get a Quality (JPEG) or Options (TIFF) field or none. TIFF compression is lossless, the JPEG quality setting as a measure for compression is not. Choose a lower quality for the web to save space and allow a fast transmission.
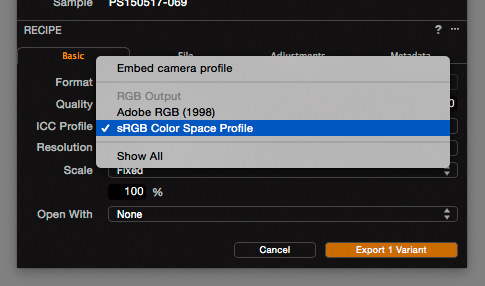
The ICC Profile is the working space or color space the color information is saved to. If you are not technically experienced or not much into color management, choose sRGB. It is safe for the web too. For prepress and printing a larger color space as AdobeRGB is more suited. When you have extensive control over color management in your workflow, go with the flow and pick your best.
Special feature: embedding the camera profile assures you that all color information of the images is retained in the output.
The Resolution field in pixels per inch, millimeter or centimeter does not affect the number of pixels or quality of the image. This is a common misconception. Leave it to the default 300 px/inch unless you have a reason to change it. It is used to translate the number of pixels to physical dimensions.
The Scale field is a bit more complex. The default is Fixed at 100%. This means that the amount of pixels in your original file (after a potential crop) is the same as what you get on output. Any other value than 100% or other than Fixed effectively makes Capture One to upscale or downscale to the desired output value. You can prevent upscaling if you like in a separate option in the Scale drop-down list.
Last but not least, you can have Capture One open the newly saved image in a program of your choice from the Open With field for review or further processing. Be aware that this may cost extra memory and other resources that Capture One uses (or likes to use) for the Export task.
Tips
- You can make a keyboard shortcut to either one or both Export options, depending on your use.
- You can add the Export Variants button to the toolbar.
- When you Export multiple selected images, make sure you have the Edit All Selected Variants enabled. When you are new to this toggle, please refer to the blog on Capture One Variants to get you sorted.
Thank you
For reading. Please feel free to leave a comment. Like us on Facebook or subscribe to our newsletter to stay informed about new blogs.
Best Regards,
Image Alchemist







Hello! In the Scale field, I use the Width x Height (841mm x 1189mm) option to export variants. I’m wondering why are my photos after being exported, they are not in the specified width x height that I wanted. (All my photos have different cropping in Capture One). Any advice? Did I do my export correctly?
Hi, when you need specific dimensions (width x height) on output you first define the output (as you did). Next, you set your Crop tool ratio to Output. Last adapt your crop so that it has the right ratio according to your export settings. Mind the ‘Apply aspect ratio’ function in the crop tool action menu (top right, three dots) to do this quickly.
Hello, Thanks for the info. I just got started in this. I can adjust and modify the original file to look how i want it to. Done. ready to be shared, stored, whatever. In no way can I export the finished picture. I export to desktop, and it looks like original. I do not know how to SAVE my adjustments/modifications. VERY frustrating. Please help! Thank you. PS: I am used to the very satisfying (for me) Nikon Capture. Very organized, simple, and works. Then I got a Sony camera. I spent one evening with Phase One and it took a lifetime out of simple, enjoyable photography for me. 🙁
Hi Joe, Capture One does autosave all adjustments. If your export does not contain your adjustments, you perhaps have done Export > Originals. Choose Export > Variants instead.
Best, Paul Steunebrink / Image Alchemist
Hello,
I would love to know how can I export the photos by time or data in Capture One.
I can’t find it.
Thank you.
Hi Joana,
Capture One exports the selected images in the order you sort the thumbnails in the Capture One browser. So you first sort the images with the sort options in the browser, next you export.
Best regards, Paul Steunebrink / Image Alchemist
Hi Paul,
Thank you so much for the information.
Best regards,
Joana
Hi,
I am finding that the exported files are hugely different in size – from 2 MB to 12 MB. I cannot deliver images with such random file sizes to my clients. Is there a way to set a maximum file size?
Hi Lesley,
There is no size limit feature. Maybe the size difference in bytes relate to size difference in pixels: more pixels, larger file. You can define the size of your images in a process recipe.
Best regards, Paul Steunebrink / Image Alchemist
Thank you for your response. I appreciate it very much.
Best!
Lesley
Hi,
We are exporting exactly as described above, but it is only saving the files in the desired location as a .tmp file. We have gone as far as uninstalling and reinstalling the software, but it still won’t work. Any ideas? It was working fine previously.
Thanks
Sarah
Hi Sarah,
That does not sound right. Need more info. Either contact me via mail or contact form. You could also contact Phase One support if you prefer that.
Best, Paul Steunebrink / Image Alchemist
The same happens for me. Windows 10 system. Brand new version of Capture 1 11 Pro. It exports images as jpg, but adds a .tmp extension to the jpg I have to then manually go into the folder and remove the -tmp ending, and then I can see the jpg picture, but that cannot be right.
Hi Karin,
That is not how it should work. I suggest you create a support case at Phase One:
https://www.phaseone.com/en/SupportMain.aspx
Best, Paul Steunebrink / Image Alchemist
Hello!
I am having a big issue with exporting my variants with adjustments and am freaking out a bit since I need to deliver the images by tomorrow (I’m quite new to capture one).
I did all the necessary adjustments, including skin toning and some colour saturation. The images are indeed a bit edited as Capture one allows you to do a lot within the program, and amazingly.
So I was really surprised, thus the ” freaking out” when I tried to export my images through different forms to a Tiff file, and it happened that most of the adjustments are gone (colour-wise mainly but also contrast changes, etc). I tried Jpeg and Psd too, to see if I could bring it to another program, but it keeps altering all the adjustments made 🙁
Im exporting with max quality, rgb1998, 16bits
I saw some comments online that it can be because in capture one we don’t edit at 100% or so, so we are not aware of the real changes we are making, but as a fan I am of this program already I can’t believe they could have done such a mistake.
Thank you very much for your help. Any hints are mostly appreciated.
Best,
Sofia
Hi Sofia,
Sorry to hear you have issues while facing a deadline. Blood pressure alert! Have you tried to use processing via a process recipe instead of exporting? Maybe this helps. If not, please contact me directly by mail or contact form (both on Contact page). Take care.
Best, Paul Steunebrink / Image Alchemist
Wondering if Sofia’s problem was ever solved since I”m having the same exact issue! Thanks in advance for any help!
Hi Robin,
I do not know whether Sofia worked it out, but if you have troubles you can contact me directly at https://imagealchemist.net/contact/
Best, Paul Steunebrink / Image Alchemist
Hi,
I have been using C1 Express for Sony for a short while to find out how well it works. I am certainly impressed so far.
However I am wondering if there is any way to save a preset at export? It seems to offer this, and I have named some recipes in the Export Naming/Presets/Save User Preset/OK.
However, while the recipe name I have given the preset is shown, clicking on it does not change any other settings that may be already there.
Maybe it is just not possible to have different preset setting in Express?
Hi Bob,
Where you are aiming at are process recipes, the export feature on steroids. It is available in the Pro modes, including Pro Sony. Learn more about Process Recipes here.
Best, Paul Steunebrink / Image Alchemist
Hello, I recently installed the capture one trial version (I´m a teacher and i want to share the experience in the program with my students), I have used it very well in the past few days, however now it started to give the same error described in another comment ” We are exporting exactly as described above, but it is only saving the files in the desired location as a .tmp file.”
can you help me?
Thanks
Hi Rui,
I do not have a solution but maybe I can help through online help. I will contact you directly.
Best, Paul Steunebrink / Image Alchemist
Is there a way to preserve the original numbering on an image when exporting. When I export variants they are all renumbered 1,2,3 and etc. When I send off a lot of proofs to a client through variant exports the numbers they receive are different than what I have in my capture folder which slows down the process locating theirs favorites in my folder.
Hi Jim,
You can use the token [Variant position] in your naming scheme.
Best, Paul Steunebrink / Image Alchemist
Hi there,
I want export original raw files to DXO PureRaw3. I tick the “keep adjustments” box but the adjustments are not kept when the file is exported into a folder for DXO processing. DXO won’t let me select EIP files, so that option is not open to me. How can I export adjusted raw files for processing in PureRaw? I have found that adjusting highlights recovery in the processed TIFF from DXO in Capture one is very unsatisfactory. Shadows and noise are brilliant in TIFF format after PureRaw3. Thanks!
Hi Mark,
Long story short, you can not exchange raw adjustments between different software. These adjustments work with their software only.
Best regards, Paul Steunebrink / Image Alchemist