Capture One Tethering Continued
Tethering is one of Capture One’s key features. Over the years it has evolved into a sophisticated tool for the most demanding photographer. Tethering is available for Phase One & Mamiya/Leaf digital backs and DSLRs from Canon, Nikon, and Sony. Enjoy the second part in this series, Capture One tethering continued.

Capture One Tethering Continued
In the previous episode Capture One Tethering Explained I shared the basics of tethering with you:
- the location for storing your images
- naming incoming images in a sensible way
- remote triggering the camera from your computer
We continue and dig deeper into the world of tethering. What you will learn in this post is that tethering is so more than just connecting a cord and shoot. Tethering with Capture One gives you:
- better control over composition and lighting with Live View
- improved workflow with adjustments that prolongate during the shoot
- full remote control over camera settings
Let us dig deeper with Capture One Tethering Continued!
Live View
Live View is the ability to view the image captured by the sensor in real-time. Typically you use Live View before you take the shot. Live View gives you additional control over your image, typically for focusing, composition, and lighting.
Live View on your camera’s display is a great help but nothing compared to Live View on your computer. Capture One offers you Live View for both Phase One and Leaf backs as well as for DSLRs from Canon, Nikon, and Sony.
The 50 and 100 megapixels CMOS sensor of the Phase One IQ and Leaf Credo digital backs now gives the medium format shooters the same rich Live View experience as their DSLR counterparts. You start Live View from the Camera tool.
Direct Capture
In older versions of Capture One, you had to close Live View before you could capture an image. Since Capture One 8 you can shoot direct from Live View thanks to Direct Capture.
With Direct Capture you leave the Live View window open when you capture an image. The benefits are no mirror movement, no focus change. You just take the shot, and Live View continues after the capture.
Full Camera Control
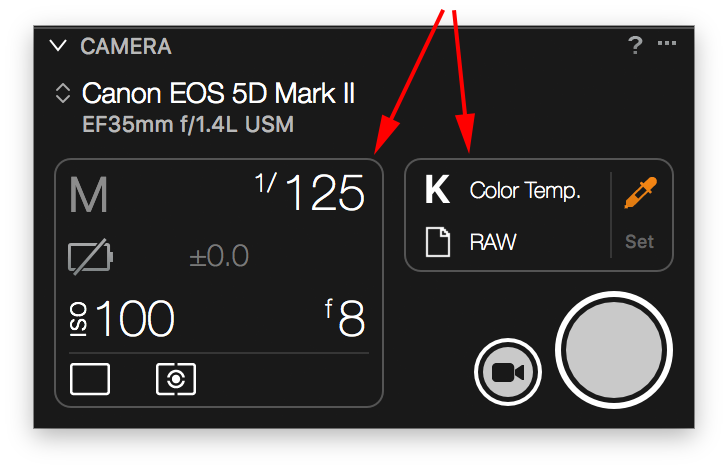
In the Camera tool, you find the most important settings you would normally look for at the top LCD of your camera.
You often change these settings during a shoot, like an aperture, shutter speed, white balance (color temperature) or ISO.
Apply And Prolongate Adjustments
One of the most powerful features of tethering with Capture One is that you can apply adjustments during the shoot. Even more powerful is the ability to let Capture One prolongate these adjustments to new incoming images automatically.
The benefit is that during your shoot you can see how the end result is going to look like. The photographer might have this in his mind but the client or art directory needs some help to get the picture.
Capture One has a dedicated tool with numerous options that allow you to control the flow of adjustments during the shoot: the Next Capture Adjustments tool.
Look At The Tools
We will now take a closer look at the tools I mentioned so far in this post:
- Live View window
- Camera tool
- Next Capture Adjustments tool
Live View Window
You start Live View from the Camera tool. Click on the smaller circle with the camera symbol, next to the Capture button. This opens the Live View window.
The Live View window is a separate window from the main application. You can drag it to the desired location on your screen, enlarge it, and customize it.
The Live View window has a customizable toolbar, two tool tabs with tools and a viewer with the Live View image. You can enlarge the image (zoom in) as you do with the regular Viewer.
When you open the window, and the camera is connected, Live View will start automatically (with a DSLR). You can pause Live View, and it ends automatically after a predefined interval. You set this interval in the Capture One Preferences, Capture tab.
Live View Toolbar
The toolbar is very similar to the one in the main window and is also customizable. A brief description, going from left to right:
- With the first icon, you start/pause Live View. This way you can leave the window open when you temporarily pause Live View.
- The second icon is for Overlay and the third for Guides. They work similarly to those in the main window.
- The fourth icon RGB is enabled by default and shows the Live View in color. Pressing the RGB icon displays the Live View in grayscale or black & white. This does not affect the capture but only the Live View image.
- Next comes the DOF or Depth Of Field button, which only works with Phase One cameras and closes the aperture.
- The last two icons on the left are for Preferences (opens in Capture tab) and Customise toolbar.
In the cursor tool block, you notice a new symbol for the Focus Meter (a square with a black and white half). I come to that in a moment.
Tool Tabs
The Live View window comes with two tool tabs and their respective tools
- Live View tool tab contains
- Live View Navigator
- Live View Controls
- Camera Focus
- Live View Info
- Live View Focus Meter
- Overlay
- Capture tool tab contains
- Camera
- Camera Focus
- Camera Settings
Both tool tabs are fully configurable like regular tool tabs where you can reorder the tools, add and remove tools, and drag tools from the tab (and back) to make them float.
Direct Capture
The tools on the Capture tool tab are identical to their siblings on the Capture tool tab in the main window, with the exception of the Camera tool. The Camera tool has a Capture button, but this is now the Direct Capture button as it let you take a capture without closing the Live View window.
One important benefit of the Direct Capture feature is that the focus is not altered. Normally when you remotely trigger the shutter button, the camera might first focus (depending on camera settings). With Direct Capture it does not.
Camera Focus Tool
With an autofocus lens on your camera, you can remotely control focus with the Camera Focus tool. You have controls for (fast) forward and (fast) backward as well as an AF (Auto Focus) button.
Note that you have the Camera Focus tool on the Capture tool tab of the main window as well. This works only for Phase One cameras and allows you to remotely control focus, for example for focus bracketing series, without going into Live View mode.
Live View Tools
You have several Live View tools at your disposal at the Live View tool tab. Some work with Phase One cameras only like the Live View Controls and Live View Info tools.
The Live View Focus Meter tool is a very interesting tool and now works with both Phase One cameras and DSLRs.
With the Live View Focus Meter tool, you can pick up to three focus areas in the Live View image. Each point you pick relates to a meter that is displayed in the tool. When you change focus, manually or with the Camera Focus tool, you see the values in the meters going up or down. Depending on how you placed the focus areas in your image you are visually guided to find the best focus setting or distance on the lens.
Note that you can change the size of the metering points in the Live View viewer for very precise metering.
Camera Tool
We already looked at the Camera tool for triggering the shutter with the Capture button and entering Live View via the Live View button. This tool is also great for checking the connection with the camera. When there is no connection or the camera went into sleep mode, the tool does not display any information except for the text No Camera Attached. Rather boring, indeed.
With a camera connected you see the specification of the camera and lens listed at the top. Below that, in a layout as if it was your camera’s LCD you see all relevant settings for taking images.
In this example of a Canon DSLR, the auto exposure is set on Av with a dial on the camera. You can read and change ISO, aperture and exposure compensation. Just click on an item and a list of options opens. The same is true for the icons at the bottom left for drive mode and metering method, as well as the Color Temperature and File Format at the right.
You can set the Color Temperature or White Balance in two ways from the Camera tool. You click on the Color Temperature sign and select a White Balance preset (Daylight, Cloudy, Tungsten and so on) from the list. Or, alternatively, you use the White Balance picker and click in one of the images you already shot.
Action Menu
The tool’s action menu is also worth mentioning. Here you find options like Composition Mode and Hot Folder. I will discuss these in the next post in this series, Capture One Tethering In-Depth. You also can open the Preferences > Capture tab directly from this menu.
The Invert Shutter Speed and Invert Aperture refer to the plus (+) and minus (-) signs in this tool and the Camera Settings tool. The issue here is that both shutter speed and aperture are inverted values by design. Say I have a setting of 1/125 at f:/4.0. When you want to increase the shutter speed (click + sign) should it go to 1/500 or 1/60? Same for a larger aperture. We all know that a bigger opening for more light corresponds to a lower value, like f:/2.8 compared to f:/4.0.
You find the +/- signs in the Camera tool when you click on either indicator for shutter speed or aperture.
Next Capture Adjustments Tool
When you shoot tethered Capture One will show you the last capture in the Viewer. Let’s assume that you took a few shots and pause for a moment to review the result. Looks nice but needs some adjustments before you continue.
For example, you change the ICC profile (Base Characteristics tool), change the orientation (Rotation & Flip tool), add metadata (Metadata and Keyword tools), and you apply a vignette, increase contrast and set levels.
Now you continue the shoot and you notice that not all adjustments are prolongated to the next images. The vignette, contrast, and levels are done, but ICC profile, orientation, and metadata not.
In the Next Capture Adjustments tool, you can fully control what is copied and how. But before we look into that first some basic stuff on how the tool works.
Copy From Who?
The first thing you come across when you start looking into the Next Capture Adjustments tool is the option to Copy from Last and Copy from Primary. With Copy from Last Capture One will copy adjustments from the last image. This works whether or not the last image is selected.
Great start, but what if I applied adjustments to an earlier image? Select that image so that it becomes the Primary Variant. Now, you choose Copy from Primary in the Next Capture Adjustments.
Now you continue the shoot, adjustments are copied from the Primary Variant to the new image (last image) and this image becomes the Primary because Capture One always automatically selects the last image. As a result consecutive images will get the adjustments as well with the Copy from Primary setting.
I will now look into the six different settings of the tool and explain the effect of the choices offered.
ICC Profile
The ICC Profile field offers you at least the first three options:
- Default (= standard setting)
- Copy from Last
- Copy from Primary
- select any profile (only displayed with a Phase One IQ digital back)
The screenshot below is with a Phase One IQ3 100MP attached, the second screenshot with another camera.
Both Copy from options I explained above. In case you have changed the ICC Profile in the Base Characteristics tool of the last image or the Primary Variant, you should choose one of the Copy from options here to prolongate that adjustment.
The Default option means that the Default ICC Profile for that camera or digital back will be applied.
In Capture One each camera or digital back has a default ICC Profile. This is the profile you see in the Base Characteristics tool when you first open a raw file for that model. In the same tool, you can change the default. This could be a profile you made yourself with the Color Editor or otherwise.
Orientation
The Orientation field allows you to change the orientation – horizontal or landscape versus vertical or portrait – of the image. You have the following settings:
- Default (= standard setting)
- 0° / 90° / 180° / 270°
The Default setting lets the camera or back determines the orientation.
The four values overrule the camera setting and set the orientation of the image to a fixed setting. This is often needed when shooting top-down, bottom-up or upside down.
Metadata
With the settings in the Metadata field, you determine the prolongation of what you have set in the Keywords tool and the Metadata tool. You can share Rating and Color Tagging under Metadata as well, but I mention it separately as you will understand shortly.
The list of options is a bit longer than for the previous settings.
- Defaults (= standard setting)
- Copy from Last
- Copy from Primary
- Copy from Clipboard
- Copy specific from Last…
- Copy specific from Primary…
If you do not have any metadata to copy during the shoot or do not want to copy that, you can leave it to the standard-setting Defaults. Defaults basically mean do nothing because by default Capture One does not copy metadata.
Both Copy from Last and Copy from Primary settings will copy Keywords and Metadata to the next incoming image with two exceptions: Rating and Color Tag. The assumption is that you do not want to propagate Rating and Tagging as you like to do with other metadata like Keywords and IPTC data about the shoot.
Metadata And Clipboard
With Copy from Clipboard, you fully customize what is copied to your incoming images regarding metadata. You copy the metadata from an image to the clipboard. Next, you go to the Adjustments Clipboard tool and intentionally set a number of checkboxes for the items like to apply to upcoming images. For example, you might like to copy the Color Tag but not the Rating plus your name and copyright information and start shooting.
Note that here all other settings on the Clipboard outside the Metadata section are ignored by this setting.
The last two settings Copy specific from Last and Copy from Primary are effectively a combination of Copy from Last/Primary and Copy from Clipboard. When you select Copy specific… you get a kind of clipboard style window where you can set checkboxes for Metadata to copy. See the screenshot below with the All Other setting.
All Other
The All Other field controls how all adjustments are copied, except for the ICC Profile, Orientation, and Metadata, which are controlled separately. The choices you have here are the same as for Metadata but the standard setting is set to Copy from Last.
- Defaults
- Copy from Last (= standard setting)
- Copy from Primary
- Copy from Clipboard
- Copy specific from Last…
- Copy specific from Primary…
The working of each choice is obviously identical as for Metadata.
In case you do Spot Removal tool adjustments, the Dust adjustments are copied but the Spot adjustments not. This is identical to how the Clipboard works and is intentional.
The Defaults option does not copy adjustments! So if that is what you want, choose Defaults.
With Copy from Clipboard and Copy specific from… you can selectively copy adjustments to the next incoming images. The screenshot above shows the clipboard kind of dialog you get when you select one of the Copy specific from… options.
If you are a bit confused about why these two almost identical options exist, the explanation is that initially there was only Copy from Clipboard but that was cumbersome to use and slowed down your workflow. Both Copy specific from… are much faster to work with and have superseded the Copy from Clipboard command, which you can forget now.
Styles
The Styles field lets you select both Styles and Presets. Note that Styles and Presets you select here are not applied to the selected image in the Viewer, but only to new incoming images.
There is an option Stack Styles to apply multiple Styles. You can also apply multiple Presets but only when from different tools. Multiple Presets from the same tool, even when they contain different settings always override and the last applied precedes. If you need to Stack Presets, apply the Presets at the tool itself.
Auto Alignment
The checkbox for Auto Alignment applies to Phase One IQ backs.
Capture One can automatically compensate for roll and tilt by using information from sensors in those digital backs. Capture One uses the Keystone and Rotation tools for the alignment.
Summary And More
Here ends the second post on tethering, after I started with the basics in Capture One Tethering Explained. I continue this series with Capture One Tethering In-Depth explaining advanced tethering techniques.
Thank you
For reading. Please feel free to leave a comment. Like us on Facebook or subscribe to our newsletter to stay informed about new blogs.
Best Regards,
Image Alchemist


Leave a Reply
Want to join the discussion?Feel free to contribute!