Using Capture Pilot with Capture One
Allow others to follow the shoot from their own screen and rate and tag incoming images, while you control the camera from a comfortable position? It all can be done with Capture Pilot.
Using Capture Pilot With Capture One
Capture Pilot is a remote viewing application for Capture One and Phase One IQ2 and later digital backs. Its main purpose is to view and rate images during a shoot although you can use it for numerous other occasions as well. Additionally you can control your camera remotely and make adjustments.
In this post I focus on using Capture Pilot with Capture One, make you familiar with its features, and give you some troubleshooting tips. I also focus on using an iPhone or iPad as the remote viewing device, while briefly mentioning the browser as an alternative route.
Note that I will leave the use and setup with a Phase One IQ digital back for another occasion.
History
Capture Pilot was introduced with Capture One 6 Pro and DB and required the Capture Pilot app on iOS devices like iPhone, iPad, and iPod touch as remote viewing device.
With Capture One 7 it also became part of Capture One Express, in addition to the Pro and DB running modes. It introduced the so-called Web option to view images via a browser as well, removing the exclusivity of using an iOS device.
How It Works
Capture Pilot is very easy to setup. You need to set it up at both sides: your computer with Capture One on one hand and your iOS device on the other.
I prefer to use the term iPad as a replacement for iOS devices in the remaining text of this post. Just know that an iPhone is as good as well, or an iPod touch.
You need to connect both your computer (Windows or Mac) and iPad to the same local network.
Capture One serves the images per Folder or Collection and the iPad is able to browse through that collection. On the iPad you can switch between thumbnail view and full screen.
Basic Setup
Leaving the dirty details for the next paragraphs, let’s start using Capture Pilot. The following prerequisites must be met for the basic and most easy setup:
- a computer with Capture One installed
- an iPad with Capture Pilot app installed
- a local network that connects to both computer and iPad
If you are new to Capture One and Capture Pilot, you can fully enjoy the game without spending any money. Capture One Pro has a 30-day trial and Capture Pilot is a free app.
Getting Started
To start using Capture Pilot remote viewing with the default settings, perform the following steps:
- on your computer start Capture One and open a Session with images in the Capture Folder or a Catalog with images
- in Capture One, go to Capture tool tab, Capture Pilot tool
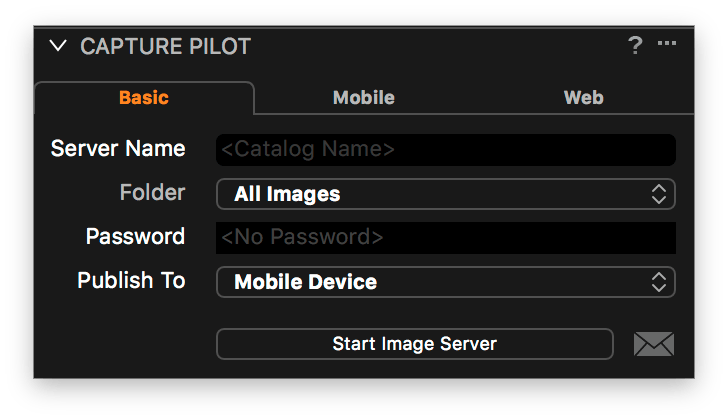
- in the Capture Pilot tool, Basic tab, record the Server Name for later reference in the Capture Pilot app
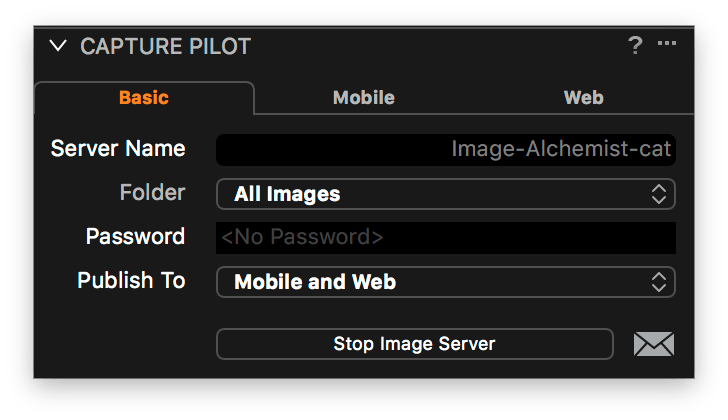
- on the same tab, change the Publish To setting to Mobile Device
- click on the Start Image Server button; Capture Pilot is now running in Capture One and offering images for viewing.
- on your iPad, start the Capture Pilot app
- in the Capture Pilot app, on the Server List screen, under Local Servers, notice the Server Name from the Capture One Image Server that you recorded earlier
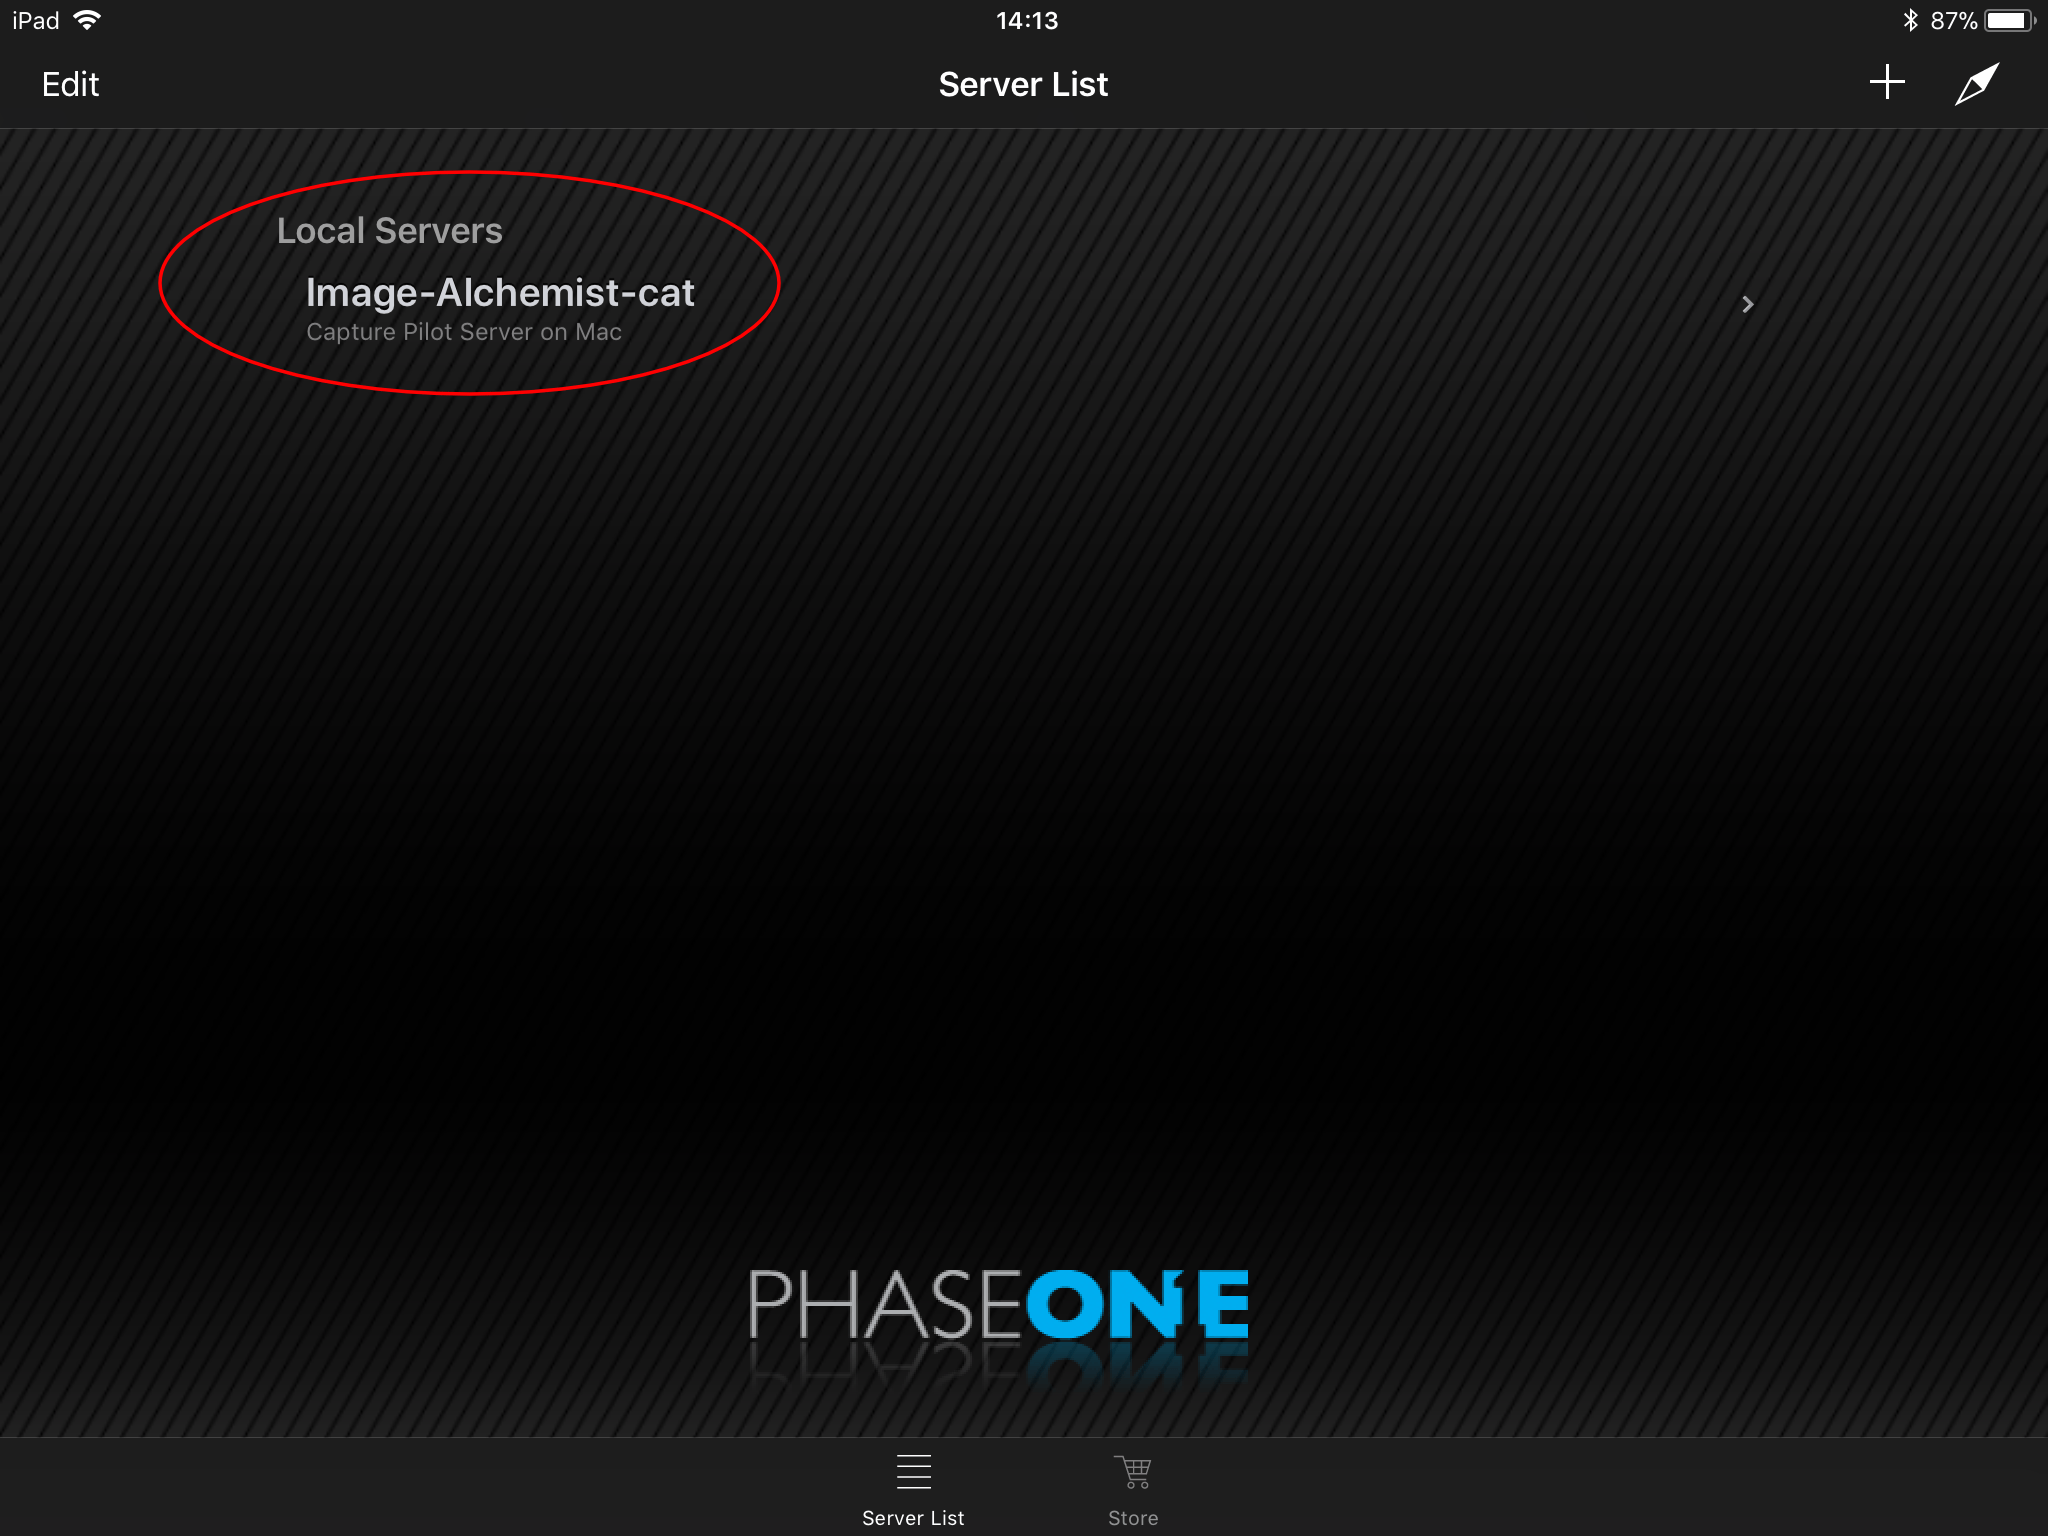
- select that Local Server
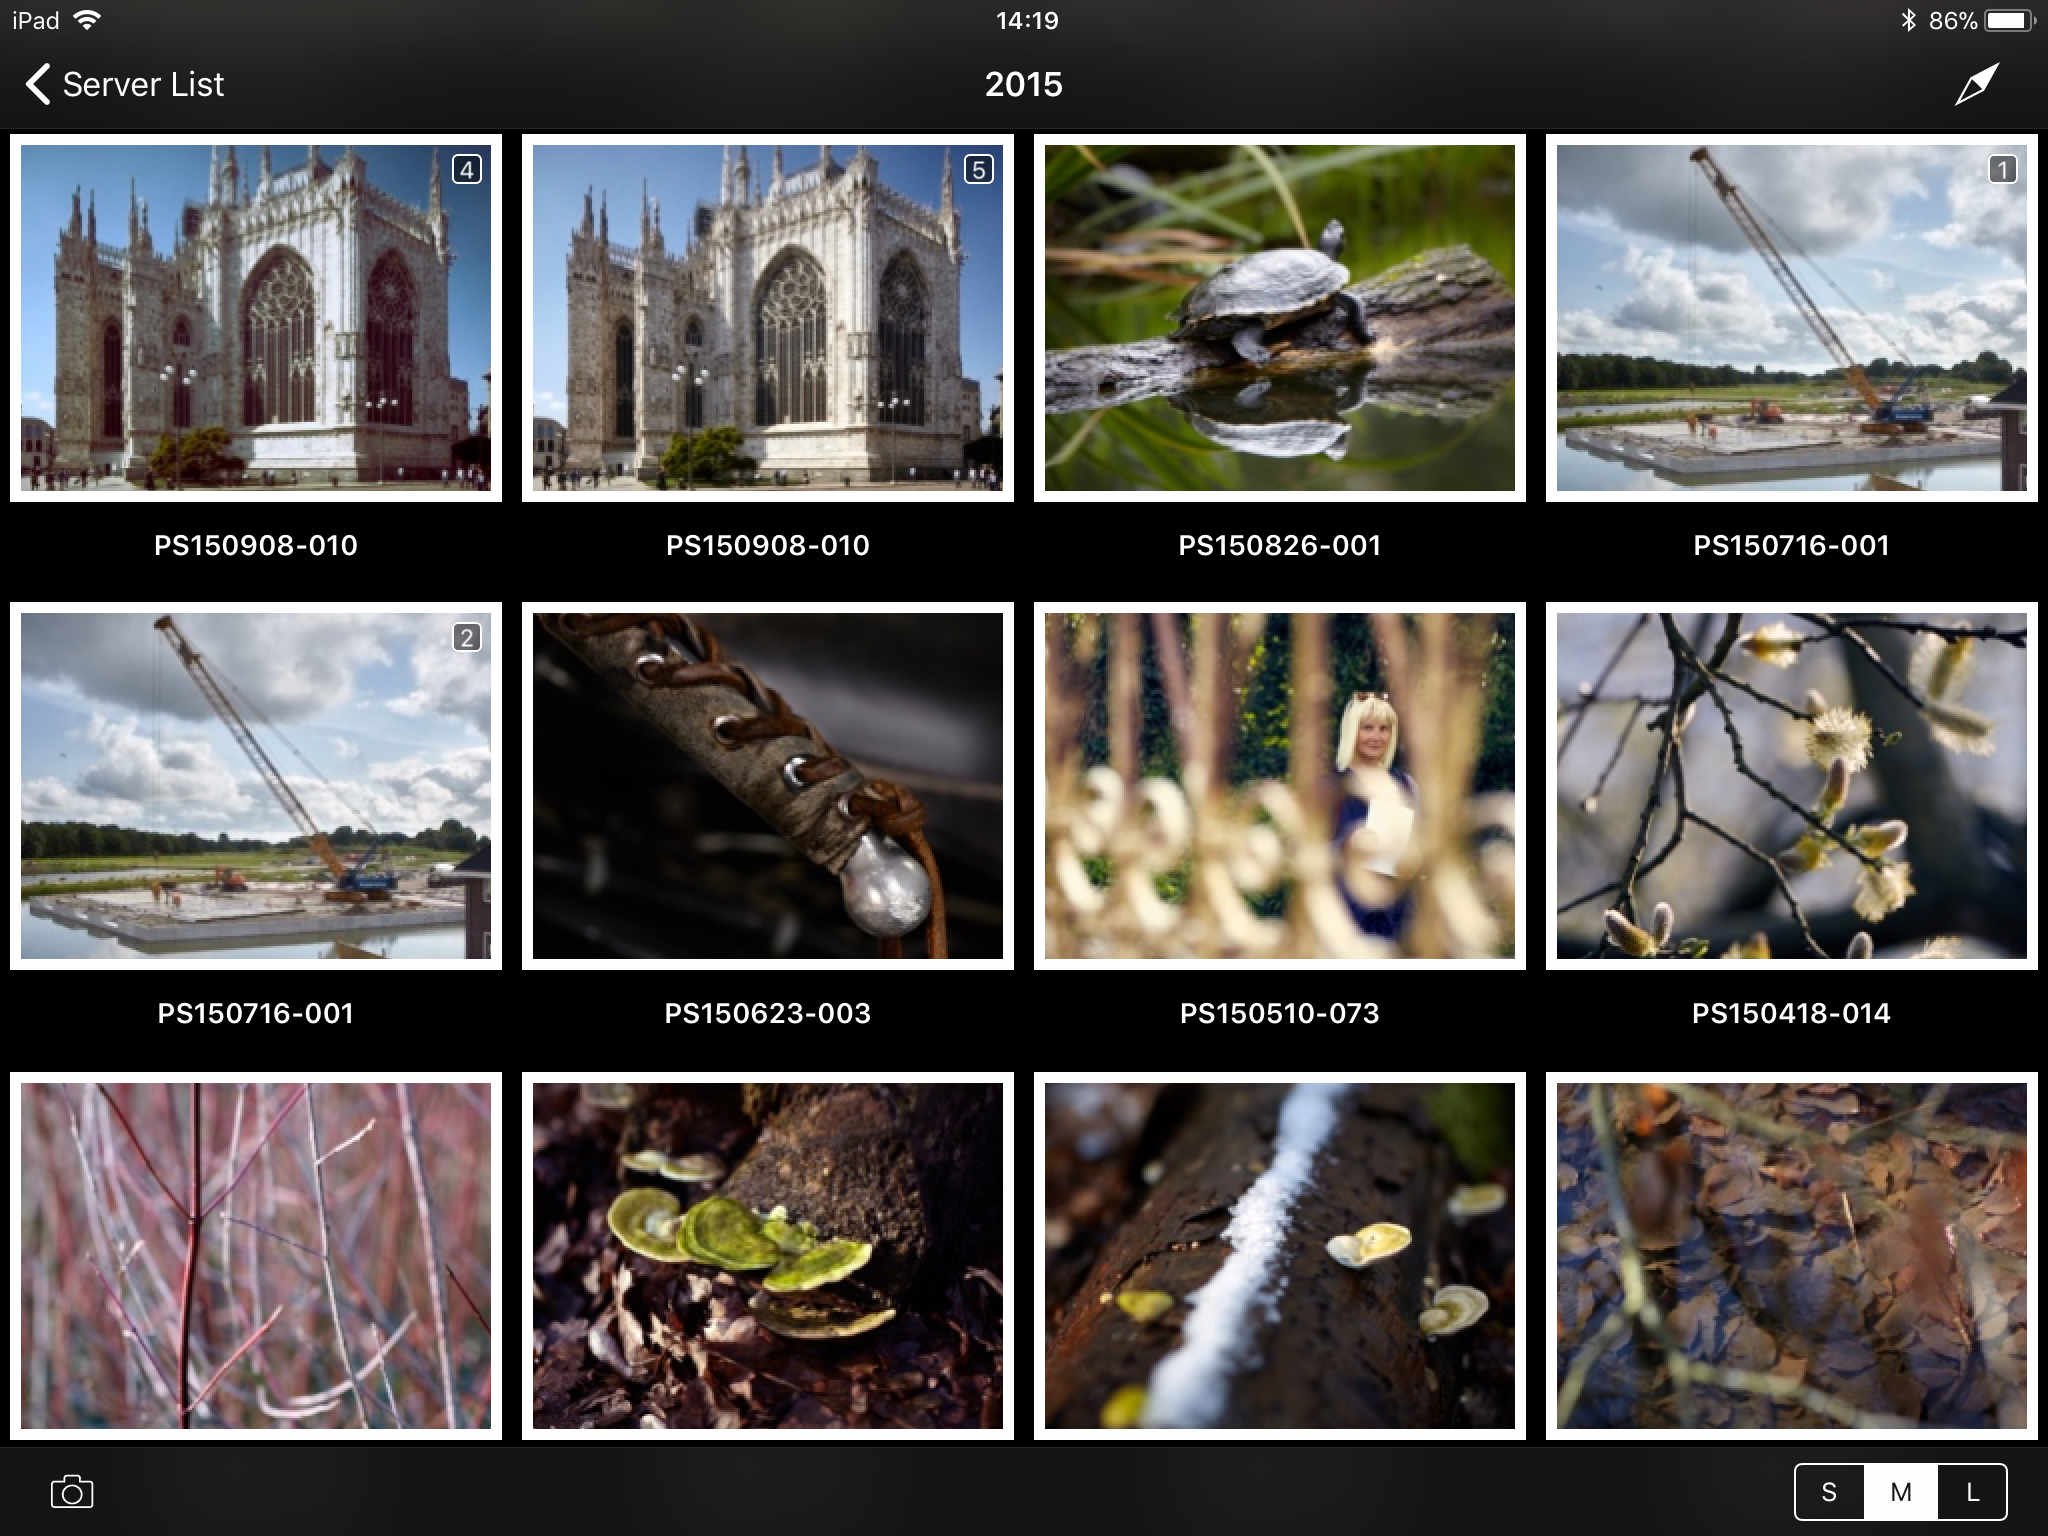
- a new screen opens with thumbnails from your Capture Folder (Session) or All Images collection (Catalog); scroll through the thumbnails; tap on one of the thumbnails to open it full screen
- swipe the full screen image to the left or right to browse through the images full screen
- double tap on an image to zoom in and double-tap again to zoom out
- navigate back to the Thumbnail screen with the marking top left
- navigate back to the Server List screen with the marking top left.
- in the Capture Pilot app, on the Server List screen, under Local Servers, notice the Server Name from the Capture One Image Server that you recorded earlier
- on your computer with Capture One
- in the Capture Pilot tool, Basic tab, click on the button Stop Image Server to stop Capture Pilot viewing images.
- on your iPad with the Capture Pilot app
- notice that the Server Name has disappeared from the Local Servers list as soon as you stop the Image Server in Capture One on your computer.
Sometimes you do not see any Capture One Image Server name in the Local Servers list on the iPad. Or you do, but when you connect you do not see any thumbnails. Check all the steps and try again or see the troubleshooting section below.
Setting Up Capture One
Great that you are able to setup Capture Pilot at both ends, made a connection, and browse images. However, it does not end here. We just started.
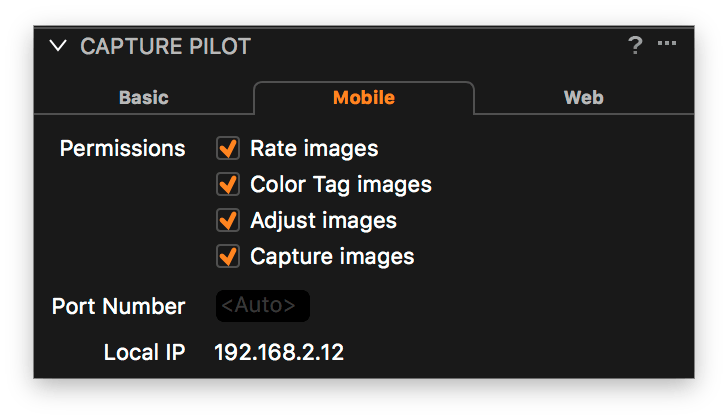
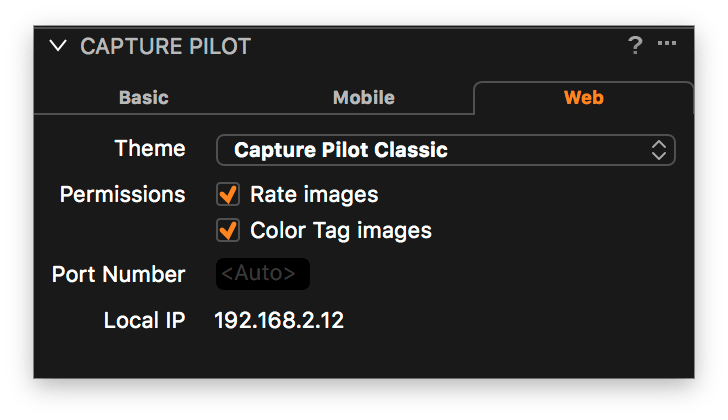
The Capture Pilot tool in Capture One has three tabs. A brief overview:
- Basic tab
here you switch the tool on/off, choose the kind of connection (iPad, browser or both), set optionally a password for restricted access and select which folder to publish - Mobile tab
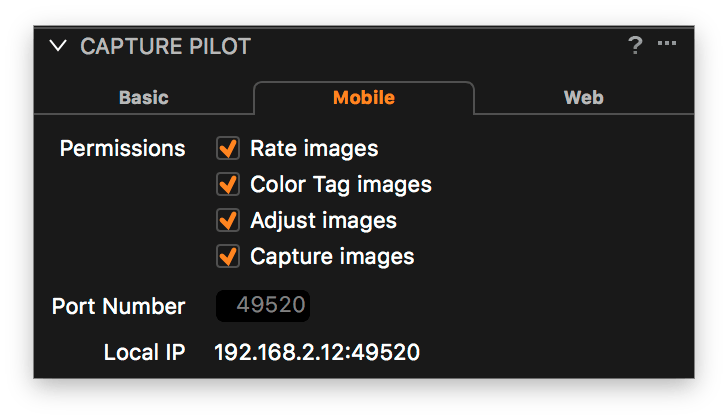
here you configure what a user with an iPad/iPhone/iPod touch with the Capture Pilot app can do with the images (controlled by Permissions) - Web tab
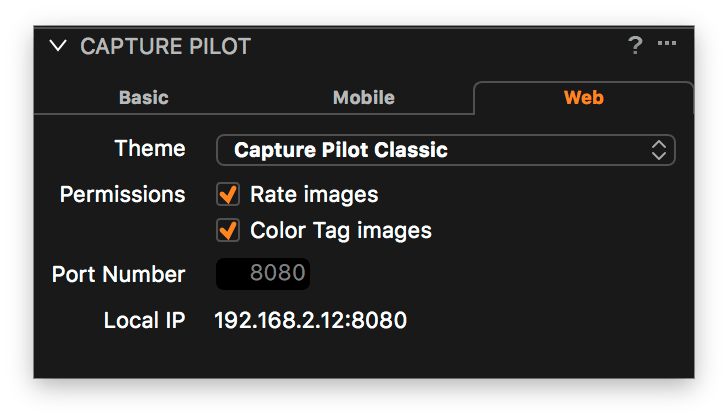
here you configure what a user with a browser can do with the images (Permissions); in addition, you can select the layout (Theme)
Note that the Capture Pilot tool in Capture One is always switched OFF when you start the program. I will now go through the three tabs in more detail.
Basic Tab
At the Basic tab of the Capture Pilot tool, you set the main features like Server Name, Folder, Password and Publish To.
Server Name
The Server Name is displayed as soon as you start the Image Server in the Capture Pilot tool. By default, it is the name of the Session or Catalog. You can fill in any name before you start the Image Server.
That name shows up in the Capture Pilot app on the iPad and helps you to identify the correct Image Server to connect to.
Bizar detail is that you can have multiple documents (i.e. Sessions and/or Catalogs) opened in Capture One and that you can enable Capture Pilot individually on each of these documents. Each one will appear on the Server List.
Folder
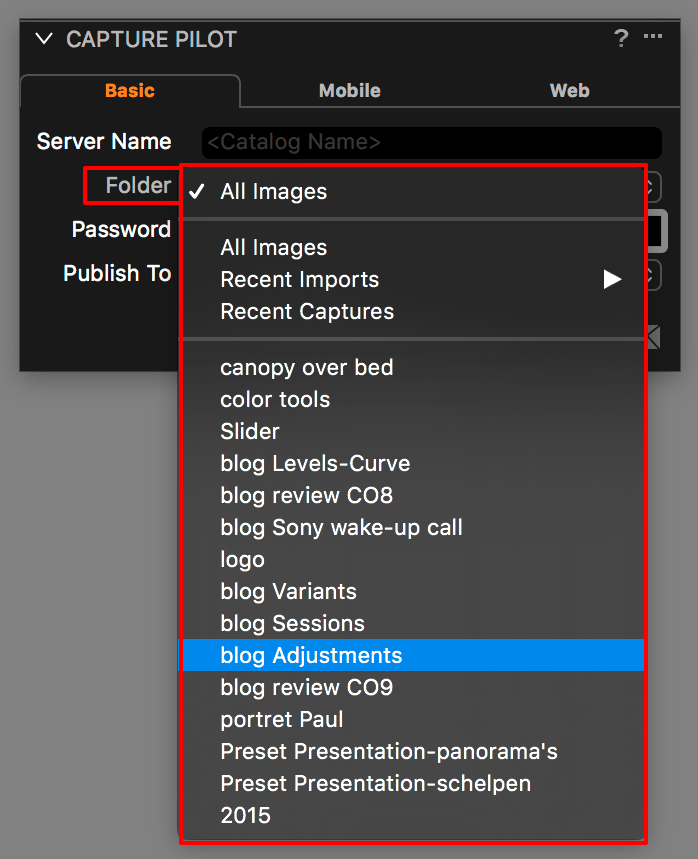
The Folder field has a drop-down list for all Folders, Favorites, Albums and Smart Albums in your document.
The contents of these lists obviously vary per Session or Catalog.
Tip
With the Folder selection, you can do some magic. I recorded the following tip during my most recent Phase One Certified Professional (POCP) training.
Before the shoot, you create a Smart Album Best Shots that filters for the Green color tag. Green tag your best images. Publish that Green tag Smart Album in the Folder section of the Capture Pilot tool.
Regarding Permissions, allow the client to rate images, from 1-5 and agree that 5 stars are what the client likes most.
After the shoot, make a Smart Album that filters on both Green tag and 5-star ratings. These are the shots you and the client like most.
Password
You can control access to the published folder with a password. Should you do that? Well, yes, in general, you should, just to make a habit of it. Note that without a password everybody on the same local network can view your images and you would not be the first photographer whose images are published on the web before he has delivered them to the client.
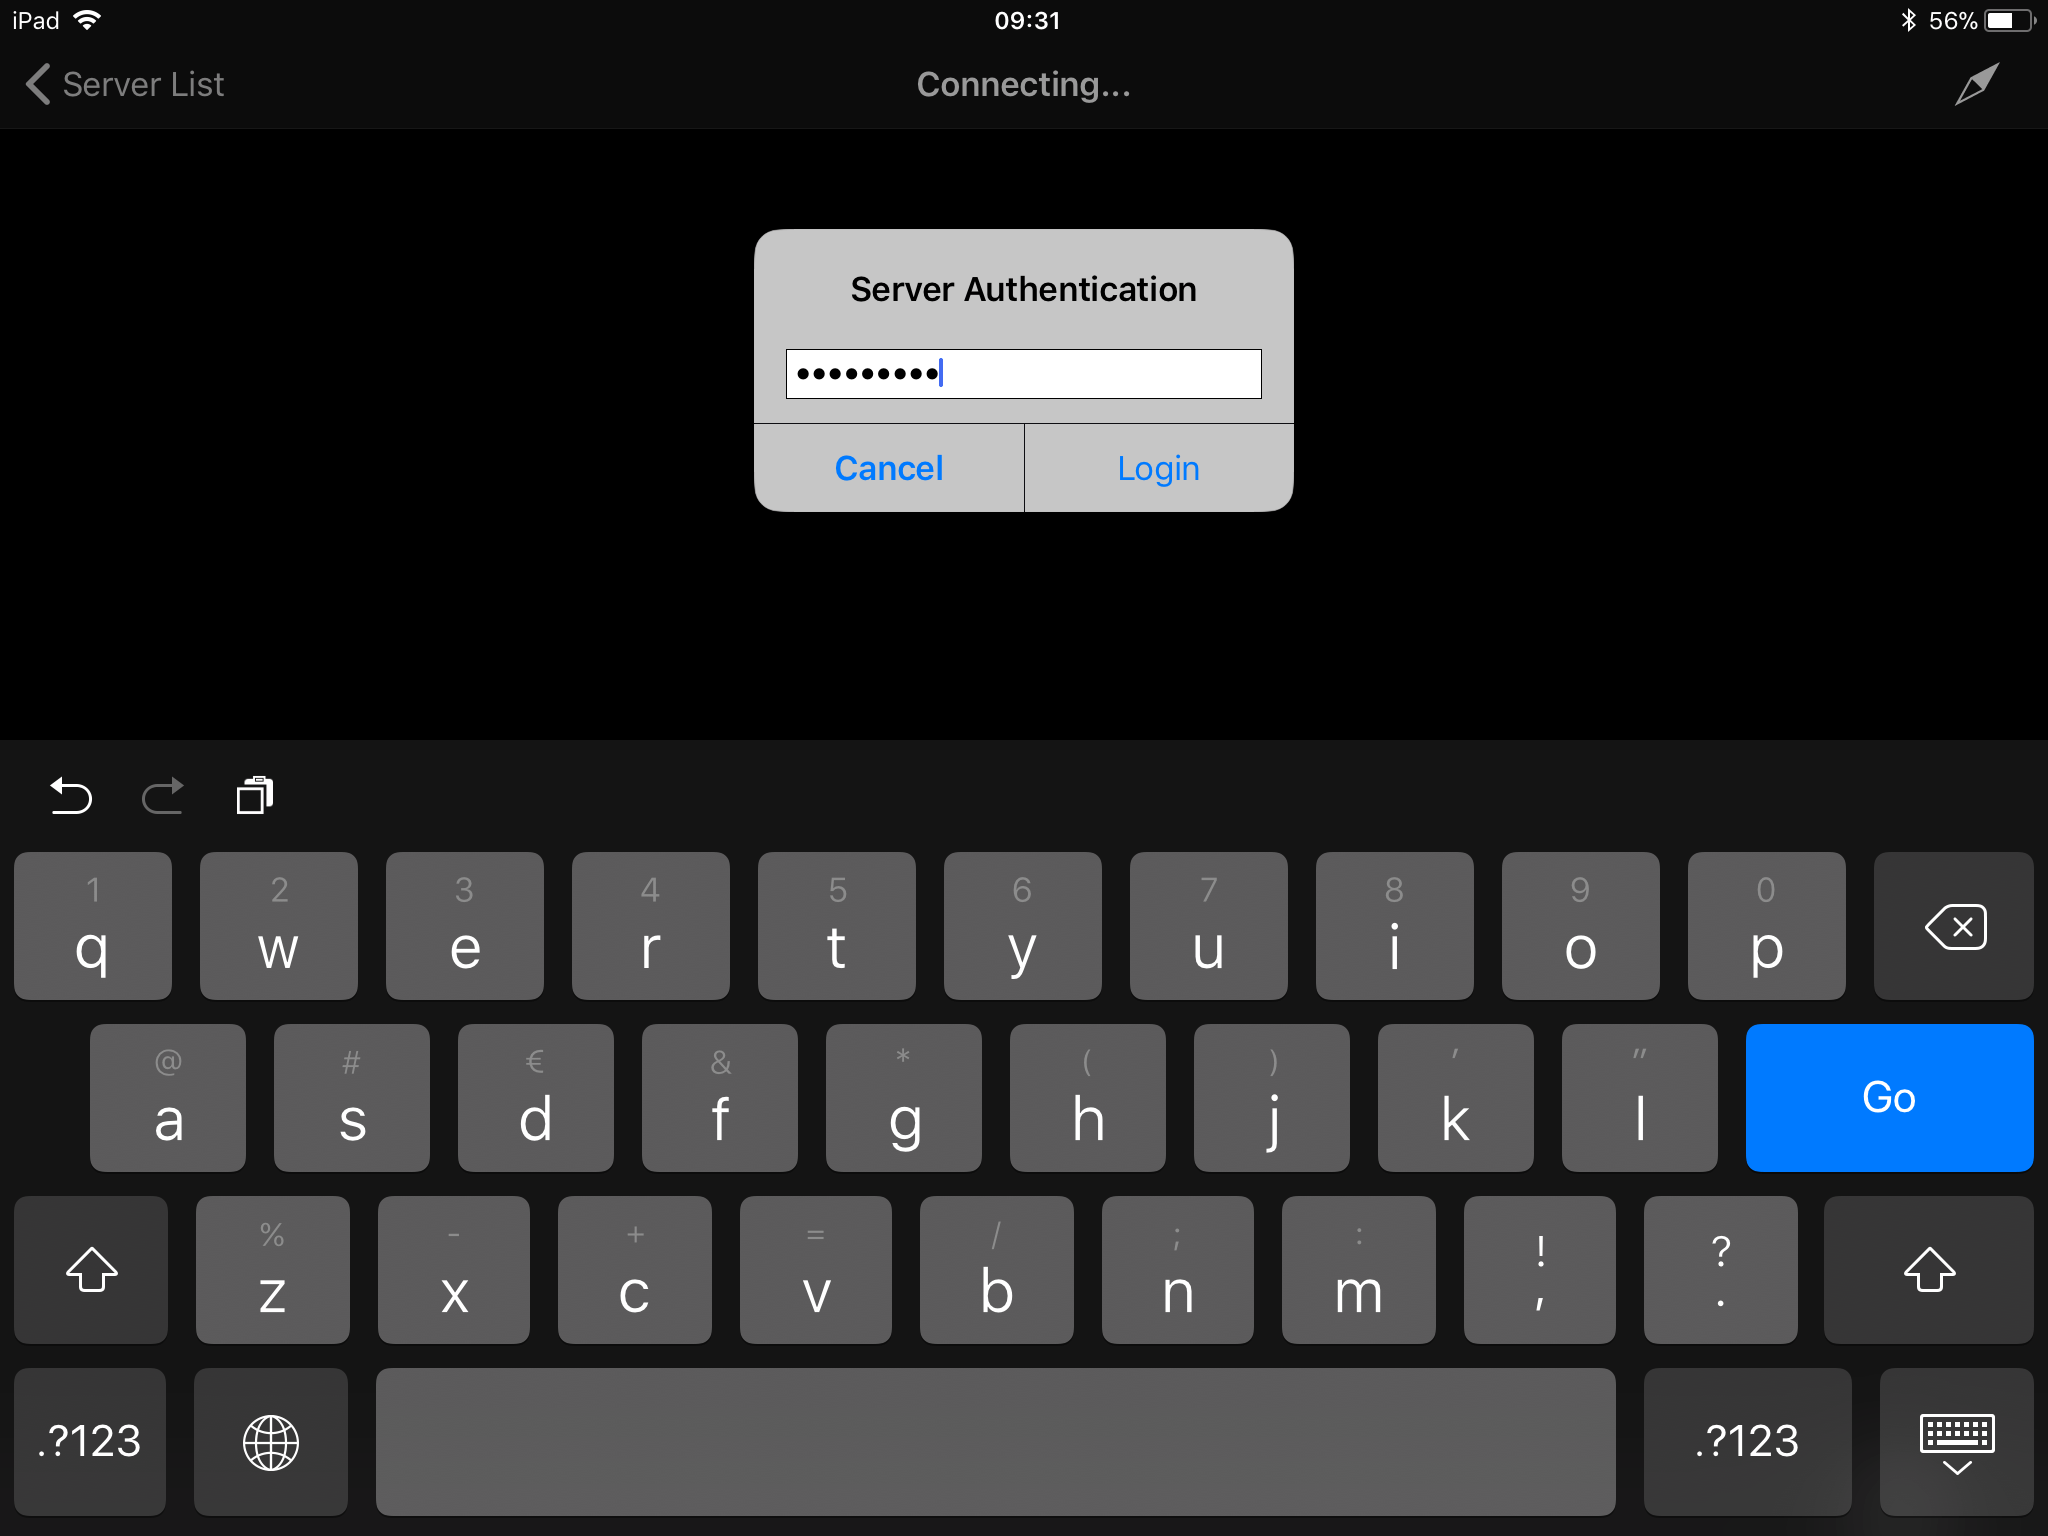
You must set the password before you start the Image Server of the Capture Pilot tool. When connecting to from your iPad or browser, you are welcomed with a prompt to enter the password.
Publish To
You can determine what kind of device you publish your images. The options are Mobile Device, Web Browser or both.
The Mobile Device option refers to iOS devices from Apple. The Web Browser option allows users with Mac and Windows computers and Android-based tablets to view your images. I suggest that if there are no browsers joining the game, set it to Mobile Device or vice versa.
When you select Web Browser or Mobile and Web the first time, you may get a pop-up screen to authenticate. This is related to your firewall that must open a port to allow clients to connect to Capture One. This is a one-time configuration.
At the right of the Stop Image Server button, you see an envelop symbol. When you click on it an e-mail is ready to send to clients with configuration details. This is in general only necessary for connecting with browsers, not for Mobile Devices as they are self-connecting on the same local network.
Note that this envelop icon is only available when the Capture Pilot image server is started.
Mobile Tab
What is really interesting on the Mobile tab, are the Permissions. With Permissions, you control from within Capture One what the viewer in his iPad with Capture Pilot app can do with your images in Capture One.
Permissions
By default, all four Permissions are enabled, but changes are persistent after a program restart so you do not have to set it up each time. Note that you can change permissions during the use of Capture Pilot and that changes become effective immediately.
The first two Permissions for Rate images and Color Tag images are most commonly used. Consider offering only one of the two options to prevent confusion for the client. This way the Capture Pilot user on the iPad can show his preferences and you have him participate in the selection process. See also the tip in the Folder section above.
Note that you can have multiple users with iPads and Capture Pilot viewing your images and that they all have the same permissions. You can not differentiate between Capture Pilot app users. When multiple users rate images, the rating done last remains.
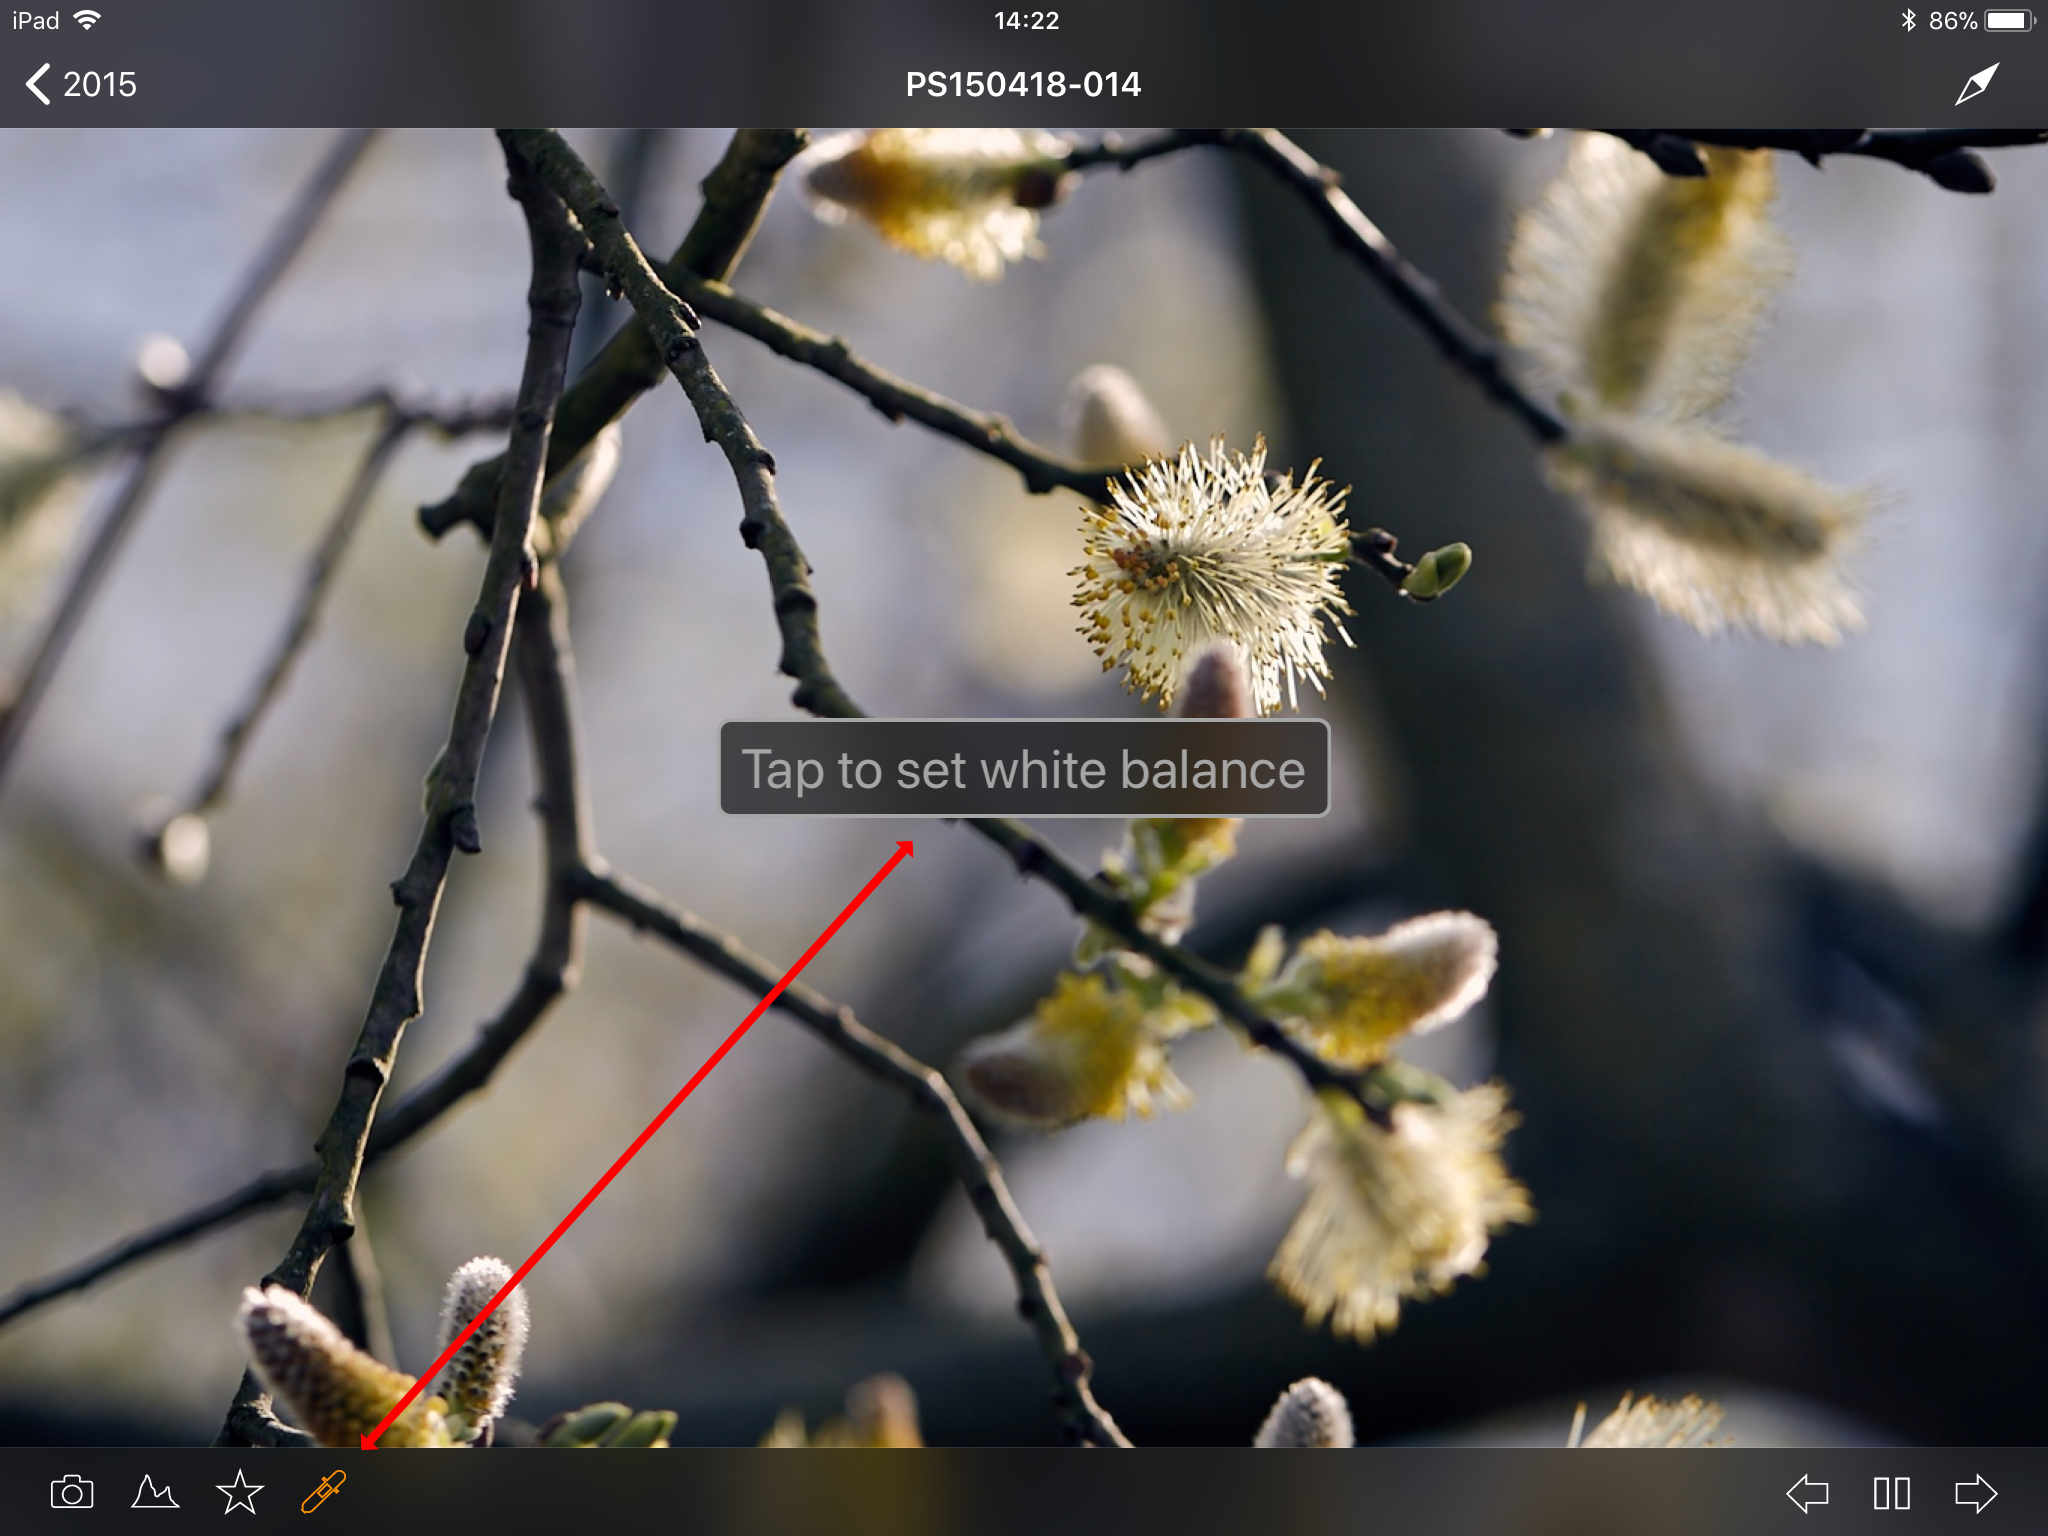
One of the other Permissions is to Adjust images. Enabling this will activate the White Balance eyedropper in the Capture Pilot app of the user. With the eyedropper, the user can change the White Balance of the image in Capture One. For a client, you would probably disable this permission but when you use Capture Pilot as a photographer including remote control, you might want to have it.
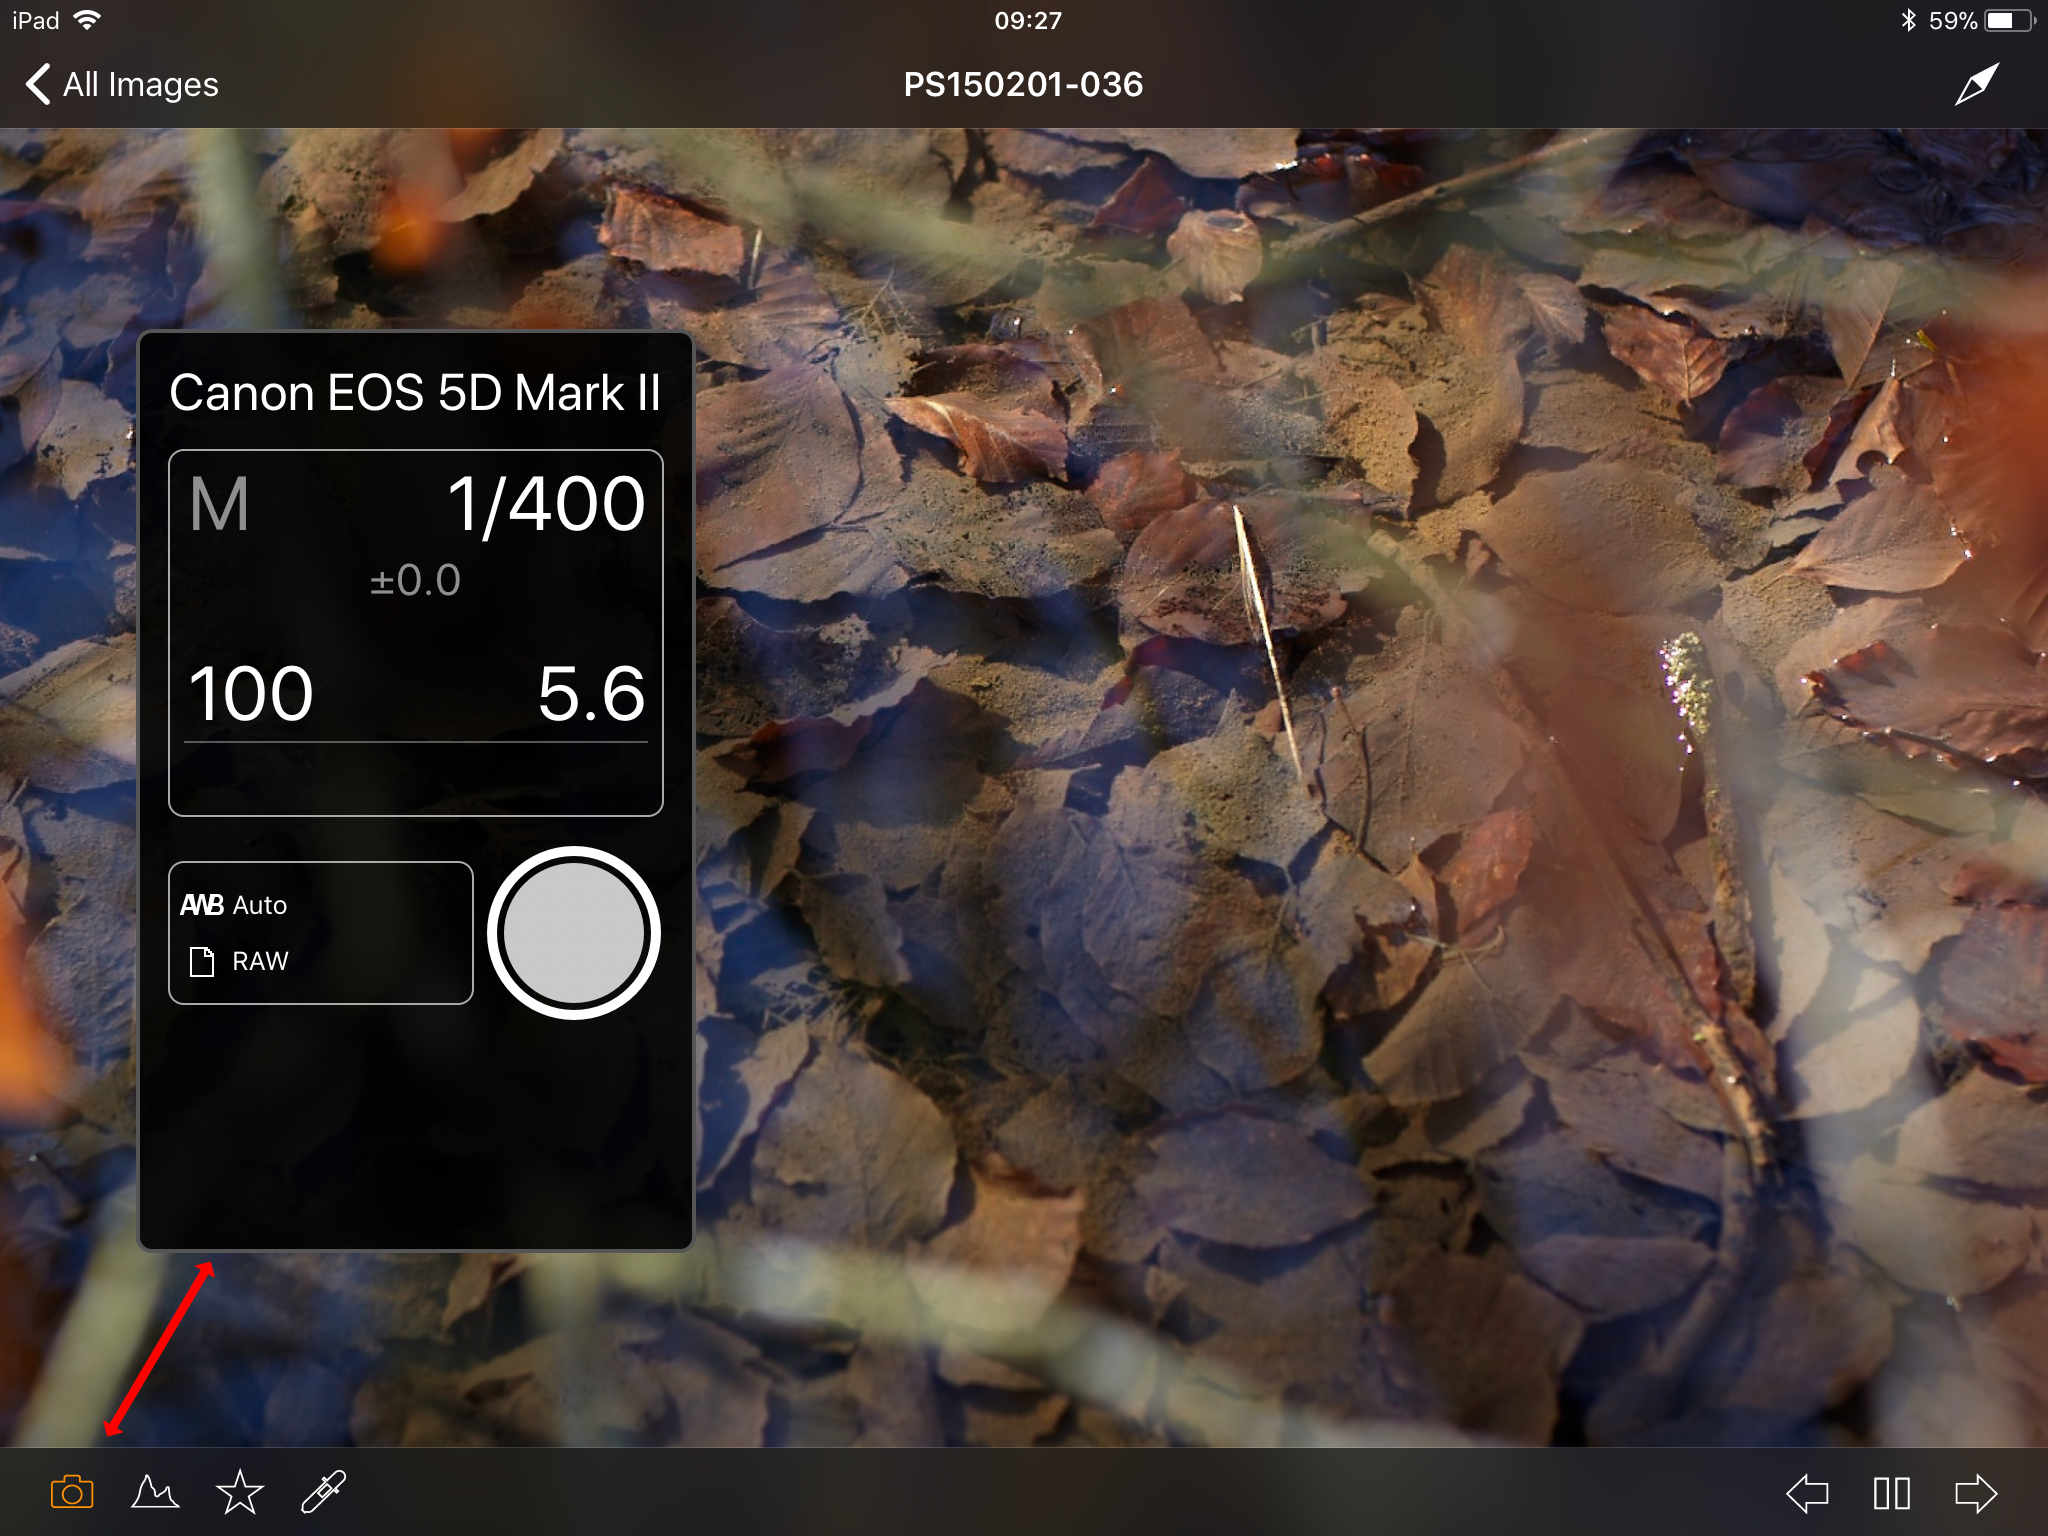
The last permission Capture images require you to install a paid in-app extension. This extension gives you extensive remote control over your camera, mimicking the Camera tool in Capture One. Remote shutter release, ISO, aperture and shutter speed are the main features.
Web Tab
On the Web tab, you again can configure Permissions for users that use a browser to connect and view images that you publish in Capture One via the Capture Pilot tool. Of course, this only makes sense when you set to publish to Web Browser or Mobile and Web on the Basic tab.
Permissions
As you might notice, there are only two Permissions, Rate and Color Tag images. There are no options for adjusting or capturing. Like for the Mobile tab, you might want to allow either rating or tagging to prevent confusion.
You can change Permissions before and while Capture Pilot is running and changes are effective immediately.
Note that by allowing some users to use the browser and others the Capture Pilot app you can differentiate permissions between different types of users.
Using the Capture Pilot App
Now that you have set up the Capture Pilot in Capture One, and that you started the Image Server, it is time to grab your iPad, or another iOS device, and fire up the Capture Pilot app. If you have not already done so, install it first from the App Store.
I will cover in succession the:
- Server List screen
- Thumbnail and full-size views
- Rating and color tagging
- Histogram
- White Balance adjustment
- Camera Control tool
Server List
When you open the Capture Pilot app you first see the Server List screen. Under Local Server are the Capture Pilot image servers listed that currently run on your local network.
You can manually configure Image Servers via the plus (+) symbol top right. They will be listed under Other Servers. Normally you do not need to do this, but for working over the internet (see below), you must.
Thumbnail And Full-Size Views
When the Capture Pilot app connects to a Capture One image server it first offers a thumbnail view of all images in the published collection. In the thumbnail view, you can easily browse the collection. You also see the different variants from a single capture.
Adjust the size of the thumbnail with the S-M-L icons at the right bottom for Small, Medium, or Large respectively. Note that on an iPhone to choice is limited between S-L.
Note the camera symbol in the left bottom. This gives access to the Camera Control tool. Note that this is a separate in-app purchase.
When you click on a thumbnail the full-size view opens. You can zoom into the image, and browse through the collection with the arrows at the right bottom corner. More options I will show below.
Histogram
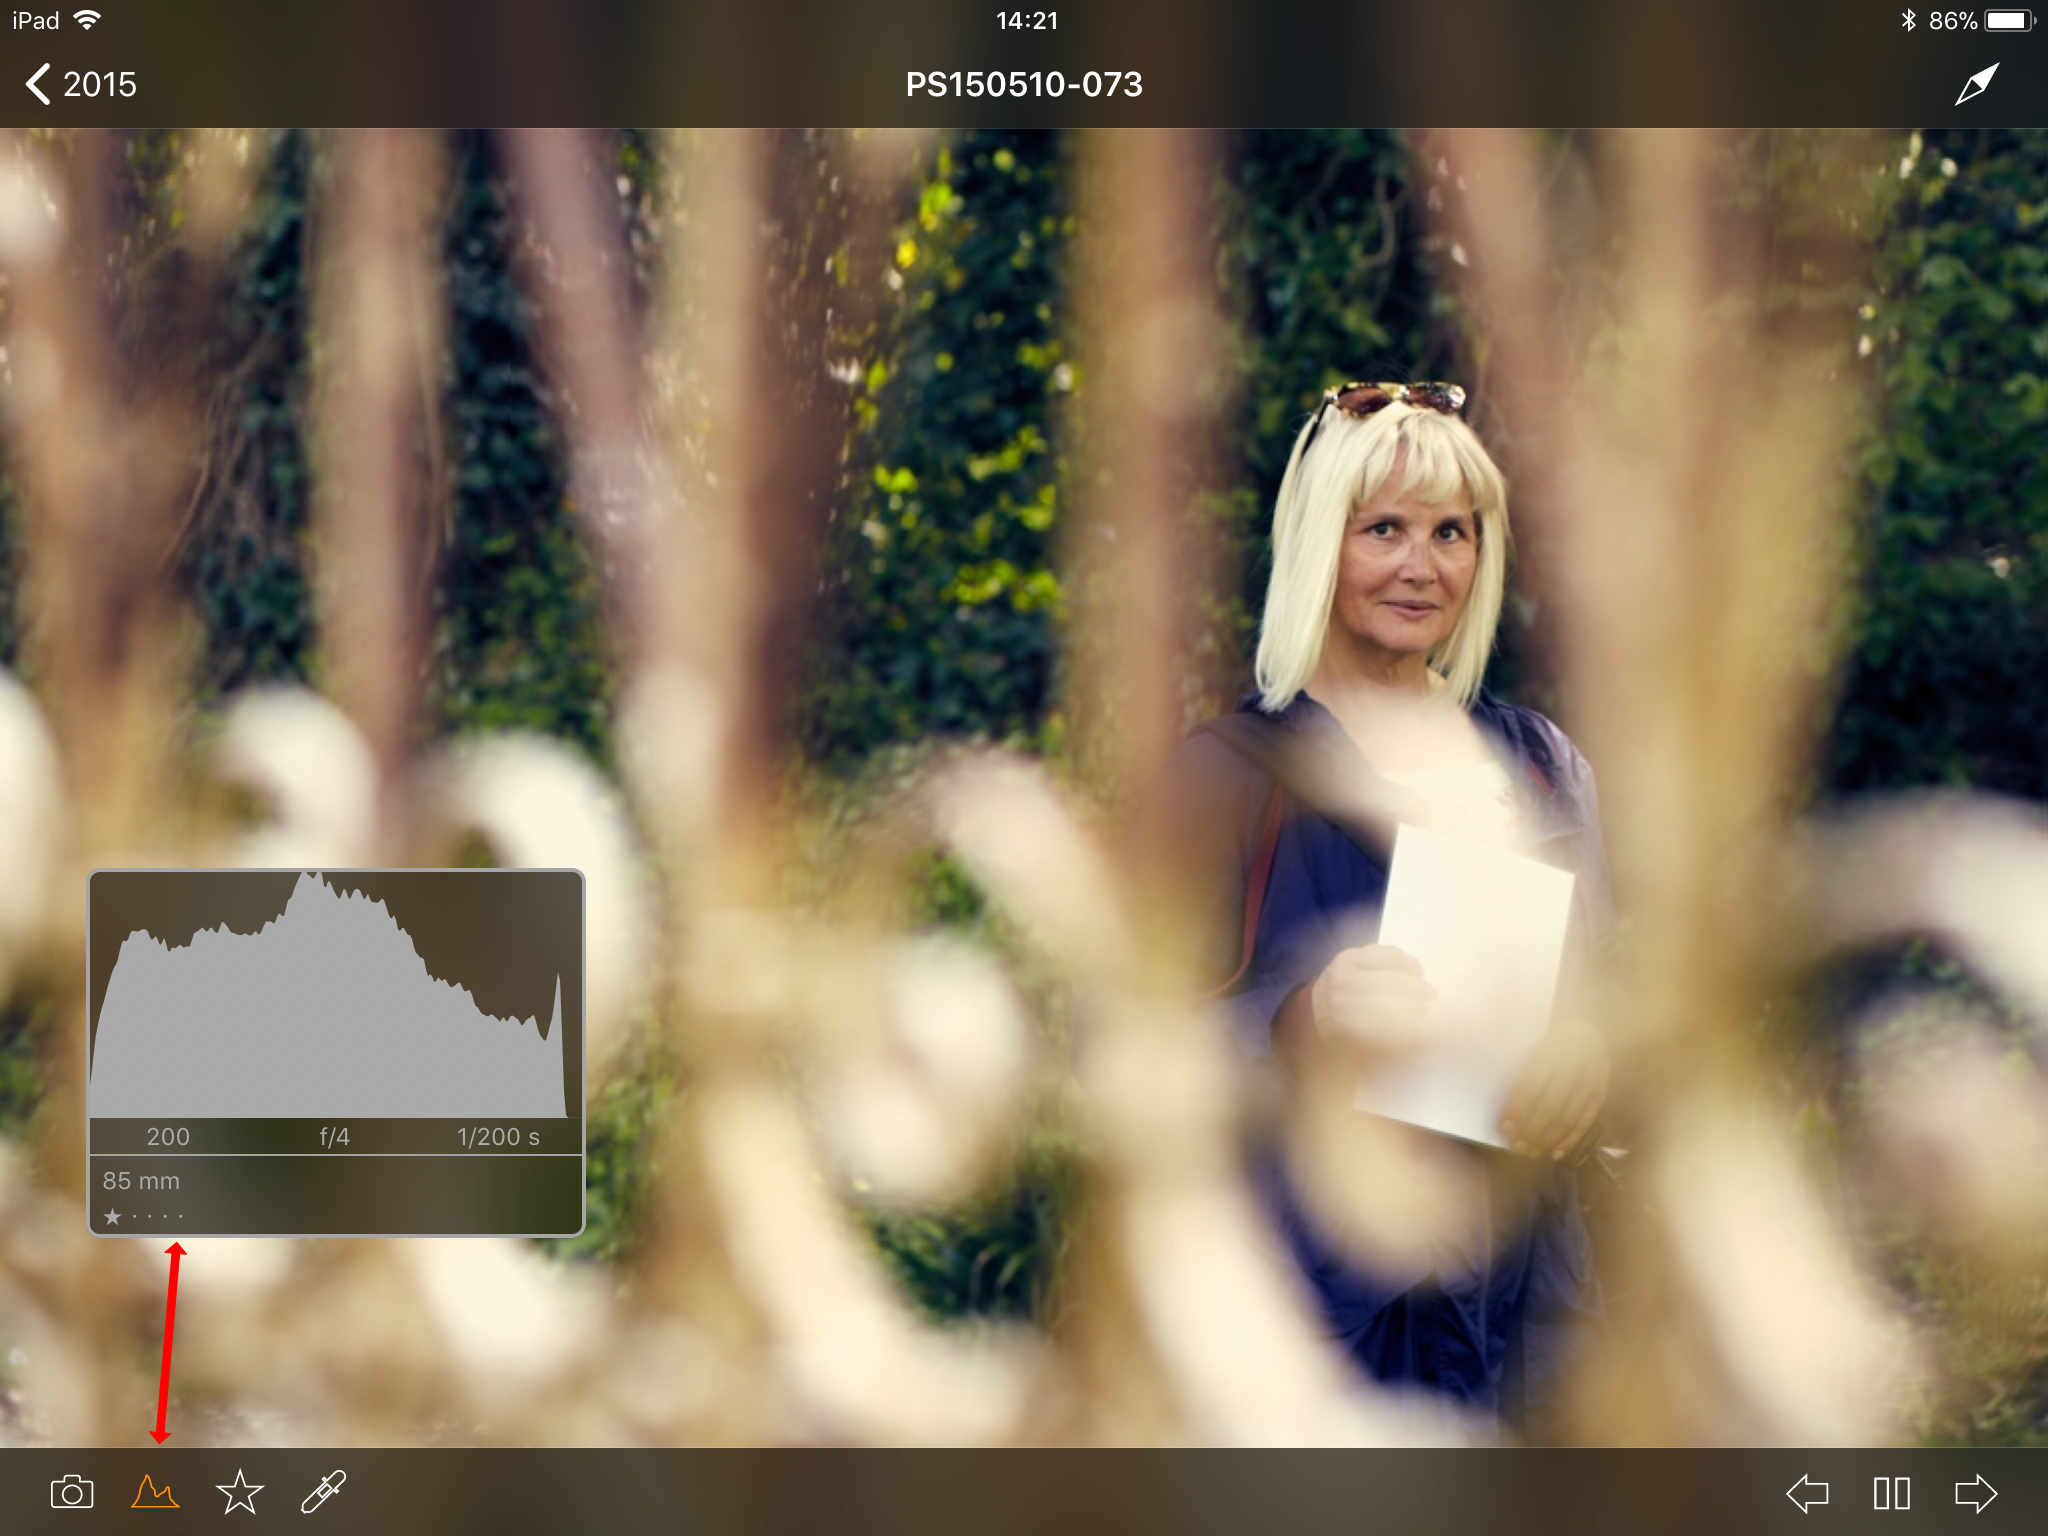
In the bottom left corner, you see the histogram icon. This opens the histogram window. Basic capture information like ISO, aperture, shutter speed and focal length are also offered.
You can drag the window to a desired position on the screen.
Rating and Color Tagging
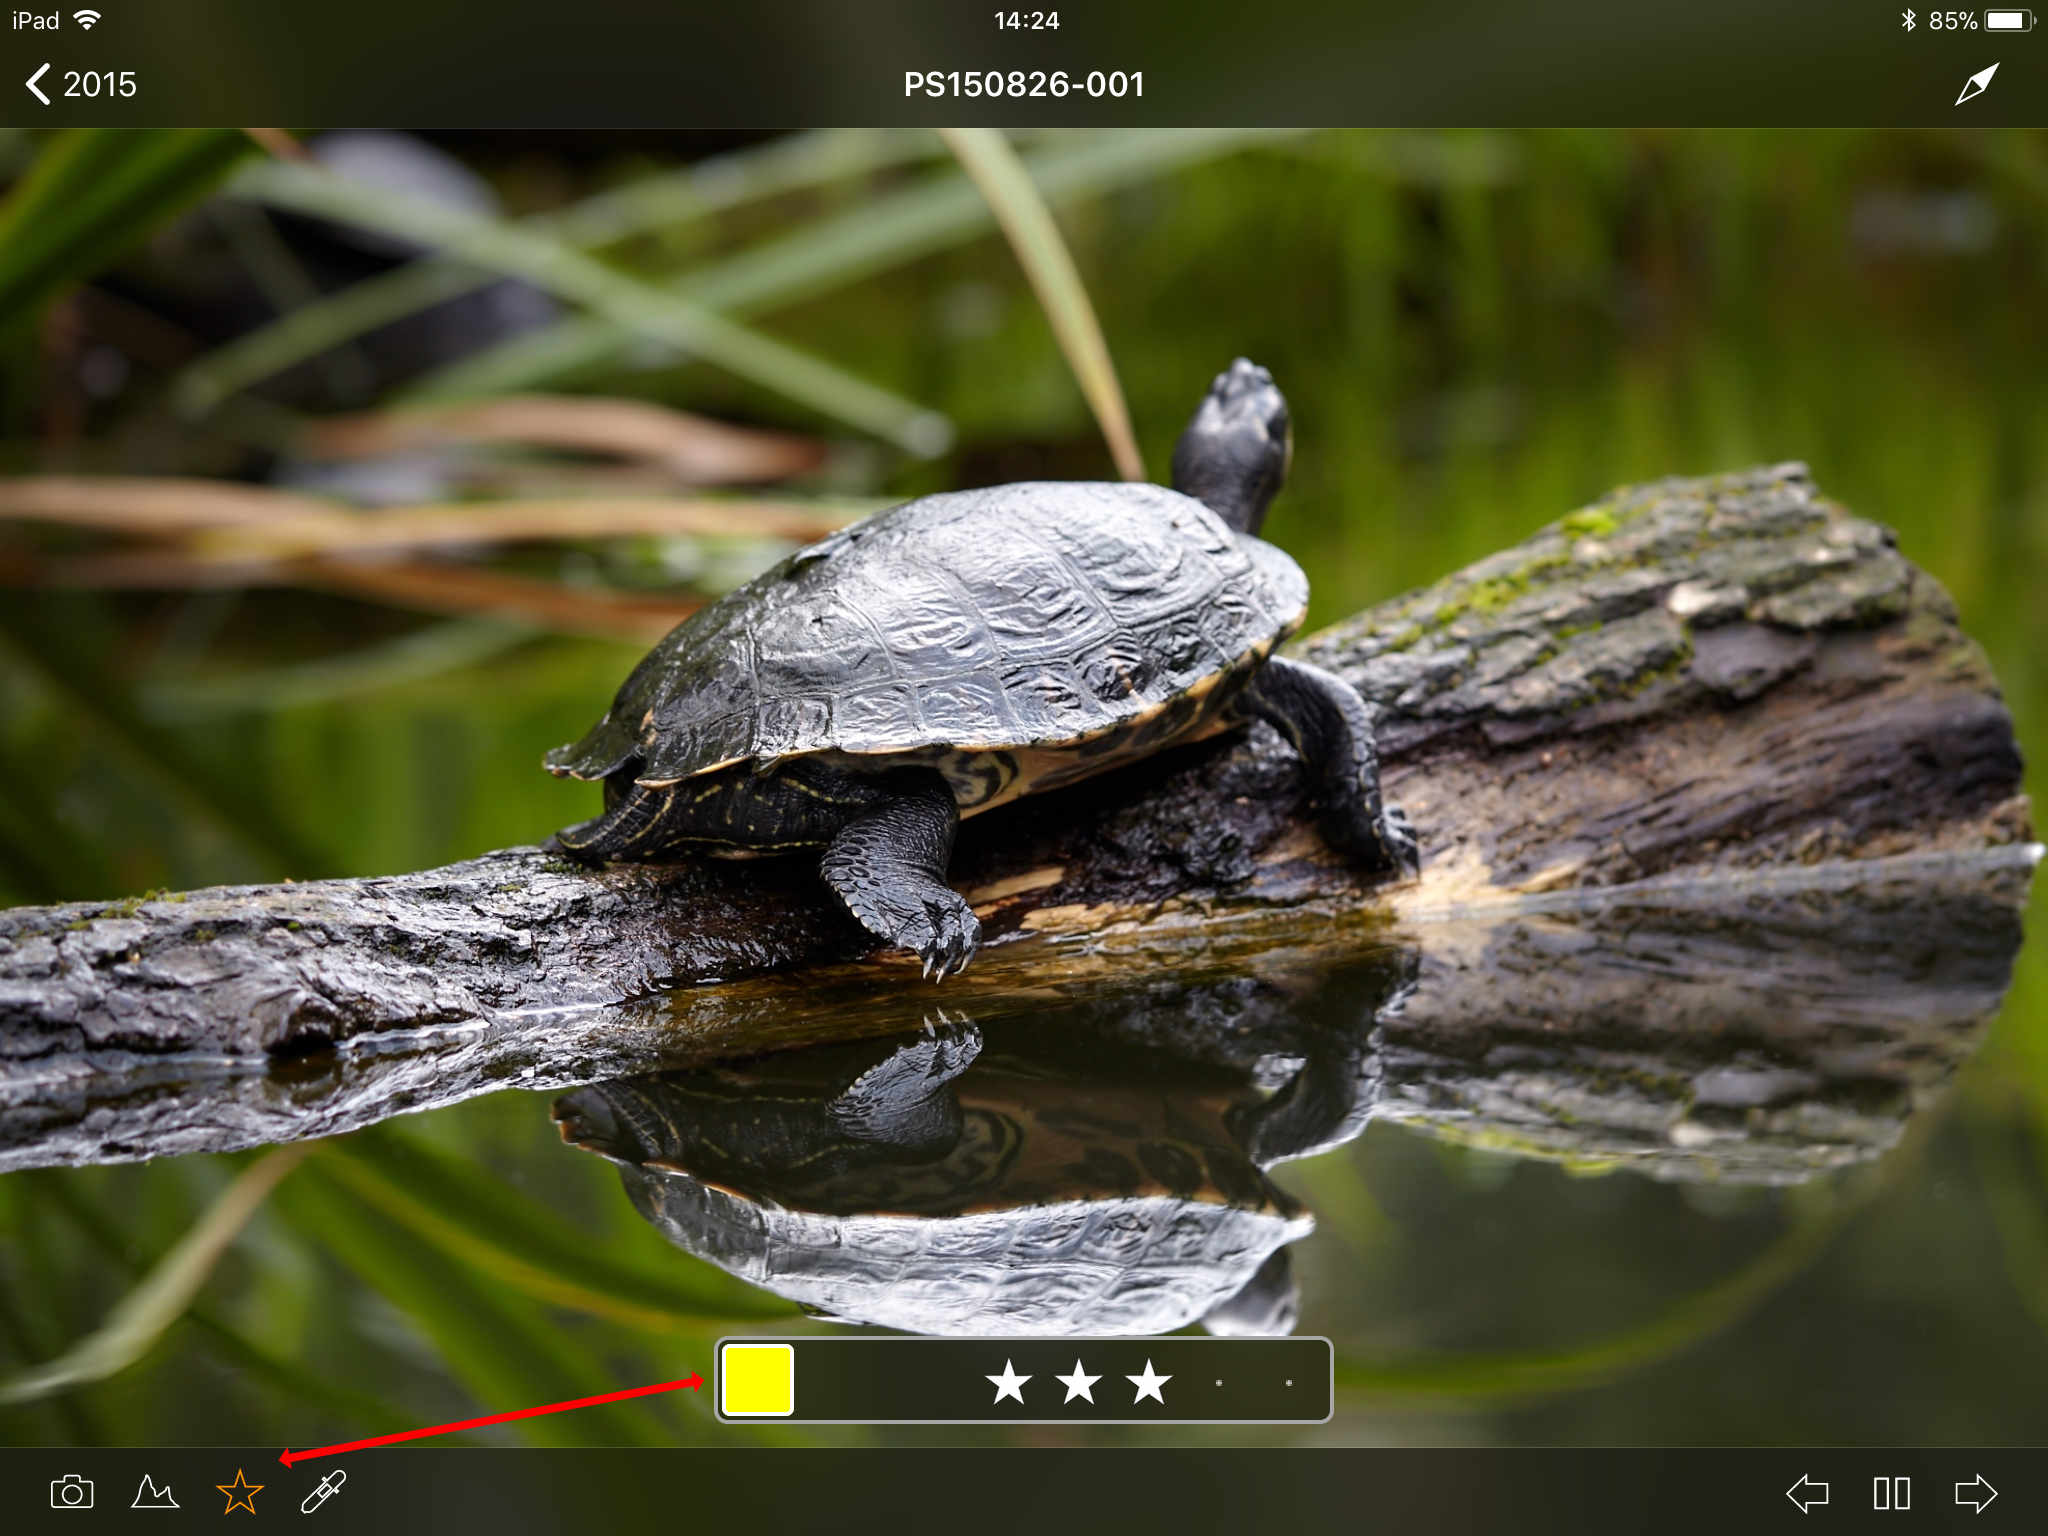
The star symbol is next to the histogram symbol. It gives access to both color tagging and rating. As I described below the Permissions in Capture One’s Capture Pilot tool determines whether each of these features is available to the viewing client.
Note that all these symbols are toggles, and can be used independently and combined.
White Balance Adjustment
Currently, the white balance is the only adjustment that you can set from the Capture Pilot app. You control the availability from the Capture Pilot tool in Capture One.
Take a shot with a grey card or a neutral area to take advantage of this feature.
Camera Control
As you now probably noticed, the Capture Pilot app on your iPad gives more user Permissions compared to the Web option. In addition, the app has another great advancement: Camera Control.
Via in-app purchase you install the Camera Control option. The option is about US$ 15,= or € 16,99 where exact pricing may vary per country. You can install it on multiple iOS devices.
Features
With the Camera Control you can set shutter speed, aperture, ISO, white balance, file format, exposure compensation, exposure mode, and more. The exact features depend on the camera system connected to Capture One Pro or DB.
The Camera Control feature largely mimics the Camera tool in Capture One Pro and DB. You can not use Camera Control with Capture One Express (for Sony) as this mode does not support tethered shooting.
Capture Pilot over the Internet
Users sometimes ask for the possibility to use Capture Pilot over the internet. As you now know the computer with Capture One and the viewer with the iPad and app or system with browser, needs to be able to connect with each other. With an internet connection that is a bit more complex then on the local network.
Our broadband internet connections are securely setup in a way that only outbound connections are possible. Inbound connections are prohibited by default as it makes our systems vulnerable for attacks.
The main bottleneck for a connection over the internet is that the Capture Pilot client with iPad or browser must be able to find the Capture One computer and be able to make an inbound connection. This requires a manual configuration of the internet device (typically a modem) at the location of the Capture One computer.
In addition, the client with an iPad or browser must find your Capture One computer over the internet.
It would be much easier if Phase One would setup an intermediate server on the internet where Capture One computers can connect to and allow Capture Pilot viewers to engage, with sufficient access control of course. Till that happens, look for details in the Phase One knowledge base article KB1921.
Troubleshooting
There are a number of issues that can prevent you from being perfectly happy with the Capture Pilot application. Let’s go through them and provide a solution for each.
Image Server not in Server List
In the Capture Pilot app on the iPad, you do not see your Capture Pilot server or Image Server from Capture One listed. There are four possible root causes here.
First, check that you really have started Capture One on your computer and started the Image Server in the Capture Pilot tool. Note that if you just restarted Capture One the Image Server is not running.
Next, check that the computer has a proper connection to the local network. Also, check that the iPad or computer with the browser has a Wi-Fi connection to the same local network as the computer.
Next, if you have a Windows computer make sure that you have Bonjour installed. You can see this program listed in Control Panel, between all installed programs. Mac computers always have Bonjour, on Windows, it is installed with Capture One but it can be uninstalled unintentionally.
Last, in case you use a public network like on an airport, restaurant or hotel, connected devices are not allowed to connect to each other for security reasons. Use your own Wi-Fi device instead.
See no thumbnails when connected
You are able to connect with your Capture Pilot app on your iPad but when you tap on the Server Name, no thumbnails appear.
This can be an issue with the firewall of your computer with Capture One. The server is listed thanks to Bonjour, which is not blocked by the firewall, but images can’t get through.
Try with your firewall disabled. When it works, enable it again and make an exception for Capture One in your firewall.
Images are coming in very slow
This can have several causes.
Most often the local network that connects the devices is busy. Use a dedicated network, just a simple Wi-Fi access point will do. If possible connect the computer with an Ethernet network cable.
Second, the computer is busy with other tasks and is slow in publishing images to the Capture Pilot client. Check that you close all other applications on your computer and that Capture One is not processing images in the background.
If you are busy with a high volume shoot were images come into the computer quickly, set the Capture Pilot app to the thumbnails screen only and do not open in full screen.
Thank you
For reading. Please feel free to leave a comment. Like us on Facebook or subscribe to our newsletter to stay informed about new blogs.
Best Regards,
Image Alchemist








What’s the order in which the images are shown in capture pilot? Is there any way to change the default sorting?
Hi Juan, the order is on name, descending. You can not change the order, unfortunately. Bit of pain in neck, if you ask me.
Best, Paul Steunebrink / Image Alchemist
Thanks Paul! Yes… would be great to see at least the selected order in the browser…
Thanks, great explanation.
I do not have any options to rate the images/see the histogram/or white balance.
Are these functions only available while a camera is tethered and cannot be done after the fact?
Hi Vito,
All features in Capture Pilot are independent from tethering, except for remote camera control, so should work after the fact. In detailed view (1 image selected from thumbnails) you should see icons in the bottom right corner in the Capture Pilot app. Make sure you have enabled the permissions in the Capture Pilot tool in Capture One.
For further questions, please contact me directly.
Best, Paul Steunebrink / Image Alchemist
hello Paul,
if I buy the Camera Control on the iPad will I see a live view of the camera on the iPad?
I mean the image on the iPad is what the camera sees, just like an external camera monitor.
Thank you!
Hi Ugo,
If you have a DSLR or mirrorless you won’t see live view on the iPad in Capture Pilot, even when you have Camera Control added. For latest models Phase One backs there is an exception IIRC.
Best, Paul Steunebrink / Image Alchemist
Does it work on android phones?
Yes, with the browser, not with an app.
Best, Paul Steunebrink / Image Alchemist
Can you focus using the camera control on the iPad? I see you can change exposure etc. and shoot, but focus?
Hi Neil,
I believe that focus control may or may not be available, depending on the camera model. In Capture Pilot, I can see focus controls on the screen, like in Capture One, but in Capture Pilot, they are grayed out. For a detailed answer for your specific camera, I suggest you contact Capture One support.
Best, Paul Steunebrink / Image Alchemist