Capture One 21 Update 3 And 4 Review
In this Capture One 21 Update 3 and 4 review, I go over all the highlights of these releases. The Capture One Live tool, the reworked Export feature with overwrite option, and the Magic Brush are the highlights of these releases. But there is more.

Capture One 21 Update 3 and 4 Review
I made the Update 3 (build 14.3.x) review earlier. However, this update stirred a lot of controversy regarding the removal of the Output tool tab. Update 4 (build 14.4.x) reintroduces the tool tab, now renamed to Export tool tab.
Because of this and due to other little tweaks on improvements in Update 4 over Update 3, you can safely say that this is the release that Update 3 intended to be. Anyway, software development is an ongoing process.
In this Update 3 review of Capture One 21, I go over all the new release features.
- Capture One Live BETA
- Reworked Export
- Magic Brush
- Mask Visibility Settings
- Subfolders in Catalog
- Catalog performance
- Tethering for Leica, Fujifilm, and Sigma
I would say ease of use to describe this update in a few words. Workflow-wise the changes with export and handling of subfolders in Catalogs makes sense. Capturing during live view saves Fujifilm owners additional mouse clicks.
The Magic Brush makes masking much easier in many situations.
Earlier reviews
For all features added in Capture One 21, please review the earlier Capture One 21 Review and the Capture One 21 Update 1 Review.
Capture One Live BETA
Perhaps the most exciting new tool in build 14.3.1 of Capture One 21 is Capture One Live. It is a collaboration tool that lets you instantly share photos in real-time over the internet.
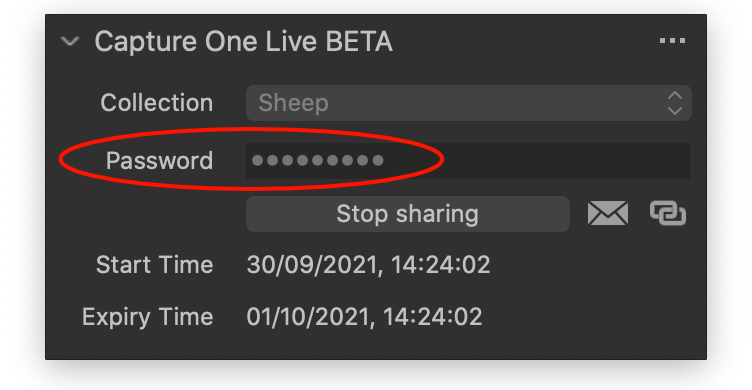
I look at it as the internet version of Capture Pilot. You find the Capture One Live tool on the Capture tool tab. You can use it during a tethered session but afterward as well.
Update 4 allows you to secure your Capture One Live sessions with a password. See the screenshot above.
Sharing scenario
Let us say that you are the photographer, and the client is at the other end of the line. The client needs a computer, tablet, or smartphone with a browser and an internet connection. You select a folder to share, for example, the Capture Folder of your Session, and start sharing.
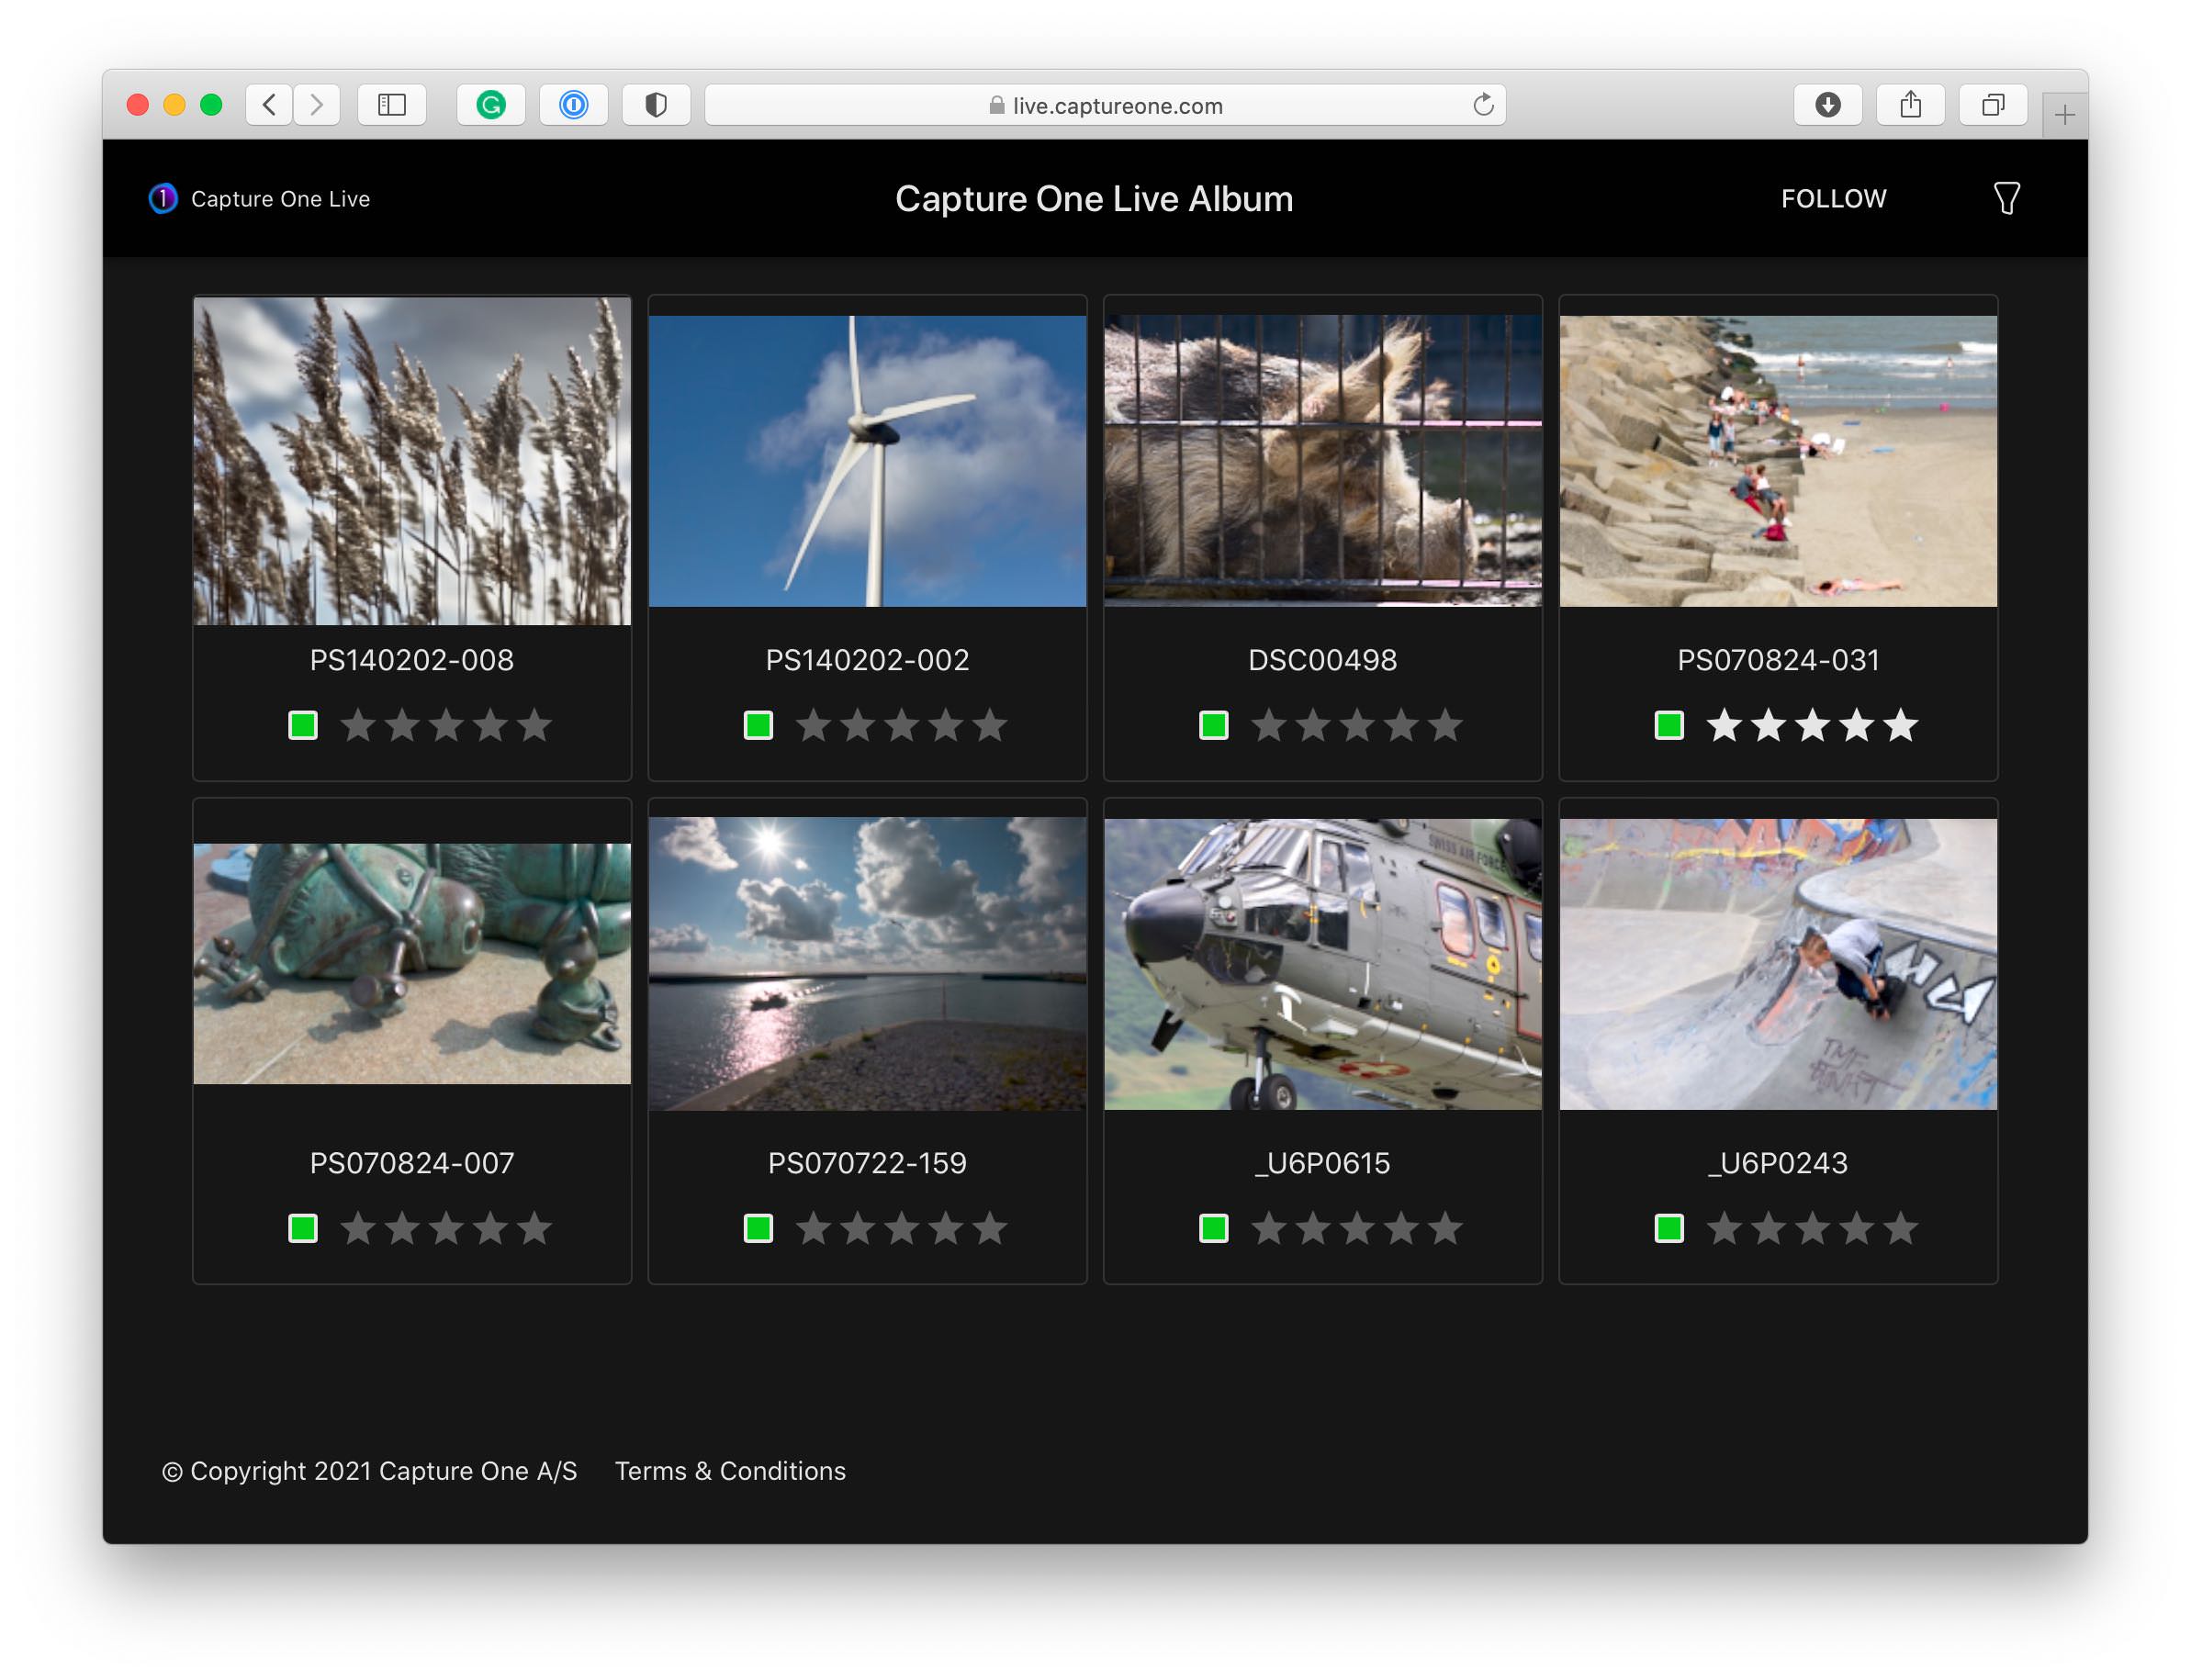
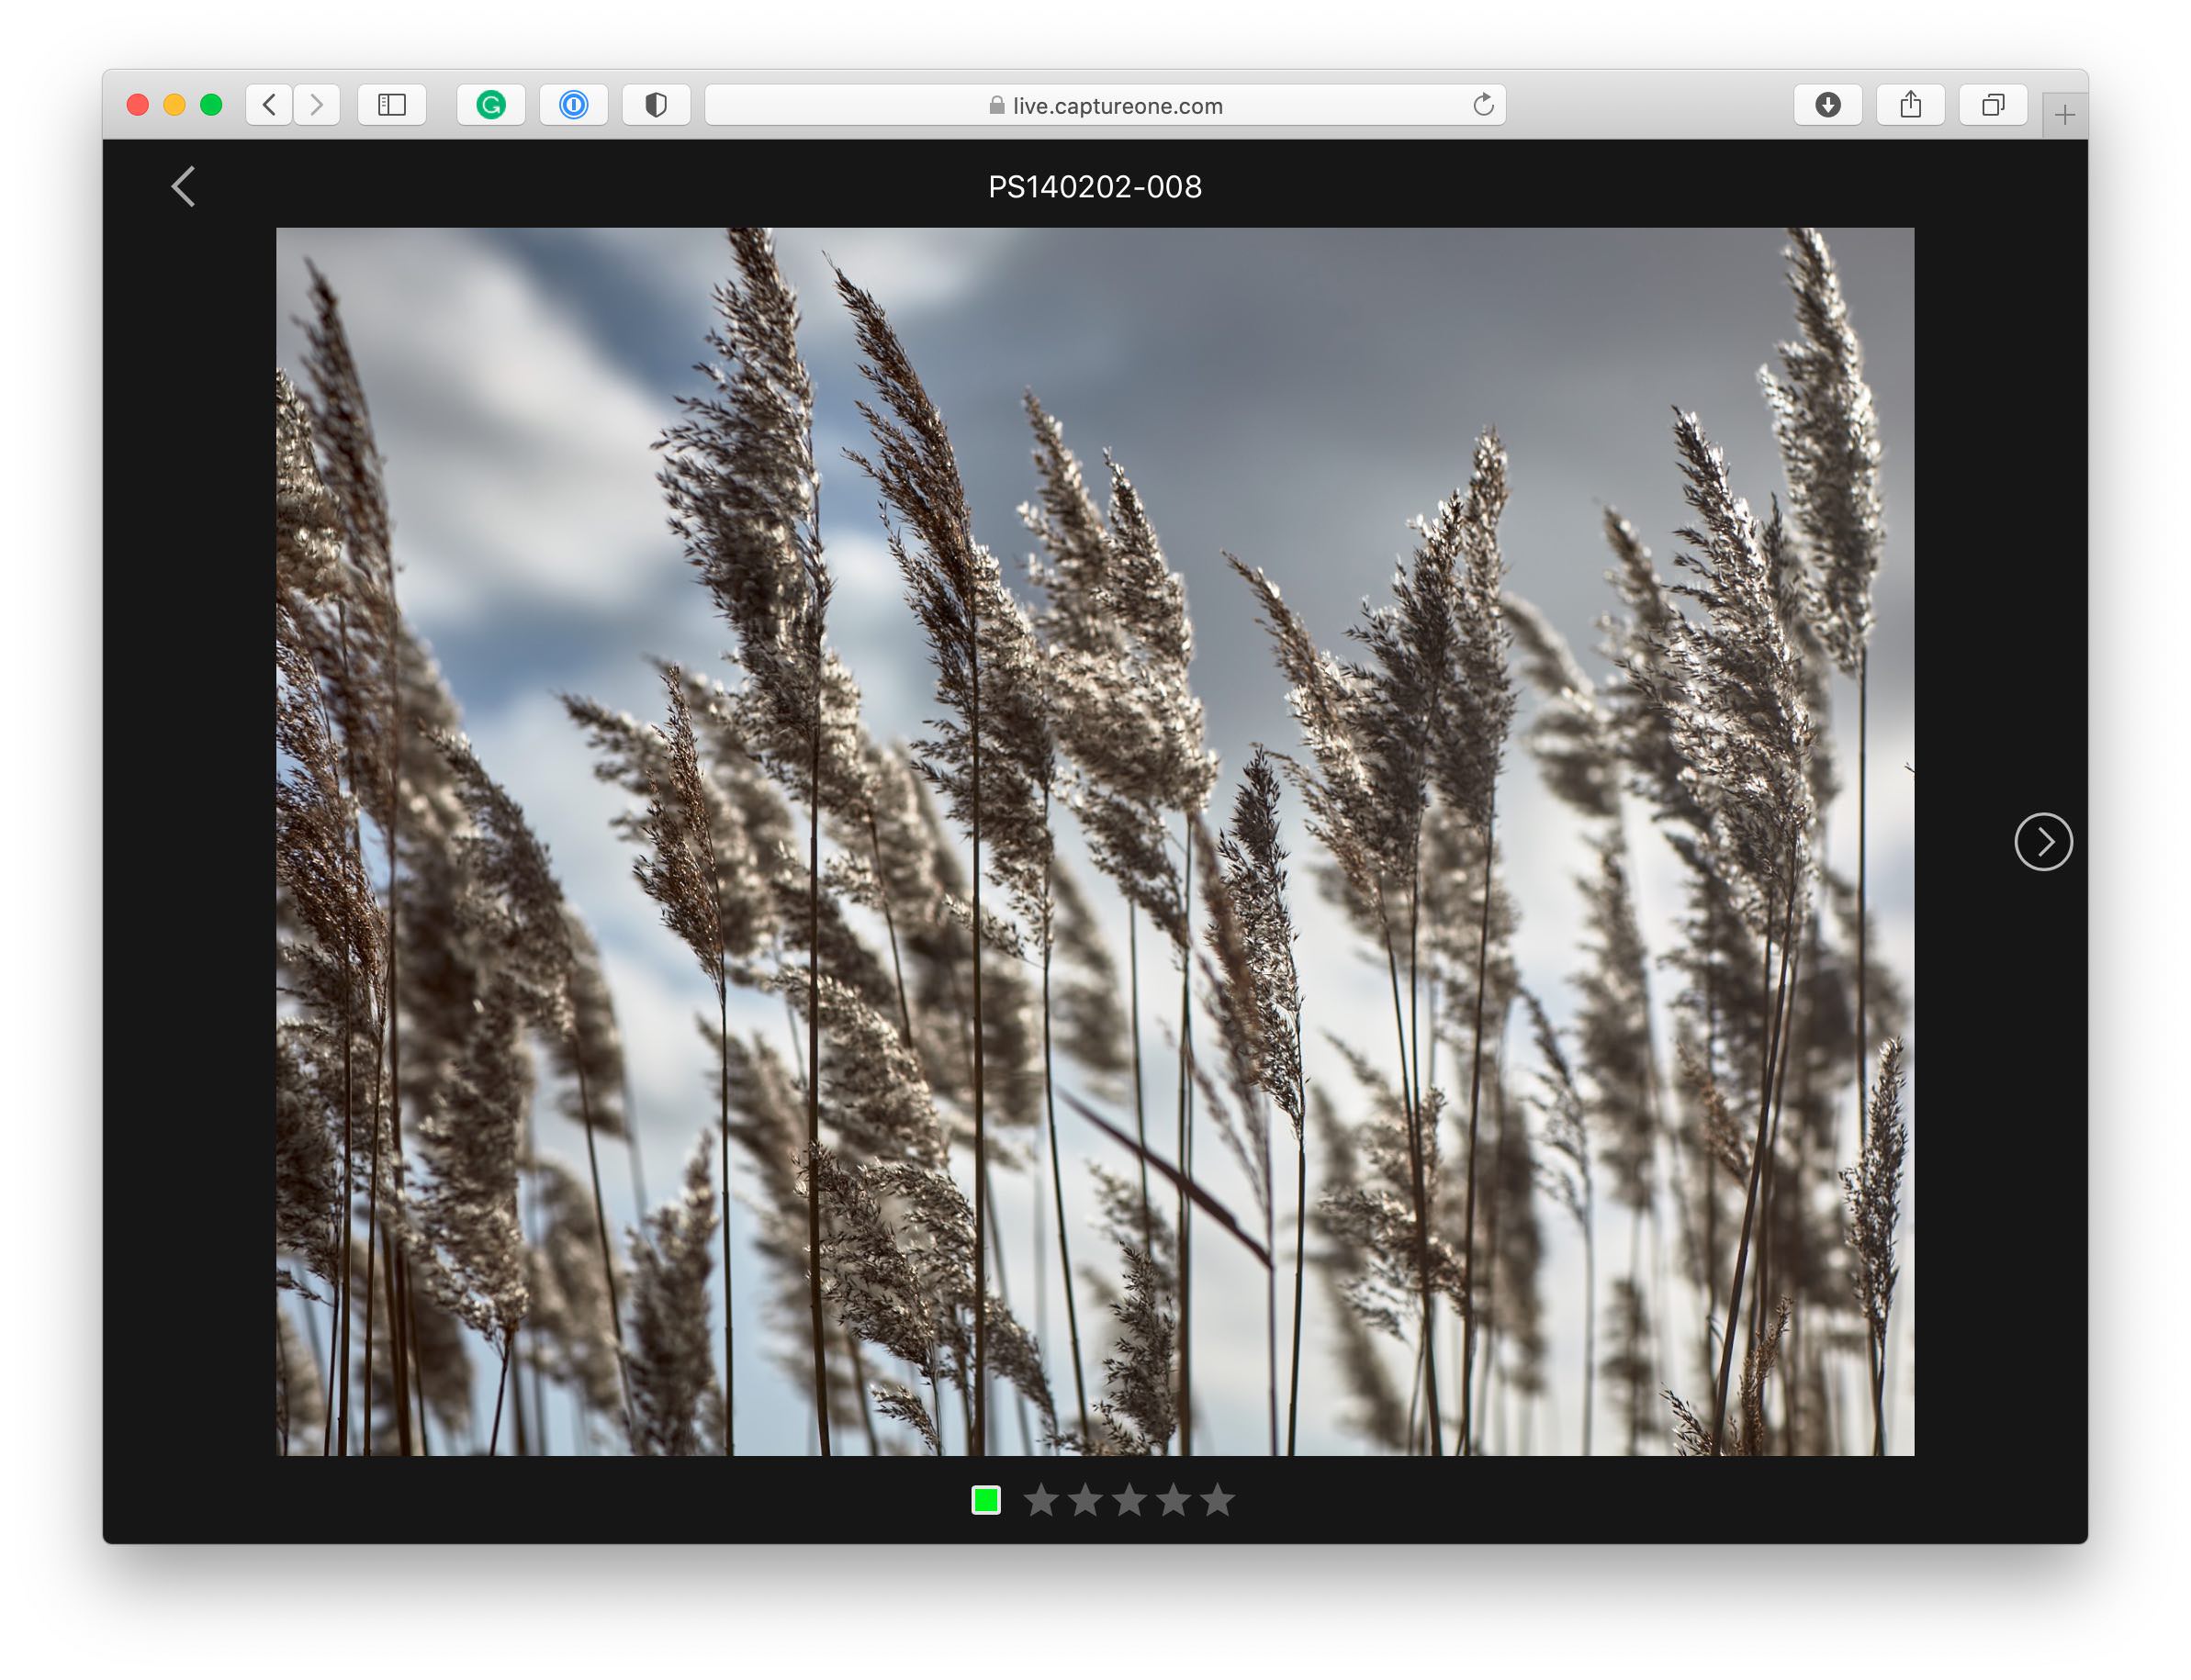
The client can switch between thumbnails and a viewer with a single large image.
Each sharing session gets a unique link that you send to the client. The client pastes the link in the browser and reviews your images. In addition, the client can rate and color-tag the images.
Note that you can not prevent the viewer from rating or tagging. Perhaps you can do this in a later version.
Session and Catalog
You can use Capture One Live from both a Session and a Catalog. The screenshot below is from a Session.
With a Session, you can share the Session folders – Capture, Select, and Output – as well as any Session Albums and Session Favorites. With a Catalog, you can share Albums.
Note that you can not share Smart Albums in a Capture One Live session.
Quota
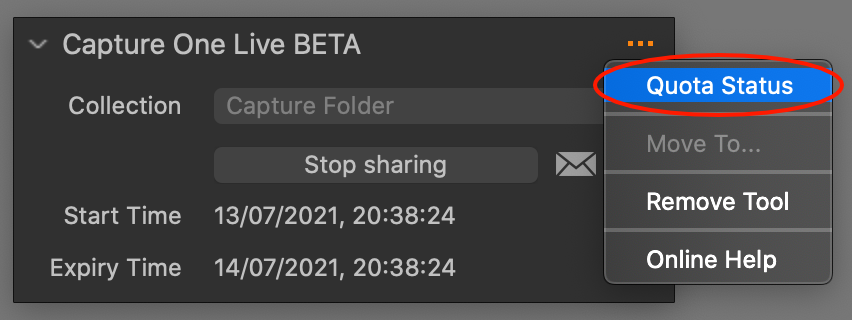
There is a quota per 30 days. You can share 25000 image uploads or 25 sharing sessions in that period. You can view your Quota Status from the tool’s action menu (3 dots).
Note that a sharing session lasts 24 hours maximum, and you can stop anytime.
You check your Quota Status from the Capture One Live tool, action menu (3 dots).
When you quit Capture One, a running sharing session pauses, and you can resume it any time before the expiry time of the shared session.
License and Beta
Details about Capture One Live licensing are not yet available. You can subscribe for free to this service as long as it is in Beta.
Export With Overwrite
Import and export of images are essential features in photo software like Capture One. In recent updates, Capture One offered a redesigned Import Images dialog while adding features. I refer to the Large Import Viewer introduced in Capture One 21 build 14.1.0.
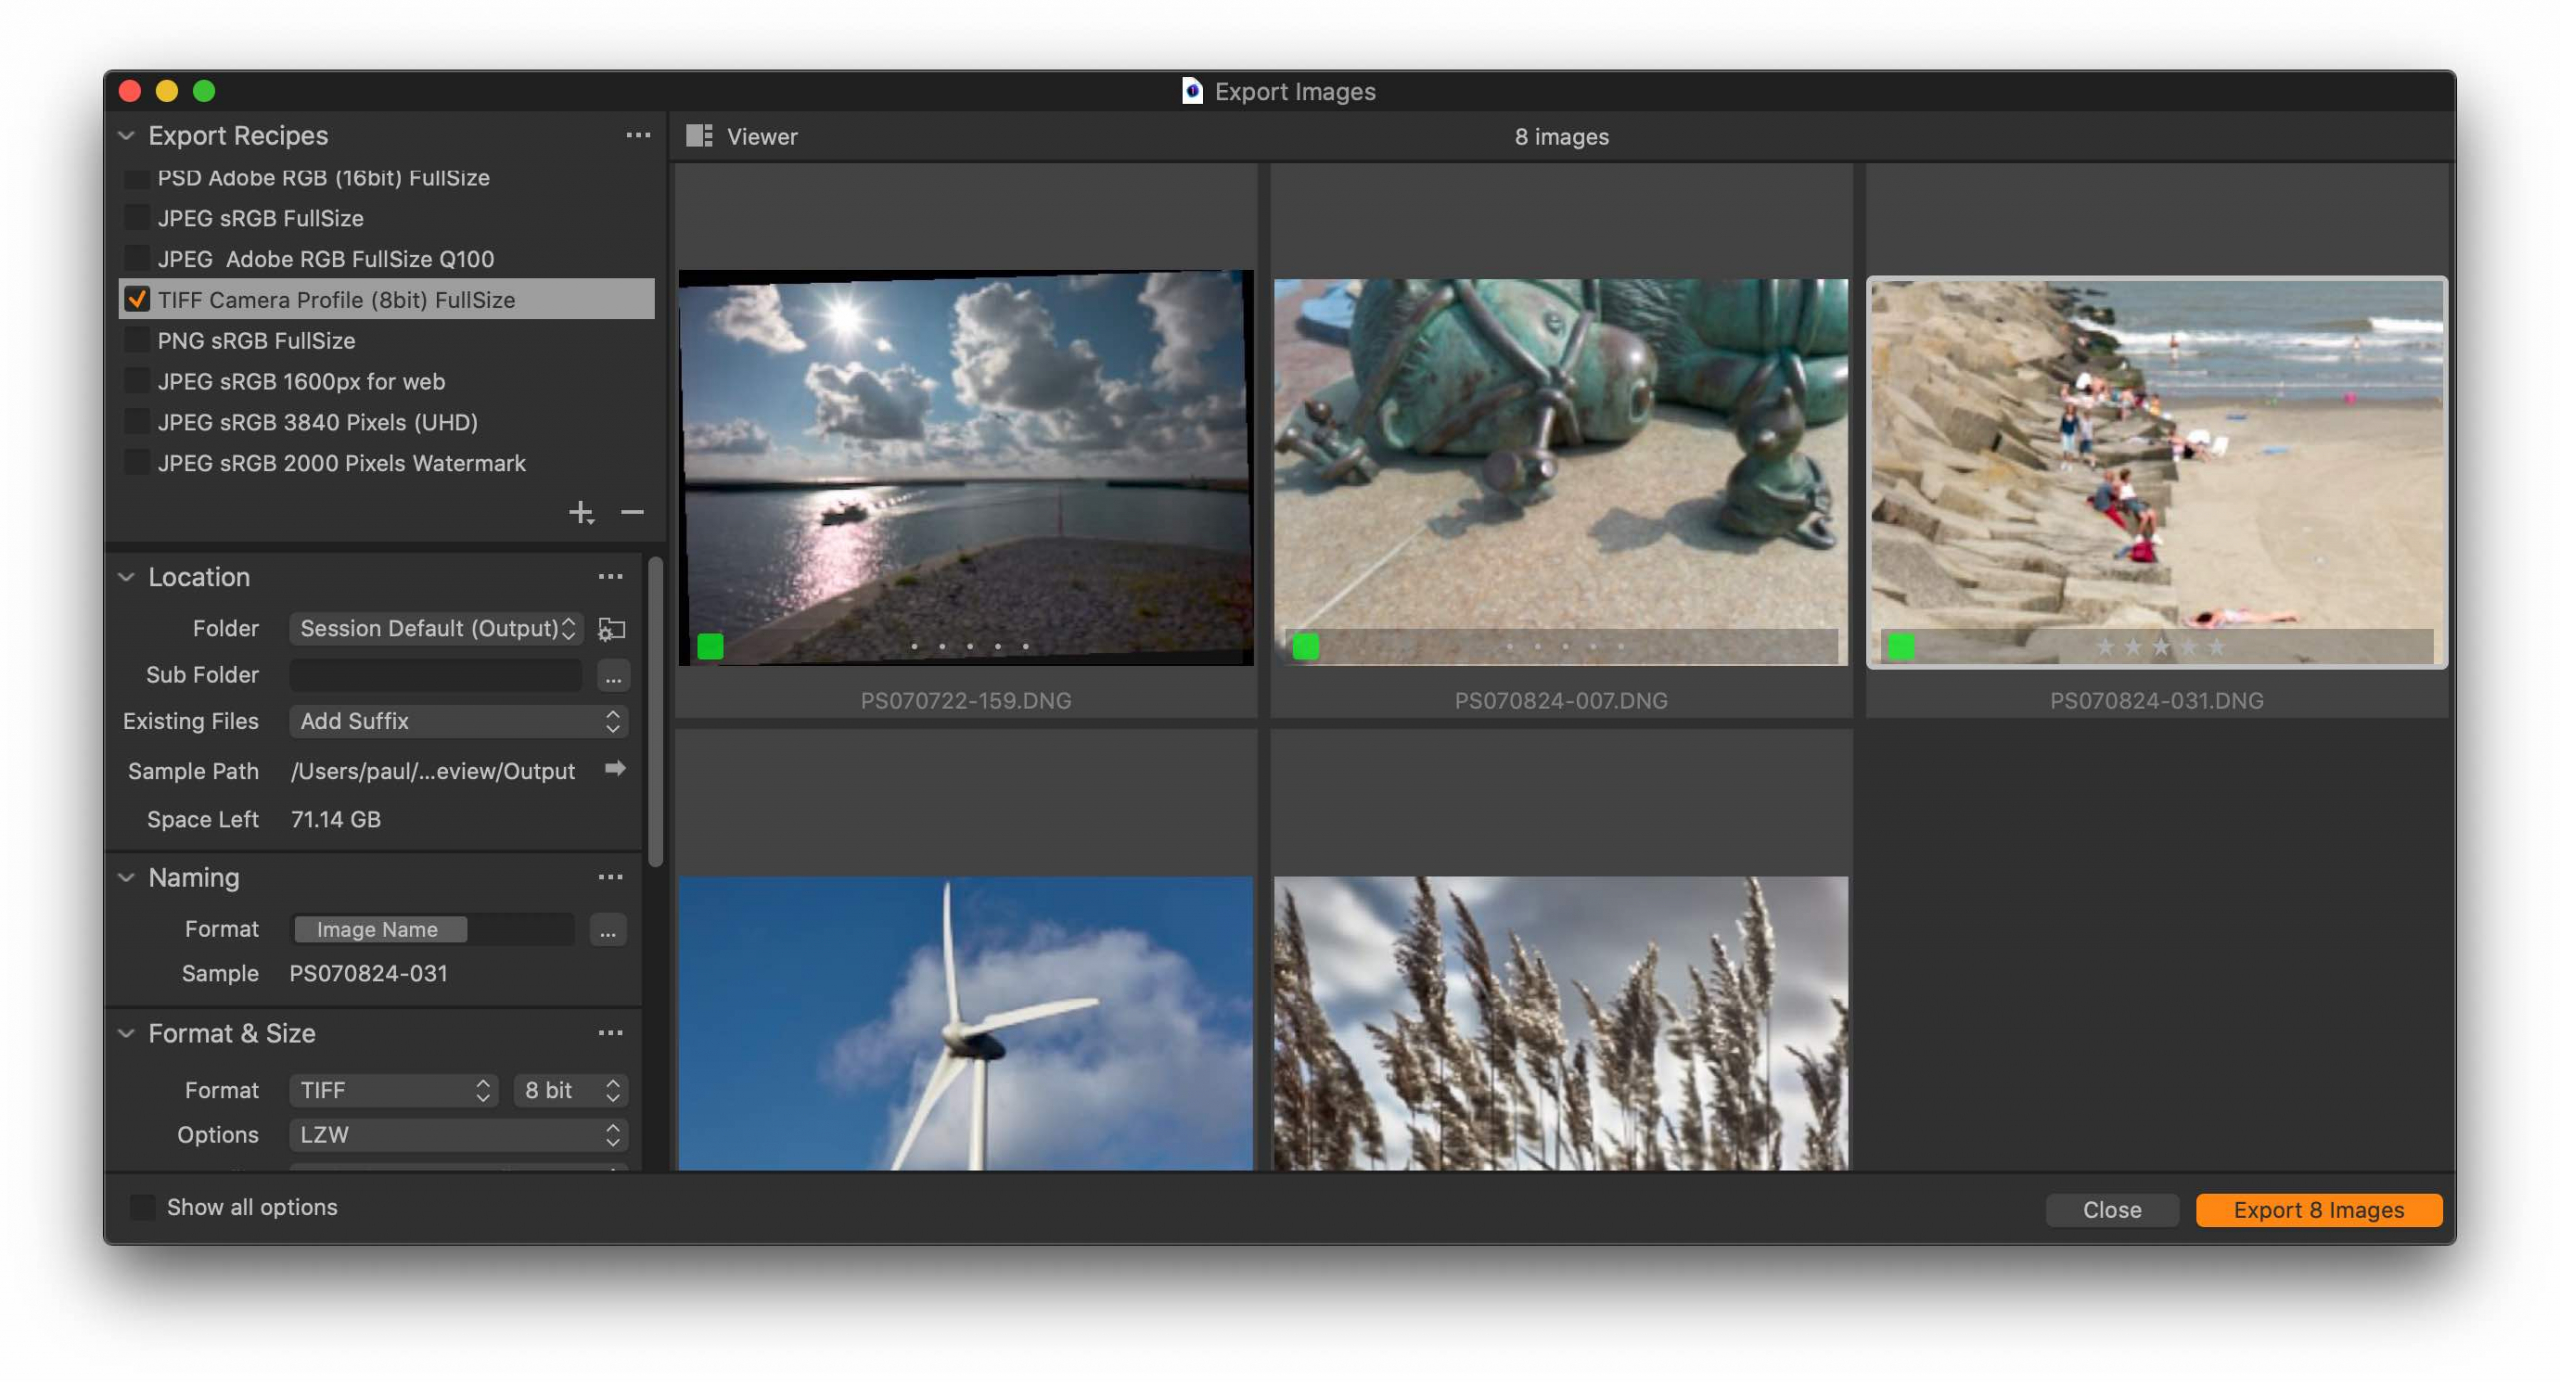
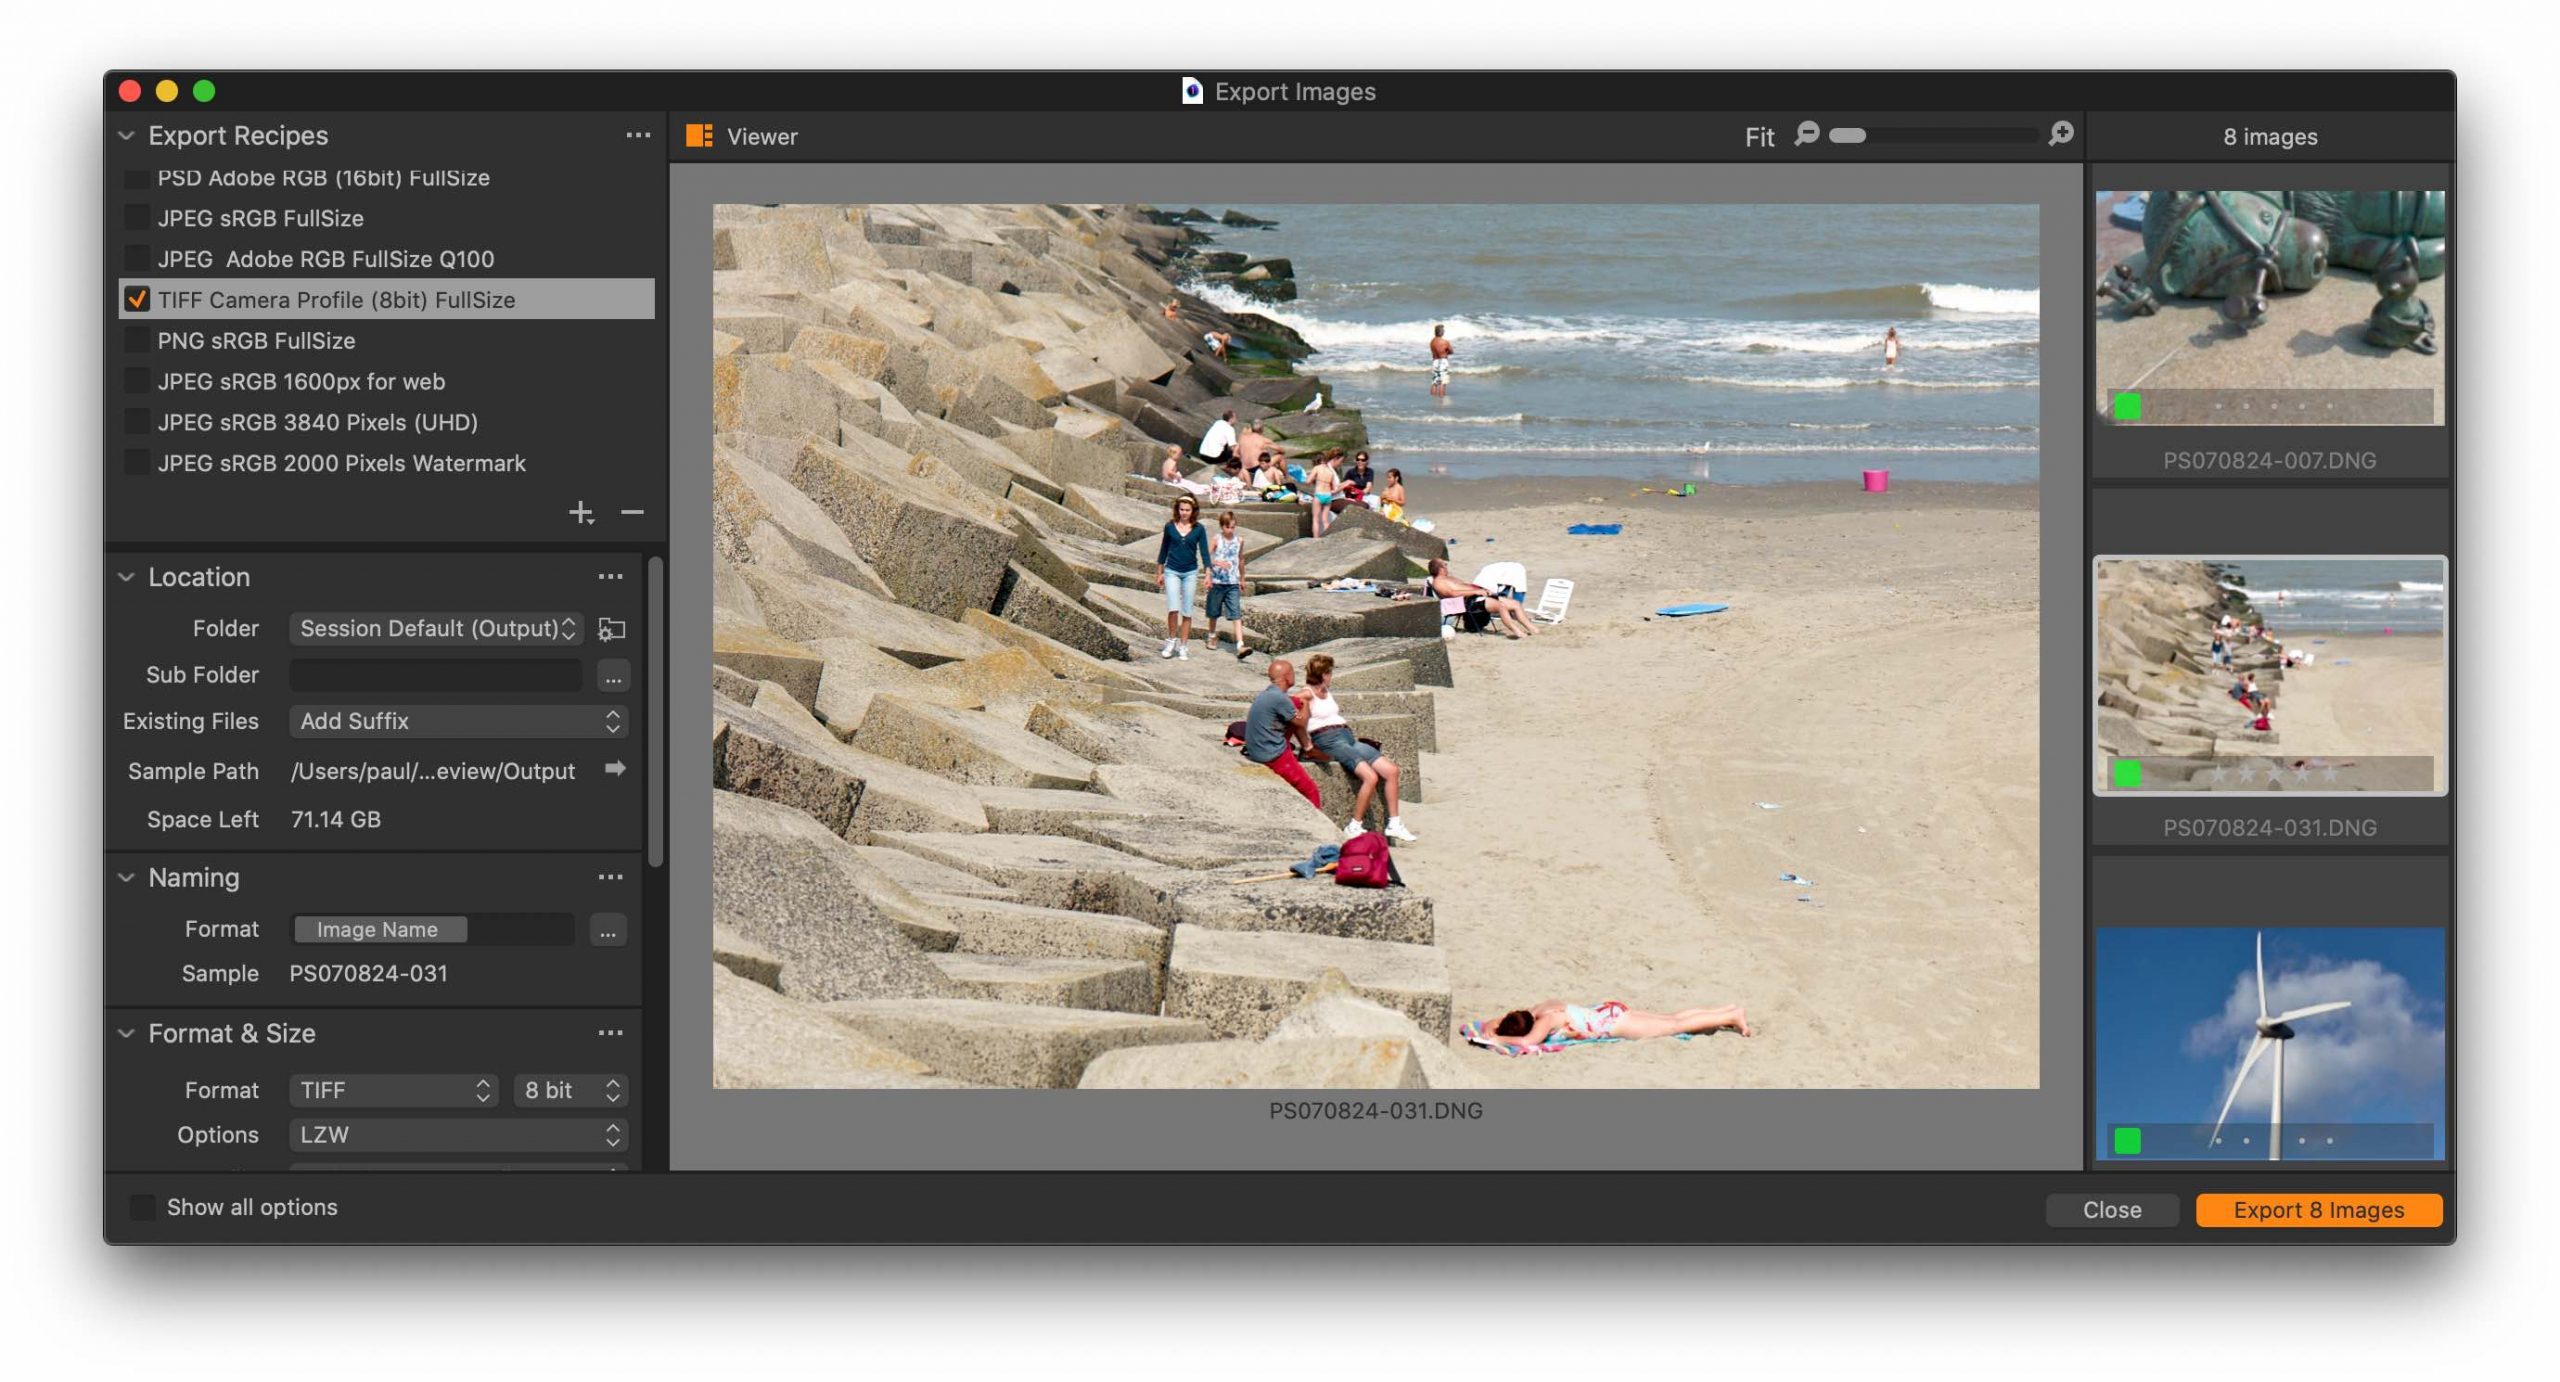
This time, the Export function got a makeover. With a separate Export dialog, a thumbnail, and a large viewer toggle. Before we dive into that, I share a little history about this feature.
Export history
Since the first version of Capture One (2003), export has been known as processing. A processed image is a new image that merges the original and the adjustments into a new file. A Process Recipe stores all options that affect processing.
You could create an infinite amount of different Process Recipes, and you only had to enable those you needed. Multiple enabled recipes resulted in the same amount of images simultaneously. This existed until today (2021). Extremely powerful but hard to swallow for new and even seasoned users.
With many users migrating from other platforms used to a much simpler feature with a different name, Capture One 7 introduced the Export function (2012). Export Variants was essentially a single recipe version of processing. It lacked the watermark feature but had the Export Original advantage, which remains unchanged in this new version.
However, two similar options in one package mean you are asking for confusion.
Merge and improve
Capture One 21 Update 3 merges both the Process and the Export features. The single recipe Export Variant function is out of the door, the multiple recipe Process function is renamed to Export, and three important features are added:
- Large Export Viewer
- Session Default and Catalog Default location
- Overwrite option
What remains are the following functions:
- separate Export Originals
- Export directly with previous settings through a shortcut
Let us have a look at the new Export feature.
Removed and Reinstated
Where Update 3 entirely removed the Output tool tab, Update 4 reintroduces it as the Export tool tab on user request. You have to install it yourself. It is not part of the Default workspace of Update 4.
You add the Export tool tab by clicking from the menu View > Customize Tools > Add Tool Tab > Export. Alternatively, you can add the tool tab by right-clicking in the tools section.
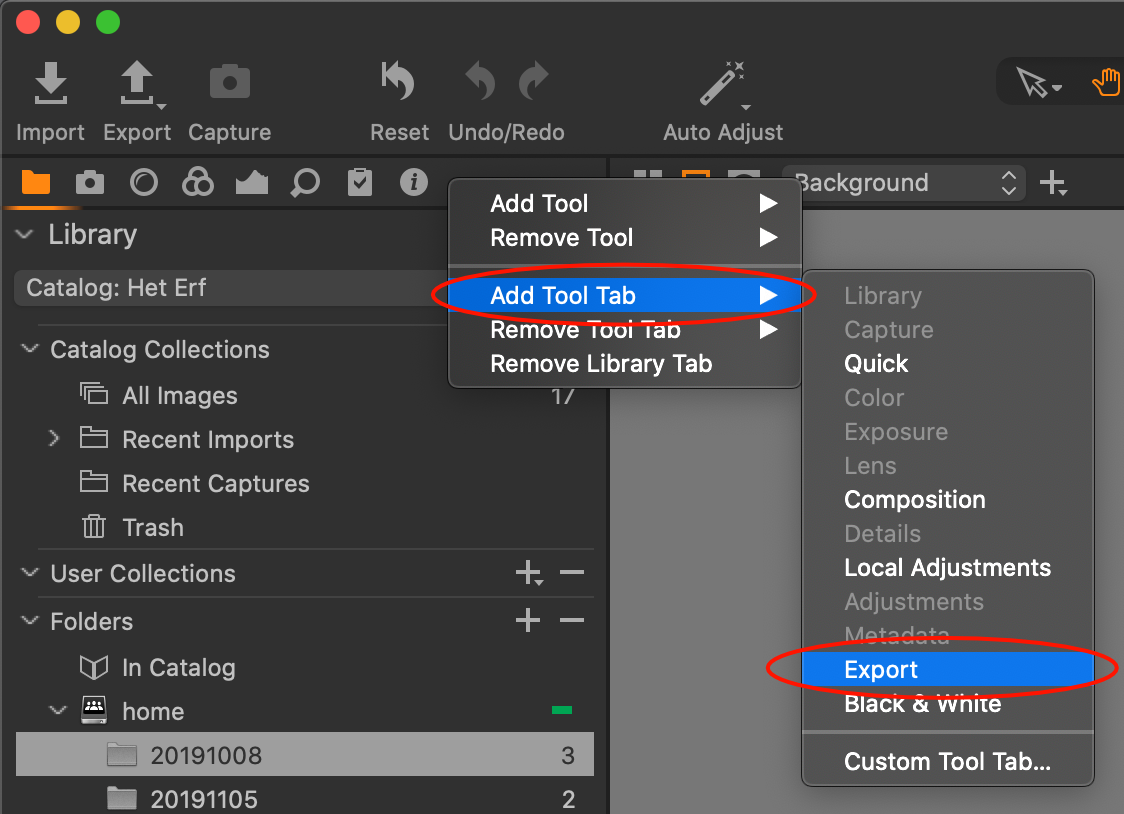
Save your Workspace after you make this change.
Long-time users will find almost any feature from the former Output tool tab in the new Export tool tab. There are two distinctive differences.
The Sub Name token did not return. This power-user feature will probably still be missed. The Job Name token is back, fortunately. This field, together with the Subfolder field, now have its own little nifty tool on the Export tool tab: the Export Cross Recipe Tokens.
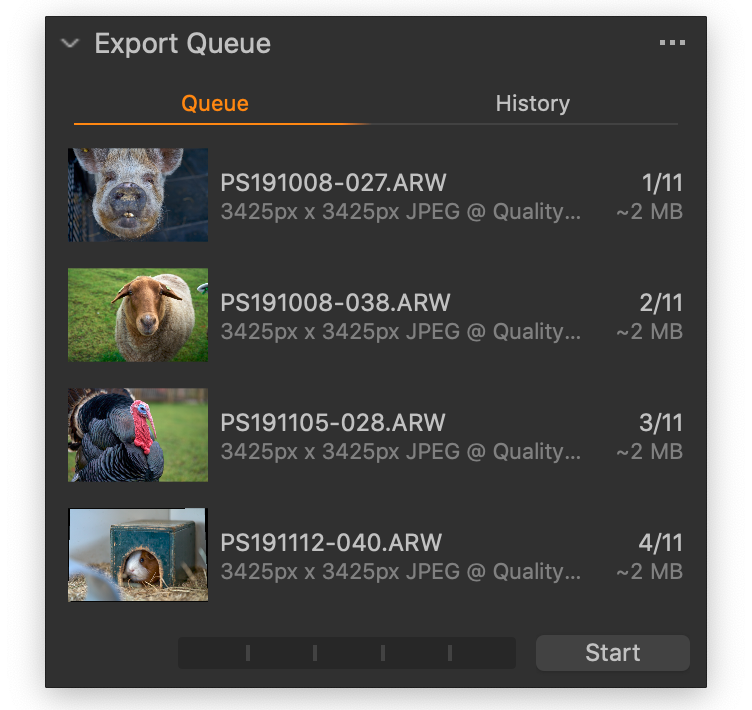
Also, the Export Queue, formerly known as the Batch tool, is reintroduced.
Menus and buttons
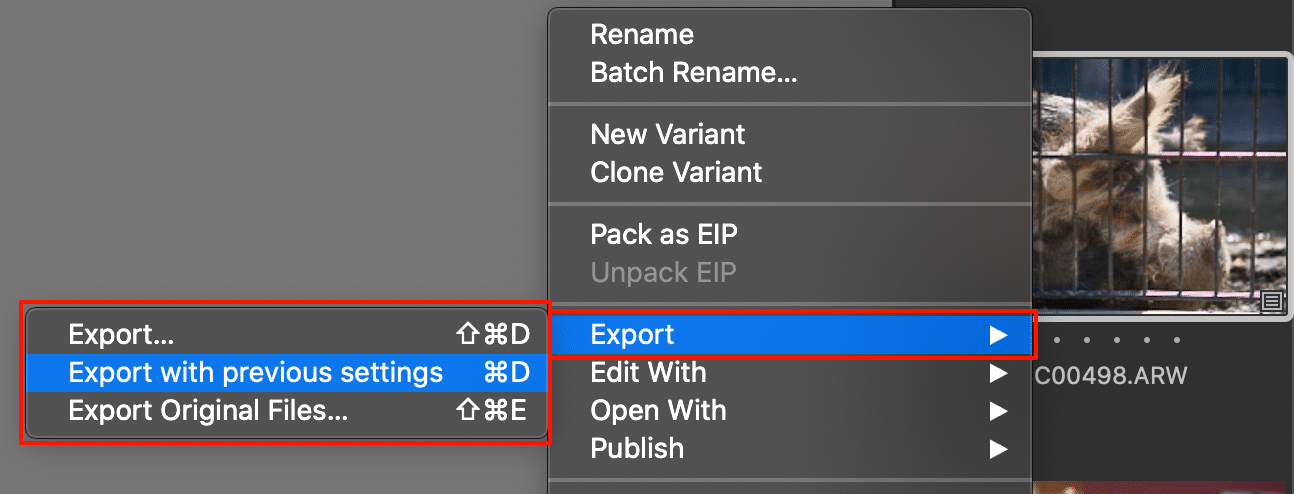
You notice a familiar icon for Export in the toolbar, but with a twist. It has a small triangle icon bottom right, noticing you of available options when you long-click to expand.
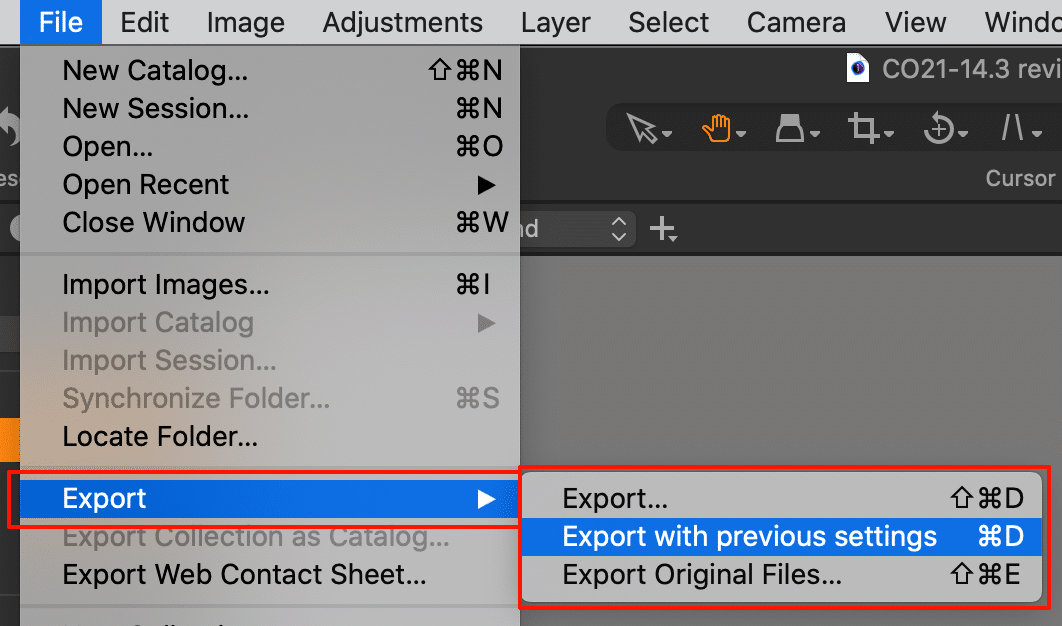
As you can see from the screenshot, you can open the Export dialog, quickly export with previous settings, or export an original, which is particularly handy for Catalog users.
In addition, you have the Edit with, Open with, and Publish options now from the toolbar as well. These options are similar to those from the Image menu.
As usual, you find the Export option in the File menu, expanding with the same three export options as the toolbar icon.
When you right-click a thumbnail, you also have all options together.
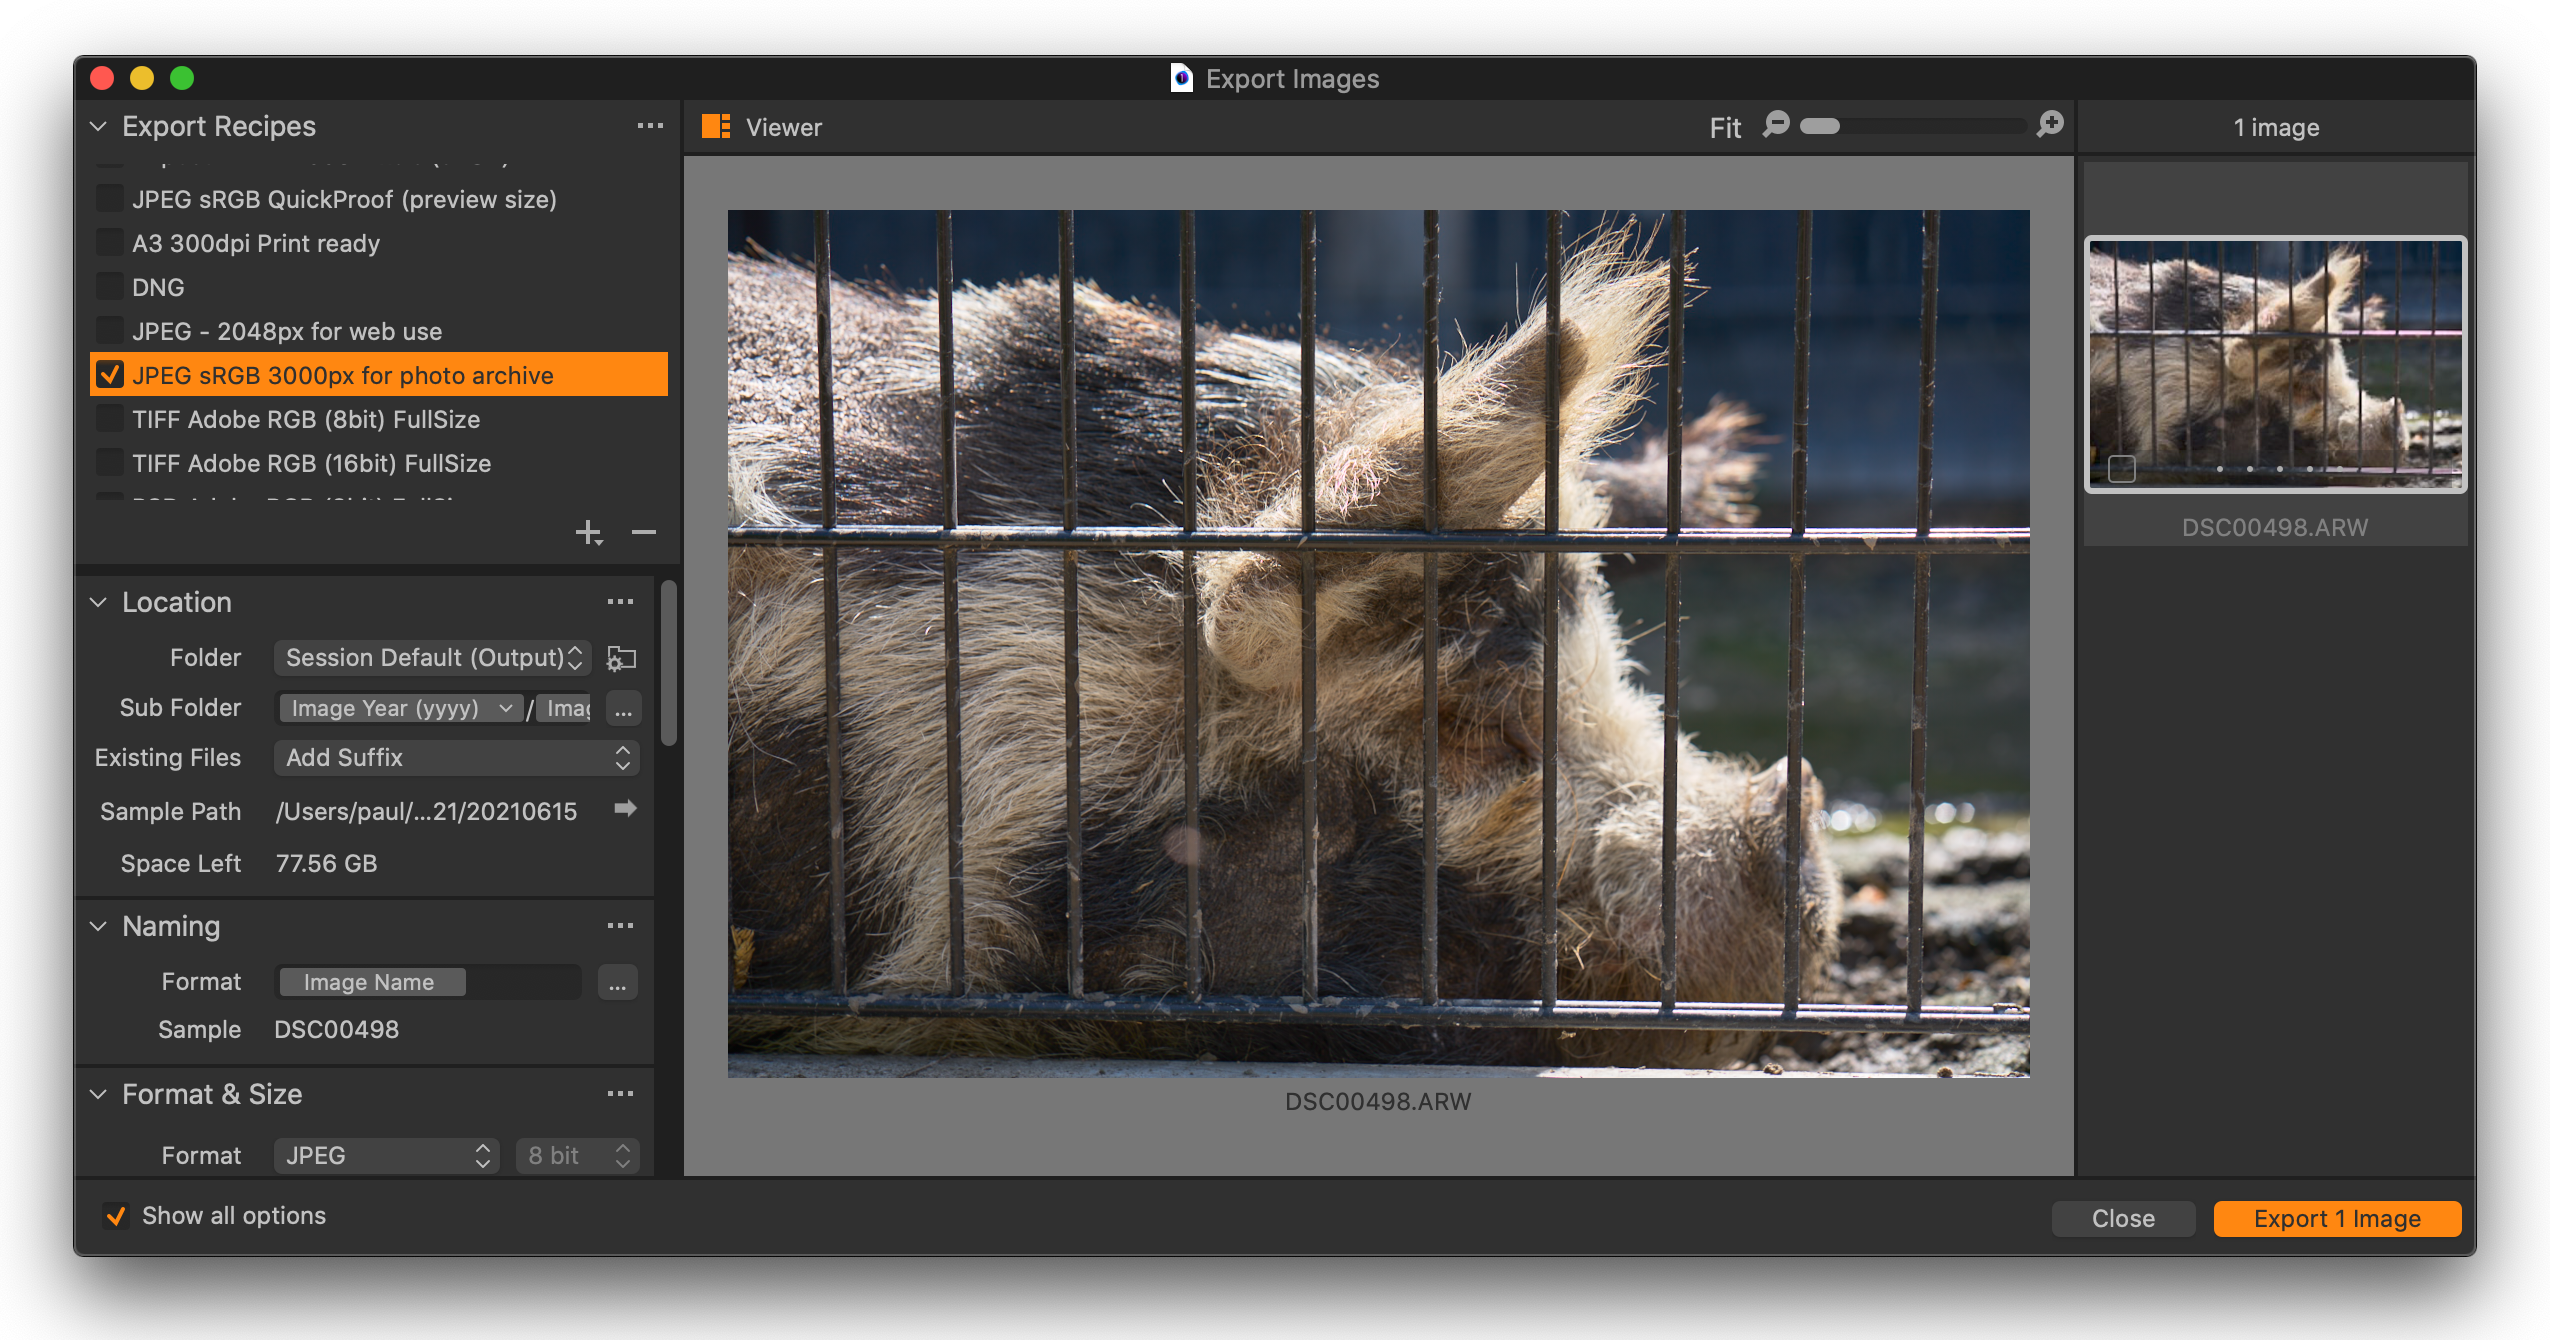
Export Images dialog
When you open de Export Images dialog, you might notice the large Export Viewer, similar to the large Import Viewer. You can switch it on/off with the icon at the top.
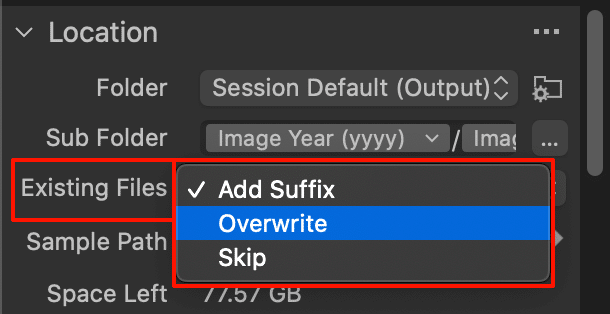
In the Location section is a new field, Existing Files. Here you can tell Capture One what to do when the file name already exists in the given location.
The option Add Suffix is the default and is similar to what Capture One already did. Overwrite is what it says. Same as Skip. I believe this feature is fulfilling a long-standing request of many users.
Note that you may miss some options. Please notice the Show all options tickbox at the bottom left corner. This will unhide the Adjustments, Watermark, and Metadata sections.
Subfolders In Catalog
There are two enhancements regarding subfolders and Catalogs with referenced images. One is called Show Images in Subfolders. The second option lets you synchronize new subfolders. Note that you can enable/disable both new features.
Show images in subfolders
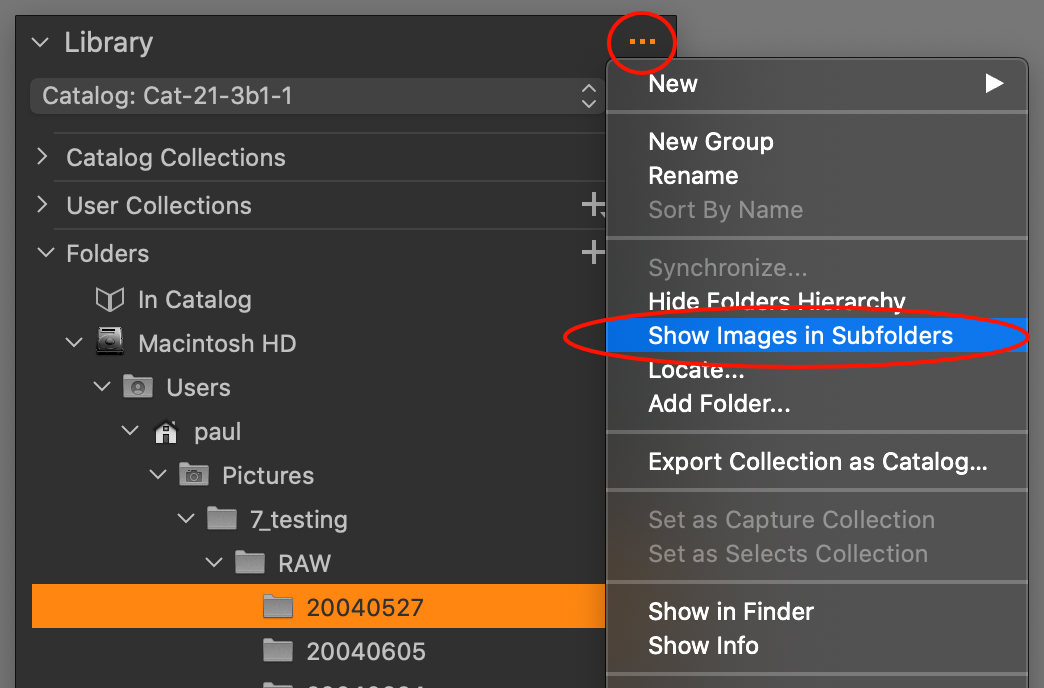
In a Catalog with referenced images, you can view the images per folder via the Library > Folders section. Until now, you could not view all images in subsequent subfolders from a parent folder. Now, this feature has been added.
In the Library tool, go to the action menu (3 dots) in the top right corner of the tool. Select Show Images in Subfolders. Note that this is a toggle, so you switch it off by selecting it again.
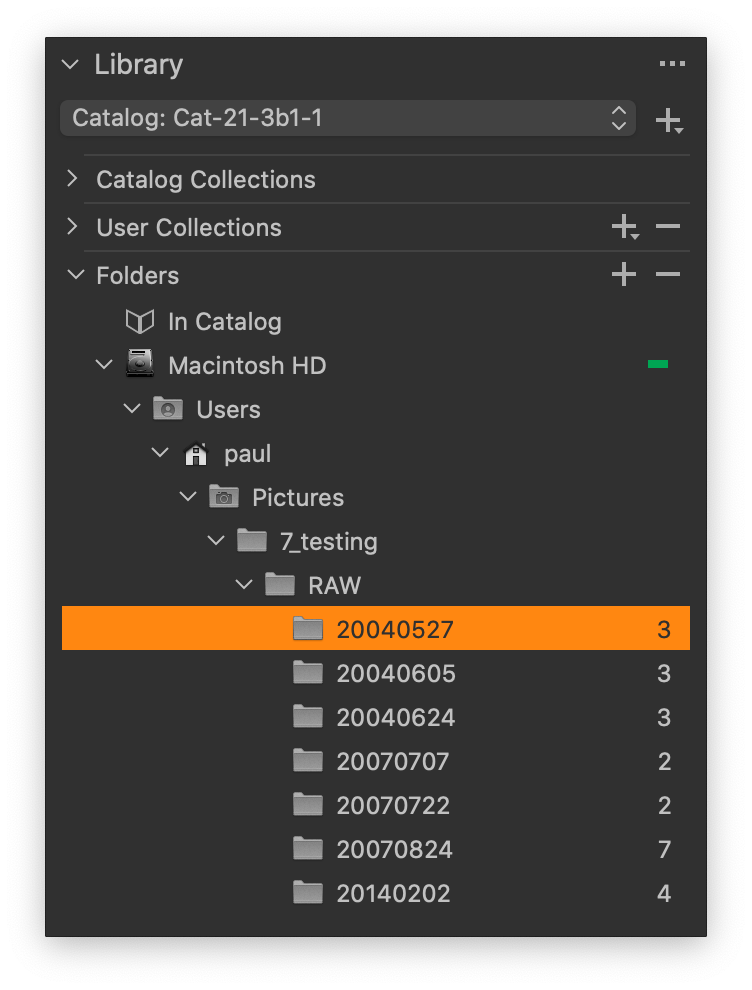
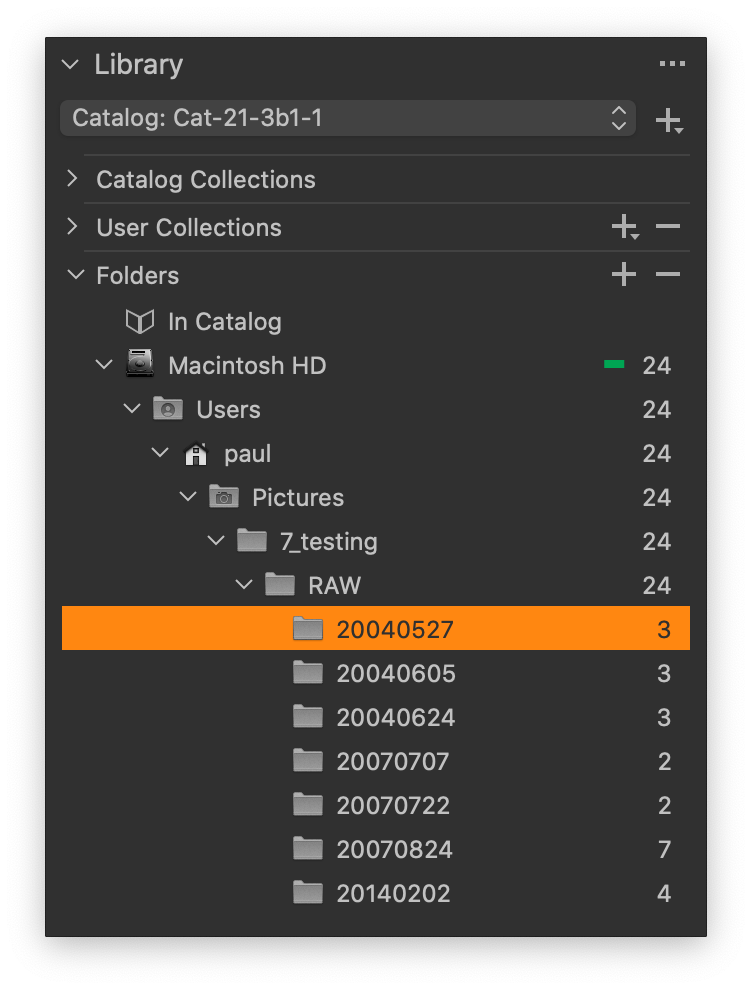
Note that the parent folder shows the number of images in that collection. For this feature to work properly, you must also enable Show Folders Hierarchy from the same action menu.
Synchronize new subfolders
The synchronize feature for Catalogs with referenced images lets you quickly import new images from imported folders. When you add images to these folders after import, the Synchronize feature detects these images and offers them to import.
This feature worked already on known subfolders if desired. New subfolders, however, were not included. Capture One 21, build 14.3, now includes new subfolders in the synchronization process when you enable the Include subfolders option.
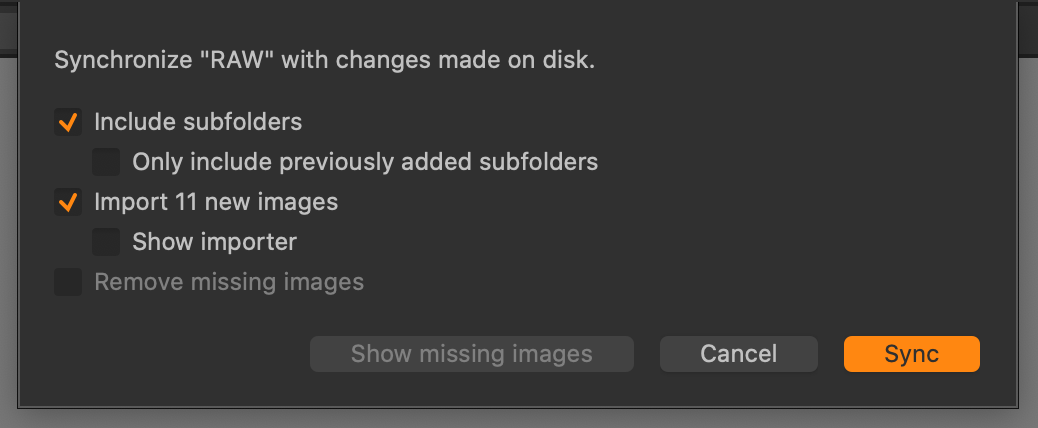
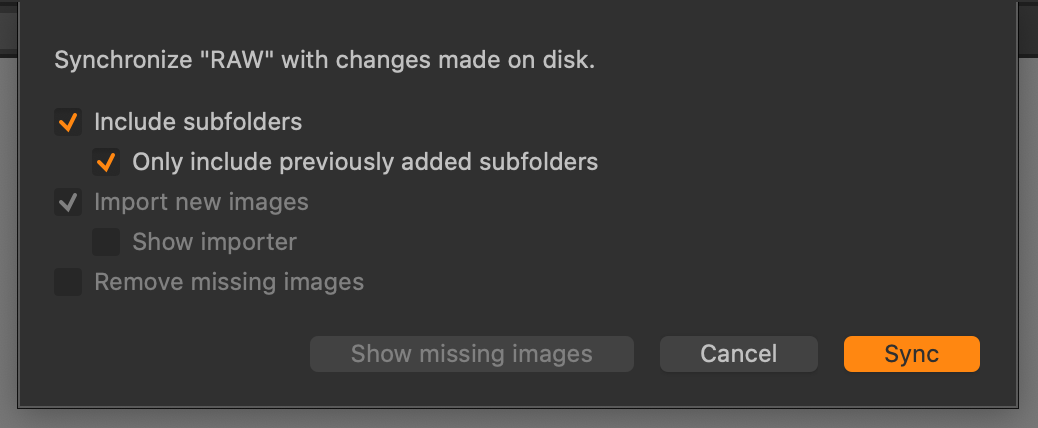
In the before/after screenshots above, I added a new subfolder with 11 images. Capture One detects it and offers to import the images (before).
In the second screenshot, I tell Capture One to stick to known subfolders with the suboption Only include previously added subfolders, excluding my new subfolder from import.
Catalog Performance
The release notes of Update 4 mention significant performance improvements for the catalog. Loading of any collection in the catalog is up to 300% (macOS) or up to 500% (Windows) faster.
Magic Brush
With this new brush, you can quickly mask areas of similar color. You use the Magic Brush on an Adjustments Layer as with other brushes.
I edited the first image of this review, the branch with blossoms against a blue sky. I selected the entire sky with a single click of the Magic Brush in the blue sky. Next, an Exposure adjustment was sufficient to gain the desired result. Done.
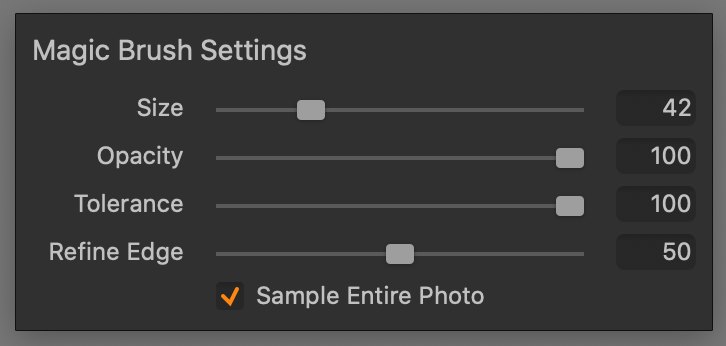
You find the Magic Brush either in the Layers tool, next to the regular brush, or in the Cursor Tools. There are a few options that affect how the Magic Brush works. You can get the desired effect in one or a few strokes by tweaking these options.
With Tolerance, you adjust the range of colors to mask. See the before/after comparison below with different Tolerance settings.
The Refine Edge slider makes the edges of the mask smoother. We know this feature from the Layers tool and the Luma Range feature. This is important because all automatically generated masks tend to have rough or unnatural edges.
The Sample Entire Photo checkbox is an interesting option. Areas of a different color sometimes contain an area of a specific color. The Magic Brush will only select that area, not similarly colored areas in the photo outside the contained area. When you enable the Sample Entire Photo option, the Magic Brush will mask similar areas in the entire photo.
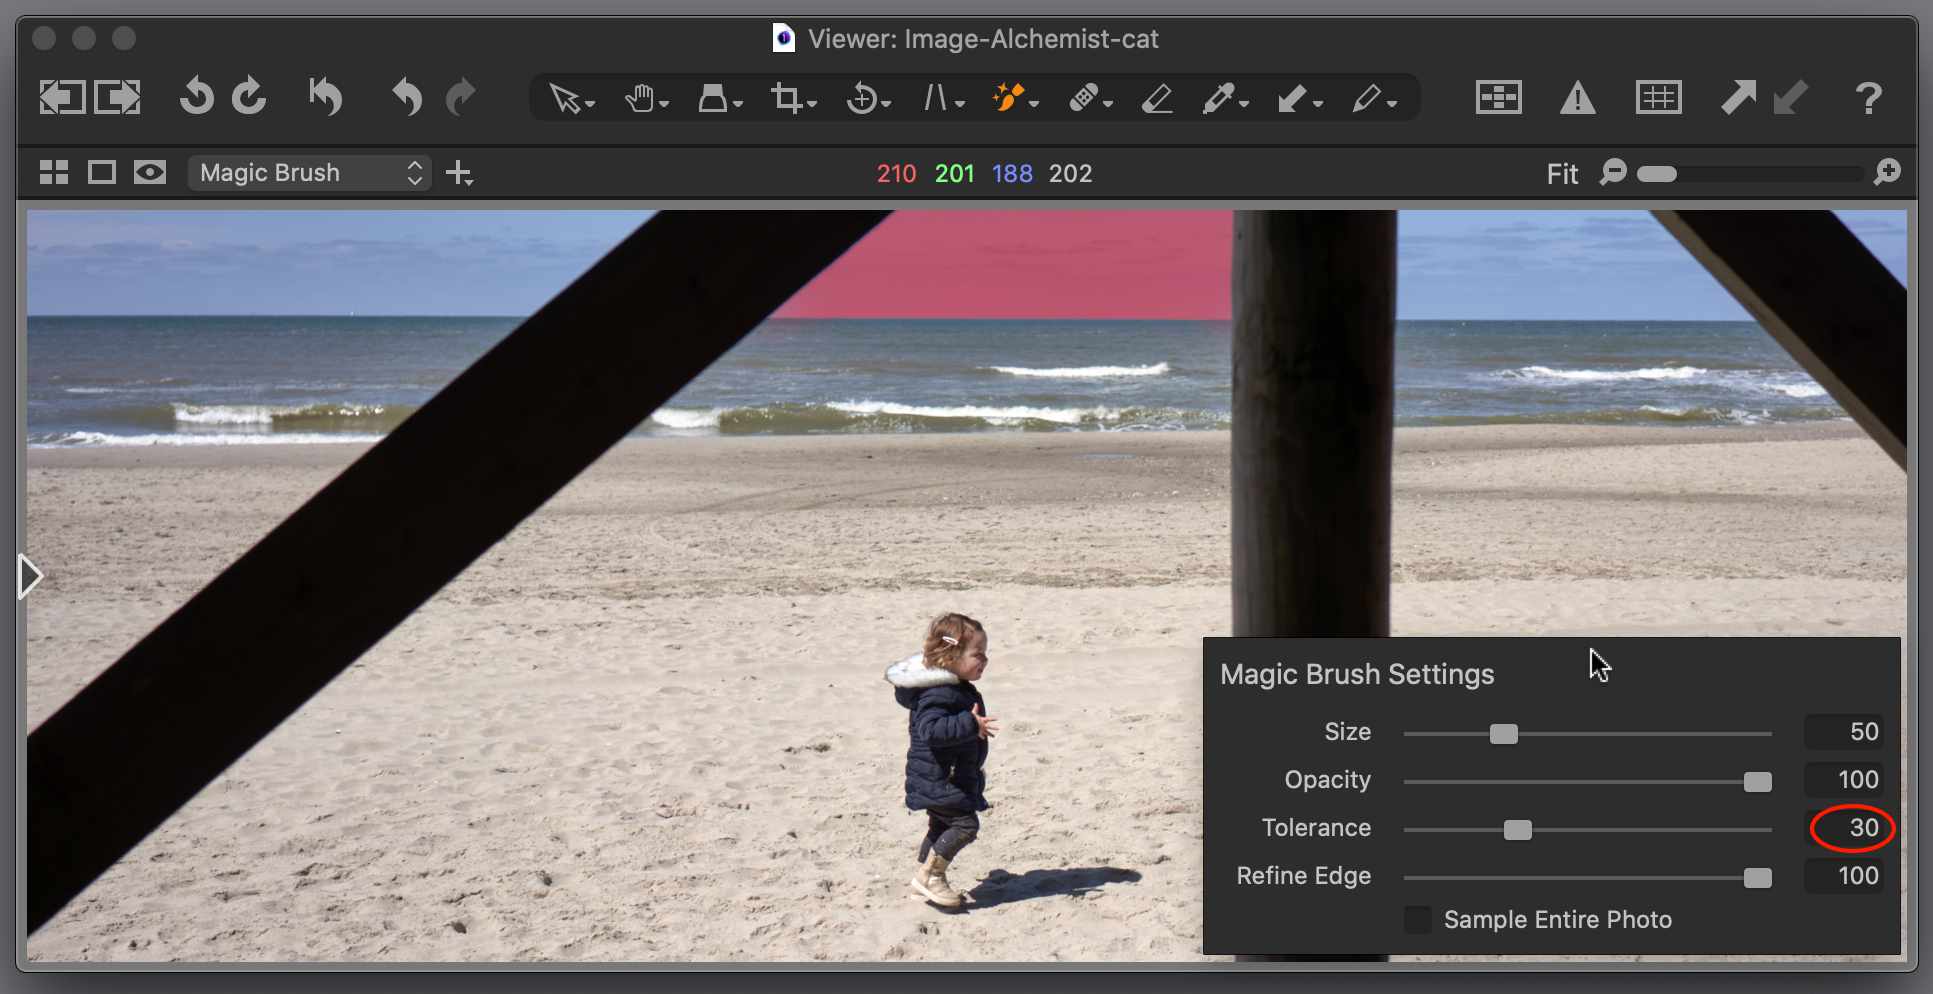
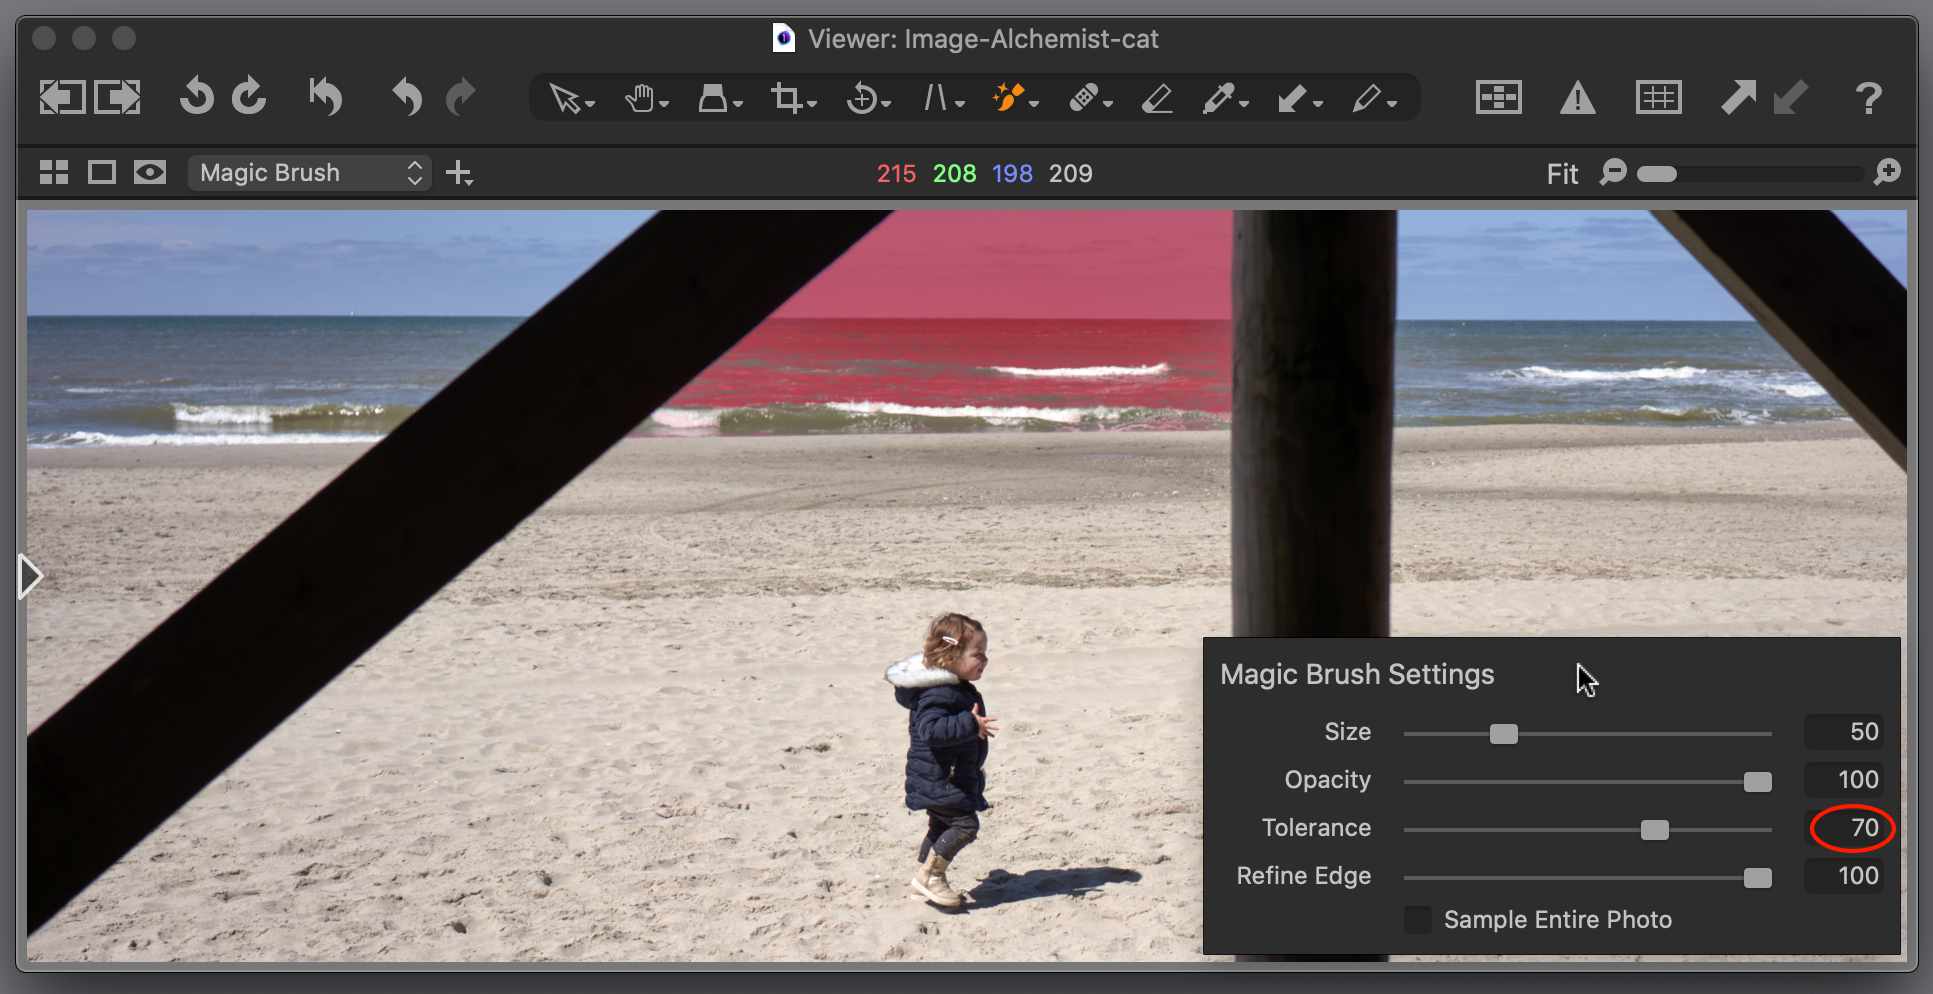
In the image above, both before/after, you see the effect of not enabling the Sample Entire Photo option. I sampled the sky, and only the contained part is masked.
The difference in the before/after comparison between both images is the Tolerance setting. When you set a higher Tolerance value, you include more areas with similar colors in your mask. When your Tolerance setting is too low, you can increase it and click again in the same area to expand the mask.
After the first brushstroke, you might get the Calculating Magic Brush Mask message.
Adjusting Magic Brush
Update 4 adds a little tweak to the Magic Brush for other brushes: keyboard shortcuts for adjusting the Size, Tolerance, Opacity, and Refine Edge.
Mask Visibility Settings
In the top right corner of the Viewer, you will find a new icon next to the Primary/MultiView toggle and the Proof Margin toggle: the Mask Visibility Settings.
These settings were earlier on the Layers tool, and action menu but are moved to this new location. You still find these visibility settings under brushes between the cursor tools.
Notice the Display Heal and Clone Arrows that you can switch on and off from this menu.
Tethering Improvements
In both the Update 3 and Update 4 releases, there are some tethering improvements.
Fujifilm cameras can capture during Live View. In addition, changing camera settings during Live View is also supported.
Compatible Leica camera and lenses support focus nudge using the Focus Nudge tool. This applies to the Leica S (Typ 007) and S3 cameras with the Leica Super-Elmar-S 24 and the Leica Elmarit-S 30 CS lenses. You can tweak the focus at three different intervals.
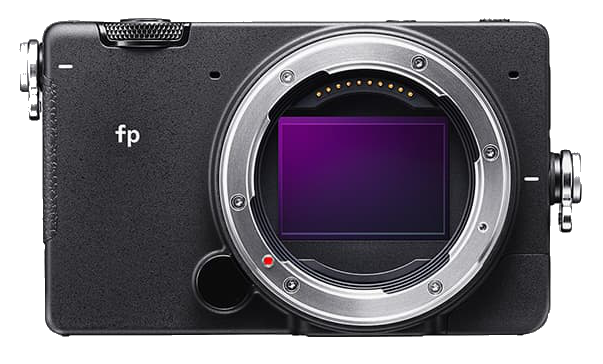
Sigma tethering is now available for the Sigma fp and Sigma fp L cameras. This includes file transfer, exposure trigger, changing camera settings, basic Live View, and autofocus.
New Cameras And Lens Profiles
As with almost every release, Capture One 21 Update 3 and 4 support more camera raw file formats and additional lens profiles.
New Cameras
These releases add RAW support for the following cameras:
- Fujifilm X-T1 IR / X-S10 tethering / GFX 50S II / X-T30 II
- Nikon Z fc
- Olympus E-P7
- Panasonic Lumix G99 / G95 / G90 / DC-FZ80 / GH5 II
- Pentax 645Z
- Sony ZV-E10
Lens Profiles
These releases add lens correction profiles for the following lenses:
- Fujifilm Fujinon XF 16/18/27/50/10-24/70-300 mm
- Fujifilm Fujinon GF30/80 mm
- Sony FE 35/40/50 (f/1.2 & 2.5) mm
- Sigma 15/16/20 Art/85 Art/105 Macro Art/105/28-70 mm (Sony E)
- Sigma 35mm F1.4 DG DN / Sigma 35mm F2 DG DN / Sigma 24-70mm F2.8 DG DN (Sony E and L mount)
- Canon EF 70-200 2.8L IS II USM + 1.4x III
- Canon RF 24-70mm F2.8L IS USM
- Olympus M.Zuiko Digital ED 8-25mm F4.0 PRO
- Phase One RS 150mm MKIII Aerial
- Phase One Industrial – Schneider Kreuznach RS 80mm-Ar
Thank you
For reading the combined Capture One 21 Update 3 and 4 review. Please feel free to leave a comment. Please like us on Facebook or subscribe to our newsletter to stay informed about new blogs.
Best Regards,
Image Alchemist











Processing, Recipes, Output, Variants, Export, Options, Merging, Combinations, Versions… looks like C1 is getting more complex or worse from version to version. If you are using C1 only once in a while, you are completely lost. You have to use it every day. Or read Pauls blog on a regular basis. Or go back to Lightroom.