Capture One 22 Review
In this Capture One 22 review you read about all the new features: panorama stitching, HDR merging, auto rotate, Canon, Sony, and Nikon wireless tethering. And of course the new camera raw files and lenses that this release supports.
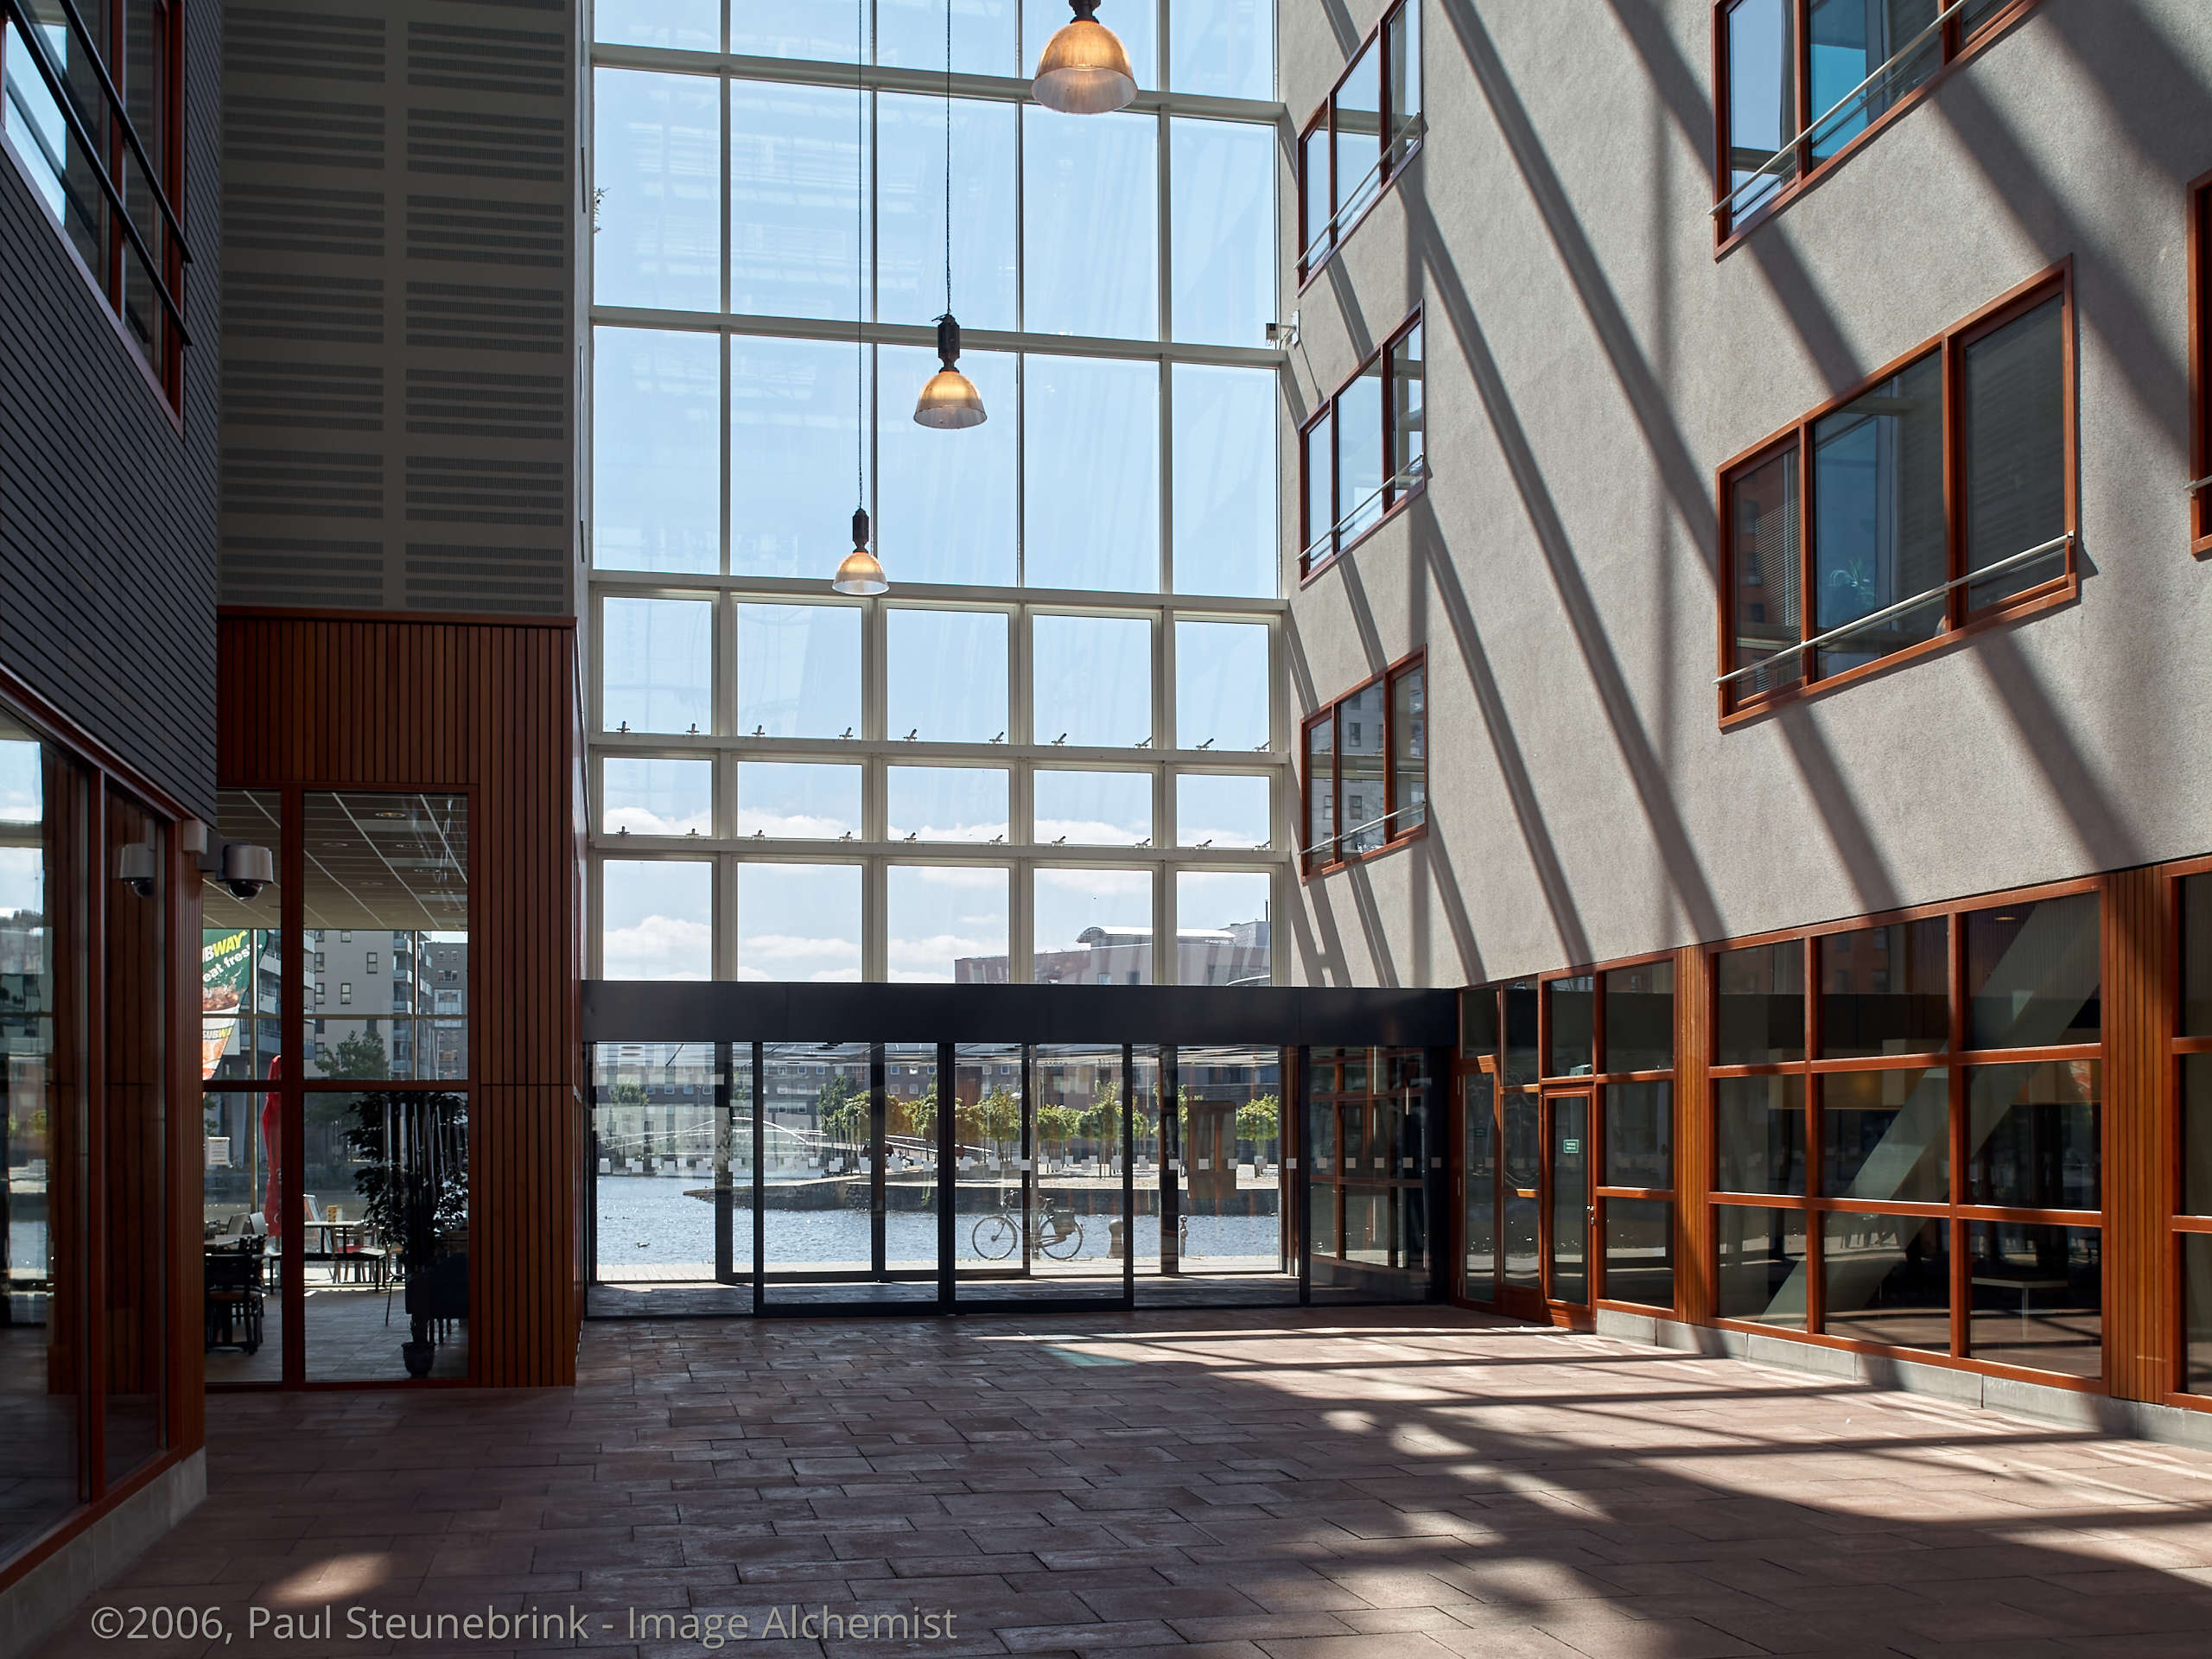
Capture One 22 Review Up To Build 15.4.1
Capture One 22 (build 15.0.0) was introduced in December 2021. In 2022, Capture One released several updates with new features, improvements, and user experience enhancements.
This review looks at what is new since the last Capture One 21 release. The review is current up to build 15.4.1.
Features
- Panorama stitching
- HDR merging
- Auto Rotate
- Canon wireless tethering
- Canon saves to card and computer during tethering
- Sony wireless tethering
- Keystone redesign, including Auto Keystone
- Magic Eraser
- Cloud Transfer from iPad
User Experience
- Default collection sorting
- Crop aspect ratio saved per image
- Style Pack functionality
User Interface
- Tool panel redesign
A few new cameras were introduced recently, and you will find raw and tethering support for them in this release. There are also several new lenses added to the Lens Correction tool.
Panorama Stitching
If your wide-angle lens is not wide enough, or you like to create a high-resolution image, you shoot a series of RAW images and merge them later in Capture One. The new Panorama Stitch tool outputs a linear DNG file, and you can further edit this file as a raw file in Capture One. 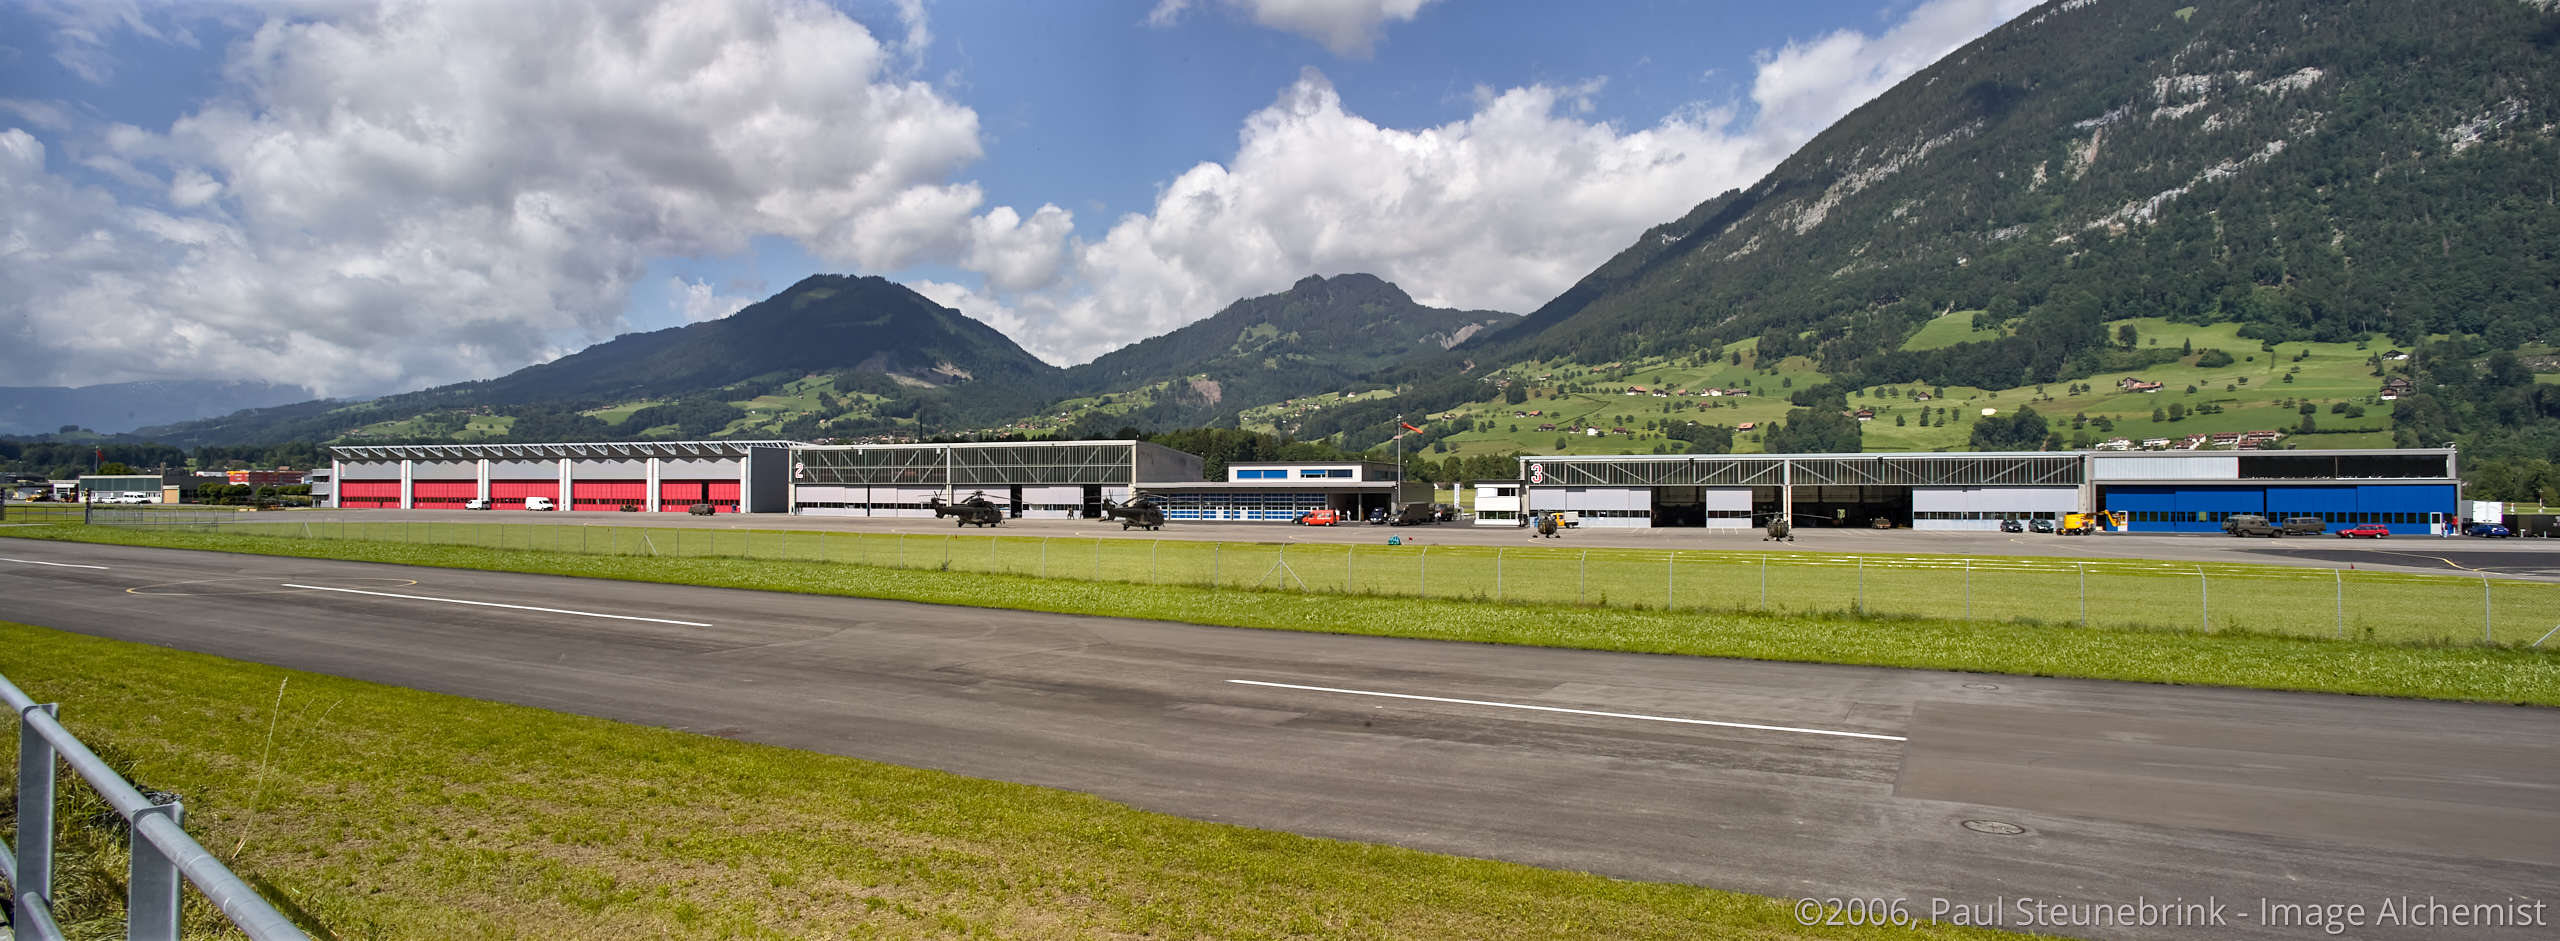 A successful panorama stitch starts with how you capture it. I mostly switch to manual mode to lock focusing and exposure. A tripod helps, as does a 20-40% overlap. Next, you give your images the same adjustments. Use the Lens Correction tool to adjust any light falloff. Note that the panorama stitch ignores layer adjustments. Please refer to this online video from Capture One for best practices. You best use a lens with a 35mm focal length (full-frame equivalent) or longer. Capture One can stitch multiple rows of images.
 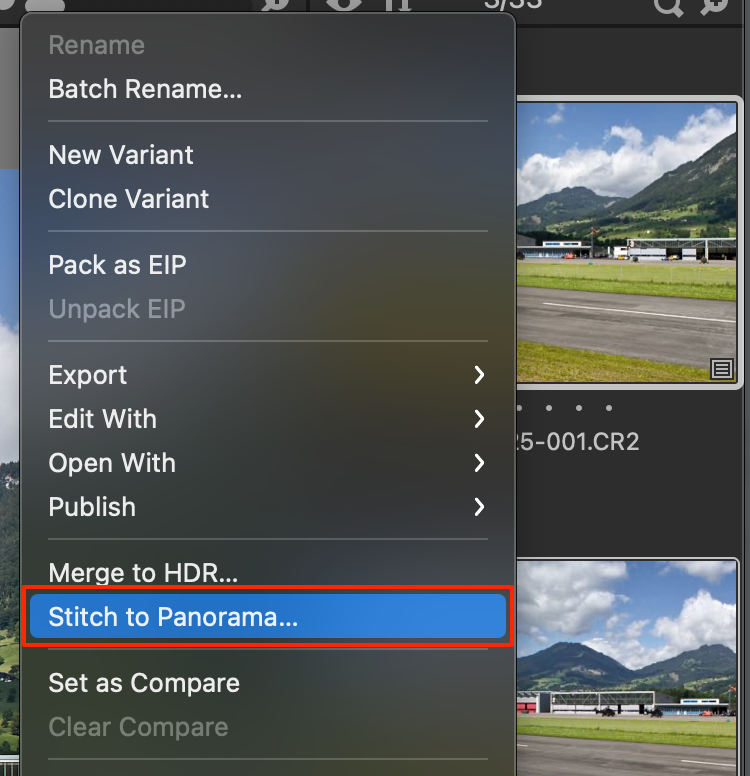 Panorama stitching in Capture One 22 is easy. Select your images, right-click on a thumbnail, and select Stitch to Panorama. The Stitch to Panorama screen opens.
 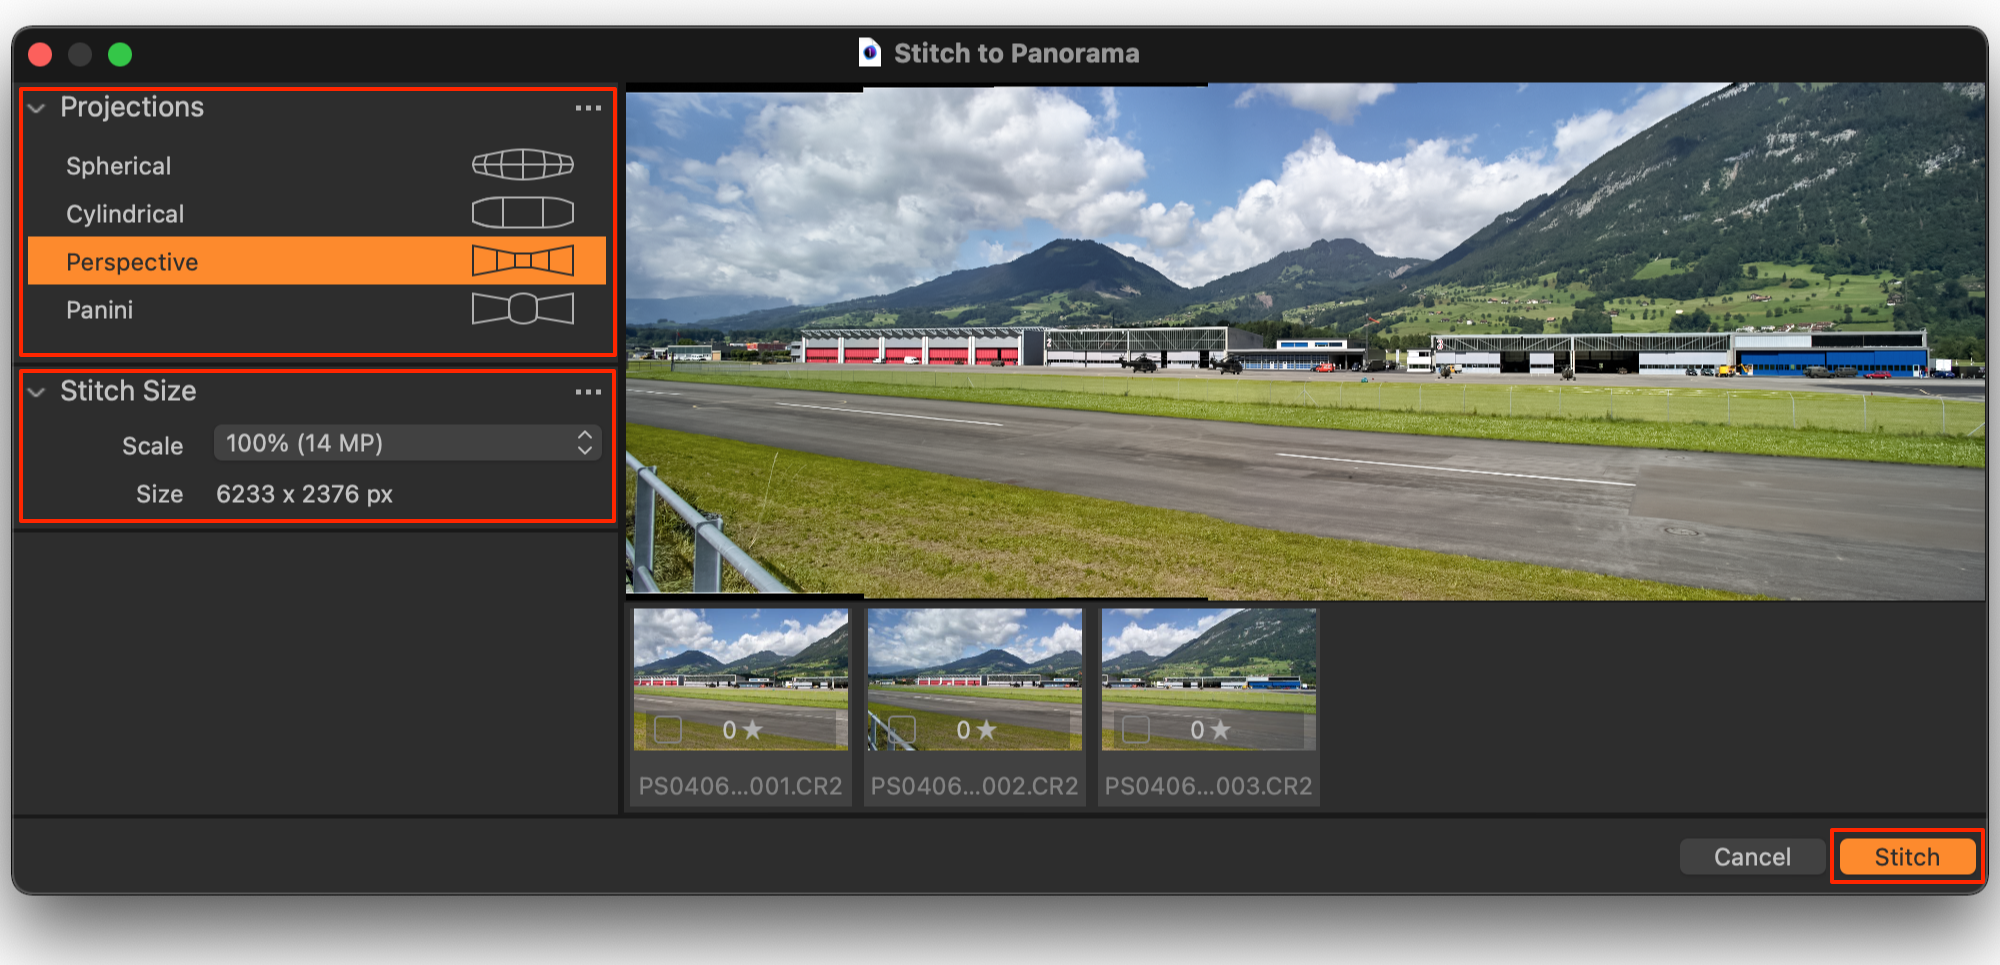 On the Stitch to Panorama screen, you can select one of the Projections:
- Spherical for multi-row stitching, with stitching both horizontally and vertically
- Cylindrical for single-row stitching, a standard projection when shooting from left to right or vice versa
- Perspective for images that cover less than 100 degrees field of view and for images captured with tilt & shift lenses
- Panini for architectural images where the vanishing point is at the center of the frame.
Below the Projections tool, you can adjust the size of the panorama, and the Stitch Size tool reports the current size of the panorama. You usually would stick to 100%, but above 600-megapixel editing, in Capture One becomes slow, and 715-megapixel or 65,000 pixels long edge is the maximum size. When the preview is ready, click the Stitch button, and Capture One creates the panorama DNG file. It stores the file next to the original files, with the file name of the last image plus the suffix ‘_Panorama’.
HDR Merging
It is no coincidence that Capture One introduces Panorama stitching and HDR merging in the same release. Both features combine multiple raw files into one new linear DNG file that you can edit in Capture One. 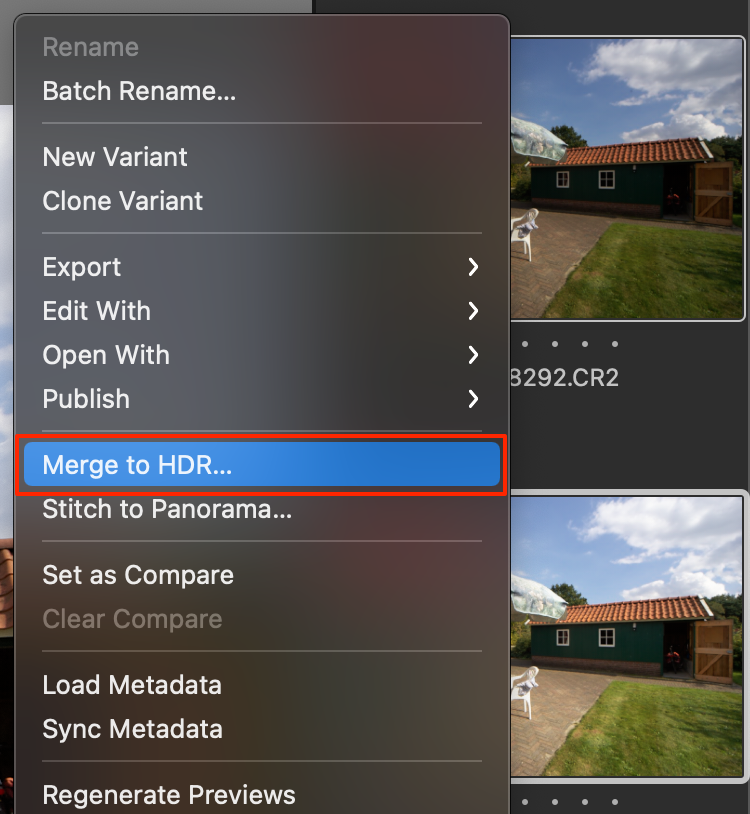 HDR merging in Capture One 22 is easy. Select your images, right-click on a thumbnail, and select Merge to HDR. The Merge to HDR dialog appears. In the Merge to HDR screen, you have two options:
- Auto Adjust
- Auto Align
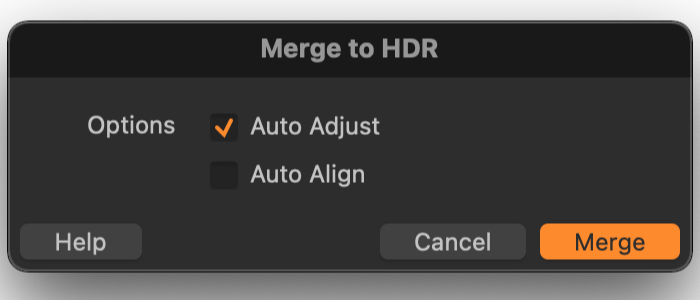 The Auto Adjust option automatically adjusts the Exposure, High Dynamic Range, and Levels for an instant pleasing result. You can alter the image, disable Auto Adjust, and do it yourself after the merge. See my comment below on what Auto Adjust does more below the surface and why I always enable it. The Auto Align option is great for handheld shots or when you are unsure whether the images align perfectly.
Images shot with a tripod and a remotely controlled camera may not need this option. Disabling Auto Align speeds up the merge process. When you are ready, click on the Merge button. Once the merge is ready, Capture One saves a new image file next to the original files with the name of the last image file in the series with an ‘_HDR’ suffix. You can also refer to an online video from Capture One about HDR merging.
Notes from the field
You do not have to adjust your images before the HDR merge. The merge works with the raw data, neglecting adjustments and adapting after the merge.
Auto Rotate
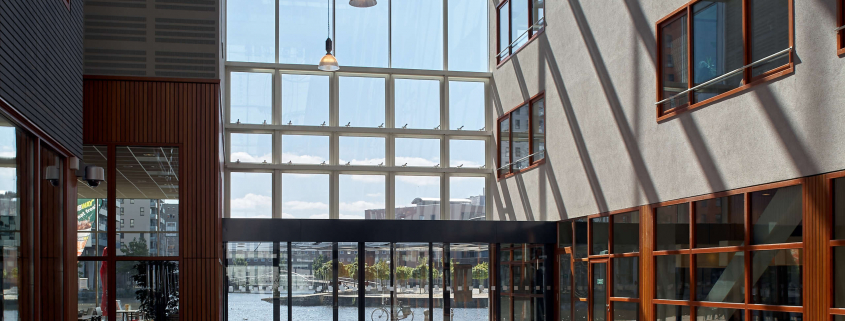
The Rotation & Flip tool now has a wizard that stands for auto-correction. The Auto Rotate feature gets its magic from artificial intelligence. You can also access it via the Adjustments menu > Auto Adjust if you enabled Rotation in the Adjustments menu > Configure Auto Adjustments.  As with other auto-correction types, like the Exposure, Levels, or White Balance tool, you can perform it on multiple selected images, automatically correcting each image. Unfortunately, Auto Rotate needs some further tweaking and learning. With the 15.0.0 release, I did not get satisfactory results, and the Auto Rotate feature did not correctly level the horizon in the image above.
Keystone Renewed
In build 15.2, the Keystone tool got a remake. There is a new tool layout with two tabs, auto-correction, a Skew slider, and better visibility of guides in the Viewer. Let’s have a look.
Auto Keystone
You now have two tabs in the Keystone tool: Guides and Sliders. You can either use the guides in the Viewer or the sliders.
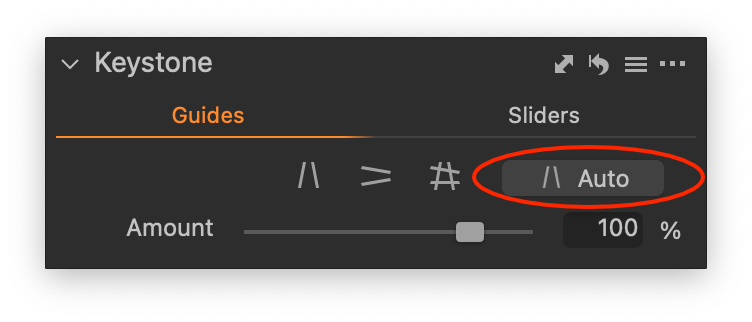
On the Guides tab, you can select the vertical, horizontal, or both guides and the Auto button for automatic correction. The automatic correction analyses the image and corrects it accordingly. We already saw a similar feature in Auto Rotate since build 15.0, and it is Capture One’s first step into the AI realm.
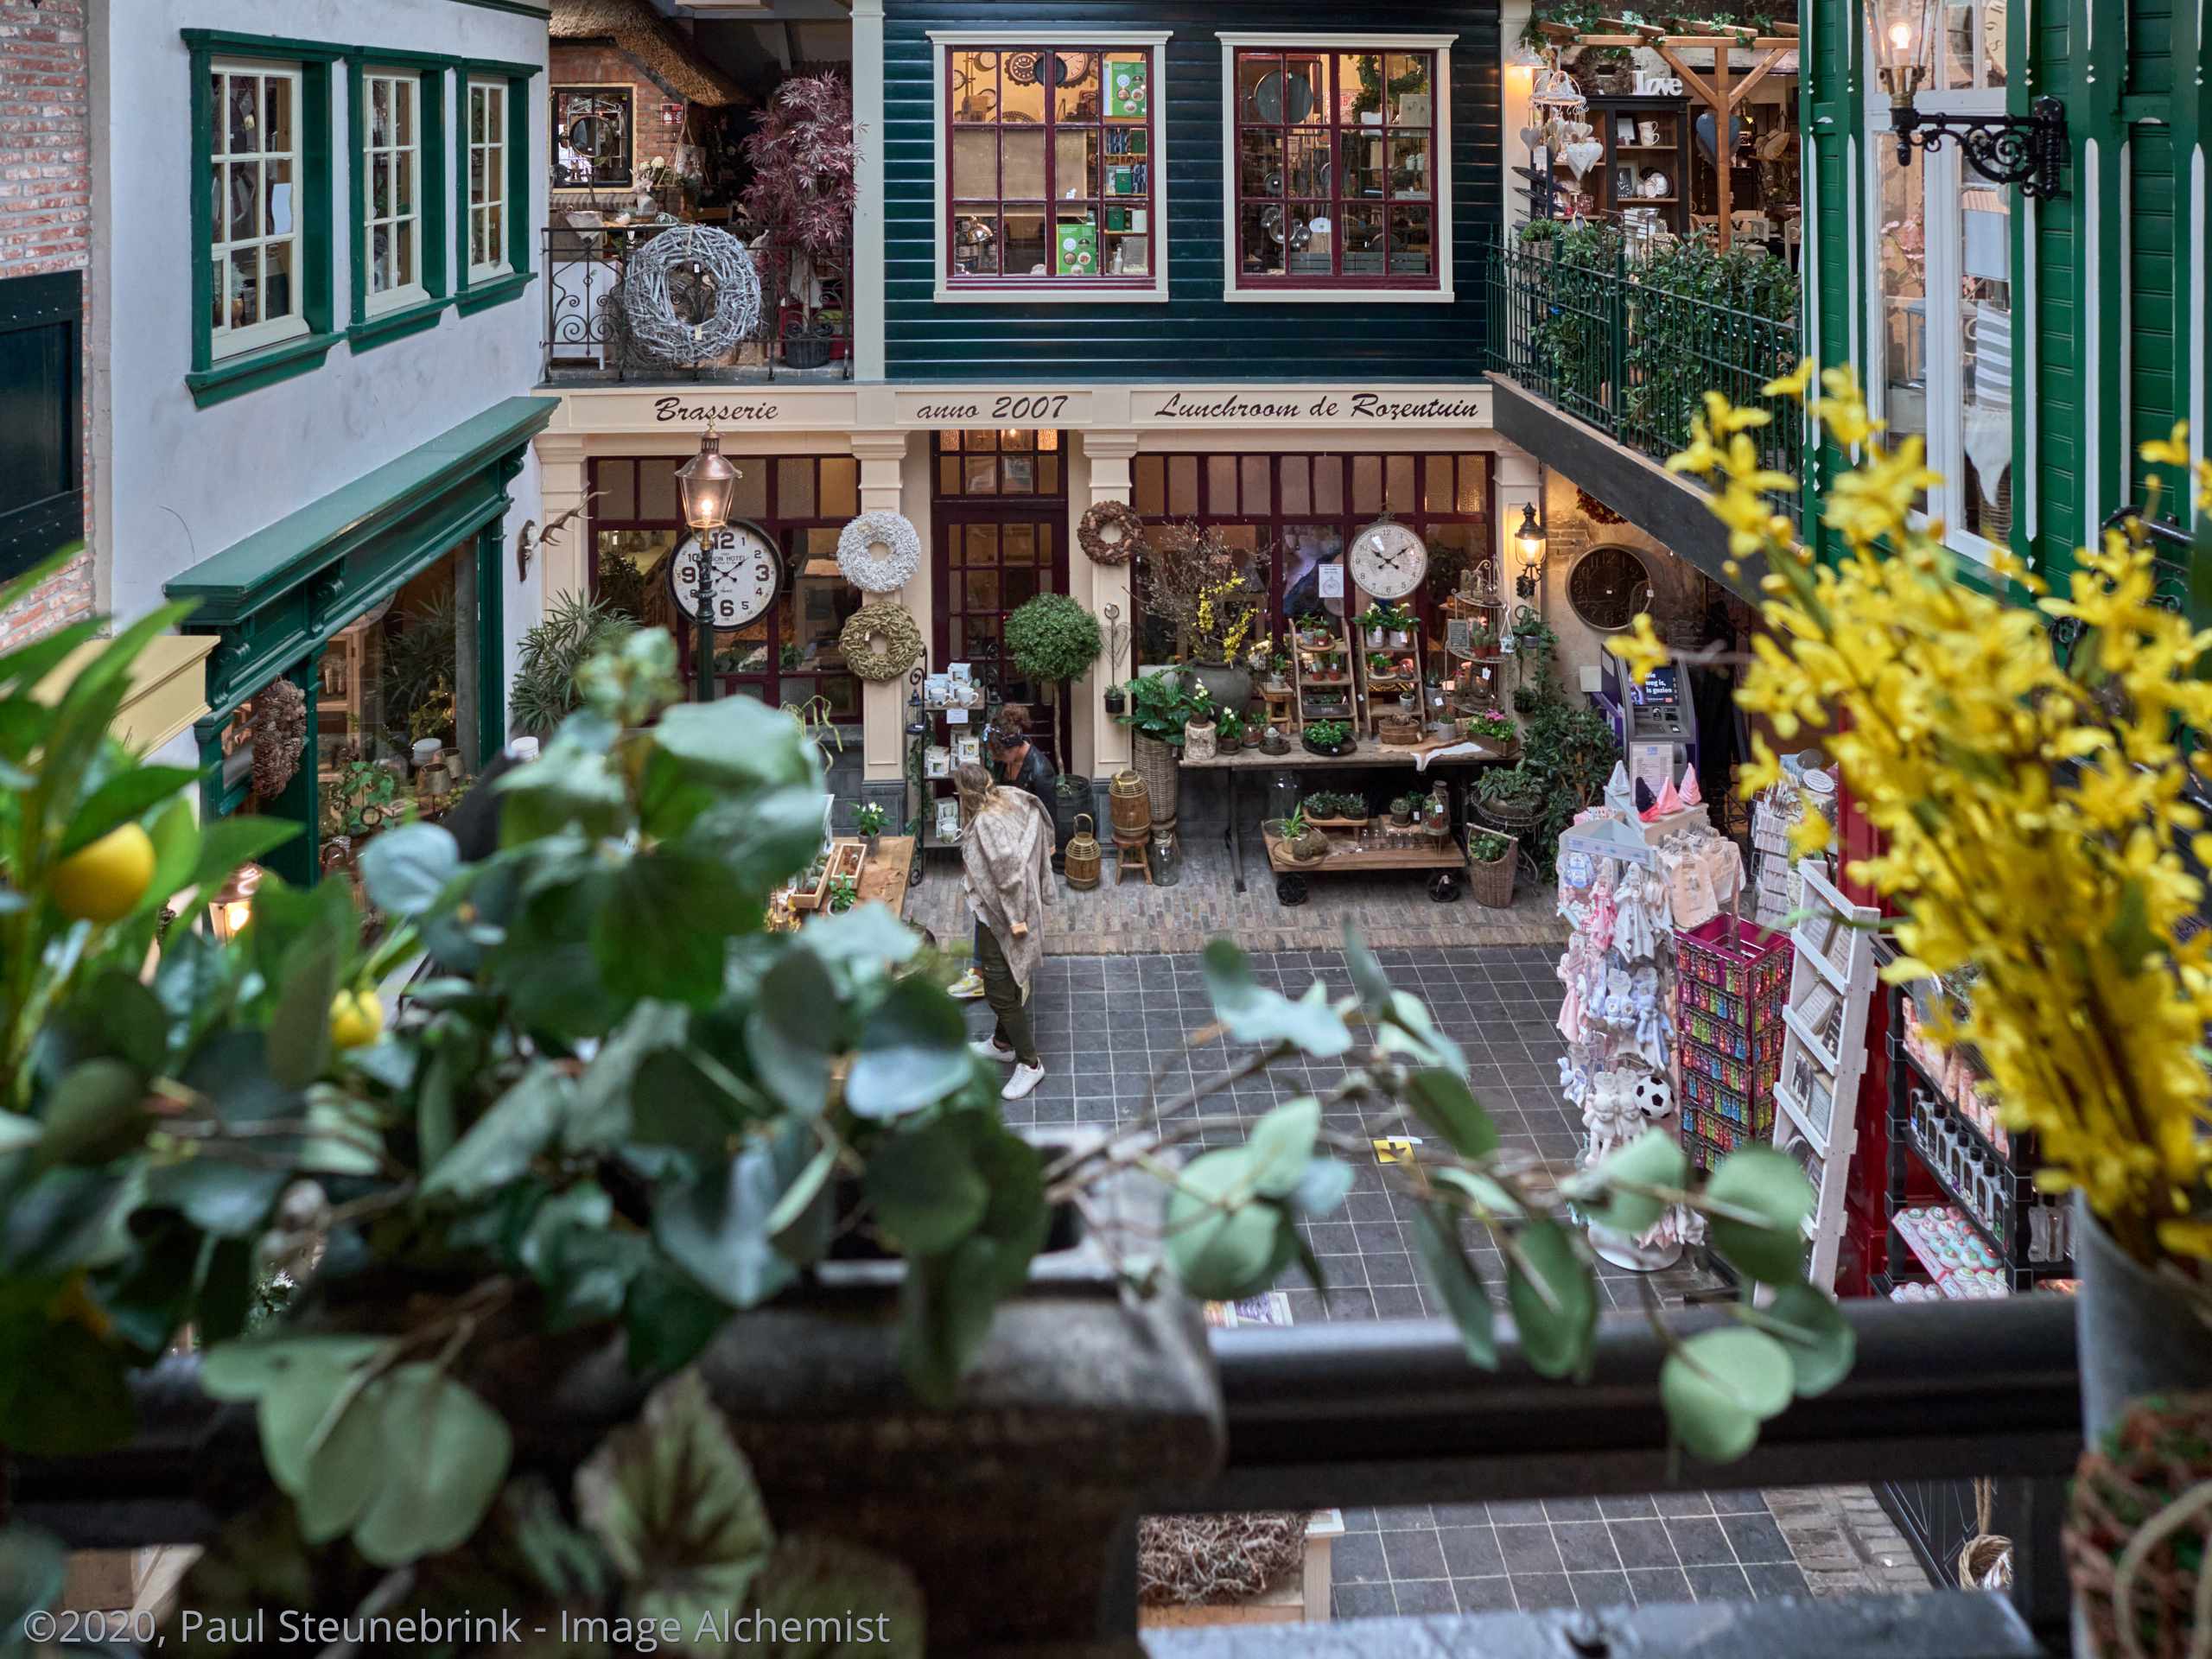
You see the Amount slider you already knew from earlier versions on the Guides tab. Note that the Amount now defaults to 100%, instead of 80%, as in the past.
Skew
On the Sliders tab, you find four sliders. Three sliders, Vertical, Horizontal, and Aspect, are familiar, and new is the Skew slider.
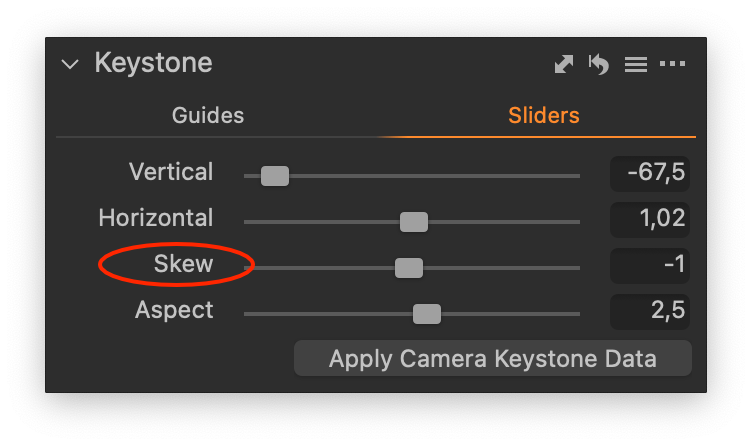
The difference between the Aspect and the Skew slider is that Aspect stretches the image vertically, and Skew diagonally from the image’s corners. The screenshot above represents the settings of the picture. With a Skew of -1, I gave the image a more natural look.
Magic Eraser
About one year ago, with Capture One 21 (build 14.3.0), I was thrilled to discover the new Magic Brush. With Capture One 22 (build 15.3.0), its counterpart sees the day of light; the Magic Eraser.

The Magic Eraser works on an existing mask, and this mask must be rasterized, not a parametric mask like the Linear and Radial Gradient tools. You can create a filled adjustment layer and work your way with the Magic Eraser to the desired result.
You enable the Magic Eraser from the Layers tool or the Cursortools in the Toolbar. The Magic Eraser works similarly to the Magic Brush, erasing the mask for your selected color.
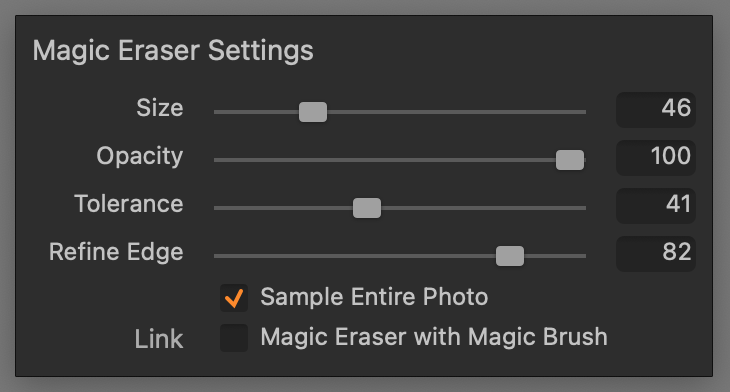
You can set Size, Opacity, Tolerance, and Refine Edge for the Magic Eraser, and there is an option to link with the Magic Brush.
Cloud Transfer From iPad
Capture One 22, build 15.3, is the first version that lets you work with Capture One for iPad. The iPad version can publish albums to the cloud, so-called Cloud Albums, including image files and adjustments. Each Cloud Album you publish is available in Capture One for download, which is Cloud Transfer.

Manually add the Cloud Transfer icon to your Toolbar. When you click on the icon, the Cloud Transfer dialog opens.
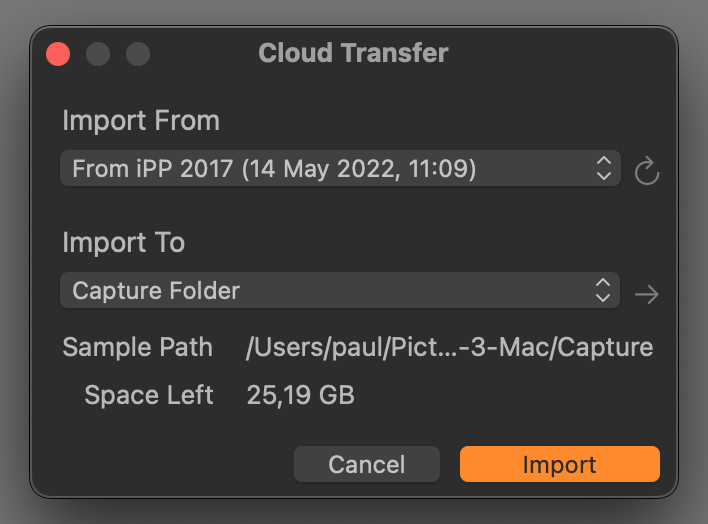
The dialog is a tiny import dialog with Import From and Import To options. In the Import From drop-down list, you choose the Cloud Album. You can have multiple Cloud Albums from a single iPad with Capture One or have Cloud Albums from different iPads.
The Import To section is like a regular import where you select a Session folder when you work with a Session or any folder when you have a Session or Catalog. Currently, the transfer is one-way, from iPad to desktop.
Tethering Improvements
Capture One 22 comes with several improvements to shooting tethered. They affect Canon and Sony shooters.
- Canon wireless tethering
- Canon saves to card and computer
- Sony wireless tethering
- Nikon wireless tethering
Canon wireless tethering
Capture One 22 lets Canon shooters tether wirelessly for a selection of camera models. The tether process itself works identically to that with a USB connection. Supported models are:
- Canon EOS R, R3, R5, R6, R7, R10, 1Dx III, 1Dx II, 5D IV, and 90D.
Capture One recommends an additional WFT grip or adapter for optimal performance.
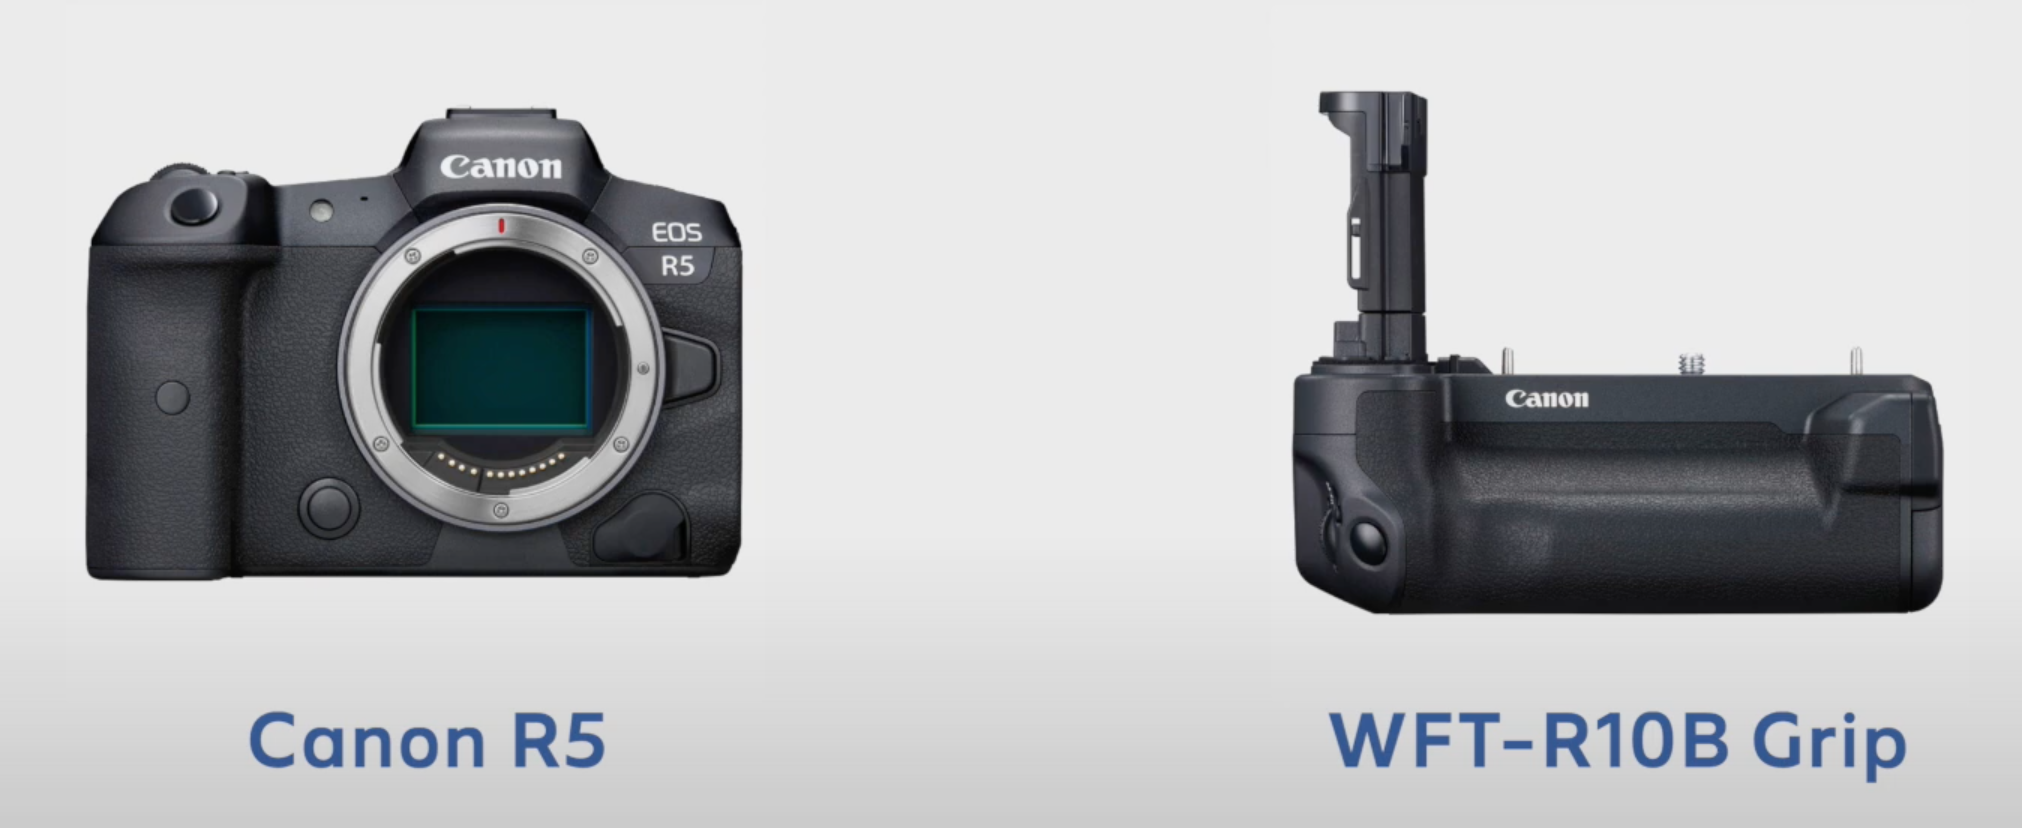
Please refer to the online tutorial Capture One published for instructions on setting this up.
Canon save to card or computer
With your Canon camera, you can now choose between saving to a card or computer. The Camera Settings tool has a Save to option.

You can choose to save to a card, computer, or both. You can save different formats at different locations, enabling RAWs to be stored on the card and transferring JPGs to the computer. This workflow will speed up wireless tethering for previewing purposes.
Tip: wipe your card before you start shooting because your operating system will index the card’s content. The waiting time will increase with the number of images saved on the card.
Sony wireless tethering
Wireless tethering with Sony is not new, as it is already built-in to recent camera models. However, you had to use the Sony Remote application from the Sony Imaging Edge suite. Now you can use this feature with Capture One from build 15.3 onwards.
The Sony cameras that support wireless tethering with Capture One are the Sony A7R IV/IVa, A1, A7 IV, A9 II, A7S III, A7C, FX3, and the ZV-E10.
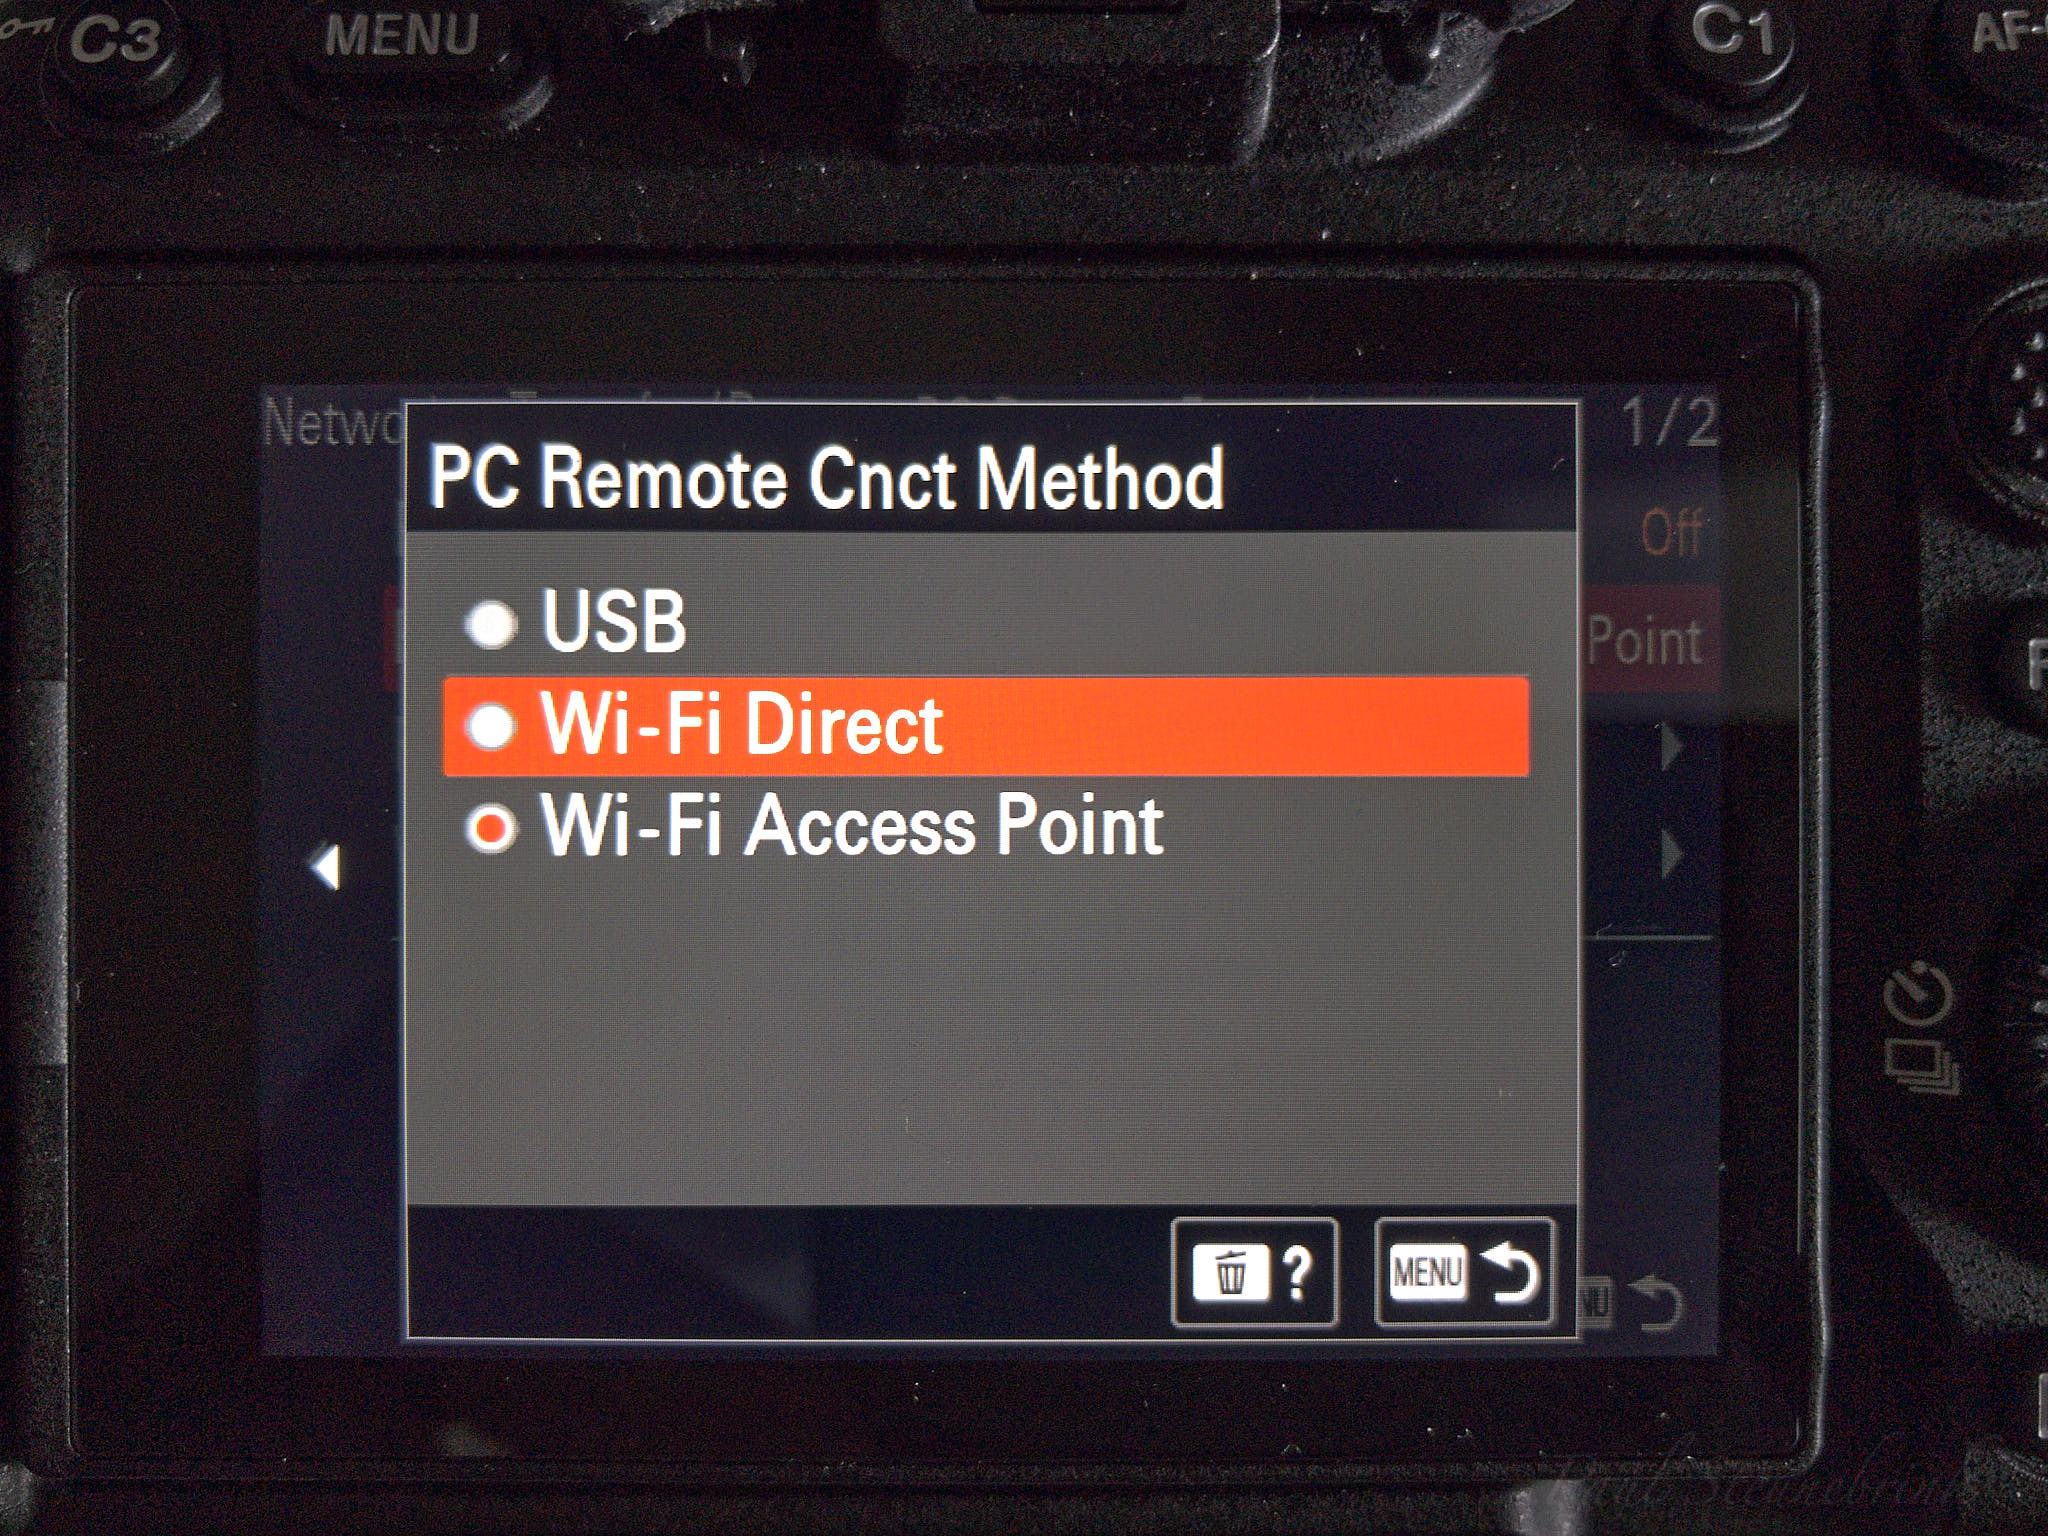
The Sony A9 II and A1 also let you tether via an Ethernet cable. You can use Ethernet over much longer distances than USB.
In the camera, you select the PC Remote Connection Method. Instead of USB, you choose either Wired LAN, WiFi Direct, or WiFi Access Point. In my post, Tethering Sony with Capture One, you will find all the details for each camera model.
From the side of Capture One, go to the Camera tool. With a USB connection, Capture One automatically recognizes and lists the camera. You might need to open the No camera available drop-down list and select your camera with the wireless connection.
Nikon wireless tethering
From build 15.4.0 onwards, Capture One 22 supports wireless tethering for the Nikon Z9 and D6. For the D6, you need the additional WT-6 wireless transmitter.
User Experience Improvements
There are several areas where the user experience has improved: sort order, crop ratio, and Style Pack functionality.
Default collection sorting
The ability to fix the sort order of images in a collection is a long-standing request. Since Capture One 22 (build 15.2), there is a new option in the Preferences > General tab.
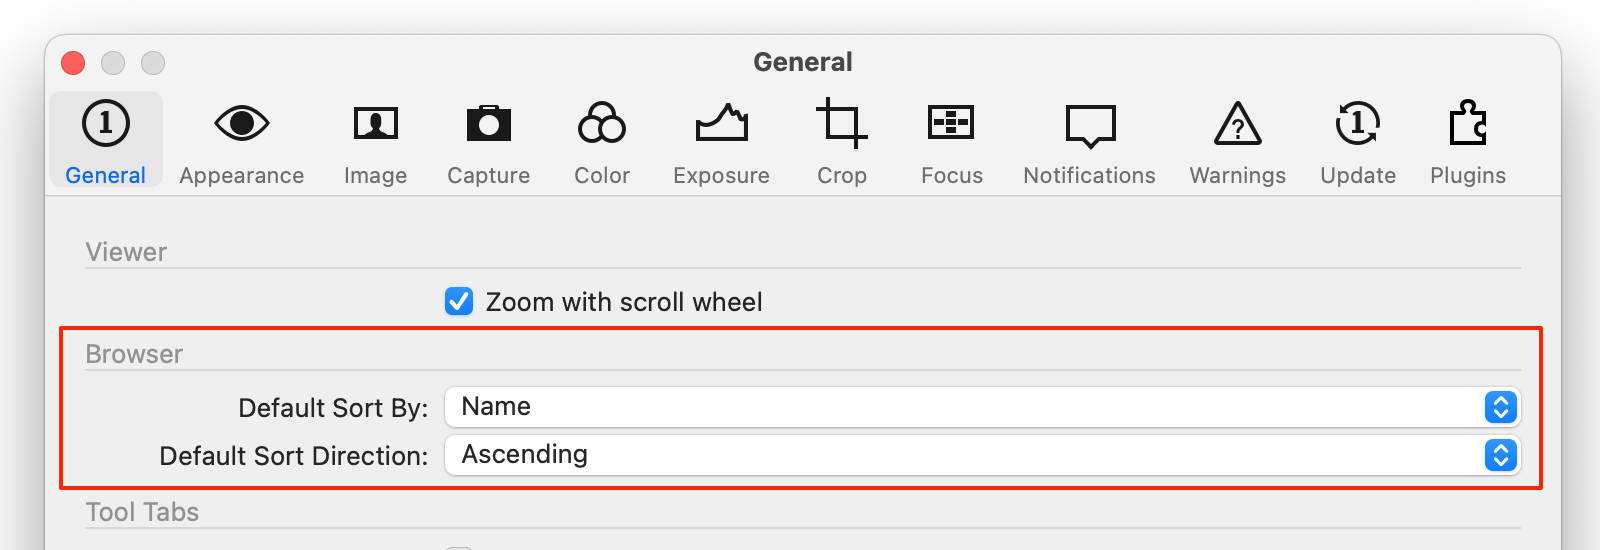
In de Browser section, choose your preferred sort option and the direction. Note that this is the default sort order. You can change it later for each collection separately.
Saved crop aspect ratio
Since 15.2, changing the Aspect Ratio from the Crop tool will immediately apply this ratio to the selected image. This enhancement makes working with different aspect ratios easier and more intuitive, as you don’t have to change the crop for the new ratio to apply.
In Capture One 22, build 15.3, the crop aspect ratio is a property of the image, not the program. When you crop one image in your collection in a 3:2 ratio and the next in 4:3 and go back to the first, the crop tool will continue with a 3:2 ratio until you change it for that image. When you copy and apply a crop from one image to another, you copy the ratio with the crop.
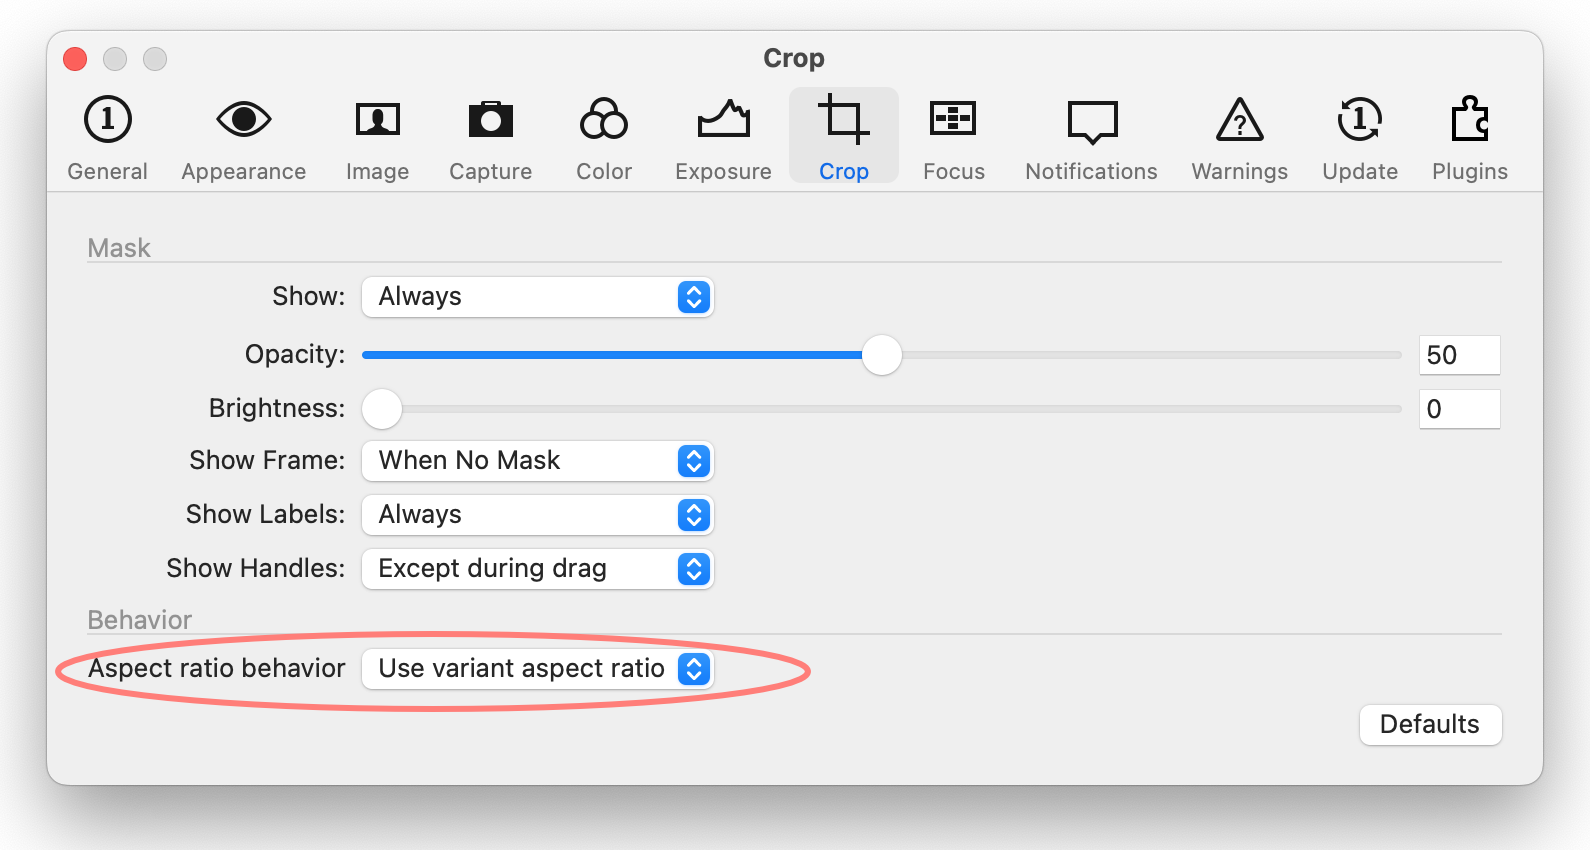
The default aspect ratio is Original. Although it is a great feature to have the crop variant based, it does not suit everybody. Therefore, Capture One 22 (15.3.1) introduces a preference setting to have the crop global or variant-based.
Style Pack functionality
You can pack multiple Styles into a single pack, a Style Pack. Installation is easy: double click on the Style Pack. But due to lack of confirmation, users sometimes accidentally install a Style Pack multiple times. And deleting a Style Pack from Capture One was impossible and had to be done at folder level in a hidden tree structure. Not user-friendly.

Capture One 22, build 15.3, now comes to the rescue. First, a confirmation message helps you to prevent double installation. Second, deleting a folder with Styles, like a Style Pack, is accessible from within Capture One.
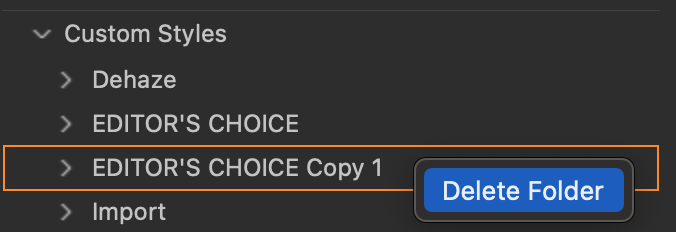
Right-click the parent folder and select Delete Folder. Confirm in the confirmation dialog.
Last, you can distribute Style Brushes as a Style Pack and Styles in the same pack.
Tool Panel Redesign
Capture One 12 (2018) reorganized the menu and removed differences between Mac and Windows. With Capture One 22, build 15.3, you will notice the new icons in the tool tabs.
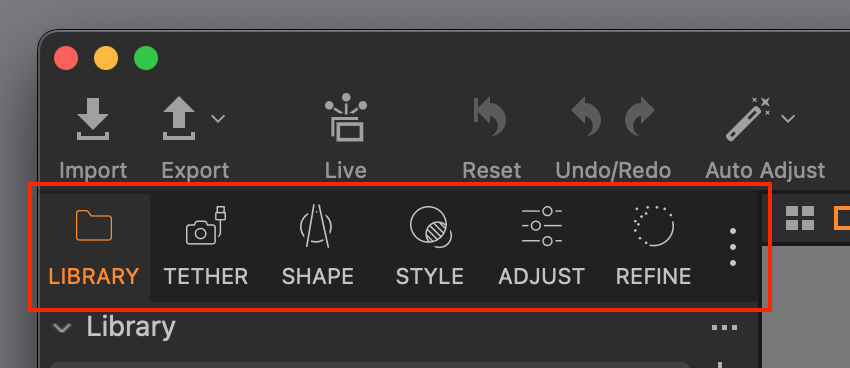
To summarize the changes:
- new and larger icons with text
- compact mode with smaller icons without text (see screenshot below)
- fewer tool tabs
- reordered tools
- three-dot menu for easy customization
- tool tabs and icons align with Capture One for iPad
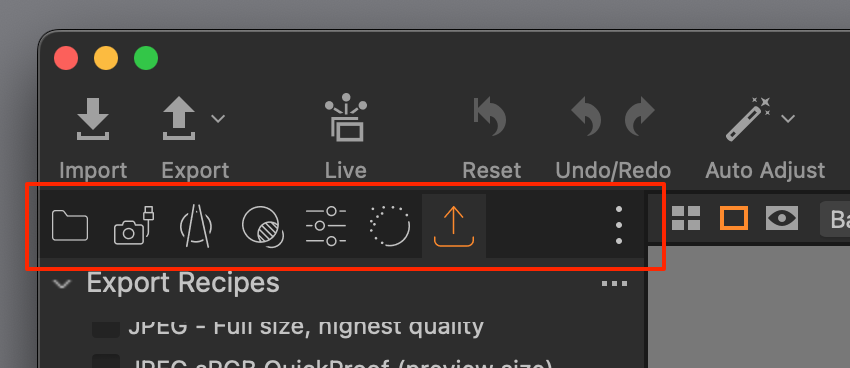
Capture One 22 saves the previous workspace; the previous default workspace is available as Default (Legacy). If you had a custom workspace, you might want to check and save them again.
New Camera And Lens Support
A Capture One 22 review is incomplete without a list of new cameras and lenses.
New camera support
Compared with the latest Capture One 21 (build 14.4.1), Capture One 22 supports the following cameras:
- Canon EOS
- Ra
- R3
- R5C
- R7
- R10
- M50 MkII
- DJI Mavic 3 (native DNG)
- Fujifilm
- X-H2
- X-H2s
- Leica M11
- Nikon
- Z9
- Z30
- Olympus OM System OM-1
- Panasonic GF8
- Phase One iXM-GS120
- Sony A7 IV
New lens correction support
Compared with Capture One 21 (build 14.4.1), Capture One 22 supports the following lenses for lens correction:
- Canon RF
- 14-35mm F4L IS USM
- 24-240mm F4-6.3 IS USM
- 100-500mm F4.5-7.1 L IS USM
- 50mm F1.8 STM
- 85mm F1.2 USM DS
- 85mm F2 Macro IS STM
- 800mm F5.6L IS USM
- 1200mm F8L IS USM
- Canon EF
- 70-200mm F4L IS II USM
- Canon PowerShot G1 X Mark III
- Fujifilm
- Fujinon XF 18-120mm F4 LM PZ WR
- Fujinon XF150-600mm F5.6-8 R LM OIS WR (Super EBC)
- Fujinon GF45-100mm F4 R LM OIS WR
- Olympus
- M.Zuiko Digital ED 20mm F1.4 PRO
- Panasonic
- Lumix G Vario 12-32mm F3.5-5.6 ASPH. MEGA O.I.S.
- Sony FE
- 70-200mm F2.8 GM OSS II
- 70-200mm F2.8 GM OSS II + 1.4X Teleconverter
- 70-200mm F2.8 GM OSS II + 2X Teleconverter
- Sigma
- 20mm F2 DG DN | C
- 24mm F2 DG DN | C
- 24mm F3.5 DG DN | C
- 30mm F1.4 DG DN | C
- 45mm F2.8 DG DN | C
- 56mm F1.4 DG DN | C
- 65mm F2 DG DN | C
- 90mm F2.8 DG DN | C
- 18-50mm F2.8 DC DN | C
- 100-400mm F5-6.3 DG DN OS | C
- 100-400mm F5-6.3 DG OS HSM | C
- 150–600mm F5-6.3 DG DN OS | S (L-Mount)
Thank you
Thank you for reading the Capture One 22 review. Please feel free to leave a comment. To stay informed about new blogs, please like us on Facebook or subscribe to our newsletter.
Best Regards,
Image Alchemist





Leave a Reply
Want to join the discussion?Feel free to contribute!