
Capture One Variants
When you start working with Capture One, you quickly come across the term Variant. What does it mean and how is it used throughout the program? This tutorial blog shows you all aspects of the term Variant and how you can use it to your benefit. Get ready for Capture One Variants!

Capture One Variants
When you shoot an image, open the image file in Capture One, you have one variant. Easy as that. In Capture One you can adjust that variant, give it a rating, and export it. A second image you open in Capture One is another variant. Now you can copy adjustments from one variant to the other. And you can export both at the same time.
For now, just remember that Capture One links an image file with a set of (possible) adjustments, a preview, and a thumbnail. This set is called a variant. OK, child play. Next step, please.
What Is A New Variant?
Here starts the magic coming in. A New Variant is a new version of a variant you already have. What happens when I create a new variant? Is the image file copied? No. Is a new preview file generated? No. Is a new but empty set of adjustments made? Yes!
So a New Variant is the same single image file, same single preview file, but with its own set of adjustments. It looks like a new image in the Viewer and Browser. You can treat it as a separate image and adjust, rate and export it independently.
Additional variants of the same capture are great for keeping both a cropped and uncropped version of the same image or to compare an adjusted with a not adjusted version.

In the example shown above, you see one image file name beneath four different variants in the Browser. Variants three and four are selected and displayed in the Viewer.
Note that you can change the order of variants by dragging or using the promote, demote and pick commands. How? Right-click on the thumbnail or pay the Image menu a visit.
How About Cloning?
Same trick, different spell. A Clone Variant is like a New Variant. But when you clone, you copy the adjustments you already made to the originating variant to the variant you create. The clone variant is an exact copy and a great starting point for additional adjustments.
In the example above you see a colored and black & white version selected. Note that they are two variants from a total of four of a single image file.
Selecting Variants
“Master your Variants, and your life will be eternal!” (medieval belief).
For a fast workflow, you often like to work with a selection of images, which are actually a selection of variants (some may be new or cloned). Such a selection is often just a subset of an entire folder or album with many more variants. Now Capture One comes with a new term, the Primary Variant! No need to be scared. It’s easy again, I promise.

With only one variant selected, you automatically have your Primary Variant selected. You can see a fat bright border around the variant in the Browser. The Primary Variant is always in the action. Whatever you do, the Primary takes the heat. Whether you adjust, rate or export (to name a few), the Primary Variant is affected.

With more variants selected, only one is the Primary and the remaining are the other selected variants. The other variants have a thin bright line in the Browser around them.
The Viewer also plays the game along with the Browser. With only one variant selected in the Browser, it is business as usual in the Viewer. However, with multiple variants selected, the Viewer gives you two options or Viewer modes: Multi View and Primary View. You can set this from the View menu >Viewer Mode or from the upper left corner of the Viewer window.
Sounds complicated? Here’s the catch.

In Multi View mode all selected images are shown, to a maximum of 12, in the Viewer. The Primary Variant has a white border. In Primary View mode only the Primary Variant of your selection is shown. Try it and you’ll never forget.
Now Primary Is King?
“Fine, so I have a Primary and Other Variants“, I can hear you nodding. Please note that within a selection of images, you can always change the Primary by clicking on another variant in the Viewer or Browser. What does this distinction mean in Capture One? How do you use it and benefit? To explain, I will make three remarks.
First, as I told you, the Primary Variant is always in the action. Whatever you do, the Primary is affected. When you move the sliders of a tool or change a value, it only affects the Primary, not the Other Variants. This way you can individually adjust an image within a selection; you do not have to break up a selection.

For the second and third remark below, I must tell you something about a switch, a toggle. It is the Edit All Selected Variants toggle and you can find it in the Edit menu and on the toolbar. By default, it is On and then the second and third remark applies.

Second, when you copy adjustments with Capture One from one to other variants you always copy from the Primary to the Other Variants. So the Primary is the source, and the Other Variants are the target. Therefore, select your Primary carefully within a selection when you copy adjustments.
Third, actions like delete, export, move, and clone affect all selected variants equally. Also when you apply a preset or style (predefined adjustments), all variants are affected equally.
But, with the toggle Edit All Selected Variants switched Off, only the Primary is affected. This allows you to export or move just a single variant while retaining a selection, or apply a preset to only one variant: the Primary.
Ever Wanted to Compare?
In a series of similar images, you like to select the best, as quickly as possible. You can display up to twelve variants in the Viewer, but Capture One has another trick up its sleeve: the Compare Variant.
Where the Primary is King, the Compare Variant is the Queen for sure, having the beauty and the cleverness.
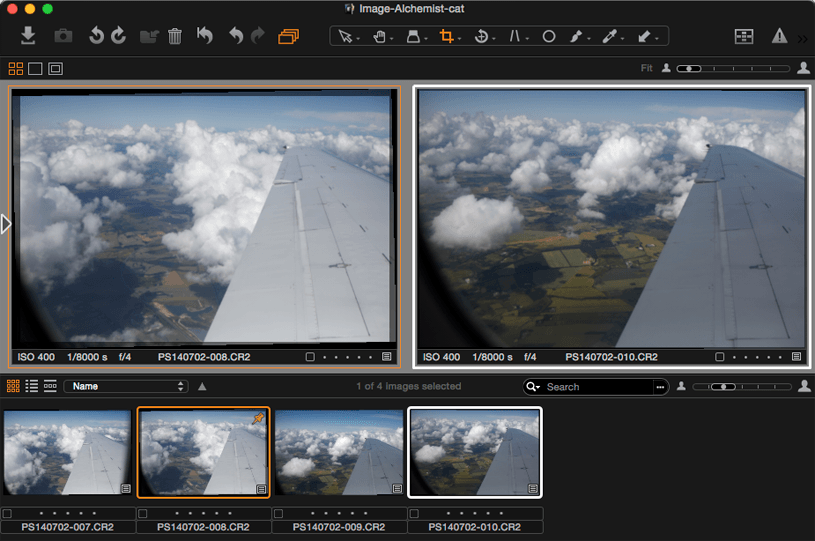
When you set the Viewer mode to Multi View (from the View menu), and make a variant the Compare Variant (Edit menu), Capture One displays the next image next to the Compare Variant. Now browse through your images. The Compare Variant remains seated on its throne (left in the Viewer), not moving until you find a better one while browsing.
Hit the Enter key, which is a shortcut to the Compare Variant, to make the Primary (right) the Compare Variant and the play continues. You really have to see this. Seeing is believing!
You recognize the Compare Variant by the orange border around thumbnail and preview. And, yes before I forget, you can clear the Compare Variant from the Edit menu or the Cmd+Enter (OS X)/Ctrl+Enter (Windows) shortcut.
Note that the keyboard shortcuts changed in later versions. You find the right shortcut in the Edit menu. Also note that you can change the color of the orange border of the Compare Variant in later versions in the Preferences, Appearance tab.
So, that’s it. Take a deep breath and take a rest. You made it.
Thank You
For reading. Please feel free to leave a comment. Like us on Facebook or subscribe to our newsletter to stay informed about new blogs.
Best Regards,
Image Alchemist


Is there a way to name a variant? Let’s say I want to make adjustments to a cloned variant for print. I want to remember that this variant was adjusted for print using a certain ICC profile.
Or is there a better way to go about this?
Thanks
Hi Joshua, good question. No, you can not name a clone variant. On output however, you can alter the name of the file with a suffix that you enter in the Process Recipe. More on that in https://imagealchemist.net/capture-one-process-recipes/
Do not hesitate to contact me direct if you need more guidance.
Best, Paul Steunebrink / Image Alchemist
Thanks for the reply. I think I will have to contact C1 about this, seems very easy to implement and would be very useful. I suppose I could output a raw copy of a photo specifically processed for a certain ICC profile, but what a waste of space. The less files the better for me.
Hi
macOS Photos has a handy feature where pressing ‘m’ will toggle between displaying the original and modified image. Does Capture One 10 offer a similar feature, or must I create a variant, and hence do a side-by-side comparison?
Many thanks
Paul
Hi Paul, since Capture One 10.1 there is a Master Temporary Reset. You find details in my 10.1 review.
Best Paul Steunebrink / Image Alchemist
Hi Paul,
there’s one simple function I cannot find: Let’s say I have 2 variants of 1 picture: One color, one b&w. Now I have two collections. One collection should have my b&w variants, the other should have the color image.
It doesn’t work as I can only put the variants as a whole into a collection. That’s a mess.
Any solution for this?
Thanks
Tobi
Hi Tobi,
The solution is to use Smart Albums. For example, give all your B&W images a purple tag (or whatever color). Create a Smart Album that only shows images with purple tag. Done.
Best, Paul Steunebrink / Image Alchemist
Thanks Paul. This is my workaround right now. But it’s not as intuitive as setting up a collection (e.g. for print) simply with drag and drop. It feels like the easiest way of putting images together in one collection does not work.
That is correct. You can not separate variants from a single image file except through Smart Albums.
I am trying out (studying & training so to speak) Capture One. For me, the proof of the pudding is in the printing (I judge my pictures by the prints, not by their display on screen) and am about to make my first large print of a C1 processed image. If that looks good, I will be a happy customer. But every now and then during the past two weeks, especially the wording or defining of terms in C1 had me unnecessarily baffled or confused. See for instance the first sentence of this instruction, ‘…you have one variant’. That’s logically impossible. There is no such thing as ‘one variant’, as one single item can never be a variation of itself. Very confusing. (Paul, I am not blaming you, you’re just explaining things, and I am grateful for it.) May I humbly suggest adding an experienced text editor to the staff of C1? Your brilliant software is well worth it.
Hi Hans, thank you for your comments (and kind words). I am quite keen on wording, but so far the ‘one variant’ thing has not put me off, although I understand where you are pointing at. You could suggest it to Phase One, because highly attached, I am the man in the middle, between you and Phase One and I am happy to be in that position.
Best, Paul Steunebrink / Image Alchemist
Dear Paul. i am currently working with Capture One Pro 11 and i have a problem with variants. When i create a new variant, there is still only one variant visible in the browser. The only thing changing is the number of the given variant. It seems to me that the new variant file must be hidden somewhere and i cannot find the trick to make it visible. Can you help me with that feature? Thanks a lot, Reza
Dear Reza,
Different causes possible. Have you expanded the variants (Image menu, Expand)? Also possible that you view the variants from a Smart Album and that the new variant is not listed in that Album. If problem persists, contact me directly via Contact page.
Best, Paul Steunebrink / Image Alchemist
Great article Paul,
I’m currently using Capture 11. Formerly on 10 I would select my images and do a clone variant and it would make a variant for each selected image now it only does it for the primary. This slows my flow down big time. How do i get it to clone everything selected like v10?
Hi Rob, check the Edit All Selected Bariants toggle (Edit menu) as described in this post. It seems your accidentally switched it off. Put it back on and your are ready to go.
Best, Paul Steunebrink/ Image Alchemist