Capture One Pro 8.3 Review
Capture One Pro 8.3 review in a nutshell: faster tethering, better tools for configuring your camera during tethering, and new grid line options to help you compose better images.

Capture One Pro 8.3 review
I would like to summarise this Capture One Pro release as the tether-update. Not that only tethered shooters benefit from this update, but the focus is clear if you look at what is new.

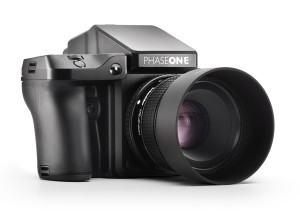
The release of Capture One 8.3 coincides with one of the most anticipated announcements for Phase One camera shooters: the Phase One XF camera alongside updated IQ3 series digital backs.
One of the main features of the IQ3 back over its predecessor is improved tethering. Phase One has taken this focus into the software as well and now we all benefit.
New Engine, New Tools
The tethering engine, which is doing all the work in the background during tethering, is totally rewritten and faster than before, on Mac. This engine is also known as the Capture Core Service.
While the tethering engine is invisible, the new and reworked capture tools are not. Here we have two interesting changes which are immediately apparent for all tethered shooters among us.
- the Camera tool is visually enhanced and mimics a camera display
- the Camera Settings tool is the improved and extended version of the former Camera Control tool, which it replaces
Both tools have some nice features I will discuss here in more detail below. You can find them both on the Capture tool tab.
Camera Tool
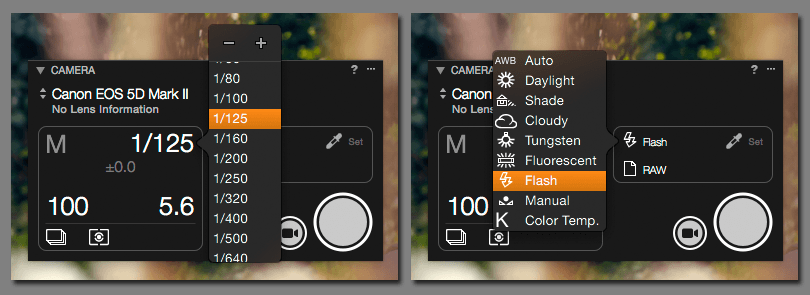
You see numbers, icons, and other indicators that have a resemblance to your camera. Items are bright or dimmed. Brightly lit items are configurable with a mouse click. This will open a list of all possible settings for you to set like shutter speed, file format, white balance, light metering mode and drive mode.
Two circular buttons, one small for Live View and one large for Capture, are now easily recognizable and impossible to miss.
The progress bar has left the building, it seems, but look again, and press the Capture button (with a camera connected). An orange segment around it indicates data is coming in (see red arrow in the screenshot above). You will only see it briefly or not at all as tethering is now very fast!
When you click on a bright lit value, a drop-down box opens and you can select another value from the list or use the ‘-‘ and ‘+’ signs like at the top of the shutter speed list.
More or Less? Get Inverted!
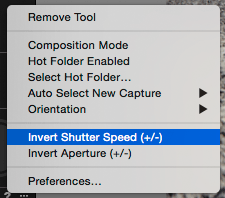
Are you a diehard in this field or a digital tech that wants to know it all? Click on the three dots in the upper right corner of the Camera tool to open its action menu. What you see is not specifically new to 8.3 but interesting nevertheless.
Apart from direct access to all related features you know from the Camera menu and to the related Preferences, you see the Invert options for shutter speed and aperture.
When adjusting these from the tool you can use the ‘-‘ and ‘+’ indicators for more or less. But what is more? Both values are inverted by design, so is going form 1/250 to 1/500 more or less? And going from f/4 to f/5.6? Never mind, don’t bother, you can have it your way with the Invert options.
Note that the inverted options apply to the Camera Settings tool as well and for both the regular Capture One window as well as the Live View window.
Camera Settings Tool
The new Camera Settings tool makes you forget its predecessor (the Camera Control tool) immediately. The new tool has more controls, a smarter interface and a search option.
Let It Scroll, Baby!
This is a pretty large tool with a lot of settings to configure. The settings are grouped in sections, like the Camera section and About section in the example above. Connecting a Phase One XF camera will give you a huge list of configurable options. In other words, you can configure your camera from Capture One Pro, even if you do not use it for tethering.
You can collapse each section to save space. Note that depending on the amount of space given in the tool tab, the tool will allow you to scroll.
More Settings
Added are ISO, white balance, image quality (file format), and drive mode, compared to the former Camera Control tool for a regular DSLR. The camera determines the precise list of settings.
Search?
First reaction: that is odd, a search tool in Camera Settings. Just try it for fun: ‘aperture’, or ‘shutter speed’. You get only that setting without distraction from all the other stuff. Yeah, sometimes Capture One can be so cool!
As a side note regarding the tool’s action menu, you have the same invert options as with the Camera tool, and what is more, they are connected (setting one, is setting both) as I mentioned earlier.
About Grid
To help you make the best composition Capture One Pro 8 can show you a grid of lines. The grid lines show during crop only, by default. You can change that from the Preferences, Crop tab, Show option. Here you can also change the number of lines, both horizontal and vertical (max. 60 lines each). The lines are evenly spaced.
Okay, that’s old stuff. However, on the same tab, you can now choose some fixed configurations of lines. The most appealing is the Golden Ratio and the Fibonacci Spiral. The Fibonacci Spiral brings two additional options, Clockwise and Mirrored.
If the Fibonacci Spiral is a bit too complicated to work with but you like to ‘rule of thirds’, try the Golden Ratio type. Note that the Golden Ratio is a 3×3 grid, but not evenly spaced.
Below, you see the main image of this post with the Fibonacci grid of Capture One Pro 8.3. For the occasion, I changed the color or the grid to make it more apparent, another great feature of this tool.
Tip
Would you like to have Capture One to show the grid lines when shooting, set in Preferences > Crop tab > Grid > Show: When Grids and Guides On
Tip
When using the Golden Ratio or Fibonacci Spiral, you can use any crop ratio. However, to line up the crop ratio with these grids, create a custom ratio of 21 x 34.
Levels Auto Adjust Fixed
Many bugs are fixed in this release without mention. This one I came across accidentally and I like to share it because I like it much. The auto-adjust option of the Levels tool always move the black and white point markers with at least one point to 1 and 254 respectively, despite a cropping histogram. This has been fixed and they stay at the 0 and 255 standard positions after Auto Adjust when no adjustments are needed.
Previous Reviews
Each Capture One 8 point update (8.1, 8.2) got its additions over the original 8.0 release. I reviewed each of them, and you can find them here.
Thank you
For reading. Please feel free to leave a comment. Like us on Facebook or subscribe to our newsletter to stay informed about new blogs.
Best Regards,
Image Alchemist


Leave a Reply
Want to join the discussion?Feel free to contribute!