Synchronize Referenced Catalog Images
Synchronize referenced Catalog images makes sense when the Catalog and the folders with images differ. Either the Catalog has images that the folder does not contain anymore, or the folder has images that the Catalog is not aware of. In either case, synchronization is the answer to solve any mismatch.
Synchronize Referenced Catalog Images
Is it me, or is the synchronization feature for referenced images underrated? Anyhow, if you come from another application, you might be familiar with Catalog synchronization. But as with many similar features, it works a bit different in Capture One.
This is the third post on the maintenance of Catalog images. In an earlier post, I discussed Move Managed Catalog Images and Move Referenced Catalog Images.
Main Features
What are the main features of synchronization in Capture One? First, it is for Catalogs only, not for Sessions. Second, it is for Catalogs with referenced images and their folder, not for managed images.
Referenced images are stored in folders outside the Catalog folder, while managed images are stored inside the Catalog folder.
The contents of a folder with imported images may change over time. Pictures are added or removed since the last import. Or you did not import all images, but you want them anyway at a second thought.
These are the scenarios where the Synchronize command can help you.
How To Start Synchronization
There are two ways to start synchronization to synchronize referenced Catalog images. One is via the File menu > Synchronize Folder command. Note that you must select the folder to synchronize first in the Library tool > Folders section.
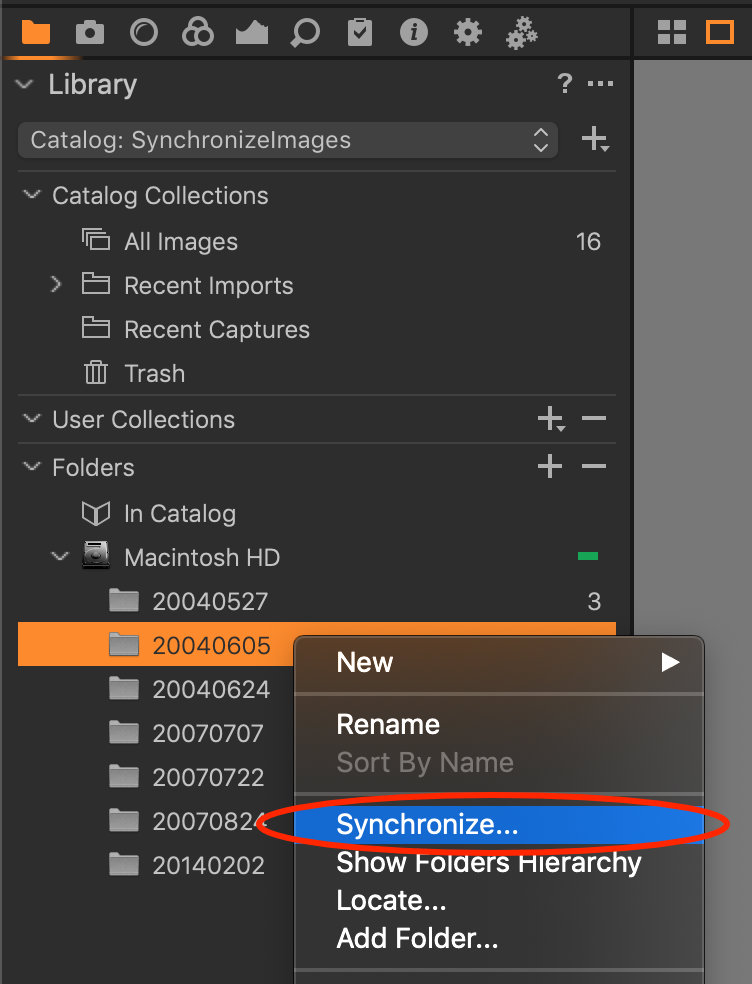
The other way is to go to the Library tool > Folders section first, where you right-click on the folder to synchronize and select Synchronize… from the menu. Note that you can select a parent folder as well. Synchronization can work in the chosen folder plus subfolders but only in known subfolders.
This restriction means that subfolders that are not known to Capture One – you never imported images from these folders – are not included. There is a workaround for that, which I will cover at the end of this post.
The Synchronize Dialog
When you open the Synchronize dialog to synchronize referenced Catalog images, Capture One immediately gets to work, looking for new and missing images. Now you have two possibilities:
- New images
there are images in the folder that are not in the Catalog - Missing images
there are images in your Catalog that are not in the folder anymore
Of course, a combination of both can happen as well.
New Images
Capture One imports the new images for you when you click on the Sync button. Capture One will instantly add the new image to your Catalog, with adjustments if they are available in a .cos sidecar file or if it is an EIP file.
Capture One import all new images. Optionally, you can choose to enable the Show importer check box. In this case, after clicking on the Sync button, the Importer opens with the new images in the Importer. There you can select which image to import and which not.
Note that almost all options in the Importer dialog are grayed out, except for the Adjustments section, where you can decide whether or not to include existing adjustments or apply auto adjustments.
Missing Images
With the Synchronize feature, you can also remove missing images from your Catalog. Assume that you removed already imported images from a folder with another tool than Capture One. Capture One still has the preview and a link to the image in its Catalog database.
Before you remove missing images, you can click on the Show Missing Images button. Capture One creates an album named Missing images in the folder “<folder_name>” that contains the missing images.
Now you can decide which image to remove from the Catalog.
Synchronize An Unknown Folder
As I mentioned earlier, the Catalog must know the folder before you can synchronize it. But in case you have images in a folder that is new to Capture One, that folder is unknown.
Now it is obvious to use the importer to import those images, which will also include the folder into the Catalog. But we can also play a little bit.
In the Library > Folders section, you can add a folder.
Right-click on any object in the Folders section, preferably on a folder that is a parent to the folder to add, and select Add Folder… Selecting the parent folder is for easy of use, not a functional necessity. Alternatively, you can simply click on the plus (+) sign in the Folders section, as I did.
In the Finder/Explorer window that opens, browse to the folder to add and click the Add button. The folder now appears in the Library > Folders section, but without images (it has no number).
Next, right-click on the folder you just added and select Synchronize… and follow the instructions on the screen to add new images.
Thank you
For reading. Please feel free to leave a comment. Like us on Facebook or subscribe to stay informed about new blogs.
Want to try Capture One? Or would you like to buy it?
Best Regards,
Image Alchemist


Leave a Reply
Want to join the discussion?Feel free to contribute!