Using Metadata in Capture One
Using metadata in Capture One is perhaps not the most obvious part of your workflow. With some small steps, you step into the world of IPTC. After a brief introduction, you are ready to give your photos a descriptive text to help you to find them when needed.
Using Metadata In Capture One
Metadata means information about data. In our case, the photo is the data, and metadata tells the viewer something about a photo.
Where and when was the photo made? On what assignment, or which trip? Who are the people on the image? Who is the creator of the image, and how claims the copyright? These are just a few examples of metadata.
Metadata is a must for professionals but I highly recommend its use to any photographer, even the occasional shooter. Metadata can help you find an image in your collection, protect your copyrights, or help a publisher find you as the photographer.
More on Metadata
With this post, I focus on the user who is not yet using metadata. I explain the capabilities of Capture One in this area. I have planned consecutive posts on metadata to cover this vast area from different angles.
- Using Metadata In Capture One
this post; covering metadata in general, and the Metadata tool in particular - Using Keywords In Capture One
discussing the use of keywords, and both the Keywords and Keyword Library tools - Using Photo Mechanic With Capture One
looking into a metadata workflow with a tool outside Capture One - Geotagging Your Images
showing different tools and workflows to geotag your images - Filter And Search Your Images in Capture One
about rating and tagging, filtering, and searching images
Two Types Of Metadata
From a practical point of view, there are different types of metadata: EXIF and IPTC. Understanding the difference helps you to enjoy the benefits and prevent confusion.
I cover both types of metadata below. You can skip this section, as it is rather theoretical. However, I find it useful to provide you with at least the basic background information that helps you understand where all this is coming from.
The EXIF Standard
You have metadata that the camera writes into the image file, known as EXIF, or Exchangeable Image File Format. This type of metadata is a standard most manufacturers of digital cameras use to record information in the image file.
The camera writes technical information into the image on capture. Examples of EXIF metadata are date and time, ISO, focal length, shutter speed and aperture, and model of the camera. Note that Capture One handles EXIF as read-only and therefore can not change it.
Sometimes, however, you like to change the EXIF. For example, you shot a series with two or more cameras and their internal clocks did not align. This makes it difficult to merge them in the proper order. There are several tools on the market to change the EXIF data and time.
If you like to read more about the EXIF standard, just search or start reading the Wikipedia page.
The IPTC Standard
The second type of metadata is what you add to the image. This is mostly referred to as IPTC metadata. IPTC is a definition of fields and the information they should contain. Where Capture One treats EXIF as read-only, IPTC, on the other hand, is fully writable in Capture One as in other programs that handle IPTC.
The International Press Telecommunications Council maintains the IPTC standard. This standard has many revisions, starting with the legacy IPTC-IIM. Today, the IPTC standard exists of two schemas, IPTC Core and IPTC Extension. A schema defines the fields and the information that you store in these fields.
On the other hand, there is the XMP or Extensible Metadata Platform standard, developed by Adobe, and now maintained by ISO. Today, XMP is an IPTC Extension and as a result, integrated into the IPTC standard.
Capture One saves IPTC like other adjustments and reads both IPTC that is embedded in the images file as well as in XMP files. You may be familiar with adjacent XMP files, next to your image files.
You find more information about the IPTC standard for photographers at the IPTC Photo Metadata Standard page. Here you can download the reference image that you see above.
And another source at Photometadata.org describes the different fields in IPTC-IIM and IPTC-Core.
Working With IPTC in Capture One
Whether you work for many years with IPTC metadata or just decided to start today, as a Capture One user, you have two options for your metadata workflow. One possibility is that you only use Capture One for your metadata. This post covers all the nuts and bolts for this scenario.
Your second option is that you use another program for metadata, either exclusively or in combination with Capture One. In this scenario, you have to configure both the other application and Capture One for the desired synchronization options. In this second scenario, the preferred method for transferring and exchanging metadata between software is the XMP sidecar file.
There is an excellent Capture One support article from about metadata that you might want to read as well.
In the remaining part of this post, I concentrate on using Capture One exclusively for your IPTC metadata. In another post, I look into different scenarios where I use both other software and Capture One in conjunction.
Starting With Metadata
Capture One can handle metadata in different ways. In Preferences > Image tab > Metadata section at the bottom, you see an option for synchronization and two settings about what is preferred.
In the scenario where you exclusively use Capture One for your metadata, you leave these settings to their default, as in the screenshot above. I also discussed it in Capture One Preferences, part 2.
Capture One’s standard behavior regarding metadata is that it will read the image metadata on the first opening. In a workflow where you exclusively use Capture One for metadata, this is perfectly fine.
Maybe you added metadata to the image file with another program before opening in Capture One for the first time. Capture One reads that metadata on the first opening as well.
I discuss other metadata scenarios with their Preferences settings in a consecutive post.
Working with Metadata In Capture One
You have done your first steps let us consequently have a look at the tools that Capture One offers for your metadata workflow.
- Metadata tool
review the EXIF, write all IPTC data except keywords - Keywords tool
manage keywords for your images - Keyword Library tool
manage your keyword libraries
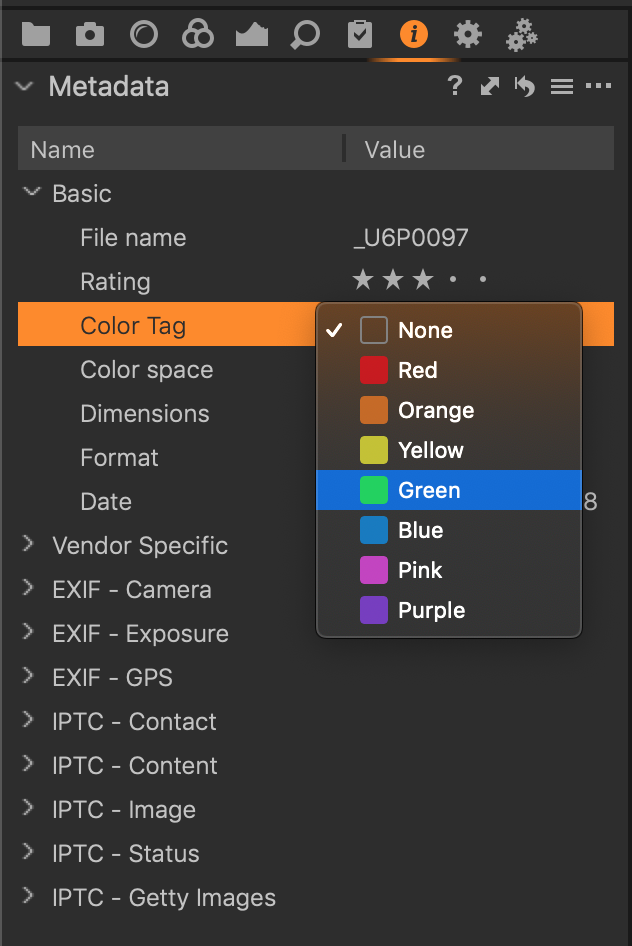
You find all these tools on the Metadata tool tab. And for completeness, star ratings and color tags are also metadata, as well as annotations. You use the Annotations tool for that.
This post explains the Metadata tool. A consecutive post discusses the Keywords and Keyword Library tools.
Copying metadata between images
Inside Capture One, metadata is as any adjustment. As a result, you can copy and apply metadata from one image to the other. However, you have to enable the metadata items on the Adjustment Clipboard after a copy command to prevent accidentally replacing metadata between images.
Resetting metadata
You probably know that you reset all adjustments of an image via Adjustments menu > Reset or Cmd+R/Ctrl+R. Note, however, that this command does not reset metadata. To reset metadata, including rating, tags, and annotations, you must use the reset option of each of the tools.
Enjoying metadata with Capture One
Before you start with metadata, you want to understand the benefits, in particular, in more extensive collections that most people store in a Catalog.
All search features, including the Filters tool and Smart Albums, work with metadata. Tokens that you can use for naming and renaming images also work with metadata.
Enough preparations. Let’s take a closer look at the tools and start using metadata in Capture One.
The Metadata Tool
The Metadata tool is a long list of fields with a value, divided over several sections or groups. Capture One separates EXIF from IPTC metadata. At the top, you find all the EXIF groups, followed by IPTC groups.
Basic
The first group is named Basic and precedes the EXIF groups.
You find the most basic information about the image here, like file name, dimensions in pixels, format, and date. Note that for RAW files, there is no color space. In the RAW field, you find information about the type of RAW, like cRAW for compressed RAW (Sony) or IIQ L for Phase One backs.
What is interesting about the Basic group is that you can read and write both Rating and Color Tag, but for the Primary Variant only, not for a selection of images.
EXIF
There are four EXIF groups, and they all have the EXIF-prefix, except for the Vendor Specific group. In case you have image files from different brands, you could browse through the images while keeping an eye on the fields in EXIF groups.
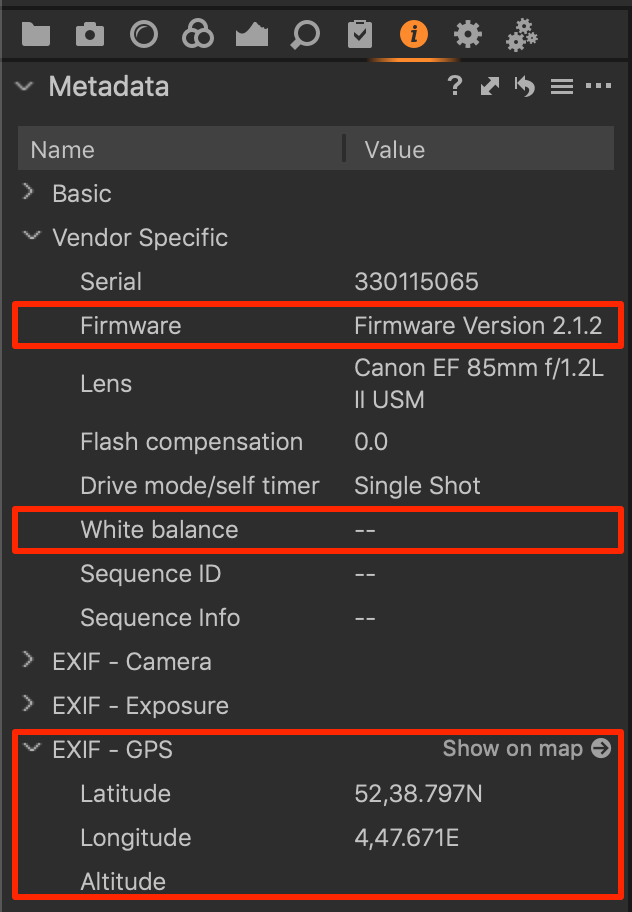
You sometimes find the camera’s firmware in the Vendor Specific > Firmware field, sometimes in the EXIF-Camera > Software field. Phase One digital backs use the Software field to report the software used for tethering.
You find a White balance setting under both the Vendor Specific or EXIF-Exposure group. Either one is used or both. When you set the white balance in the camera to a fixed value, EXIF-Exposure > White Balance reports Manual, and Vendor Specific > White balance indicates the chosen amount.
A group worth mentioning is the EXIF-GPS group. Although you can not enter GPS data with Capture One, a Show on map option appears when there is GPS location data. When you click on this option, it opens your browser with Google Maps at the specified location.
You often can write your name in your camera, either directly from its menu, or via software on your computer. Either way, you find your name back in both the EXIF-Camera > Owner and the IPTC-Contact > Creator fields.
IPTC
There are five IPTC groups in the Metadata tool in Capture One. The last group, IPTC-Getty Images, is for a specific group of users, so let stick to the remaining four groups.
When you expand the four IPTC groups for the first time, the number of fields is overwhelming. So let us make it simple.
Static IPTC
The IPTC-Contact and IPTC-Status contain static information. That means that you can fill in those fields with the same values in the fields each time. I often use a Metadata preset for that and call it the IPTC Stationary preset.
I created that preset for you already, and you can download it here. You load it in your Metadata tool, replace the information with your values, and save it again with the same or a new name.
Last, you can tell Capture One to use this preset for all images that you import or capture tethered. In the Import Images dialog, Adjustments section, Styles drop-down list, select your IPTC Stationary preset under User Presets. For tethered shooters, go to the Next Capture Adjustments tool, Styles drop-down list, and follow the same procedure.
Dynamic IPTC
In contrast to the more static information in the IPTC-Contact and IPTC-Status groups, the narrative of the photograph is unique. Each image can have a different description and location, to name just two fields from the IPTC-Content and the IPTC-Image groups.
In the screenshot above, I wrote the kind information I would usually put into these fields.
In case you like to copy specific fields to another image, use the double arrow in the tool’s header to open the Metadata clipboard. Capture One enables all fields that have a value. See for more options the next sections on the tool’s action menu.
Metadata Tool Action Menu
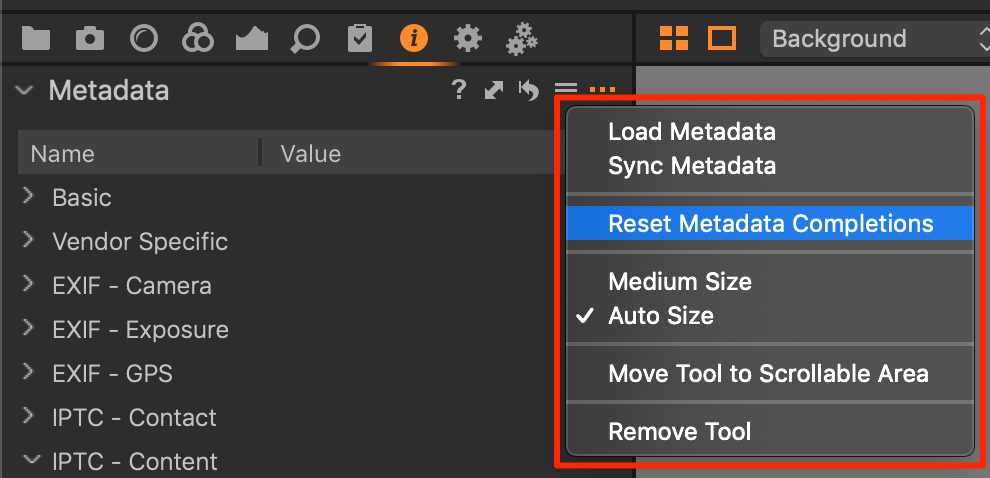
As with most tools in Capture One, you open the context or action menu with a click on the 3-dots at the right of its header. There are a few exciting options on this menu that I like to discuss with you.
Metadata Completions
The highlighted option in the screenshot above, Reset Metadata Completions, but what does it do? Well, Capture One remembers what you typed earlier in a specific field, and fills in while you type. That can be a great time-saver.
However, sometimes it is counterproductive if you made a typing mistake. Fortunately, you can reset those completions and start with a blank slate.
Load and Sync Metadata
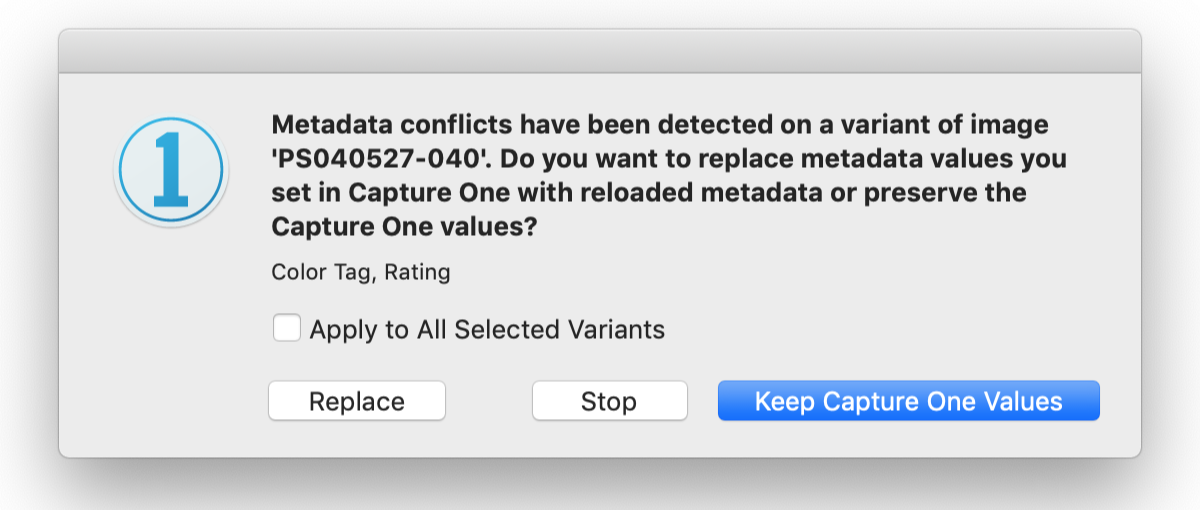
As I explained at the beginning of this post, Capture One loads metadata of an image on the first opening. If you added any metadata to an image after this event, you could give the Load Metadata command in the Metadata tool’s Action menu. Capture One will reread the image and load any additional metadata.
Note that before loading, Capture One can give the above warning. In this case, the values for Color Tag and Rating conflict between the XMP file and Capture One. If you decide to Keep Capture One Values, it loads all metadata except for the conflicting items. With the Replace option, the XMP values will overwrite Capture One values.
The Sync Metadata command works similarly but is bidirectional. It loads metadata but also writes metadata that you entered to the image in Capture One. Because Capture One never writes to the image file, it will always save the metadata to the XMP file that belongs to the image, typically with the same name and .xmp extension.
I will discuss this in an upcoming post where you use another program to add metadata to your images, either exclusively or with both that program and Capture One.
Metadata On Output
Adding all this information to your photos may be a great idea, but you do not necessarily want everybody else to see it. For Your Eyes Only, you know the drill. Fortunately, Capture One is that smart too. You have great control over what Capture One records in the output file.
Each Process Recipe and also the Export Variants feature has a Metadata tab. I skip the Keywords and Workflow options at this moment and focus on the Metadata part on this tab, with its checkboxes.
Capture One leaves the option Rating and Color Tag always disabled by default, but you can enable it, of course. Copyright is an option you probably like to enable always, in particular, for what you publish on the web.
Publishing GPS Coordinates may hurt your privacy, so use it with caution. And do you like others to see the Camera Metadata from the EXIF? Finally, the All Other Metadata option lets you decide about the remaining metadata.
To Be Continued
This post on metadata and the Metadata tool continues with a post about the Keywords tool and the Keyword Library tool in Using Keywords in Capture One.
Thank you
For reading. Please feel free to leave a comment. Like us on Facebook or subscribe to our newsletter to stay informed about new blogs.
Best Regards,
Image Alchemist


Dank je Paul voor deze heldere uitleg!
Dank je Rob, graag gedaan.
Vriendelijke groet, Paul Steunebrink / Image Alchemist
trouble is, metadata is not being copied as an adjustment in CO Pro 20. No matter how often I select my image with the specific metadata (GPS to be specific), select the Copy arrow icon in the top toolbar, then view the Adjustments Clipboard, nothing is selected, and under the Metadata main heading, when I disclose the heading to reveal all metadata, GPS Long and Lat aren’t even present. I really wish instructions like yours were true for us learners/users.
Hi Matt,
Please be aware that metadata items are never selected on the clipboard. You always intentionally have to select which items you like to copy.
Regarding GPS data, this is regarded as EXIF data, in contrast to IPTC data, which is not editable in Capture One. Please refer to my post about geotagging.
Best, Paul Steunebrink / Image Alchemist
Hey, I created a metadata preset and I want that the data from the preset going to be applied automatically to the photos which are loading in the folder. That means when I shoot, the data is automatically applied to the next photo.
Best Regards
Daniel
Hi Daniel,
When you shoot tethered, go to the Next Capture Adjustments tool, and under Styles, use the drop-down list to select your metadata preset.
Best, Paul Steunebrink / Image Alchemist
Using Capture One 21, I want the creation date/time (capture date/time) in the exported file but not the other camera metadata. Is this possible? Unfortunately, the creation date is included with the camera metadata and is not separately available.
Hi Paul,
The capture time/date is part of EXIF, which includes other metadata from the camera. On export, you can suppress camera metadata (Export Metadata tool), removing all camera metadata, including the creation date. The exported file gets the date of export as the creation date.
Best regards, Paul Steunebrink / Image Alchemist
Thank you Paul, for your time and effort.
Paul.