Catalogs Explained
When you start working with Capture One, you are presented with the choice to either use (or create) a session or a catalog. Making a choice between either one is mandatory. This tutorial blog will explain what a catalog is and when you might prefer it over a session. Please note I have a similar blog on sessions. Get ready for Catalogs Explained and get your images organized!

Catalogs Explained
The Catalog in Capture One was built with a single idea in mind: to manage your images. The way it does this task is both simple and brilliant. Once you understand the trick, it becomes much easier to understand all the nuts and bolts you come across, while effortlessly withstanding all the nitty-gritty that comes with the package.
Your Folders
Where do you have your image stored right now and how? Different disks, internal or external, directly connected or through the network? The Catalog does not care. Folders, subfolders, you name it? Again, the Catalog does not care.
It looks for only one property: accessibility. It needs access during import (more on that later) and export (ok, and then some, but I take the shortcut here). Just remember one word: Folders. I will come back to that later when we explore the Folders section in the Library tool.
Import
Whether you have only a few images to import from a memory card or your local hard drive or a pile of external and network drives containing terabytes of data, you have to import your images into the catalog.
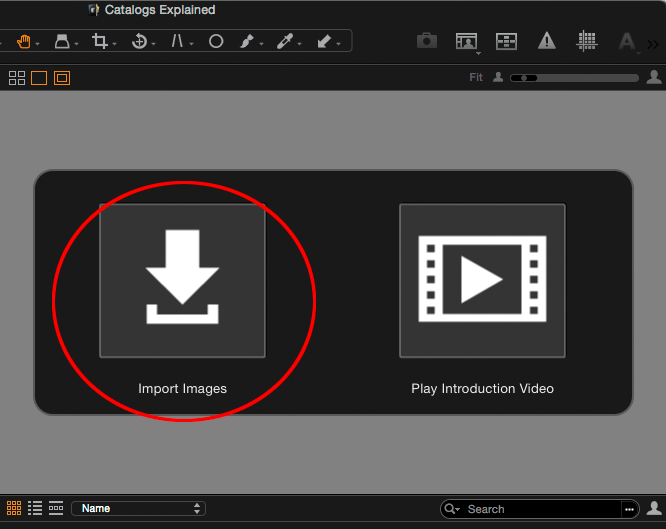
Browsing folders without importing is not an option, like you could with sessions. Import is mandatory. Can you store that? That is why you see this big import button in any new catalog:
When you import an image, a folder of images or an entire disk, the Catalog stores a link to each image’s location, so it knows where to find it. It builds a preview and a thumbnail of the original image and stores these in the Catalog too.
The original image stays untouched in its present location when you select Current Location in the Import To > Store Files drop-down list. This is the preferred choice for images already on your hard drive.
In case you import from a memory card or other temporarily kind of storage, let Capture One import the images into the Catalog while it copies the images from card to disk.
For this occasion, select Choose Folder in the Import To > Store Files drop-down list and select/create your folder. This is the third item to remember: Location.
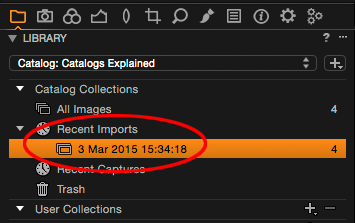
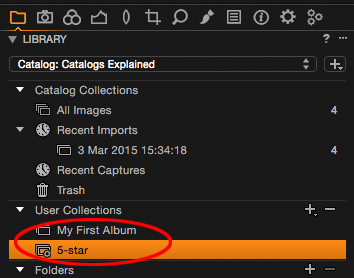
You can see your import here: Catalog Collections in the Library. It lists the ten last imports under Recent Imports. It also lists the All Images collection, which always shows all images in that Catalog.
For now, remember another word: Collection. The Catalog makes collections (hence: Catalog Collections) and you – the user – can create some or many of you own (yes, the User Collections, you saw that coming, didn’t you?).
All Images? No Thanks!
The All Images collection shows you all images in the Catalog. This is fun in the beginning, maybe, but not when you have hundreds, thousands or more images in your Catalog. You feel the need to organize your images. Let us introduce the User Collections.
User Collections
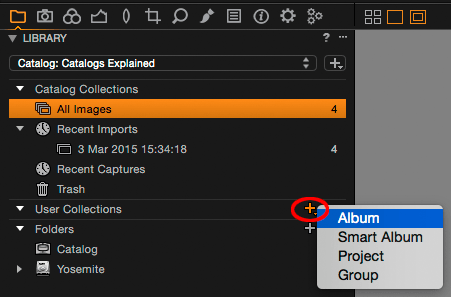
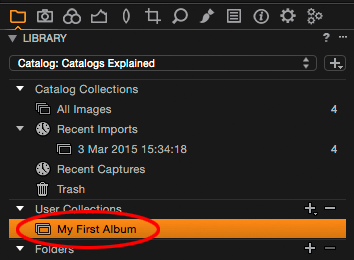
Now the magic starts. After the import, you are actually done with the Catalog Collections department. Let’s shift gear and move to the User Collections. In this section of the Library tool, you can create your albums, either the regular Albums or the more sophisticated Smart Albums. With either type of album, you can organize your images your way.
The magic is that this organization is fully independent of the physical location of the image. Even when you move images to another disk after the import, your albums are not affected. Let the Catalog take care of the outside world (we’ll discuss details in a succeeding blog).
You can group images by topic, customer, region or date, or a combination. You are fully flexible in setting this up and change it any time you like and it does not affect the original or its location.
Albums have several advantages. First, an image in an album is the same image as in the Recent Imports collection or the All Images collection. There are no copies. Each collection just shows you a link to the original, or the preview and thumbnail of that original actually.
As a result, when you adjust an image that sits in a certain collection, you adjust all other representations of that image too. Second, you can put one image in as many albums as you like. No physical limits, no copying.
Smart Albums
Smart Albums are like Albums, however not you but Capture One is populating these collections with images.
You define one or more criteria for the images that a Smart Album should contain and Capture One does that for you instantly and dynamically.
For example, five stars rated images automatically fill the Smart Album for five-star images. Does the rating change to four, the image is removed from that five-star smart album, and might show up in the four-star smart album if you have made one.
Folders Revisited
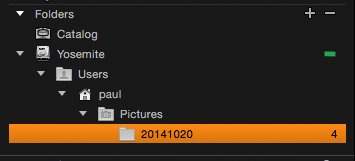
As promised, we would have a look at the Folders section in the Library to finish up our trip through the Library. In contrast to the User Collections section where you create your own image organization inside the Catalog, the Folders section shows you the disk and folder organization outside the Catalog.
Here you can find the disks you imported from with a green or red indicator. Green means connected or ‘online’. Red means disconnected or ‘offline’. No harm is done when you disconnect a disk, and after reconnecting the online status is reinstated.
To Summarize
I challenged you to keep a few words in mind. Folders: these are on your disk and presented in a separate Folder section of the Library. Import: this is what you must do to connect the original image to the Catalog. Location: that is where the original image is stored.
Normally the location is on disk and the Catalog refers to that location. New images, from a card, for example, can be copied to disk and linked to that location in one step during import.
Collection: is the general catalog speak to organize images in a Catalog. The Catalog makes collections and you can make them too. The Library displays them in separate sections.
Are Catalogs Right For Me?
Working with Catalogs is the right way to go if you need a level of organization for your collection of images beyond the physical folder level. Making cross-references in a larger collection over time is one benefit.
Freedom of storage location another: storing the catalog on your local disk is preferred, but the originals location is not critical. That is benefit number two compared to Sessions.
In succeeding blogs you might discover more benefits, as there is a lot more to discover.
Catalogs Explained or Want More?
Maybe this blog got you covered. Great. Maybe you noticed that we skipped some interesting topics. These topics and more will be explained in a succeeding blog named Catalogs Continued (level-2) and Catalogs In-Depth (level-3). This post continues!
Thank You
For reading. Please feel free to leave a comment. Like us on Facebook or subscribe to our newsletter to stay informed about new blogs.
Best Regards,
Image Alchemist









As for me it was long waiting article — thanks a lot! Waiting for next one in this series.
Hi,
you can import photos only from SD or even directly from the camera (USB connection)
Hi Steve, you can import photos direct from memory card (like SD, CF). You can not import directly from camera over USB or Firewire. Connecting a camera means to Capture One that you want to shoot tethered.
Grazie 1000! Very useful
OK, I think I made an error. Can you help me fix it? I thought I had selected current location but I must have told it to import to folder. However, now when I search my HD for the images, they aren’t there. When I right click in the catalog, the ‘location’ options are all greyed out.
Thank you
lisa
Hi Lisa, I have two tips for you.
First, when you open the Import Images dialog, you can review the settings from the latest import. This can give you a clue of where the images went last time.
Second, look into the Library > Folders section > Catalog container. Click on it. If your imported images show up in the browser, you have imported “Inside Catalog”. You can move the outside to a folder as explained in Catalogs In-depth.
Hi Paul,
which import settings are necessary that only NEW images will be imported from the SD card to C1?
thanks and br
Paul
Hi Paul,
When importing images into a catalog as referenced images, the catalog should detect images that were already imported and skip them during later imports.
Best, Paul
Hi, Paul – this blog might just have saved my sanity. I’ve been using C1 for about 6mos now, and really like it, but ive been having a ton of crashing and other issues I can’t seem to rectify. After reading your Sessions Explained blog post, I think I see the light: all my images are stored on a 16TB Synology NAS. Apparently, sessions doesn’t like this arrangement. I have my NAS shared folders set up in genres (portrait, travel, etc), and then I created sessions for each client within that volume.
So now I think I need to change the error of my ways and switch to a catalog(s). Am I looking at a long and painful process? Is moving from sessions to catalog(s) a straightforward thing? Thanks so much!
Hi Andy, your assessment is correct that with a NAS it is better to use catalogs. Moving from sessions to catalog(s) is straightforward.
You can either import each entire session if you made favourites and albums in that session; they will come along. This is a great workflow it you have multiple sessions.
Or you just import the image folders from your NAS. In both cases you will have the images with adjustments. I advice you to run a testdrive with a few folder (or sessions).
Hi Paul,
Thanks for your tutorial blogs! I’m a new C1 user (version 9) and although I find the learning curve to be steep, your articles are very helpful. Is it possible to remove/delete a catalog that is no longer needed? Thanks in advance.
Hi Matt, great you like the tutorials! Yes, you can delete a catalog. Go to Finder (Mac) or Explorer (Windows) and locate your catalog folder. Delete it.
Best, Paul Steunebrink / Image Alchemist