Advanced File Naming In Capture One (part 2)
You know the expression “What’s in a name?”, and the answer is: a lot. File naming is important and the advanced file naming feature in Capture One is very powerful and used extensively in a professional workflow. Learning to master its power is something different. This post – part 2 of 2 – helps you on the way.
Advanced File Naming In Capture One Continues
Welcome to part 2 of advanced file naming in Capture One. In case you missed the previous section, please go to Advanced File Naming In Capture One (part 1) first.
In part 1, I discussed:
- introduction to tokens for renaming and where to use them in Capture One
- file name and naming scheme to use
- renaming on capture, import, and batch rename
In part 2, I continue with:
- rename on output
- processing with recipes
- output naming
- output location
- exporting variants
- exporting originals
- save your naming presets
- set and reset counters
It is maybe interesting to note that tokens have been in Capture One for a long time but got a makeover in Capture One 8. This version introduced many new tokens and renaming via Find and Replace.
Rename on Output
Whether or not you renamed your images during capture, import, or through batch rename in Capture One, you can assign a different name on output during processing or exporting your images.
In addition to naming files on output, you can also define specific subfolders for the processed or exported images. And it would not surprise you that you can use both text and tokens to create a file path up to multiple nested folder levels deep.
Renaming images on output work similar to batch rename, discussed in part 1. There are some additional aspects, however, that I will explain below. These aspects relate to:
- the renaming in general or per Process Recipe
- the creation of subfolders in general or per Process Recipe
- the differences between processing versus exporting concerning renaming
Note that I make a distinction between Exporting and Processing. You find both options in the File menu.
They both produce the same beautiful images, but it depends on your workflow, which method you prefer. I do not cover the differences between both ways here since I did this earlier in the Capture One Export and Capture One Process tutorial blogs.
I will do my best to breakdown this fascinating and compelling area of Capture One into smaller, digestible pieces and start to discuss Processing first and Exporting next.
But first, I give an example of why you should rename on output in the first place.
Why Rename On Output
You may lose the connection between your original and the processed image but may want to hide your internal naming scheme from clients, friends, or family members. Or you mix photos from different cameras or photographers on a trip.
For example, you made a trip to Venice that span several days. You process a selection of images with a naming scheme like Venice2020-001 up to Venice2020-999.
You even may have changed the order of your images in the browser manually before processing. Since Capture One processes your selection in the order in the browser, the numbering on output reflects that order too. Another nice feature of advanced file naming in Capture One.
Processing With Recipes
When you process your image files with Capture One adjustments into a new TIFF/JPEG/PSD file, you enable one or more Process Recipes. Each Process Recipe is a distinct collection of all settings related to output, like size, file format, color space, naming, or storage location. The power of Process Recipes is two-fold:
- create as many recipes as you need and use when necessary
- enable multiple recipes and let process Capture One all files in one go with their distinct parameters as defined in the respective recipes
Two tools are involved with Process Recipes:
- the Process Recipes (plural) tool where you select and enable recipes
- the Process Recipe (singular) tool where you define the selected recipe
In addition to these tools, two more are involved:
- the Output Location tool where you set the location of your output
- the Output Naming tool where you define the name of your output
Below I discuss how this all works together and where the confusion starts. Let us take a look at where you can define the name of both files and folders on output during processing.
Select And Enable A Process Recipe
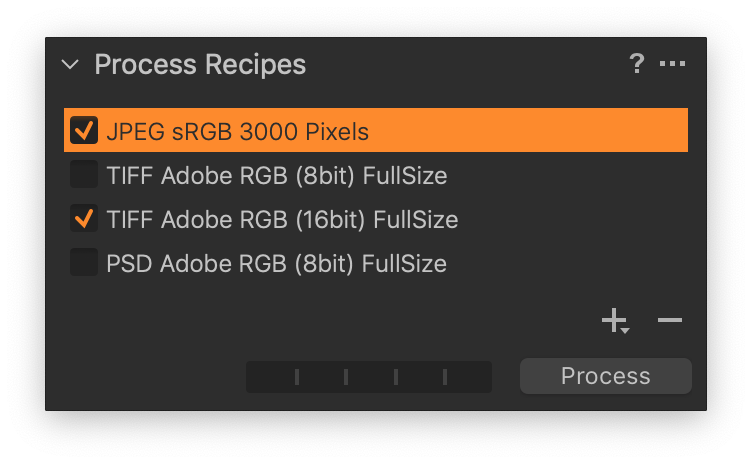
In the Process Recipes tool, you can both select and enable a Process Recipe. To be more precise, you can only select one recipe at a time, but enable as many recipes as you like. In the screenshot below, you see that the selected recipe is enabled, and another recipe is enabled too.
The selected Process Recipe is highlighted, and you can review and adjust its settings in the Process Recipe tool. Note that Capture One uses the color space of the selected recipe for its color management, auto-adjust calculations, and color read-out in the Viewer.
Each recipe that you enable with the mark in the checkbox executes during processing. When you enable three recipes, you will have three process files for each original.
Process Recipe
First, select the Process Recipe in the Process Recipes tool that you like to review or adjust. Next, in the Process Recipe tool, select the File tab.
At the File tab, you find all the settings that may affect the output name and output location, in combination with the Output Naming and Output Location tools.
Output Naming
Capture One first looks in the Output Naming tool how you define the format of the output name. When you only use the [Image Name] token, the output name is identical to the current file name. You can use all kinds of tokens and text, as discussed for batch rename. There are two distinct tokens, however, to mention, the [Job Name] and the [Sub Name] token.
You can use either or both the [Job Name] and the [Sub Name] token in your output naming format. Although similar in their function – filling in a value you predefine – their working is different.
From Job Name
In case you use the [Job Name] token in the Format field of the Output Naming tool, do not forget to fill in a Job Name in the field below it. If you leave it blank, Capture One skips the token.
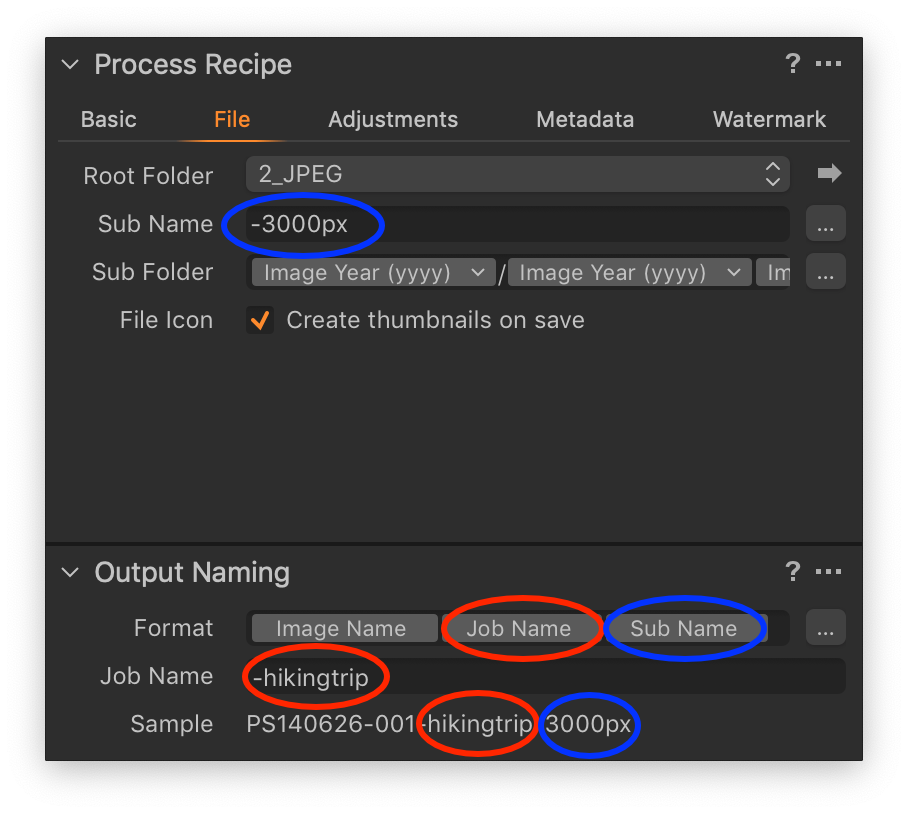
Just remember, the [Job Name] token is generic in the sense that it affects all output, independent from the selected Process Recipe. You see the Job Name, and its token marked red in the screenshot below.
To Sub Name
You also can include the [Sub Name] token in the Format field of the Output Naming tool. This token is functionally similar to the [Job Name] token, but it is Process Recipe specific. You define the value for this token in the Process Recipe tool at the File tab.
Now, with each enabled Process Recipe, the value of your output is determined by the recipe.
Just remember, the [Sub Name] token is Process Recipe specific in the sense that each recipe can fill in a different value. A typical use for the Sub Name token is the size of the image like -3000px. You see the Sub Name, and its token marked blue in the screenshot above.
Tip
Note that I prefer to use dashes as separators in my file naming, and I include the dash in the token value, not the naming format definition. The advantage is that when the value of the token is empty, the token leaves no traces behind like an orphaned dash in the output name.
Output Location
After looking at all variables regarding output naming, Capture One looks for where to save the processed images. This time it looks in the selected Process Recipe first. On the File tab of the Process Recipe, you have the Root Folder field.
Here you have three options:
- Output Location
- Image Folder
- Select Folder… or a selected folder
If this says Output Location, the Output Location tool controls the location of the processed images. In the Output Location tool, you choose a folder in the Destination field. For Sessions, this is de Output folder of the Session. For Catalogs, you select any folder.
If you set the Root Folder to a selected folder or the Image Folder, Capture One bypasses the Output Location tool. Now the Process Recipe controls the output folder. Note that this is a point of frequent confusion among users.
The Image Folder refers to the folder where the original image resides. With this option, you store the processed file in the same folder. Note that if you saved your image file inside the catalog folder, you could not use this option. An error message will appear in the Event Log when you start processing.
You can also choose Select Folder… to select any folder. In the example that I show in the screenshot, I let all JPEGs go to the 2_JPEG folder, but add additional sophistication with the Sub Folder field, which I will discuss below.
Sub Folder
Both Process Recipe, as well as the Output Location tool, has a Sub Folder field. They work the same, and you can enter both text and tokens in those fields. The Sub Folder field is added to the selected Root Folder. Note that you do not have to start with a slash (Mac) or backslash (Windows). Capture One adds this for you.
You can nest subfolders multiple levels deep. You separate nested levels with the separator of your platform, either slash or backslash.
In the screenshot above, you see the naming format dialog for the Process Recipe Sub Folder tokens in full swing, including the slash for the second level folder. The sample field below shows the result for the selected image. Note that Capture One adds the subfolder to the Root Folder of 2_JPEG.
Sub Folder in Output Location tool
As I mentioned earlier, when you set the Root Folder in the Process Recipe to Output Location, the Destination and Sub Folder fields of the Output Location tool are processed. However, you still can use the Sub Folder field in the Process Recipe.
In this scenario, Capture One reads the Sub Folder field of the Output Location tool first, and that of the Process Recipe next.
For example, if in the Output Location tool, the subfolder is “Location”, and in the Process Recipe is “Recipe”, the path will be ../Location/Recipe inside the selected Destination folder.
Exporting Variants
As you understand by now, processing allows for both complex and sophisticated workflows. This feature can meet the demands of almost any photographer’s output workflow. But it does not always have to be that complex.
Many users have more moderate needs. Enter the Export Images > Variants feature. The Export feature was introduced with the Catalog in Capture One 7 (2012) to make converting users feel quicker at ease with the program.
In the Export Variants dialog, you find a Location section to determine where to save the exported image, a Naming section for optional renaming on export, and a single recipe in the Recipe section for all parameters of the exported file.
Export Variants Naming
In the Naming section, you can use text and tokens to rename during export. In the Job Name field, you can enter the value for the [Job Name] token.
When you go to the Recipe section, File tab, you find the Sub Name field. The [Sub Name] token uses the value you enter here in the Naming section.
As you might remember from the discussion on Process Recipes, the Sub Name is recipe related, where Job Name is generic. But since the Export Variants feature has only one recipe, the Sub Name is generic, like the Job Name.
Export Variants Location
In the Location section of the Export Variants dialog, you set the Destination field first. You have one or two options:
- Session Output Folder (only when working with a Session)
- Choose Folder…
With Choose Folder… you can, of course, select any folder.
Next, you may want to define a subfolder in the Sub Folder field, just below the Destination field. You can make nested folders several levels deep with the separators of your platform, slash (Mac), or backslash (Windows).
When you jump to the Recipe section, File tab, you see a Root Folder and Sub Folder field. The Root Folder field offers you three options:
- Export Location
- Image Folder
- Select Folder… or any selected folder
If you choose Export Location, the location for the processed images is controlled by the Location section, Destination, and Sub Folder fields discussed above. When you use the Sub Folder in both the Location and Recipe section in this scenario, the Location subfolder comes first, and the Recipe subfolder is added.
If the Root Folder is set to a selected folder or the Image Folder, the Location section is bypassed. Now the Recipe section controls the export folder. If you want to define a subfolder in this scenario, you have to do it in the Recipe section, since the subfolder of the Location section is neglected as well.
The Image Folder refers to the folder where the original image resides. The processed image is stored in the same folder. Note that if your image is stored inside the catalog folder, you can not use this option. An error message will appear in the Event Log when you start processing.
You can also choose Select Folder… to select any folder or select one of the folders you used earlier from the list, like 2_JPEG in the screenshot above.
Exporting Originals
The ability to export original image files from your Catalog or Session is a unique export feature that you can not do with processing. The Export Originals dialog is more straightforward than its Export Variants sibling.
The Export Originals dialog does not have a Recipe section, as it is not necessary. You have a Location section for the Destination and optional subfolder, and a Naming section.
The Naming section has an extra feature, however. Besides renaming with Text & Tokens, you also have the option to use Find & Replace, just like with Batch Rename, discussed earlier in this post.
Save Your Naming Presets
It is a good idea to save your naming format into a Preset. I advise that you include the purpose of the Preset in the name, in particular, whether it is for capture, import, batch rename, or export. I emphasize that because not all tokens can be used for all different purposes, so you should not use a batch rename preset for capturing.
Click on the Presets drop-download to open the dialog to save. Next, select Save User Preset… and give the Preset a descriptive name, starting with Batch Rename, Capturing, or Importing, depending on its purpose.
Capture One stores the naming presets in the Preference file. I am not happy about that as it is virtually impossible to independently back them up and transfer to another computer. Secondly, when you once in a while need to delete your Preference file, you lose your naming presets.
I suggest you document your naming presets if you heavily rely on them and backup your Preference file too. Advanced file naming in Capture One is a great feature; maintaining it is not so sophisticated, yet.
Set and Reset Counters
You may often use counters in file naming. In particular, the [1-6 Digit Counter] token is a great help. Note that for each of the five purposes – Capture, Import, Output, Export, and Rename – there are separate and independent counters. Each counter has its value, and you can reset them independently.
You can access the counters via the File menu in Capture One 12 or later, or via the 3-dots menu of the respective tools. At both locations you see three options for each counter:
- reset counter
- set counter
- set increment
In addition, you can decrease the Capture Counter.
When you reset a counter, it is set back to 1 (one). The set counter command lets you set the counter to start at a specified value. The set increment command is 1 by default, but you can define bigger steps.
During capture, you might want to delete the last image(s). To prevent a gap in the numbering sequence, you can decrement the counter as many times as the amount of deleted images, and continue with your shoot.
Thank you
For reading about advanced file naming in Capture One. Please feel free to leave a comment. Like us on Facebook or subscribe to stay informed about new blogs.
Want to try Capture One? Or would you like to buy it?
Best Regards,
Image Alchemist


Leave a Reply
Want to join the discussion?Feel free to contribute!