Capture One Pro 20 Review
This Capture One Pro 20 Review guides you through the improved High Dynamic Range, Basic Color Editor, Crop, and Noise Reduction tools. It also discussed the improved DNG support, the Select Next When feature, and changes in the user interface.
Capture One Pro 20 Review
Pre-announced a month before release, Capture One Pro 20 got our attention earlier than ever. But what is so special about this release?
This Capture One Pro 20 review guides you through all the nuts and bolts, and the nitty-gritty there is to know. The what and where to find, the how, and sometimes why.
You can also reference the Capture One Pro 20 Update review, with additional new and improved features since build 13.1.0.
What’s New
First, the name. Why version 20 after 12?
I assume that 13 is not a lucky number in some parts of the world, so they skipped it. Next, they named it after the year 2020. Hence, Capture One 20.
The weird and confusing part of this story is that it is internally still Capture One 13, as you can see from the build number. So what happens over seven years?
In this review, we look at different aspects of this release:
- better image editing
- improved features
- enhanced workflow
- user interface
- camera and lens support
- license keys
- other reviews
Better Image Editing
With regards to image editing, Capture One 20 contains three tools that are considerably improved.
- High Dynamic Range
- Basic Color Editor
- Crop
High Dynamic Range
The expansion of the High Dynamic Range tool is the change that I am most excited about in Capture One 20. There are several improvements.
First, you notice that there are now four sliders, instead of two. The new White and Black sliders work similar to the well-known Highlight and Shadow sliders but for the very brightest and darkest tones only.
You can combine all sliders in any combination, making a compelling highlight recovery by combining White with Highlight. The same is right for combining Black and Shadow.
Neutral position
The second change with this tool is that all sliders have their neutral (zero) position in the middle. You can now also brighten your highlights or darken your shadows with this tool instead of using the more time-consuming Levels or Curve tool.
I noticed that I need to get used to the new behavior of the tool. In Capture One 20, all sliders darken the image when moved to the left and brighten to the right. This behavior is similar to the Exposure and Brightness sliders of the Exposure tool.
In earlier versions, the Highlight slider could only darken the highlights and brighten the shadows by moving the sliders to the right.
Note that Presets and Styles you made with earlier versions of Capture One still work correctly, but new Presets/Styles made with Capture One 20 for this adjustment are not backward compatible because of the new features.
Presets
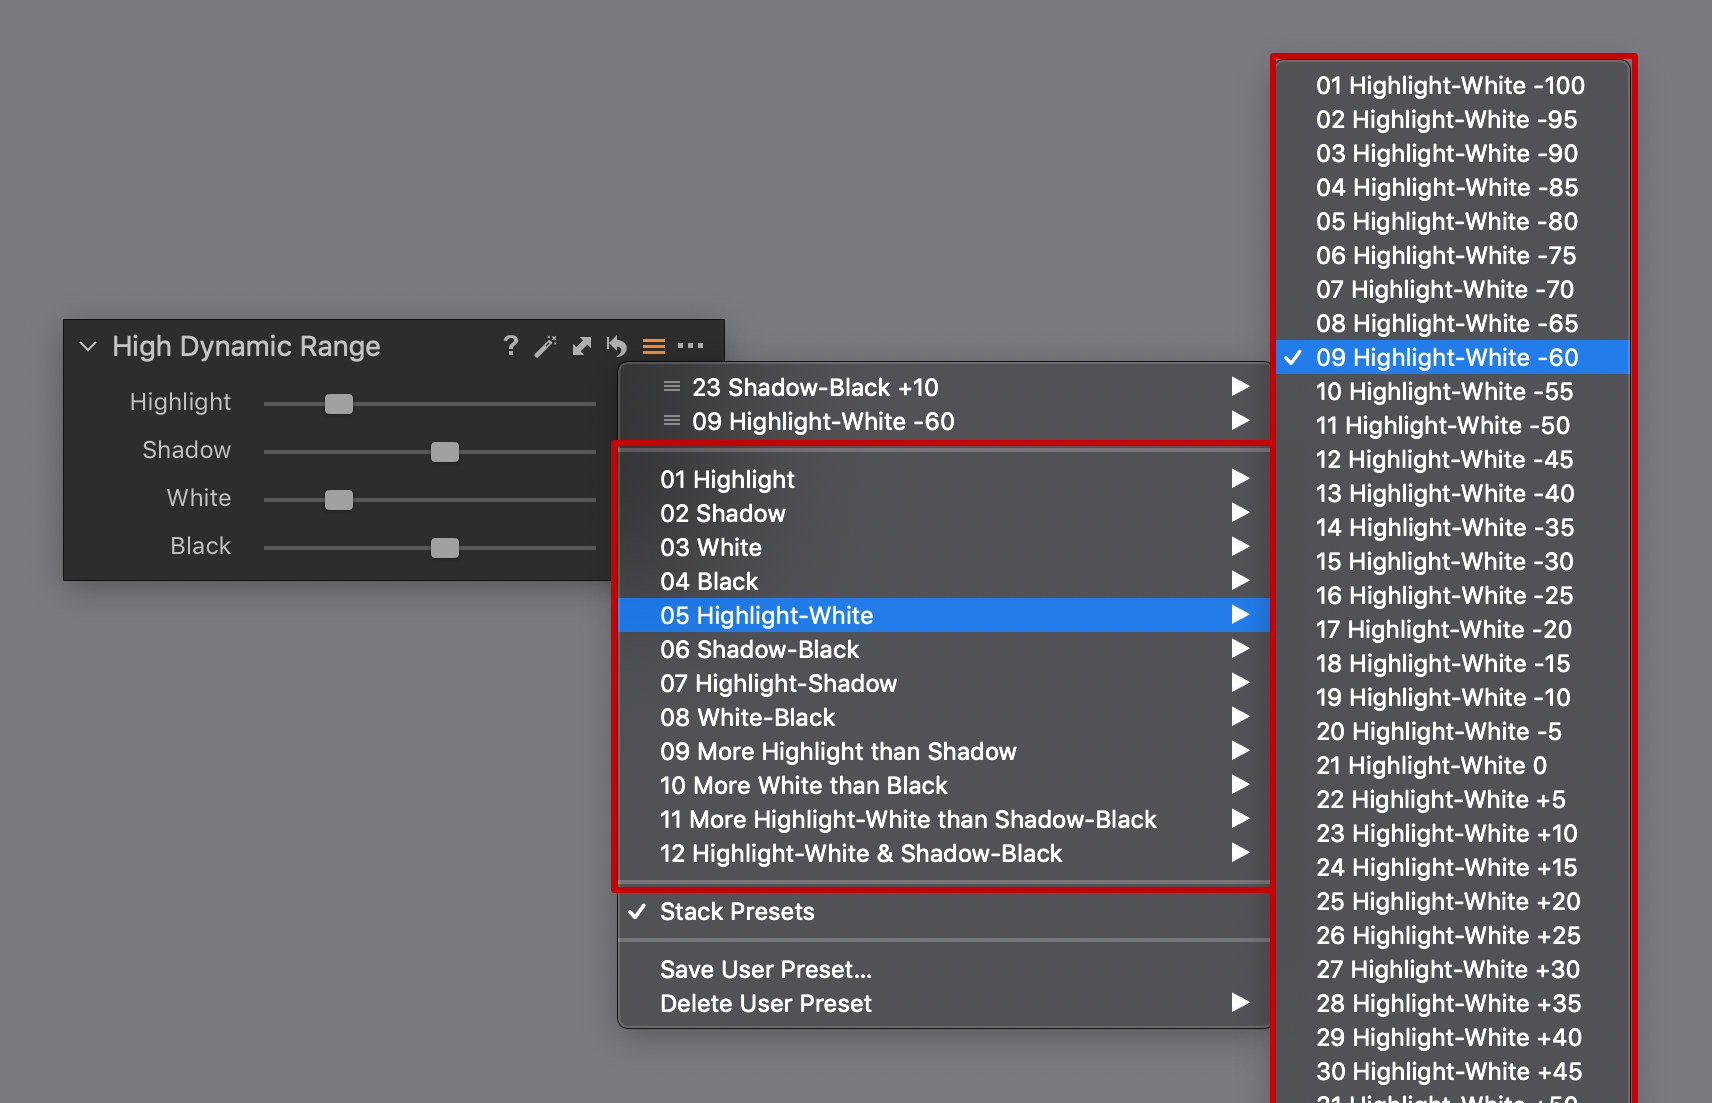
The new sliders in the High Dynamic Range tool open many new possibilities for different adjustments. As a result, I made an entirely new set of Presets for Capture One 20.
Among others, I found that combining the Highlight + White sliders, as well as the Shadow + Black sliders gives you a very powerful recovery feature.
You find the new Presets on my Capture One HDR page on the webshop. You find an option to use the trial first as well.
Note that also the existing set for Capture One 12 and earlier is renewed and expanded. They are included in the set with the Capture One 20 presets.
Basic Color Editor
The Basic Color Editor is one of the three Color Editors in Capture One Pro. It is also the only Color Editor in the free Capture One Express editions. The tool is now enhanced in four different ways.
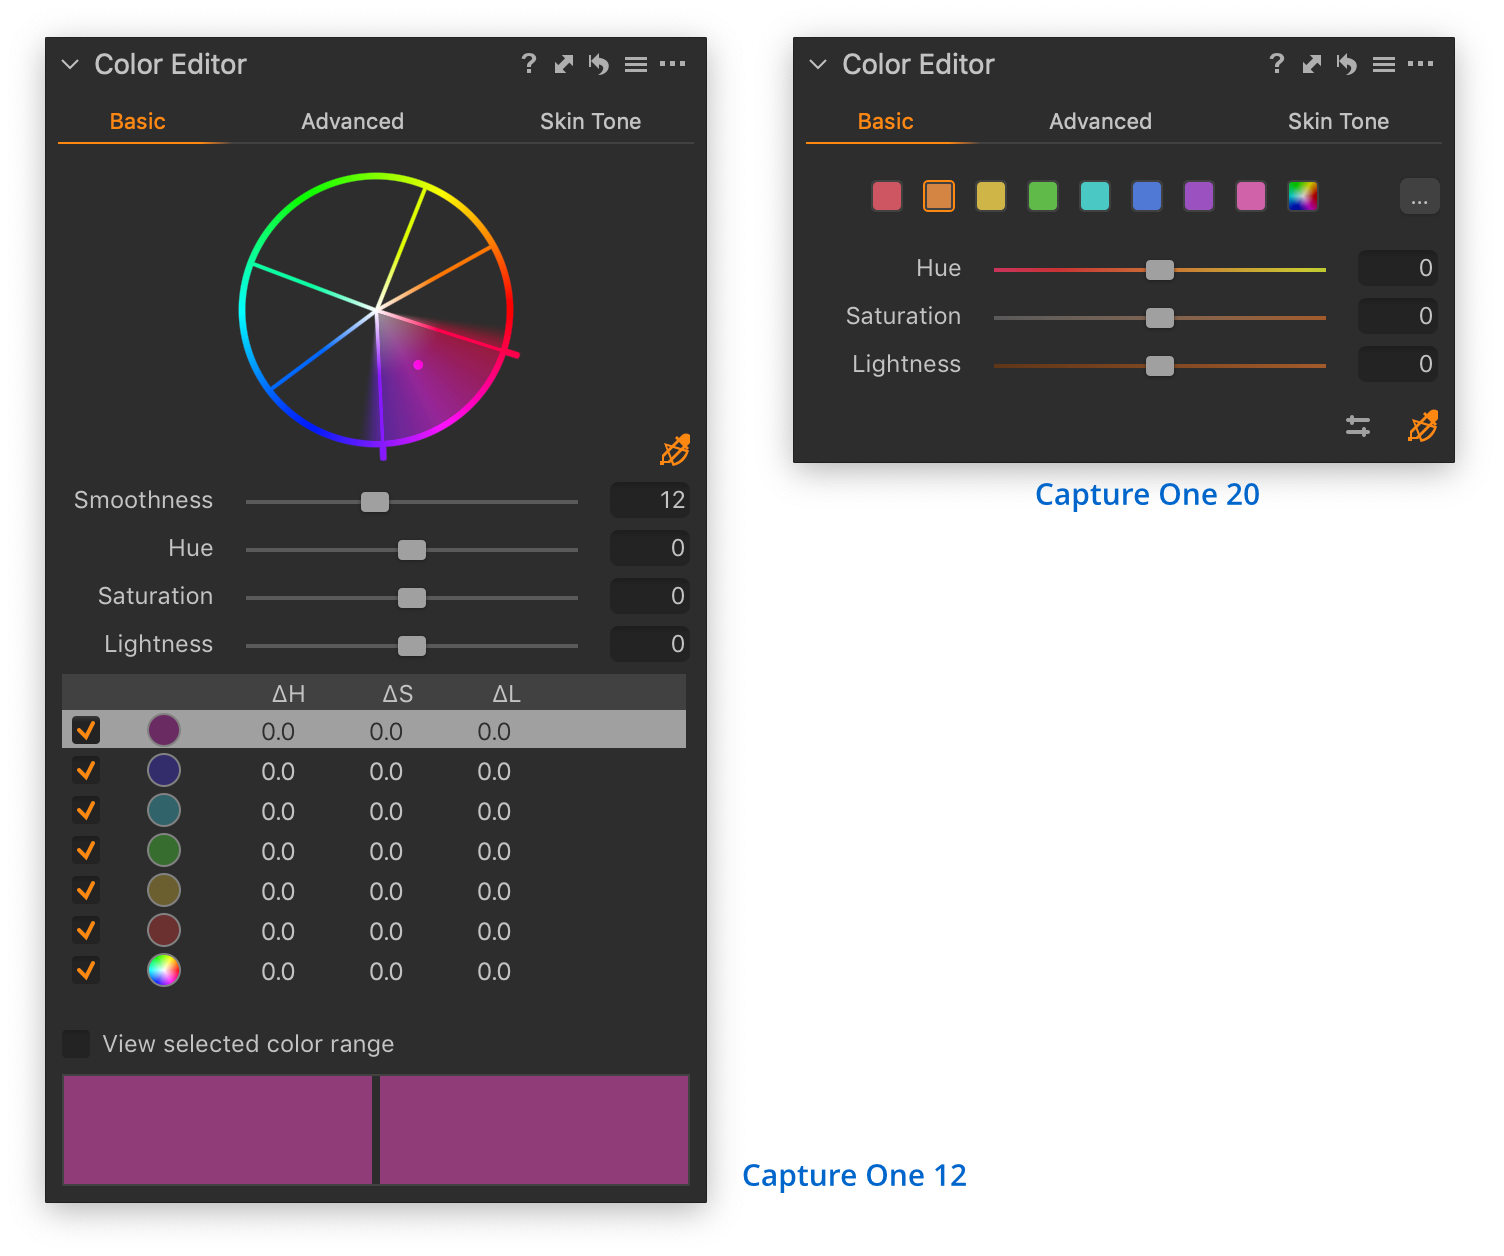
First and foremost, a row of color sets replaces the color wheel with predefined compartments. As a result, the tool uses considerably less space on your screen.
More range, more samples
Second, the Hue and Lightness sliders allow for stronger adjustments compared to earlier versions. And instead of six predefined colors to adjust, the range is refined and spread over eight color samples. The new orange sample is great for correcting skin tone.
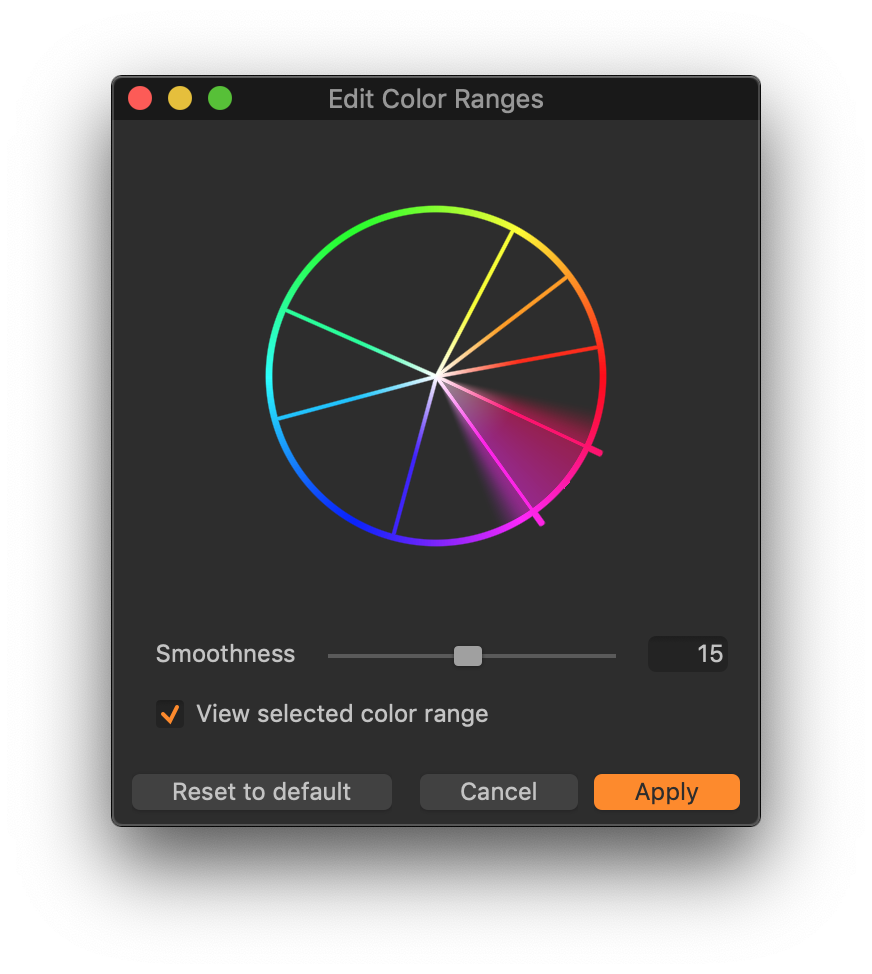
Note that you still can adjust the range of each color sample with a color wheel, as in the old days. Click on the three dots at the right of the row with colors, and you will see the Edit Color Ranges dialog.
Direct Color Editor
Third, there is the Direct Color Editor, an exclusive for the Basic Color Editor. The Direct Color Editor refers to a kind of direct control of the Basic Color Editor adjustments directly from the image with your mouse.
How? Click with the cursor tool of the Basic Color Editor in your image and start dragging left/right, up/down, and Alt+left/right. This way, you directly change the Hue, Saturation, and Lightness of the selected color.
You can configure the movements and their effect from the Direct Color Editor Settings. The Sensitivity slider helps you to make the tool more or less responsive.
Note that the Direct Color Editor is a Pro-only feature, not available in the Express modes.
Fourth and last, you can now use the Basic Color Editor on layers as well.
Crop Tool
The Crop tool is now easier to use and got smarter too.
First, you now have handles at all sides and edges are more visible and easy to grab and drag. After you made the crop, you can hit the Enter/Return key on your keyboard. The cursor tool changes from the Crop to the Pan tool (hand symbol), and the Viewer shows only the cropped area as in earlier versions.
Please note that hitting the Enter key is optional. You do not have to press Enter to confirm the crop, as it is always confirmed automatically. It is just a convenient way to end the crop mode.
Key modifiers
You can use the key modifiers Shift, Alt, and Command (or Control on Windows) to do some additional tricks with the Crop tool.
- Shift-key
With the unconstraint ratio, you make your crop. Next, press Shift while you alter the crop size. Note that due to the Shift key pressed, the ratio remains unchanged. - Alt-key
With the Alt-key pressed, you can change the crop size around the center of the crop. In other words, the crop becomes larger or smaller around its center, not from one side. - Shift+Alt-key
With these keys combined, you change the crop size around its center and with the same ratio, if the ratio is unconstrained; you effectively combine both options mentioned above - Command-key (Control-key for Windows)
Let you directly jump to the freehand rotation as long you keep the key pressed
I think that together with the much improved High Dynamic Range tool, a lot of users will switch to Capture One 20 in a second. But there is more to come.
Improved Features
I like to highlight three improved features in Capture One 20.
- DNG support
- Noise Reduction
- White Balance picker
DNG support
Smartphones, drones, and other image-producing devices are flooding the market with their native DNG image files. To mitigate the lack of explicit support through profiling, Capture One 20 now uses a new DNG Standard film curve for these images.
The DNG Standard curve is the new default curve for not explicitly supported DNG raw files. It does some tricks in the background to make the colors of any DNG file look good.
Noise Reduction
The release notes state that noise reduction is improved but not many details were added to that statement. My experience is that details are better preserved while suppressing noise. I also found the color rendition clearly better in Engine 20 versus Engine 12.
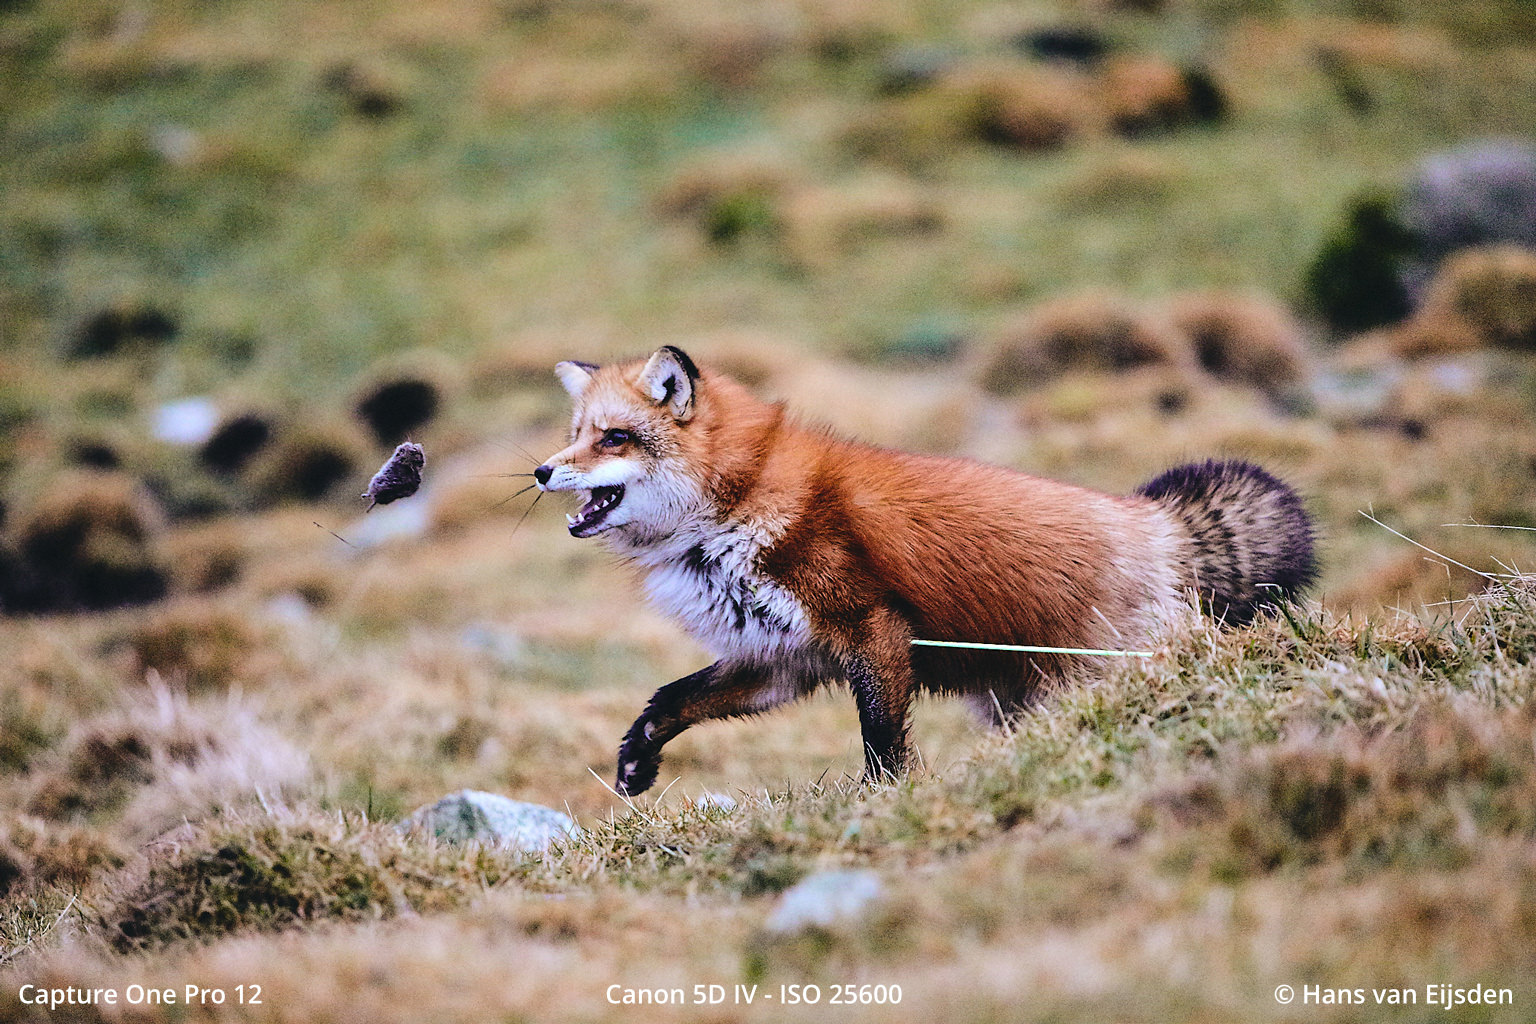
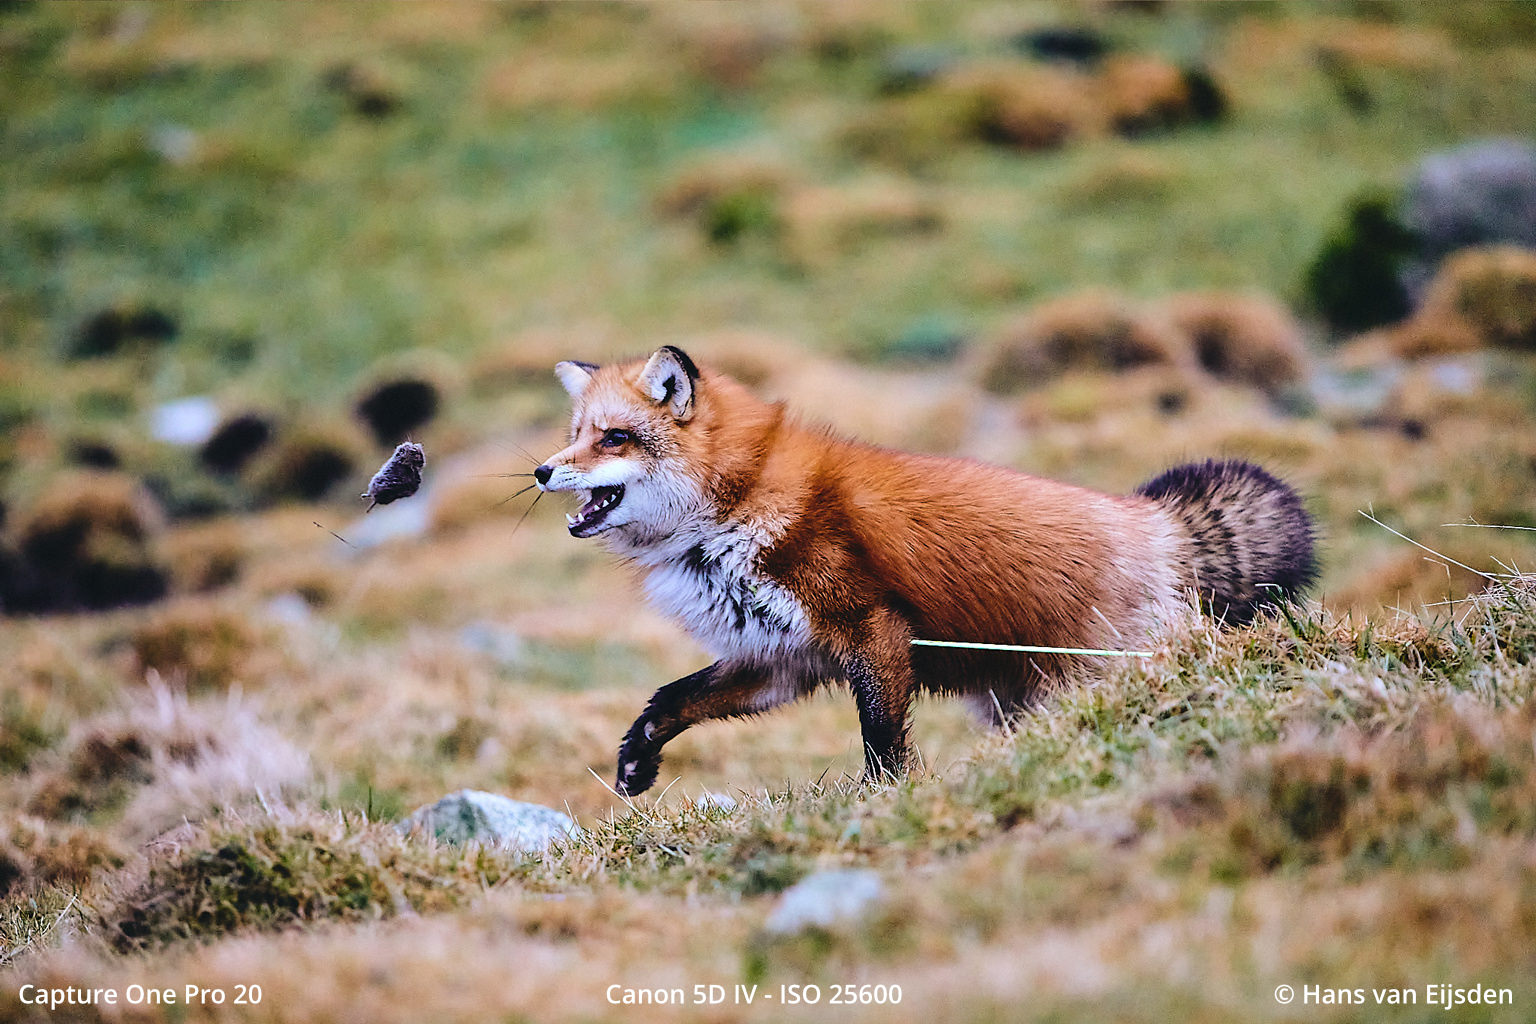
The image of the fox above shows the clear difference between Capture One 12 and 20 respectively. Less noise and better color rendition are visible in the newer version. Note that both images were processed with the same adjustments.
Try out for yourself and be the judge of this. Please note that you have to upgrade your older images to Engine 20 in the Base Characteristics tool before you can reap the benefits.
White Balance
The white balance picker is now less affected by noise in the image and will give a more consistent reading.
Enhanced Workflow
There are several workflow enhancements in Capture One 20 that improve the overall user experience of this release over its predecessors.
- Select Next When
- Copy/Apply layers
- Adjustments Clipboard
- New Process Recipe
Select Next When
This is a new option in the Select menu. It has two options that you can enable either or both.
The result of enabling Star Rated and Color Tagged is that the Browser (and the Viewer as a result) will automatically move to the next after you have rated or tagged the current image. This immensely speeds up your rating process.
Note that it works for sets of images as well. Do not forget to disable Edit All Selected Variants from the toolbar or Image menu for the best results with sets. Disabling the setting Edit All Selected Variants lets you individually rate or tag each image in the set before moving on to the next.
Copy/Apply Layers
Layers are a great feature, thanks to recent additions like Layer Opacity and Styles on Layer in Capture One 11 and the Luma Range and both Gradient Masks in Capture One 12. This expansion calls for another improvement: more flexibility in copying layers to other images.
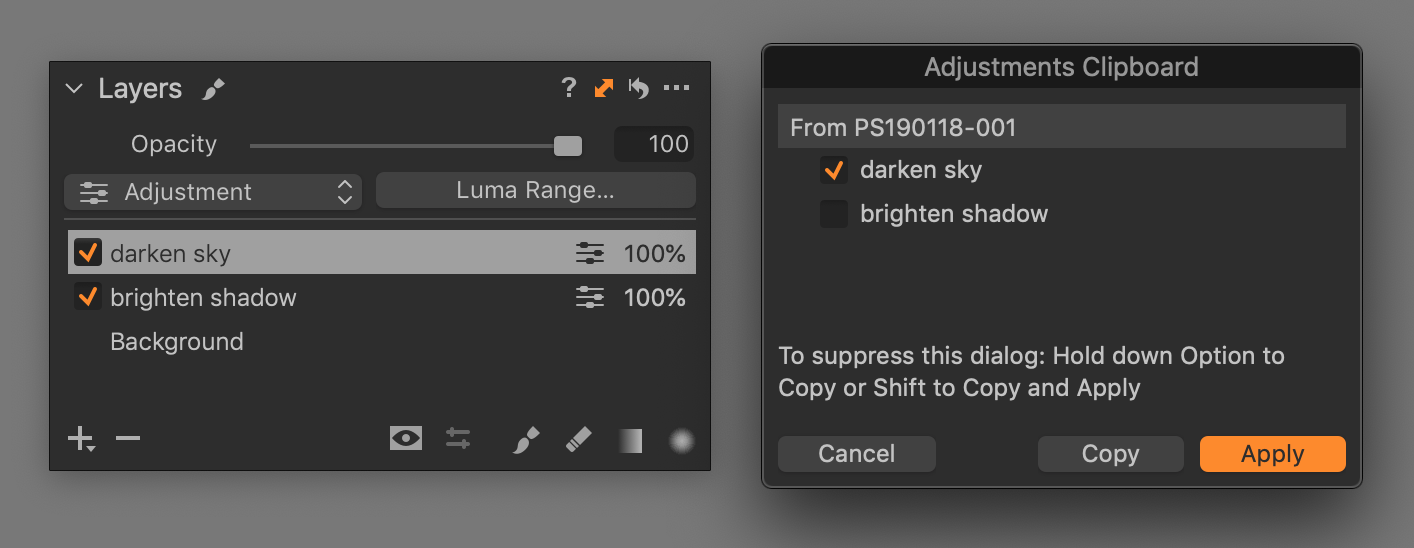
That option has now arrived. Let’s have a look at the example below, where I have two layers, one for the sky and one for the shadows.
I only want to copy the layer for darkening the sky to another image. With a click on the double arrow, I open the Adjustments Clipboard for the Layers tool and deselect one layer. Next, I click on Copy or Apply.
Layers that you apply always appear on top of any existing layer of the target image. The copied layer includes the mask with gradients, the adjustments, the opacity setting, and the Luma Range of the originating layer.
This new feature is available from the Layer tool clipboard (double arrow) as well as from the more extensive Adjustments Clipboard.
And last but not least, you can now copy layers between images of different sizes (in pixels) or file formats (raw to JPEG, for example).
Adjustments Clipboard
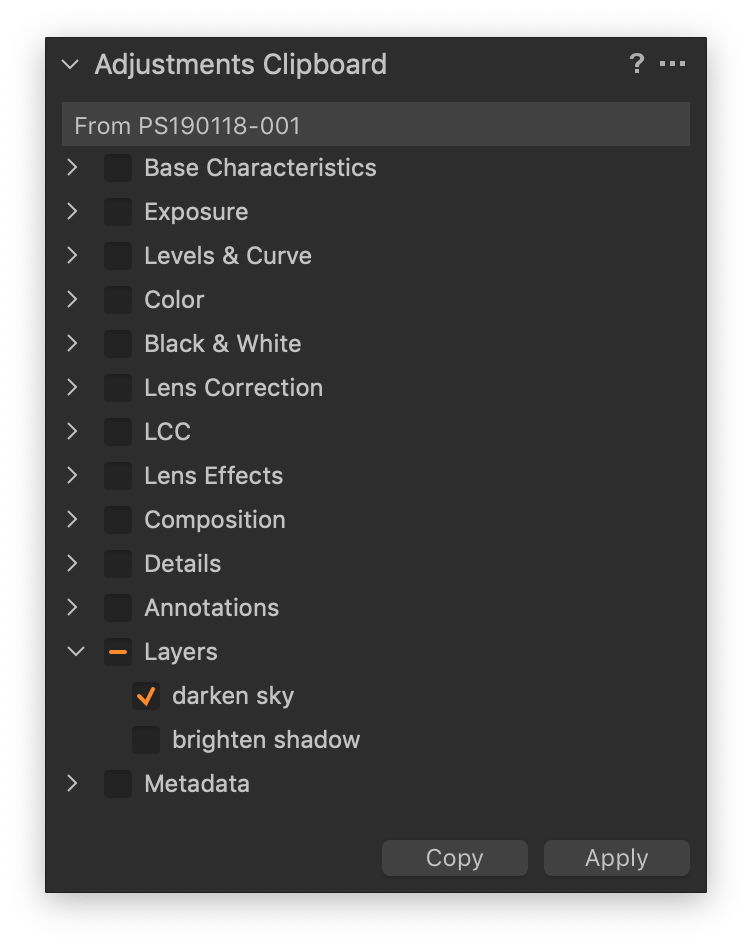
That brings us to the Adjustments Clipboard, which is at the heart of copying and applying our adjustments. The clipboard has the nasty habit of being a long list with only a few checked boxes.
Not any longer.
Adjustments that are not changed in the source image will stay collapsed after the Copy command. That makes it much easier to read the clipboard and uncheck any box you do not want to apply.
New Recipe
In a clean setup without previous Process Recipes, Capture One creates six recipes for you with a more consistent naming than before. Also, when you long-click on the + sign to create a new recipe, you are offered a list to choose from as a starting point.
The list makes creating recipes faster. Unfortunately, there are no predefined PSD recipes, only JPEG and TIFF. This omission is strange, as Capture One offers additional features with PSD output like layers for Watermark, Overlay, and Annotations.
Also note that the Process button now appears in the Process Recipes tool, instead of the Process Summary tool.
User Interface
Capture One 20 has a long list of user interface enhancements. Some of them are minor changes, while some are bigger. Let us take a look at the most exciting changes and improvements.
- Scrollable and Pinned areas
- Viewer background-color
- Toolbar Text & Icon
Scrollable and Pinned areas
The many tools on each tool tab take up to much space, in particular when you work from a smaller laptop screen. The result is that tools collapse when you expand another tool.
To mitigate the issue, Capture One Pro 20 now comes with two different areas per tool tab: a Scrollable and a Pinned area.
Pin or scroll
The Pinned area (marked red) sits at the top of the tool tab, and the tools in that area take up a fixed amount of space.
In the Scrollable area (marked blue), the tools scroll within the remaining space. Notice the scrollbar at the right.
The tools do not automatically collapse anymore, but manually collapsing is still possible, of course. You are free to move a tool from one area to the other and vice versa. To do this, click on the three dots at the top right of each area and select Move tool to scrollable area and Move tool to pinnable area, respectively.
Preferences
Rotating the mouse wheel now moves tools up and down, where it initially moved a slider as in previous versions. If you still prefer to use the mouse wheel for controlling the tool sliders, go to Preferences > General tab > Tool Tabs section and check the Scroll wheel changes slider value option.
Note that when you choose this option, you can still scroll the tools by keeping the Alt-key pressed while using the mouse wheel. The Alt-key temporarily disables the option in the Preferences until you release the key.
Viewer Background Color
The background color of the Viewer has always been adjustable from the Preferences > Appearance tab.
Now you can change it via View menu > Customize Viewer > Background Color as well. Because of being a menu item, you can make keyboard shortcuts for each color.
Another option is to right-click in the Viewer background and change the color from the pop-up menu.
Toolbar Text & Icon
Since Capture One 4 (2007), the toolbar was icon only, despite the icon-and-text option it offers. Only after about ten years, this was fixed in Capture One 11 (2017).
Now the setting Icon with text is the new default option. Of course, you can change this via View menu > Customize Toolbar or by right-clicking on the toolbar and selecting Customize toolbar.
Camera and Lens Support
New cameras that Capture One Pro 20 support are:
- Canon EOS 90D
- Canon EOS M6 Mark II
- Leica V-Lux 5
- Nikon Z50
- Olympus E-M5 III
- Panasonic Lumix DC-S1H
- Pentax K1 Mk II
- Ricoh GR III
- Generic GoPro HERO raw support
New lenses that Capture One 20 support are:
- Rodenstock RS-23mm/Aerial
License Keys
With Capture One 12 and earlier you had a selection screen with all different running modes for Capture One. This was quite confusing.
From Capture One 20 onwards, this screen has disappeared. Now you select your product from the Capture One website. Next, you log in and download your product. During the download, you receive your key. This can be a 30-day trial key for the Pro products or a permanent key for the Express products.
More Information & Reviews
Don’t take only my word for it but continue reading the Capture One 20 review of Alex On Raw and see what he has to say about it. Capture One visualizes their take on this release in this video.
Catch up with later developments in Capture One 20 Update (13.1.0) in my Capture One Pro 20 Update review.
Thank you
For reading. Please feel free to leave a comment. Like us on Facebook or subscribe to our newsletter to stay informed about new blogs.
Best Regards,
Image Alchemist






I have C1 Pro 12.1 installed. Can I install a trial of C1 20 without overwriting 12.1 but still access my 12.1 catalogues from 20?
Yes, Capture One 20 is installed in a separate folder. Please be aware that you do not open your Capture One 12 catalog with Capture One 20 as you will not be able to open it again in version 12. Create a separate catalog to test.
Best, Paul Steunebrink / Image Alchemist
Paul, Thanks you so much for your easy to understand reviews of the new features.
I had problem uploading CO 20. I did a pre-order with a ‘License Key’. I used this to open CO 20 but the number was refused. This ‘License Key’ from the approved re-seller should have read ‘License Code’ or some other names. It was truly confusing, and I needed the help of Capture One Support to work it out.
Odile, thank you for your nice comments. The pre-order promotions have indeed led to quite some confusion among users. I am glad to hear it worked out well in the end.
Best, Paul Steunebrink / Image Alchemist
out of dxo and capture 1 pro 20 what one of them is best at noise reduction .
Hi John,
As I mentioned it is best to try this out for yourself. The experience of noise and noise reduction is influenced by personal preferences, camera model, ISO, and type of subject. Nobody can tell what is best for you. Fortunately, there is a 30-day trial for Capture One Pro.
Best, Paul Steunebrink / Image Alchemist