Capture One Tethering In-Depth
Tethering is one of Capture One’s key features. Over the years it has evolved into a sophisticated tool for the most demanding photographer. Tethering is available for Phase One & Mamiya/Leaf digital backs and DSLRs from Canon, Nikon, and Sony. Enjoy the third part in this series, Capture One tethering in-depth.

Capture One Tethering In-Depth
Capture One Tethering In-Depth is the third and last post in a series on tethering into Capture One. In the first episode – Capture One Tethering Explained – I shared the basics of tethering with you:
- the location for storing your images
- naming incoming images in a sensible way
- remote triggering the camera from your computer
In the second post – Capture One Tethering Continued – I highlighted the main areas of interest for the intermediate shooter:
- better control over composition and lighting with Live View
- improved workflow with adjustments that prolongate during a shoot
- view and control camera settings
In this third post I walk you through some tools and features that are less obvious for the occasional tethered shooter but are indispensable for the seasoned Captionist (yeah, new word):
- quickly evaluate your exposure
- define layout and composition during the shoot
- advanced file naming features
- configure your camera remotely
- control how tethered operation behaves
- setup Capture One Pro/DB for the best tether experience
- check camera battery status
As you see this is quite a list so let’s get started with a quick overview before first and a close look at the tools next.
The Right Exposure
No matter how much control you have over your raw images in Capture One, it all starts with the right exposure. This is, in particular, true for images with a high dynamic range.
Therefore, a tool that gives you a quick assessment of the exposure of the incoming image is a big time saver (and sometimes even a live saver). That is exactly what the Exposure Evaluation tool does.
Layout And Composition
Imagine you shoot a cover for a magazine and you have to take the layout of the cover into account during the shoot. A great help would be if you had the cover layout on top of your shots, superimposed.
That is exactly what the Overlay tool does for you. It just displays the layout in the Viewer but stays fully separate from the image you shoot and adjust.
File Naming Presets
We all know how important the image file name is: for later retrieval, recognition by the client, or for archival purposes.
In the first post on tethering, I already mentioned the Next Capture Naming tool and what it does. Now in this last post on tethering, I return to this tool and show you some more tricks that it has on its sleeve.
Camera Settings
Where the Camera tool gives you a quick to use and visually attractive tool to use the camera remotely, takes the Camera Settings tool remote control to a whole different level.
You configure your camera up to the finest detail remotely from Capture One with the Camera Settings tool.
Camera Menu
You find almost all tools and controls at the Capture tool tab, discussed here and in both previous posts. But it does not end here. In Capture One you find the Camera menu with a list of items.
All items in the Camera menu relate to tethering and how it behaves. I explain to you exactly what they do in the second part of this post.
Preferences
With the Preferences, you configure Capture One to your liking. Spread over three different tabs you find settings that relate to tethering.
I went through all the bells and whistles of the Preferences in a series of posts in the past. Therefore, you will find a brief summary here and references to the respective posts elsewhere.
Battery Check
This is for Phase One gear only but nevertheless very important. Since the Phase One XF camera and IQ digital backs each run on their own battery by default, checking their status is important for trouble-free operation.
Both the Toolbar and the Camera tool have battery status indicators.
Look At The Tools
We will now take a close look at the tools I mentioned so far in this post:
- Exposure Evaluation tool
- Overlay tool
- Next Capture Naming tool, action menu and presets
- Camera Settings tool
- Camera menu
- Preferences: Capture tab, registering your device
- Toolbar
Exposure Evaluation tool
The Exposure Evaluation tool on the Capture tool tab shows you a histogram with an exposure indicator below it. Its purpose is to give you a rough indication of your exposure. The indicator marks your exposure on a scale.
With a range from over +/- 2 EV, you see a green area considered good or adjustable and a grey (below -2) and red (above +2) area considered not good. The image this screenshot came from needed a +0.2 exposure correction, which matches quite good with the exposure indicator.
The histogram and exposure indicator are not affected by the adjustments you make in Capture One with a few exceptions:
- The Film Curve from the Base Characteristics tool affects the tool the most.
- The White Balance setting and Color Balance (Master wheel) setting too, but to a lesser extent.
Overlay Tool
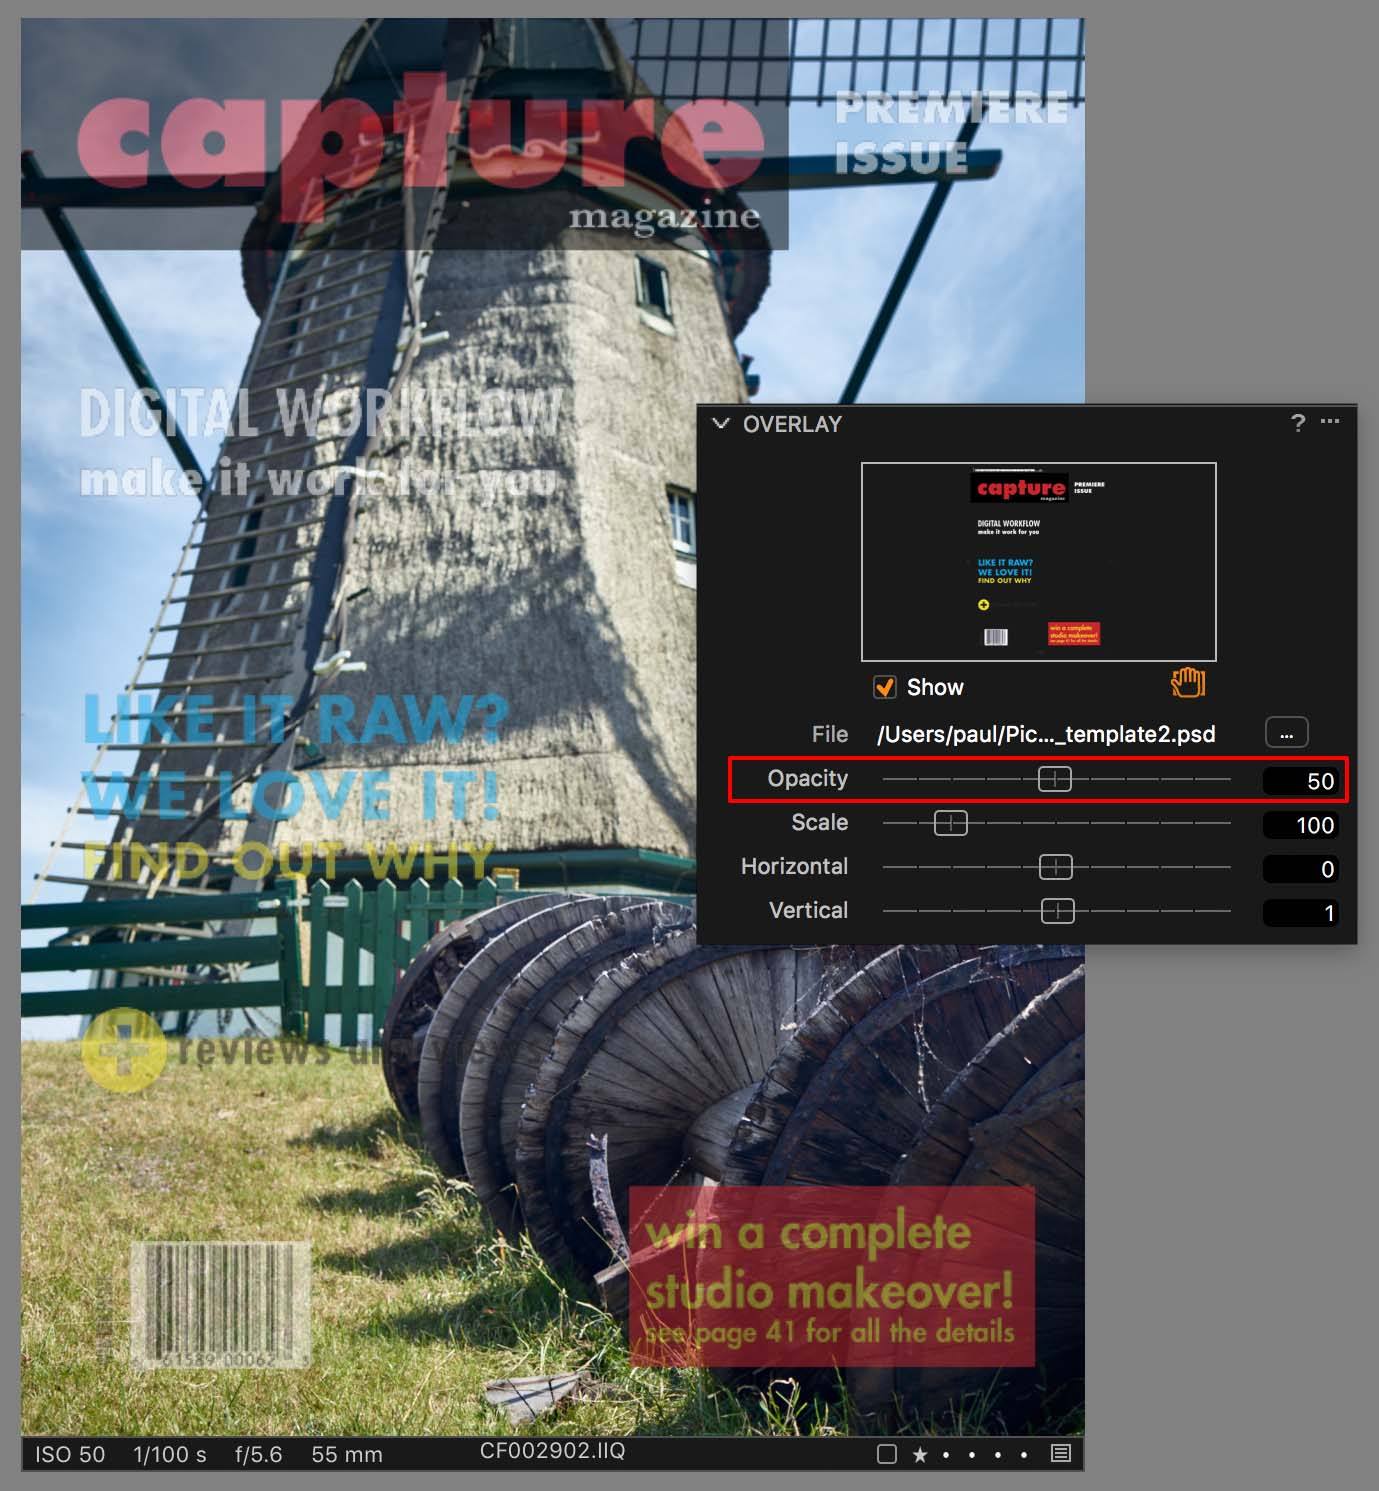
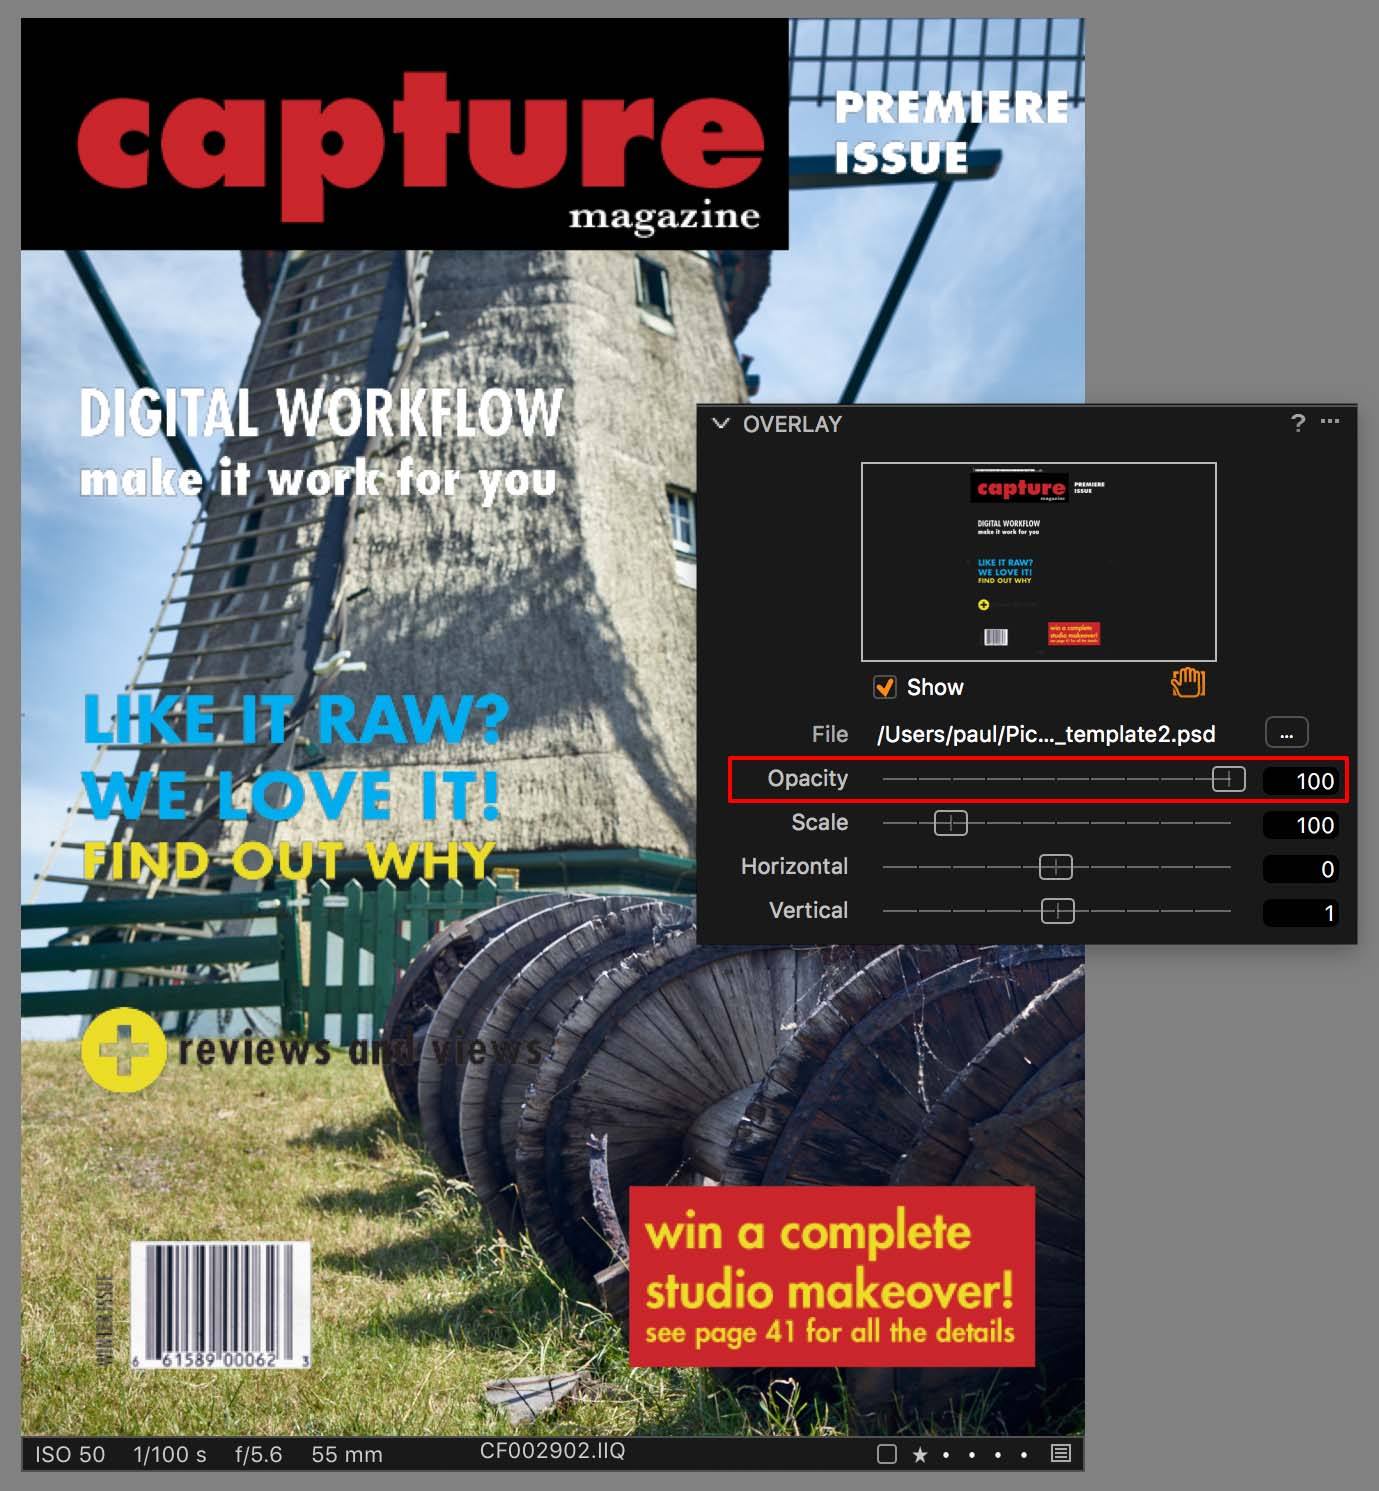
To help compose your image for that magazine cover with text and logo, it would be handy to have it on-screen during the shoot. That is what the Overlay tool on the Capture tool tab does for you.
You load an image into the Overlay tool, set Opacity, Scale and Horizontal/Vertical position. The tool comes with an accompanying cursor tool (hand symbol on top of the rectangle as you can select in the tool).
The image you load into the Overlay tool, preferably with a transparent background, is projected on top of the image in the Viewer. Note that the overlay is not saved to the image. It is just a projection.
You position the Overlay tool with the Horizontal and Vertical movements and Scaling. In addition, you can set the Opacity to make the overlay more or less visible. A 25-50% opacity is convenient for during the shoot but a 100% opacity gives you a better idea of the end result. You may see for yourself in the two stacked images below.
Overlay Cursor Tool
To move the overlay, you can also use the Overlay cursor tool. You find it in the cursor tools section on the Toolbar by long-clicking on the Pan cursor tool and select Move Overlay from the list. Alternatively, you can select the cursor tool from the Overlay tool itself or with key H (and Shift+H respectively) from the keyboard.
The Show check box allows you to quickly enable and disable the display of the overlay without affecting settings. To remove the selected overlay, open the action menu (3 dots top right) and click on Clear Overlay.
Preferred file formats for the Overlay tool are TIFF, PSD, and PNG since these support transparent backgrounds. PDF, JPEG and RAW formats supported by Capture One can also be used.
Next Capture Naming Tool
I discussed the Next Capture Naming tool briefly in the first part of this series on tethering – Capture One Tethering Explained. However, I skipped the Presets part of it.
File naming is important and you want to get it right from the start. Yes, Capture One has powerful (batch) rename capabilities for renaming afterward but why not set it right from the beginning?
In the Next Capture Naming tool, you see the Format field. At the right, you see a small button with 3 dots. When you click on it the Naming Format dialog opens.
A lot is happening here. Let’s have a closer look and explore!
Presets
Going from top to bottom I first see the Presets field with the name of the selected preset. A Preset is a predefined naming format that you can retrieve easily for later purposes. Made once, used many times.
When you click on it you see several built-in presets. I selected the [Name][3Digit Counter] built-in preset. You also see the option to save your own preset.
Format
This is the file naming format and is identical to the Format field in the Next Capture Naming tool. You can change the format by adding characters (like text, numbers, a dash) and tokens. As soon as you edit the Format field, the Preset field changes to Untitled. This is to let you know that the format is not saved as a Preset yet.
Group
The tokens that you can use for file naming are grouped for ease of use. Groups are All, Recently Used, General, Date and Time, and Metadata (divided over several groups). Select a Group, for example, Date and Time.
I encourage you to use the Group preselector for quick and easy retrieval of certain tokens. However, not all 80 tokens in the All group are distributed over the different groups.
Tokens
Here you see the tokens that the selected Group contains. You select a token by either double-clicking or dragging it to the Format field.
Some tokens have multiple layouts like the [x Digit Counter] and all date/time-related tokens. You can see this from the small arrow-like icon at the right of the token.
Tokens fill in specific information that they derive from different kinds of sources. Examples are:
- from metadata
- EXIF from the camera like data/time or focal length,
- IPTC metadata you entered in Capture One
- from the computer clipboard with [Clipboard] token
- from Capture One with [Collection], [Destination Folder Name], [Document Name] token
- from manually defined value like [Name] token for name of session, client, model, or location
I suggest you come up with your own system of naming, create a Naming Format, save it as a Preset, and embed it into your workflow.
To give you an example, the image above shows a generic naming scheme I use for images: my initials, year (4 digits), month (2 digits), day of the month (2 digits), dash character, counter (3 digits).
Context Menu
Each tool in Capture One has a Context menu. Click on the three dots in the top right corner to open it. The Context menu of the Next Capture Naming tool is in particular interesting.
The Use Import Counter option is great when your shoot is part tethered and part untethered and you have a counter in your file name. By using a single counter (the Import Counter) for both the numbering is continuous.
The Capture Counter on the other has three settings here. A reset is going back to ‘1’. But you can set the counter to any start value you like. Last, you can make the counter take bigger steps per shot. For example, you copy a book and want to sync the page number with the shot. However, you shoot all left pages first, and right pages after that. It is easy to set the counter and the counter increment.
In case you shoot both RAW and JPEG when you tether, you can tell Capture One to consider the images are a pair with the same file name and different file extension only, or as consecutive images with incremental numbers.
Camera Settings Tool
In an earlier post, I discussed the Camera tool for remotely controlling the camera. This is quick and easy to use tool and it has the Live View button and shutter release!
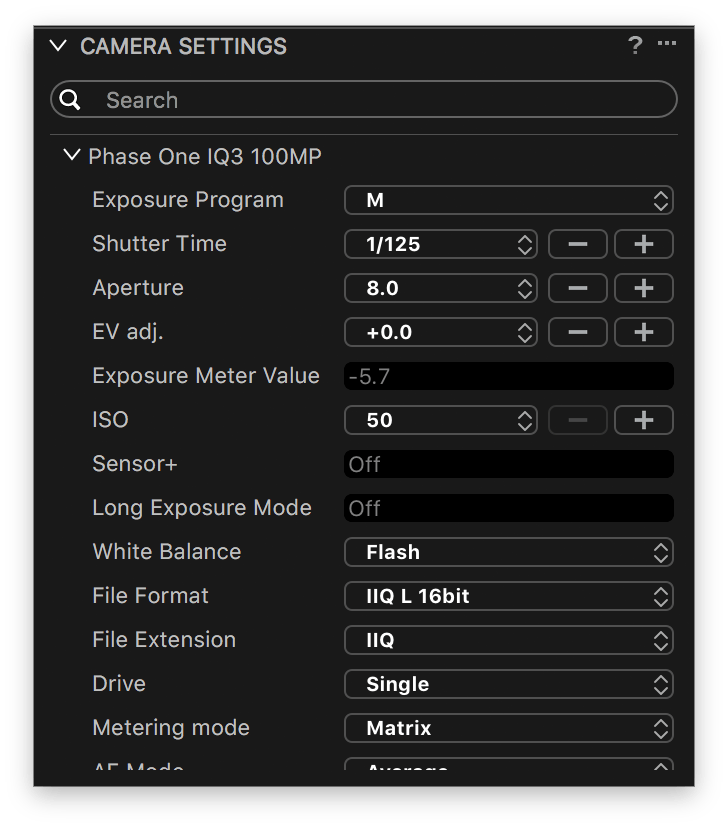
However, there is a second tool on the Capture tool tab with many more settings: the Camera Settings tool. The two stacked images below are the first two of four screens of settings of the Phase One XF with IQ3 100mp digital back.
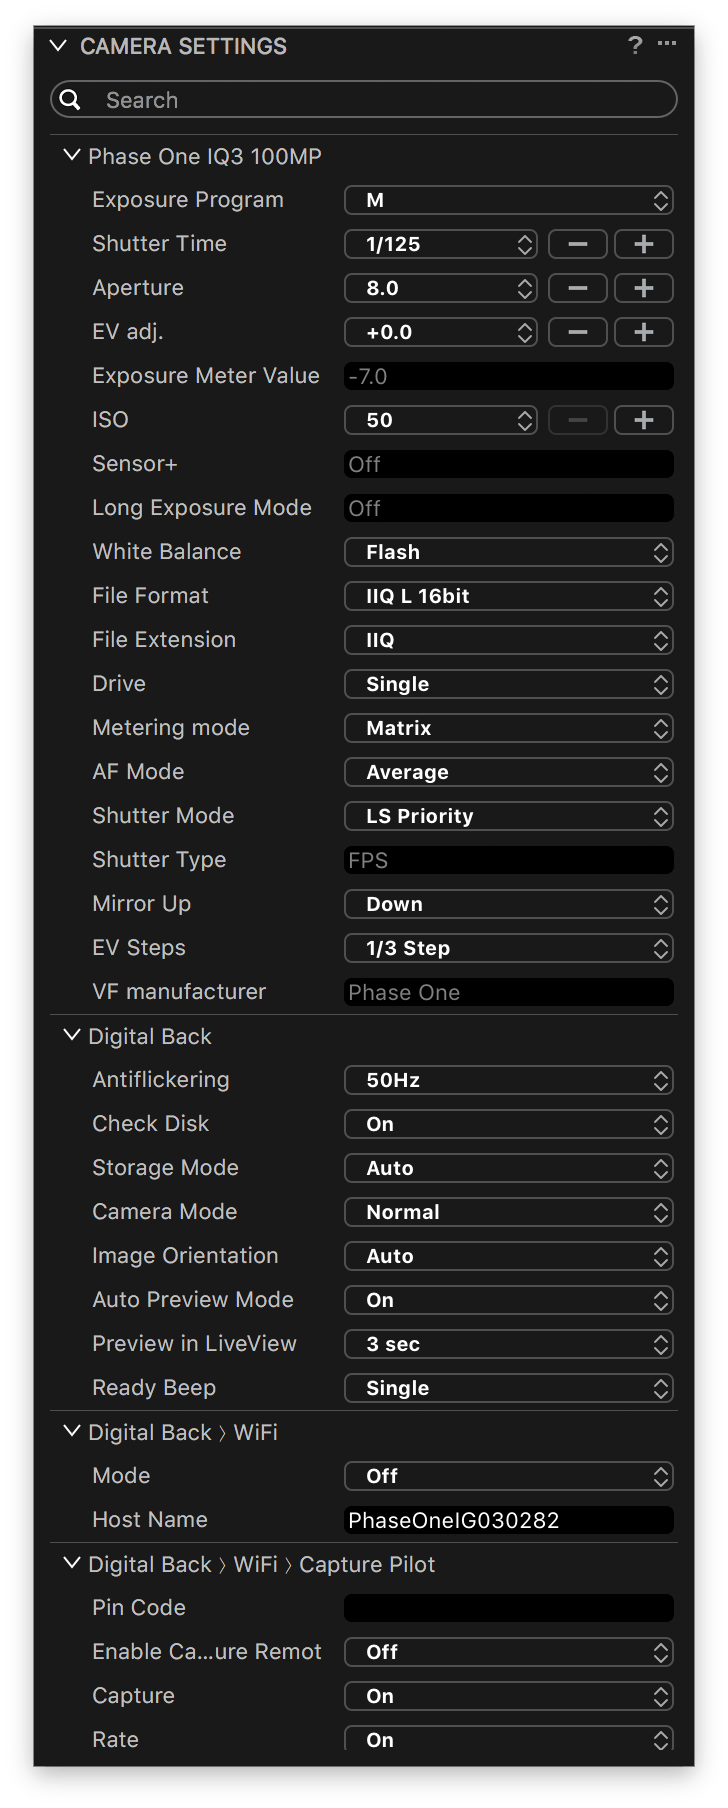
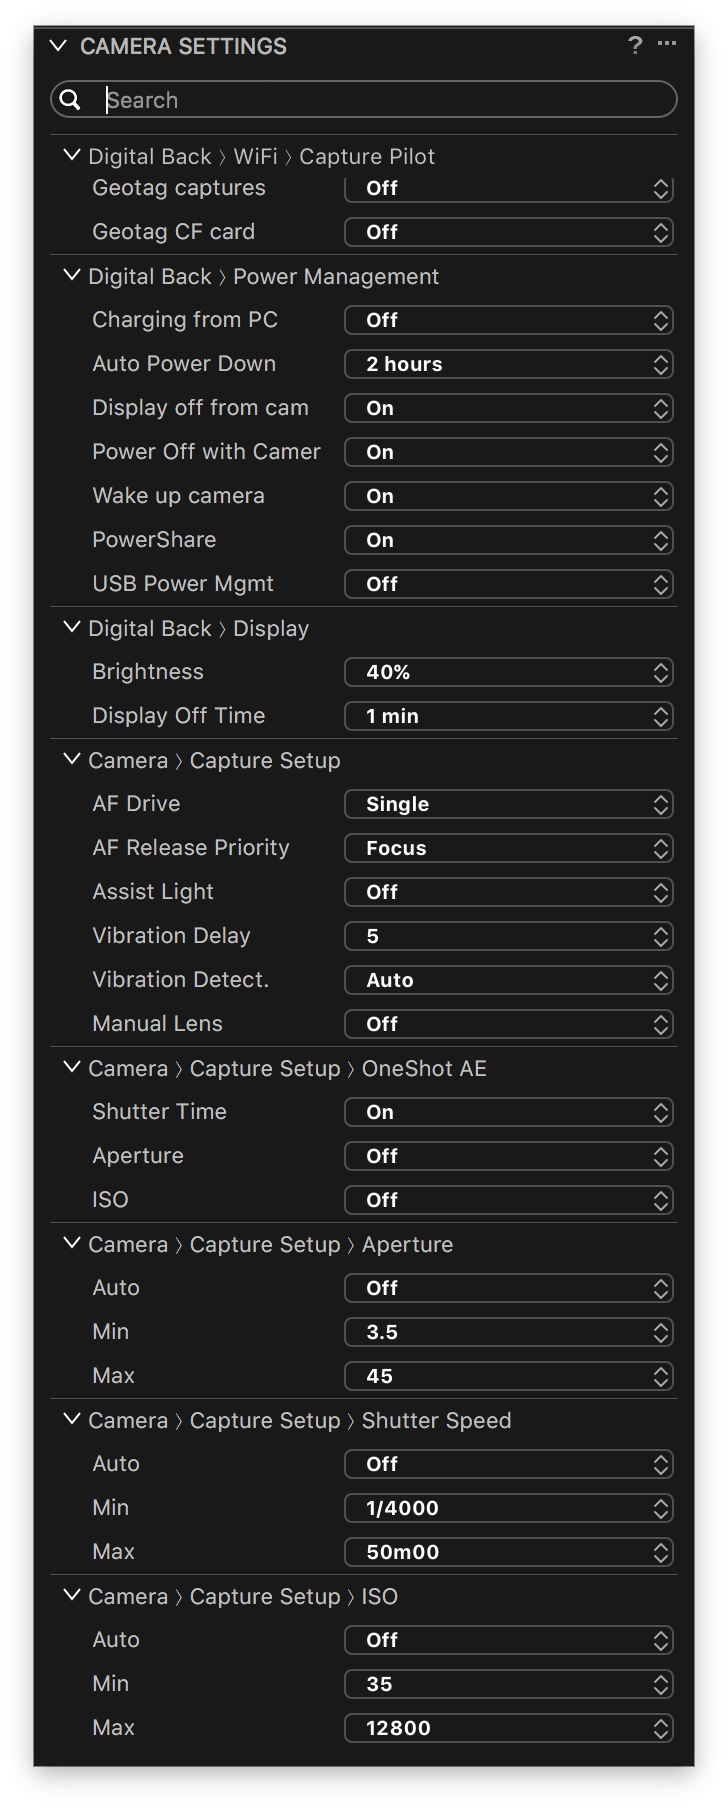
It is so comprehensive that it even has a search option! I was looking for a vibration delay setting.
Most settings are adjustable except for physical buttons on the camera. These settings are for display only in the tool and are grey instead of white.
Camera Menu
Besides the tools on the Capture tool tab, you find a dedicated Camera menu in Capture One. From this menu, you control how tethering behaves.
The Camera menu contains the following items:
- Composition Mode
- Hot Folder Enabled
- Select the Hot Folder…
- Auto Select New Capture >
- Never
- Immediately
- When Ready
- Auto Pause
- Orientation >
- Auto
- 0/90/180/270°
- Capture
Composition Mode
When you start shooting tethered you first are busy with positioning camera, model, and lighting, and with focusing, balancing the lights and so on. In the meantime, you take a lot of shots to review the result. This all happens before the actual shoot.
This results in a lot of images that you have to remove later on. And when you change the set, everything starts over again. Here the Composition Mode is your help.
When you enable Composition Mode, incoming captures are stored on top of each other, overwriting the previous test shot. If you have a counter set in the Next Capture Naming tool, it does not increase.
Obviously you should not forget to switch Composition Mode off once the actual shoot starts. To help you remember the Composition Mode shows clear signs of a circle with a cross in the Viewer.
You switch the Composition Mode on/off through the Camera menu > Composition Mode or via the Toolbar. You may not find it there because it is not part of the default workspace. You can add it or select the Simplified – Tethered Capture workspace via the Window menu > Workspace.
Hot Folder Enabled
The Hot Folder feature of Capture One is also called pseudo-tethering. The idea is that another tool takes care of the remote connection, shutter triggering and potentially other features. However, you let Capture One actively monitor a specific folder for incoming images.
Any new image file that comes into that folder is shown in the Viewer, just like with tethering by Capture One. To make this happen, your first step is to enable the Hot Folder feature via Camera menu > Hot Folder Enabled. This applies to both Session and Catalog.
The drawback of the Hot Folder function versus ‘real’ tethering is that Capture One does not do its tricks like naming, and copying adjustments. There is obviously no remote camera control from Capture One.
A Hot Folder is great if your camera is not supported for tethering with Capture One but you have another tool, most often from the camera manufacturer itself, to tether and trigger the camera.
Select The Hot Folder…
When you work with Sessions, setting Hot Folder Enabled is your first step. Next, select the folder in the Library tool under System Folders. Even smarter is to use the Session’s Capture Folder as the Hot Folder. Just select the Capture Folder from the Session Folders section in the Library tool.
Capture One always monitors selected folders when working with Sessions. Setting Hot Folder Enabled will force the last incoming image to be displayed.
For a Catalog, you need to select the Hot Folder to be monitored. Go to the Camera menu > Select Hot Folder…
As soon as an image is added to the selected Hot Folder, that folder is automatically added to the Catalog, Folders section if it was not already part of the Catalog, and the image is automatically imported, selected and displayed in the Viewer.
Auto Select New Capture
This feature is for fine-tuning your tethering experience. It tells Capture One what to do when a new image comes in.
By default, Capture One generates a preview and displays it in the Viewer window. This is the When Ready setting and it means that when Capture One is ready, it displays the image. This is the preferred option for most situations.
The Immediate setting shows you the built-in thumbnail of the image before the preview is generated. The advantage is that you see the image earlier compared to the When Ready setting, the disadvantage is that it is pixelated, and no adjustments are applied. This option is more demanding for your hardware in terms of performance.
The opposite is the Never setting, which is good for slower hardware and high paced shooting, or unattended tethering. You will notice that with this setting Capture One does not switch to the last incoming image.
Give Me A Break
Now let’s assume you use the default When Ready or the Immediate setting. While images are coming in the digital tech likes to adjust one for detailed review. Here is where the Auto Pause setting comes in.
It temporarily stops Capture One from shifting the focus to the last incoming image, which allows the reviewer to adjust an earlier image while the shooting continues. To restore normal operation, select Auto Pause again to disable it.
Orientation
The item Camera menu > Orientation might be greyed out and not available. It is for Phase One and Leaf digital backs only. Here, you can fix the orientation of the image independent of what the digital back has in mind.
For DSLR shooters, use the Next Capture Adjustments tool, Orientation field instead.
Capture
The Camera menu > Capture option triggers the shutter of your camera like the shutter button does in the Camera tool and the camera icon on the toolbar. This item is not available (greyed out) when no camera or digital back is connected.
Preferences On Tethering
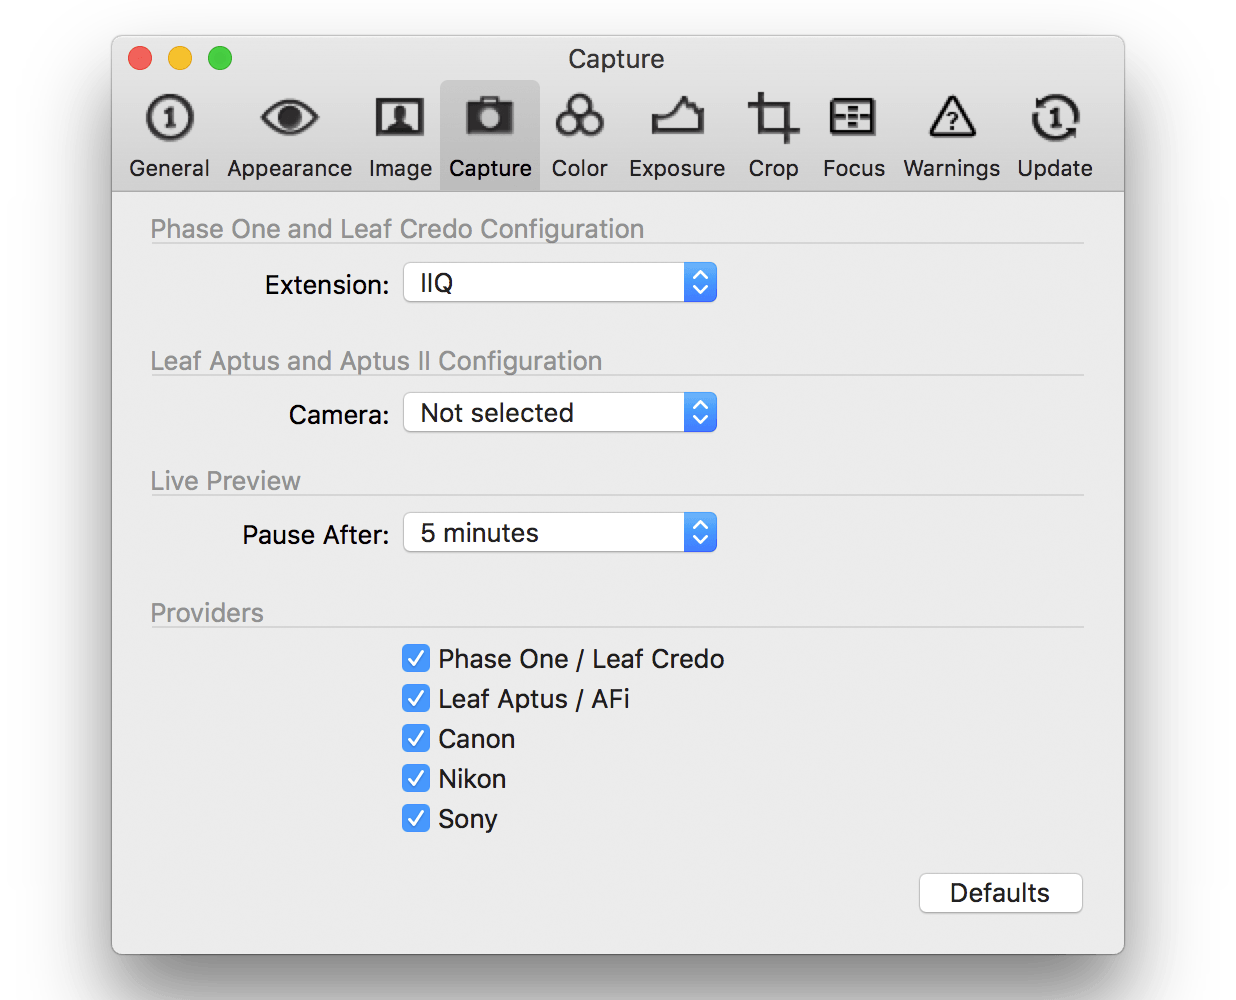
There are quite a lot of settings in the Preferences of Capture One that relate to tethering. In fact, there is a specific section at the Capture tab in the Preferences.
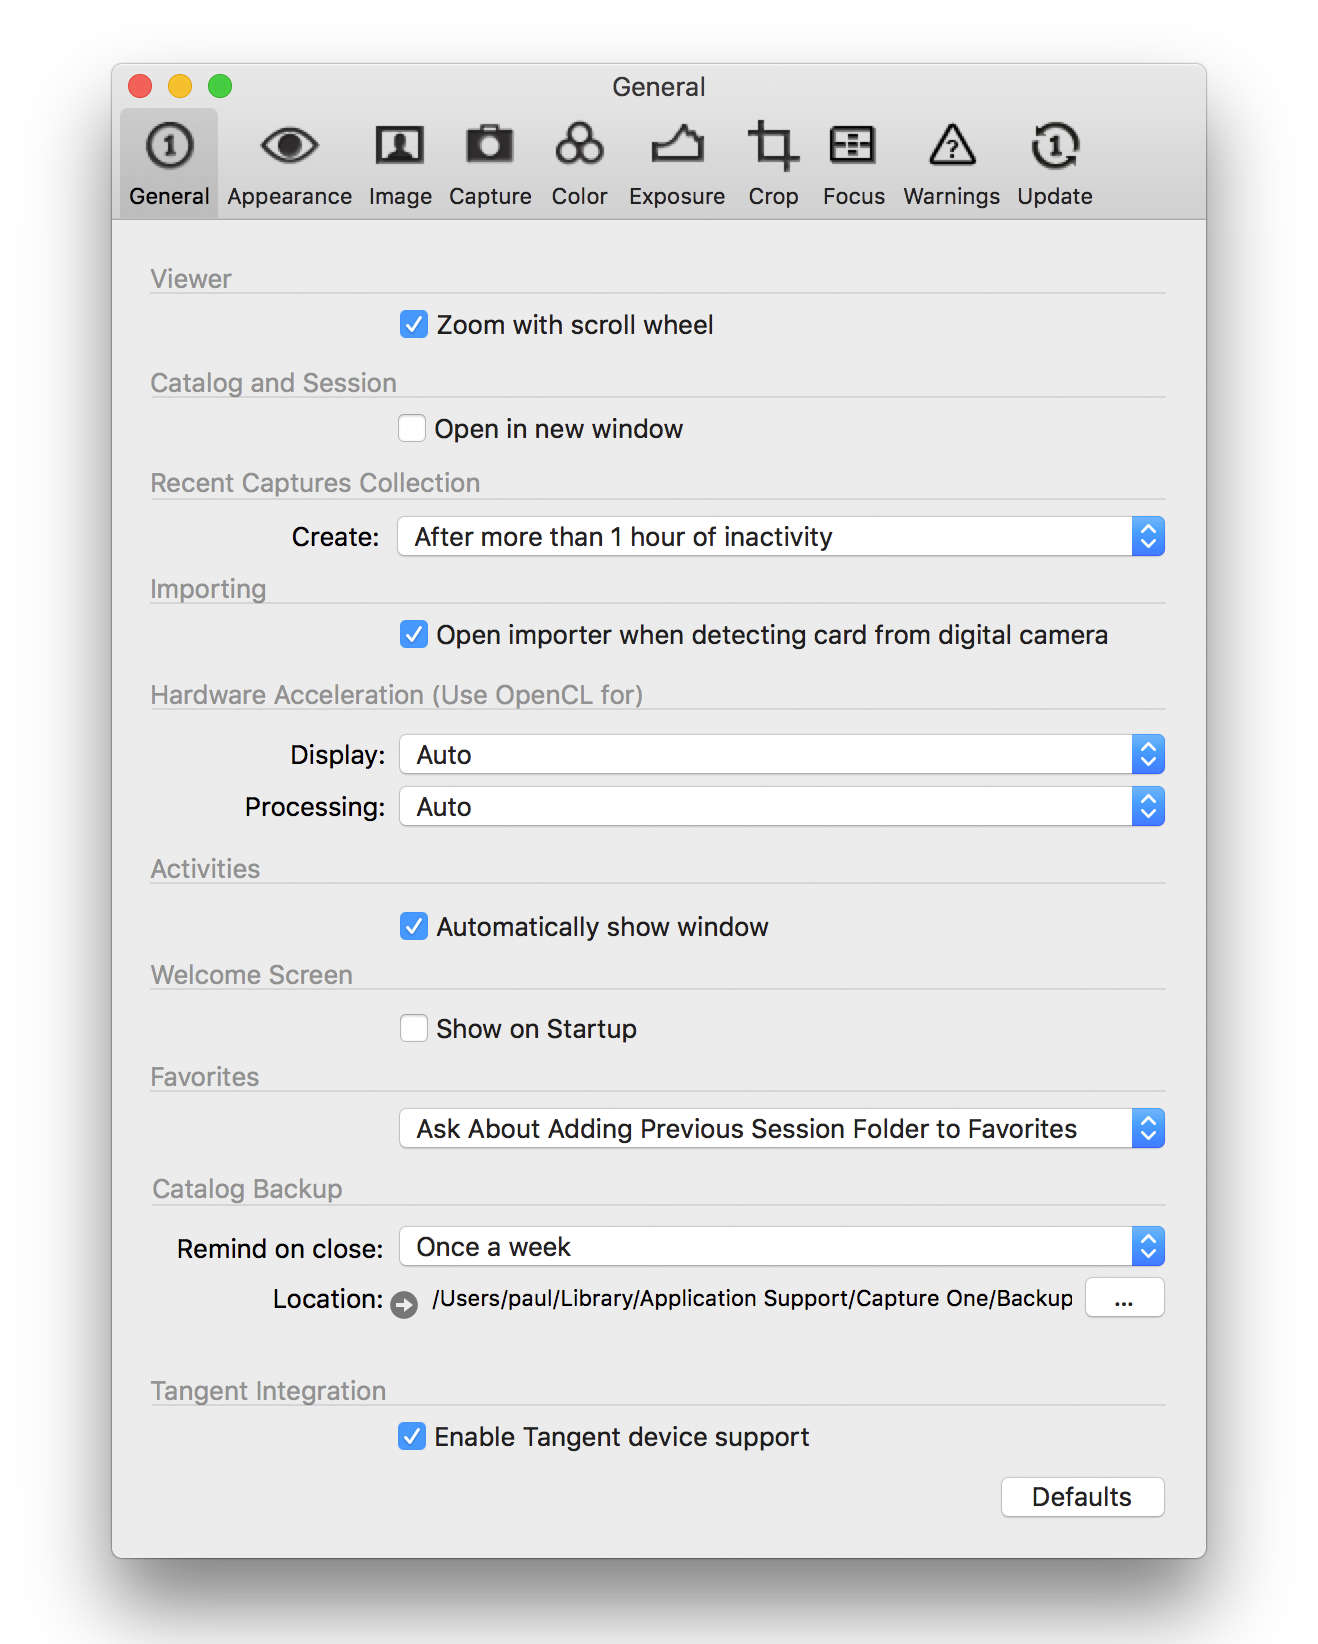
In addition, the General tab offers a single setting for those who tether to a Catalog. You can set the interval of inactivity after which Capture One will create a new Collection under Recent Captures.
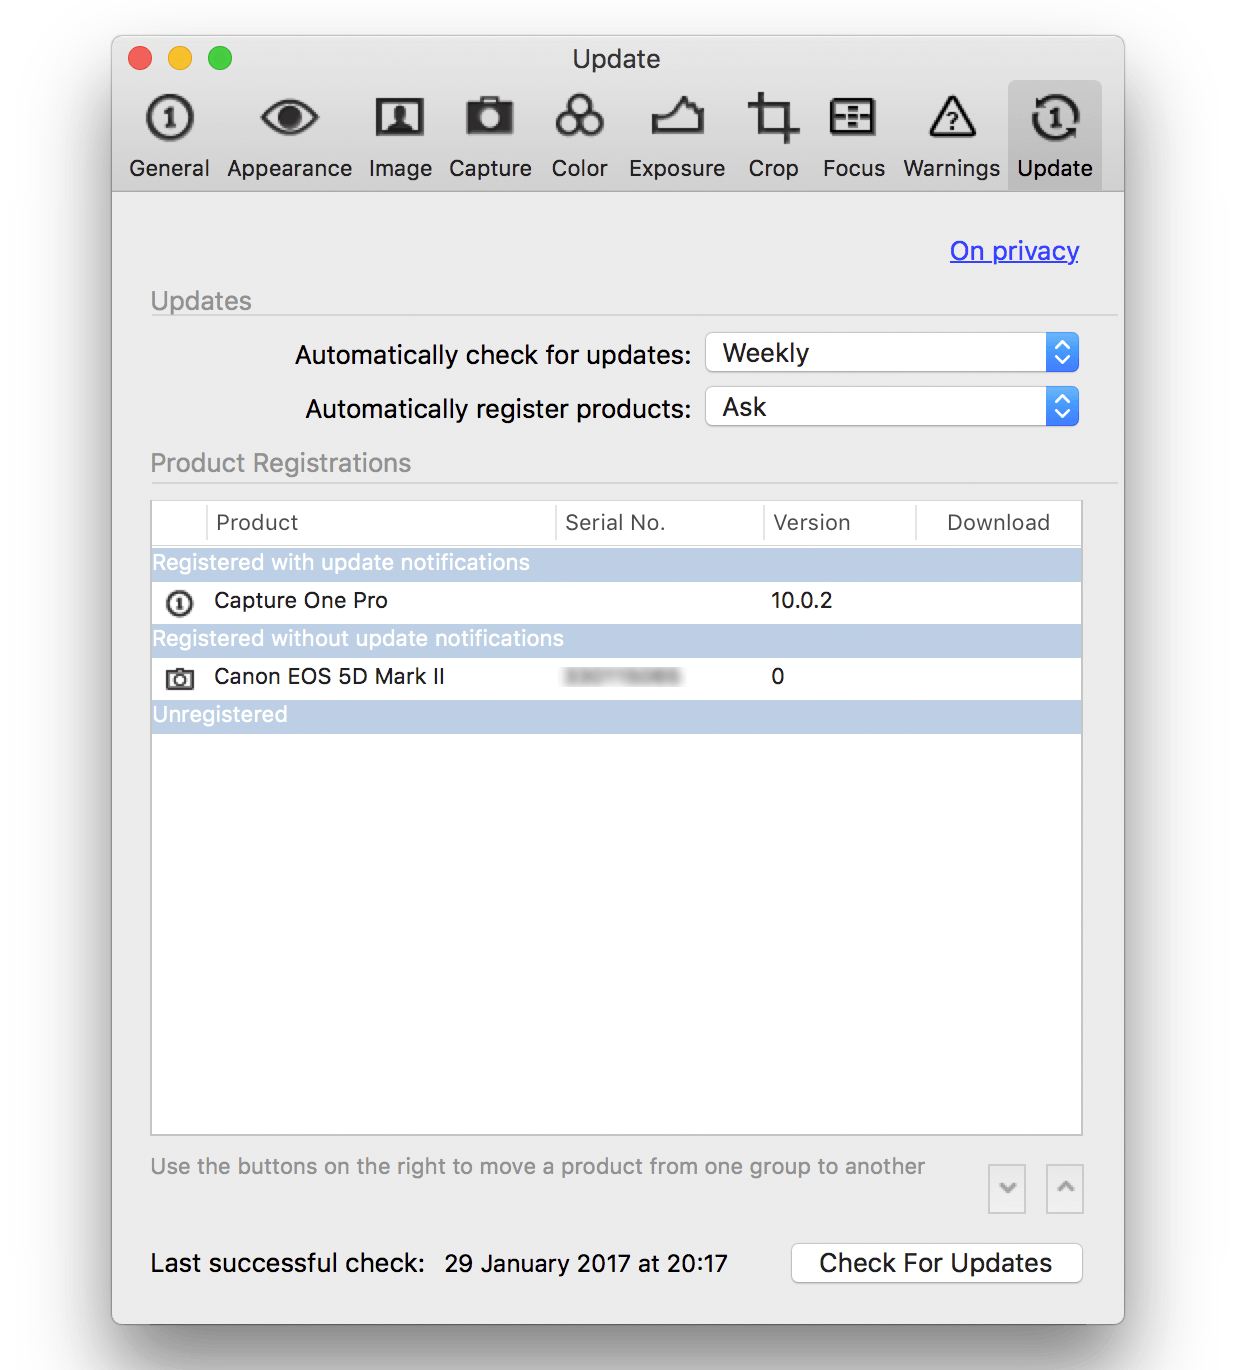
When you connect a camera or digital back for the first time to a system with Capture One you get the question to register it. This not only applies to Phase One systems but to DSLRs too.
The benefit is that you may get warnings on firmware updates.
I discussed all options in more detail in a separate series on Preferences and I like to advise you to go there:
- the Capture tab see Capture One Preferences (part 2)
- the General tab see Capture One Preferences (part 1)
- the Updates tab see Capture One Preferences (part 3)
Battery Status
You can check the Battery Status of your Phase One digital back and camera when you tether into Capture One. There are two locations where the Battery Status is provided.
First, on the Toolbar, you see a battery symbol. You can click on the symbol for detailed information. The color may change from grey to red when your batteries are depleted.
The second location is the Camera tool. The information provided here is identical to the Toolbar.
Tethering Ends
Here ends my series on tethering into Capture One Pro/DB. I plan to add a post on Capture Pilot, since this tool is often used with tethering, including remote control from this app in iPhone and iPad. I expect this end summer 2017, with some other post coming in between.
Thank you
For reading. Please feel free to leave a comment. Like us on Facebook or subscribe to our newsletter to stay informed about new blogs.
Best Regards,
Image Alchemist










Leave a Reply
Want to join the discussion?Feel free to contribute!