Capture One Process Recipes
Capture One Process Recipes are at the heart of the Process feature. Understanding Recipes give you maximum
This is the third blog in a sequence on output. One preceding post provides an overall view of the Process feature, another covers the simpler Export feature.
Capture One Process Recipes
Let’s start with an overview and highlight the concept of the Capture One Process Recipes. The use of recipes in Capture One goes back to the days of its inception. It is at the heart of the program. Capture One was designed as a raw workflow tool like a 3-stage rocket:
- capture or import
- select and adjust
- process and save
The Process Recipe covers the third stage of the process.
What Is A Process Recipe?
Each recipe is a collection of settings that defines the outcome of processing. Parameters that are stored in a recipe include file format, quality settings or bit depth, ICC profile, size, file location, naming, and more.
By collecting parameters in a set, and the ability to create multiple sets of recipes, you can easily switch between recipes. You can even combine them to create multiple output files simultaneously, with optionally different naming and in different locations.
To summarize, recipes are extremely powerful but due to their history and evolving nature, possibly complex at first sight. So let’s uncover the secrets!
Capture One Process Recipes Tool
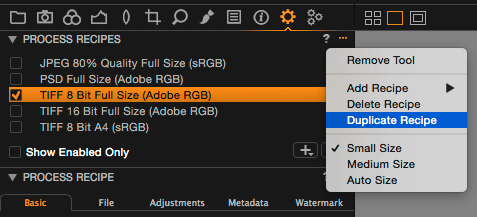
You can find this tool at the top of the Output Tool tab. The tool lists all available recipes on your system. You can add, delete and duplicate recipes from the action menu or use the plus and minus buttons at the bottom.
You can enable and disable each recipe with a checkbox at the left of the recipe. Enabling a recipe means that it will respond when you use the Process command.
For example, you have a recipe for TIFF full size and JPEG QuickProof. Enable both with the checkmark and process your images. Each original will be automatically processed into both a full-size TIFF and a QuickProof JPEG. Note that this cost hardly more time than processing one recipe. Very efficient.
In case you have too many recipes and lost the overview of the enabled ones, check the Show Enabled Only box for your ease and peace of mind.
Order Your Recipes
A long list of Capture One Process recipes might need reordering. Just drag-and-drop the recipes to put them in the right order. Also note that when you hover your mouse over a recipe, a brief summary is displayed.
You can only select one recipe at a time. In general, this is the same as your enabled recipe or your most important recipe in case you have enabled more.
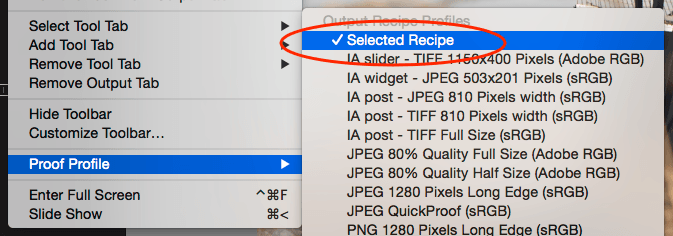
The selected recipe is used for the Viewer and the Histogram tool. RGB values and clipping are based on the selected recipe, at least when you set the proof profile accordingly. For the record, take a look at the View menu > Proof Profile and confirm that Selected Recipe is marked. This is the default.
When the selected recipe is not enabled with a checkmark, the Process Summary tool will highlight the recipe in red. I explained this in the blog Capture One Process.
Process Recipe Tool
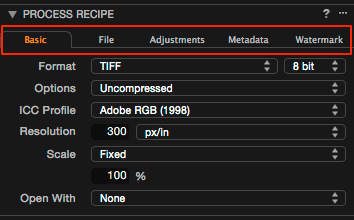
This tool shows all the details of the recipe that you selected in the list of the Process Recipes tool. It is very similar to the Export Variants dialog in case you have been there, but with some extra options. All recipe settings are spread over five tabs, and I will explore each of them now in more detail.
Basic Tab
The Basic tab is identical to the one of the Export Variants feature, which I discussed in this blog. To save space, I refer to that blog now for all fields with one exception: Scale.
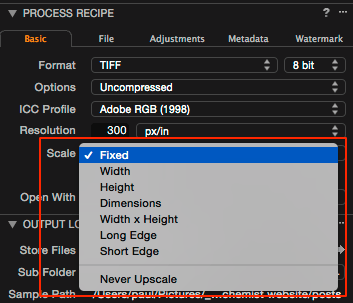
The Scale option is a very powerful feature of a process recipe. It allows you to up or downscale an image to predefined dimensions. A series of images can come from different cameras or have different crops. Either way, you end up with differences in pixel size.
With the Scale function, you can set the long or short edge, the width or height, or both sides. This is great for your online service, social media page, website, printing or any other occasion that requires you to define a precise dimension. But there’s more!
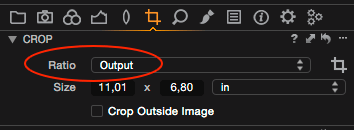
I think few users know that you can link the output dimensions to the crop tool. Normally, you would crop with a specific ratio, but the ratio does not define size! However, you can select Output as a ratio in the crop tool. Now the crop will follow what you defined at the Scale field in your recipe and as a result, both ratio and size are linked.
File Tab Root Folder
The File tab has three fields to control and their effect is often more wide-spread than imagined.
By far the most important and most misunderstood setting is the first field: Root Folder. The Root Folder field determines where images are stored and how the Output Location tool works.
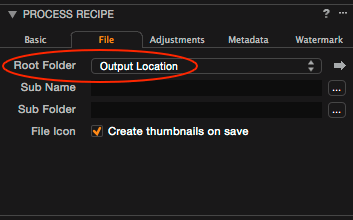
When you choose Root Folder > Output Location the control of where the processed images are stored is handed over to the Output Location tool. In other words, the process recipe does not determine the output location. This is a great option if you like to manage your output location from a single place, independent from the recipe used.
Choose Root Folder > Image Folder or Select Folder and the Output Location tool is bypassed. Now the recipe controls the location.
Selecting Image Folder as Root Folder means that Capture One will save the processed image in the same folder as the original image. Note that you can not use this option with fully managed images in a catalog.
When you choose Select Folder you give the Process Recipe full control of the output location. The images are processed into that folder each time you use that recipe.
File Tab Sub Folder
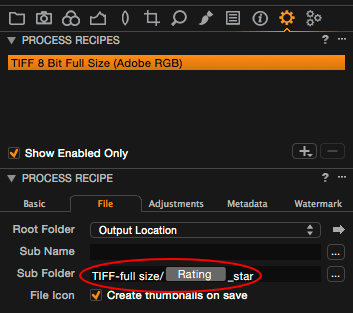
The Root Folder is also the root of an optional Sub Folder (I skip the Sub Name for a minute). Fill in your subfolder or path in the Sub Folder field. For example, when you have two recipes for TIFF and JPEG respectively, you can select the same root folder for both recipes and TIFF and JPEG subfolders.
Note that you can use both fixed text as well as tokens. You can also create nested folders inside the Sub Folder with the slash (/) on Mac or backslash (\) on Windows.
In the image above the recipe creates a ../TIFF-full size/.. subfolder and inside that folder a ../x-star/ subfolder corresponding to the rating in Capture One 8. In case you have different ratings in your processed images, they will be automatically sorted in their respective subfolders.
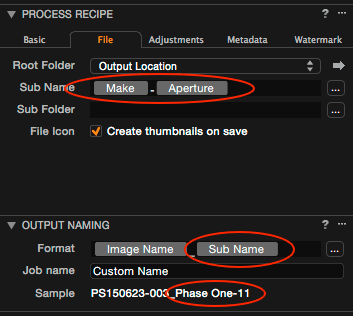
The Sub Name field is another story. Between the Root Folder and the Sub Folder fields you find the Sub Name field. The value or token you enter here will be filled in in the Output Naming tool when you use the Sub Name token in the definition. This way you can enter recipe specific information in the file name on output.
In the image above you see from top to bottom the tokens (Make-Aperture) as Sub Name. Next, you see the Sub Name field in the Format field of the Output Naming tool and below the sample. It appeared to be an image taken with a Phase One camera at f/11.
Adjustments Tab
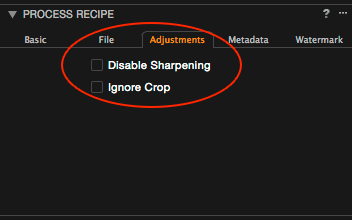
This tab has currently (version 8.3.2) two checkboxes, which allows you to bypass specific image adjustments.
- Disable Sharpening
- Ignore Crop
Both checkboxes are cleared by default and as a result not effecting the processed image.
The Disable Sharpening checkbox allows you to fully bypass any sharpening in Capture One Pro 8 during processing. You can leave the image sharpened for easy viewing and evaluating sharpness and focusing. This is great if you like to do any sharpening in another tool before printing, down-sizing or in prepress.
The Ignore Crop works in a similar fashion. Applying crop while adjusting images can help determine the composition and also affects any kind of automatic adjustment. For example, cropping out a bright sky affects the highlight and typically Exposure, HDR and Levels adjustments. Nevertheless, you might want to have the full uncropped image for reference, archival purposes or else. The option in this tab prevents the need to remove the crop from the images.
Tip: when using these settings give your recipe a descriptive name to reflect any box you checked here, like “TIFF 8-bit (AdobeRGB) – No Sharpening”.
Metadata Tab
Metadata is great and I encourage you to use it to your own benefit as much as possible. However, not all output need all kind of metadata. In particular images for the web are often cleared. This is where you do it.
On the Metadata tab, you have a list of options whether you like to include specific IPTC metadata.
Watermark Tab
A watermark is a way to label your images. You can simply apply text or your custom made image. Preferably use an image with a transparent background.
Both text and image are fully scalable and you can adapt the opacity. It is best to crop the image before you apply a watermark.
Move it around with the cursor when you select the proper cursor tool. You can find the Move Watermark tool on both the tab as well as on the cursor tool section in the toolbar (the second icon, keep pressed to select).
Instead of a simple line of text, you can make an image of your logo or cover design to include in the image.
Note: the watermark becomes a part of your output image; with the Overlay tool the text or image is only visible in the Viewer, not on the processed image.
Where To Find?
Process Recipes are as valuable as your styles and presets. You can find them in the same location in the so-called application support folders.
- Mac: ~/Library/Application Support/Capture One/Recipes82
- Windows: C:\Users\<user name>\AppData\Local\CaptureOne\Recipes82
Mind the hidden ~/Library folder on Mac and the ../AppData folder on Windows.
Wrap Up
Capture One Process Recipes are incredibly powerful and can greatly enhance your workflow. It makes sense to put some effort into setting it up properly for your own benefit. Maybe you only need one or two. Or you like one for each purpose, like online services and social media, for fine art printing in-house, and so on.
Thank you
For reading. Please feel free to leave a comment. Like us on Facebook or subscribe to our newsletter to stay informed about new blogs.
Best Regards,
Image Alchemist













I have Capture One 12.0.3for Sony. The process recipe is great except for one thing it will not allow each recipe to save to a different folder. For example I have a Flickr recipe and an Alamy recipe so I want the Flicker recipe to go into my Flickr folder and the Alamy recipe into my Alamy folder. However each time I process any recipe I have to change the output location to the correct folder. It seems to me it should not be too difficult for Capture One programmers to allow each recipe to be saved to a different specific folder. That’s what recipes are all about so you do not have to repeat tasks.
Hi Jim,
The feature you ask for is already there. Go to the File tab, Root Folder field and choose Select Folder. Select your Flickr or Alamy folder for that recipe respectively.
I updated the text in this blog in File Tab Root Folder section to make it more explicit.
Best, Paul Steunebrink / Image Alchemist
Hi, I have tried to export files from Capture One directly to specific folders using the folder naming structure that I have been using to store my photos for a while (YY/YYMM/YYMMdd). It works, but for a reason that I do not understand, Capture One ignores the existing folders (that have the exact same naming structure) and creates new folders with the same name… I end up with two folders with the same name at the same level, quitte strange. Would have an explanation for this? Thanks in advance.
Hi Jean-Pierre,
Hard to say what went wrong. Please send me a mail (address in contact page) with screen shot of Capture One settings and of the double folders.
Best, Paul Steunebrink/Image Alchemist
I try to print an image on A4 landscape format. The margins won’t align to equal values. e.g. lh .64cm, rh 1.45ch, top .64cm, bottom .64cm,
cell height 19.7cm, Cell width 27.6cm.
Any ideas or suggestions to solve the problem?
Hi Kurt,
It could be that the image has a different ratio than A4 paper, or that the print module is making fun (sort of).
If nothing helps, I suggest to process as TIFF and print with another application.
Best, Paul Steunebrink / Image Alchemist