The Secret, yet Powerful, Color Editing Tool
Colored light can make it hard or even impossible to properly balance the color of an image. With the Levels and Curve tools you have a secret, yet powerful, color editing tool. The green in fluorescent light, the red of the sunset at the beach, or the colored light at your big birthday party last year can spoil the fun when the images are ready.

The Secret, yet Powerful, Color Editing Tool
In this third blog post on Levels and Curves, I am going to make advanced color adjustments with both the Levels and Curve tools by using one or more of the color channels (Red, Green, or Blue). I call this kind of use for channel mode.
Note that this feature is only available in Capture One Pro, Pro (for Sony) and DB 8, and not in Capture One Express (for Sony) 8. To get started, let us change our workspace a bit. I like to have an overview of all Levels tools, one for each channel.
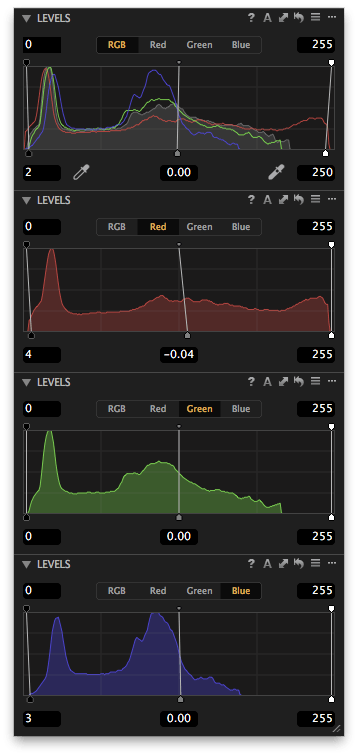
And next, we do the same for the Curve tools. Note that you can either make them floating or create new tool tabs in your workspace.

We are now ready to use the Levels and Curve tools as color editing tools.
Level Your Power
Let’s start with Levels in channel mode. You will discover that it is an extremely powerful color editing tool. It allows you to add or remove color. All the markers of the tool are at your disposal.
In the screenshot below I placed arrows on how to add color. By using the opposite marker or the opposite direction you can remove color.
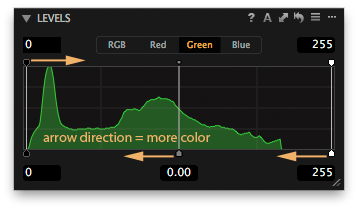
The markers at the left (top & bottom) affect the dark tones in your image, the ones at the right affect the highlights and the marker in the middle affects the mid-tones. This way you can easily adjust a color based on its brightness!
If you want to read more about how Curves and Levels tools work and the distinction between input and output Levels, click here for an earlier blog.
Sunset Boulevard
For demonstration purposes, I use a sunset image with the obvious reddish/purple cast and low contrast. Thanks to a low camera position I get the maximum reflection of the sky in the water and in the wet sand.

I like the sky but the foreground is too colored (purple). The tonal scale needs improvement by setting the shadow and highlight level. And the purple color in the dark tones needs to be taken care of. That is exactly what I am going to do with the Levels tool’s Red and Blue channels. These channels are powerful color editing tools.
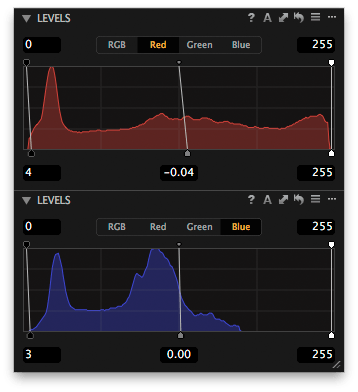
I raise the dark tone marker at the bottom left to remove the color in both the Red and Blue channel. This removes the purple cast in the shadow.
This is basically the same as setting a black point in the RGB mode of your Levels tool as I discussed in an earlier blog post: you remove the gray cast to make it black.
Next, I like to weaken the overall red cast with the mid-tone marker (move it to the right) of the Red channel. Now I have the right color at the right places in my image and I have emphasized the romantic mood. This is the result:

Ease Your Levels, Enter Your Curve
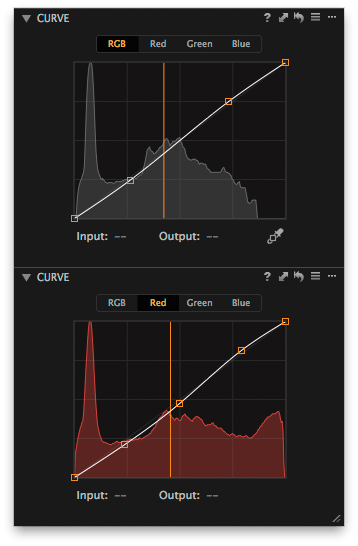
Great! Are we done now? Not completely. The Levels red mid-tone slider did a nice job, but if you have read my previous post on Curves you know that the Curve tool can do a better job. The warm tones of the sunset can create more of an impact if there are parts that do not have that color to increase color contrast.
Also, the general contrast needs a boost too. I use the Curve tool for both, one curve in the general RGB tab, one curve in the Red tab.
Note that I start to reset the Levels Red channel mid-tone marker in the neutral position because the Curve tool is taking care of that now. This is the end result I like most:

And here are my Curve tool settings:
Tips
Let us end this blog with two tips to make you more productive with these color editing tools in channel mode.
Tip 1 – Reset All Levels or Curve Tool Modes
In Capture One 8 the tool’s reset function (curved arrow icon top left) will reset all channels. If you need to reset only the selected channel, use the Command-key (Mac) or Control-key (Windows) with the reset. Note that in Capture One 7 this works the other way round.
Tip 2 – Workspace
To work with all channels in Levels and Curve, you might want to see them all at the same time. Create multiple Levels or Curve tools as floating tools or create a tool tab for them. Set the new tool to a different channel. Save your workspace for future use.
Thank you
For reading. Please feel free to leave a comment. Like us on Facebook or subscribe to stay informed about new blogs.
Best Regards,
Image Alchemist
Note
This post has been published earlier at blog.phaseone.com; I reworked it for Capture One 8 when posting it here at Image Alchemist






Great info! In your example, to remove the purple cast in the foreground sand, could you use the Color Editor in Local Adjustments? I realize you didn’t have to do that here, but I have some night images with local areas lit by different types of light, and I think I might have to use Local Adjustments to remove the color casts.
Hi Steve, in you case the Color Editor in Local Adjustments is the best course of action. I have used it a lot. Often, you even do not have to use Local Adjustments in this kind of situations.
Another tip is to use the Levels tool Auto Adjust first, but not in the default mode but the R, G, and B channels mode. This is a Capture One Pro 8 new feature. Sometimes it saves the day, sometimes absolutely not!
Thanks! I’ll try that.