Capture One Preferences (part 2)
Unlock the secrets behind the Capture One Preferences and learn how to master the program. Make it behave to your liking for best performance, speed and flexibility. This is part 2 in a serie of 3.

Capture One Preferences
The Capture One Preferences allow you to control the program’s behavior and fully tailor it to your needs. Understanding Preferences can be hard sometimes. You can easily feel overwhelmed by the many features you are not yet familiar with.
The Capture One Preferences are organized in a series of tabs. In this blog, I will discuss each tab, one by one, as well as the different sections on each tab.
This is part 2 in a series of 3. Continue reading or skip to Part 1 more move on to Part 3.
Preferences Part 2
Topics in Capture One Preferences – Part 2 are:
- Image tab
- Capture tab
- Color tab
- Exposure tab
Image Tab
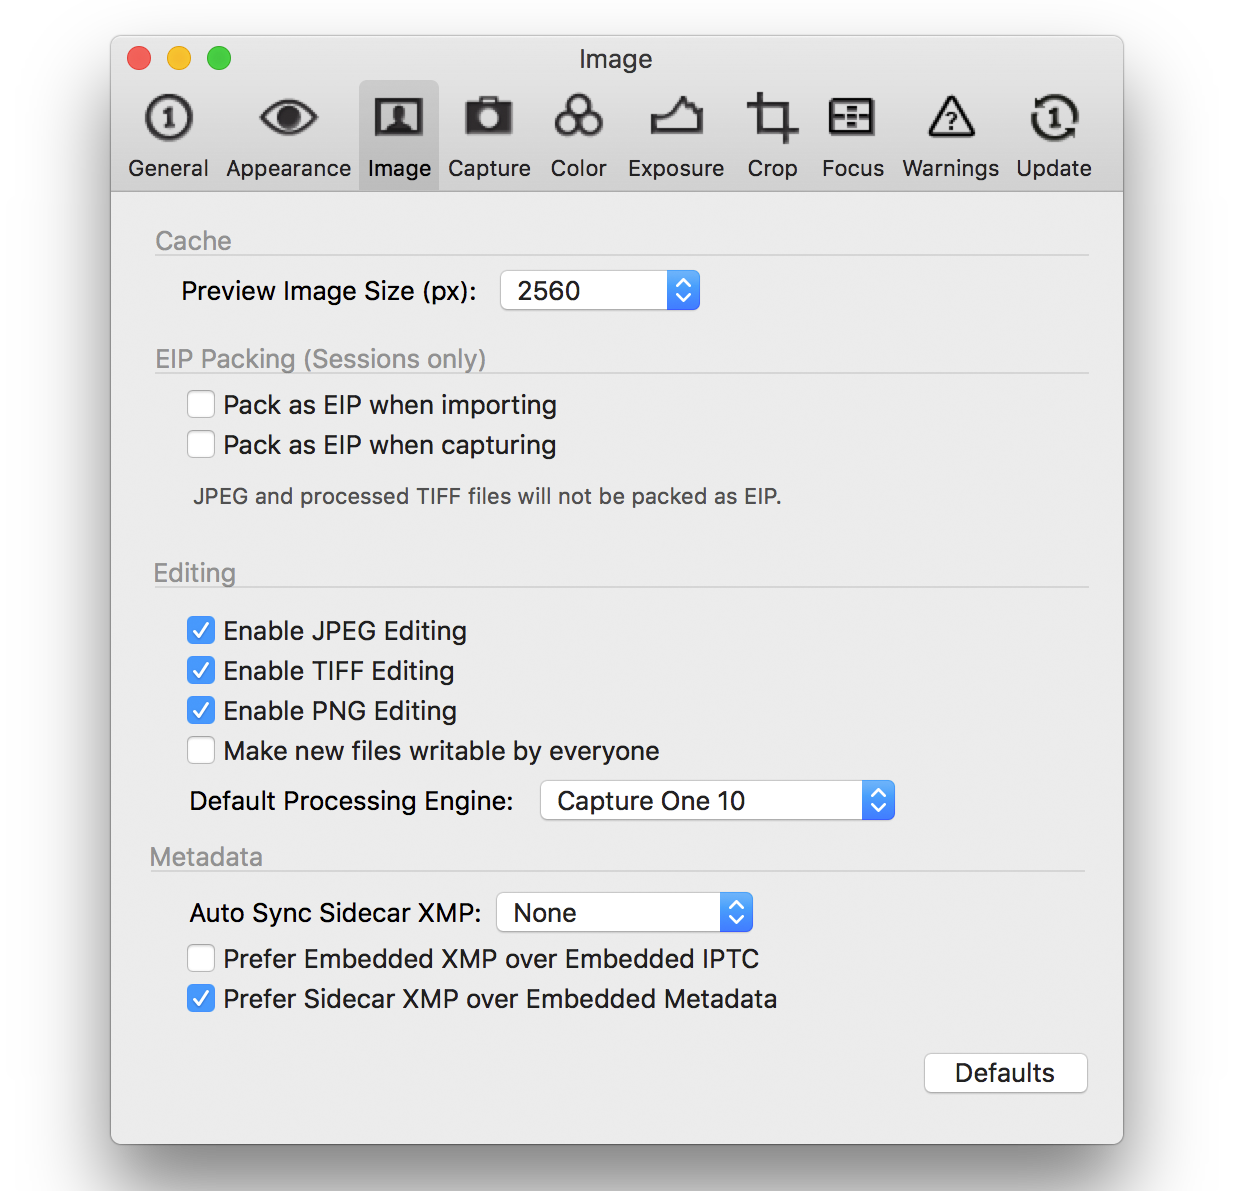
The Image tab contains a number of settings that relate to how Capture One handles image and metadata files, both inside and outside Capture One.
The Image tab contains four sections for Cache, EIP Packing, Editing, and Metadata. With eight checkboxes and three drop-down lists, there is a lot to explore!
Cache
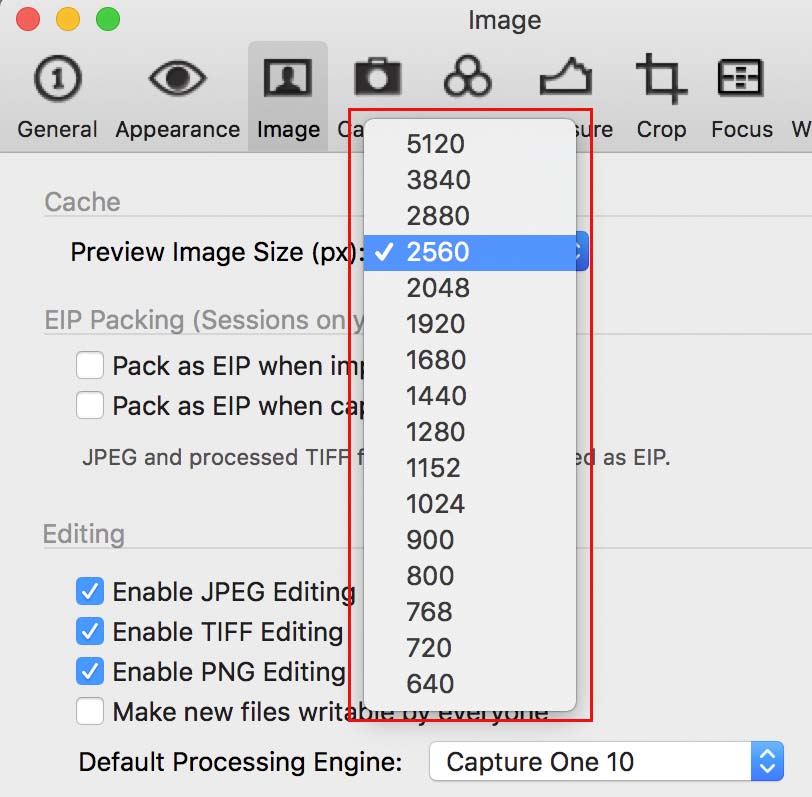
The Cache section has a single setting: the Preview Image Size in pixels (long edge). To understand what this setting does for you, a little background information first.
Capture One works with a preview image during editing and zooming. This is much faster than reading the raw data and rendering a new image at each redraw. For each image that Capture One opens or imports, it generates a preview once and stores that preview for future use.
A larger preview allows you to zoom in more without forcing Capture One to read the raw data again. The small disadvantage is that a larger preview generates a slightly bigger preview file. Setting the preview size too low will result in Capture One constantly reading the raw file, which results in a severe performance penalty!
As a rule of thumb, you best set the preview to the same size in pixels as your display or one position higher. Apple Mac systems with a Retina display should select the values at the high end of the range, 2880 pixels for a MacBook Pro with Retina display up to 5120 pixels for an iMac Retina 5K. The same is true for any external 4K display like the ones from Eizo.
EIP Packing
With Capture One Pro you can pack a raw file into an EIP file. An EIP file contains the original raw file and the settings you made with Capture One. The advantage of EIP is that it is easy to transport a raw file with settings to another system. The disadvantage is that only Capture One can read EIP. Note that you can unpack an EIP file into its original state.
You can pack to EIP manually or let Capture One Pro do it for you automatically.
In the EIP Packing section, you set whether Capture One will pack raw files to EIP. You can set this individually when importing or capturing (=tethering).
This is a setting that affects Sessions only and the setting does not apply to Express (for Sony). Note that Catalogs can handle EIP files both on import and export.
Editing
By default, Capture One Pro not only lets you edit raw files but also JPEG, TIFF, and PNG files. In the Editing section, you can disable editing for each of the processed file formats.
Since Capture One DB does not allow editing of these processed file formats, these settings are removed in DB mode.
In addition, there is a setting Make new files writable by everyone (macOS only). It eases up the read/write permissions of new files to the Everyone group. By default, this group has no access.
You are advised to enable this setting if you work with EIP files that are transferred to other computers. EIP packages need to be writable by other users than the one who created them.
The Default Processing Engine is the engine that Capture One selects for new images or images that you import without adjustments. It is also used when you create a New Variant.
The Processing Engine is the heart of the software. New features are linked to the new Engine only.
By default this is the engine with the highest version number, for example, Capture One 10 in Capture One 10. You can select older engines if you have a special purpose for that. If you do for a special case, do not forget to set it back!
Metadata
If you use IPTC or XMP metadata with multiple programs including Capture One, you should take note of these Metadata preferences. Metadata exchange between Capture One and other programs is possible through XMP sidecar files or metadata embedded in the image file. With the settings in the Metadata section, you can fully configure which type of data you prefer.
Sync Or Not
The setting Auto Sync Sidecar XMP is set to None by default, assuming there is no external data source through XMP to take into account. However, if you add metadata with for example Photo Mechanic or Adobe Bridge to your image files, Capture One will automatically read it on first opening or importing.
When you add more metadata later you need to tell Capture One to read it (setting Load) each time or both read and write to it (setting Full Sync). With Full Sync, there is a permanent 2-way communication between Capture One and the XMP sidecar file: both read and write.
Note: do not use the Full Sync option unless you really need it. It can have a noticeable performance penalty.
What To Prefer
The following two checkboxes are a bit cryptic and confusing. To be able to understand it you need to know that there are two specifications of metadata, the older IPTC (which is always embedded) and the newer XMP (can be both embedded and external in a sidecar file). What you also need to know is that the XMP set is an extension of the IPTC set, including IPTC. As a result, you can theoretically have a conflict between IPTC and XMP metadata for the same property, location for example.
- The first checkbox Prefer Embedded XMP over Embedded IPTC is your selection between both forms of embedded (internal) metadata. The default is to prefer Embedded IPTC and I think that is a good choice as XMP is stored in a sidecar file most of the time.
- With the second checkbox Prefer Sidecar XMP over Embedded Metadata you make the next step. The default is to Prefer Sidecar XMP. Again a good option. If there is XMP it will be in a sidecar file and provide additional data over IPTC.
It maybe sounds a bit complicated but the default settings work in 99% of user cases so you can probably leave it as is.
Capture Tab
The Capture tab contains settings related to tethered capture. This tab is not available on Express (for Sony).
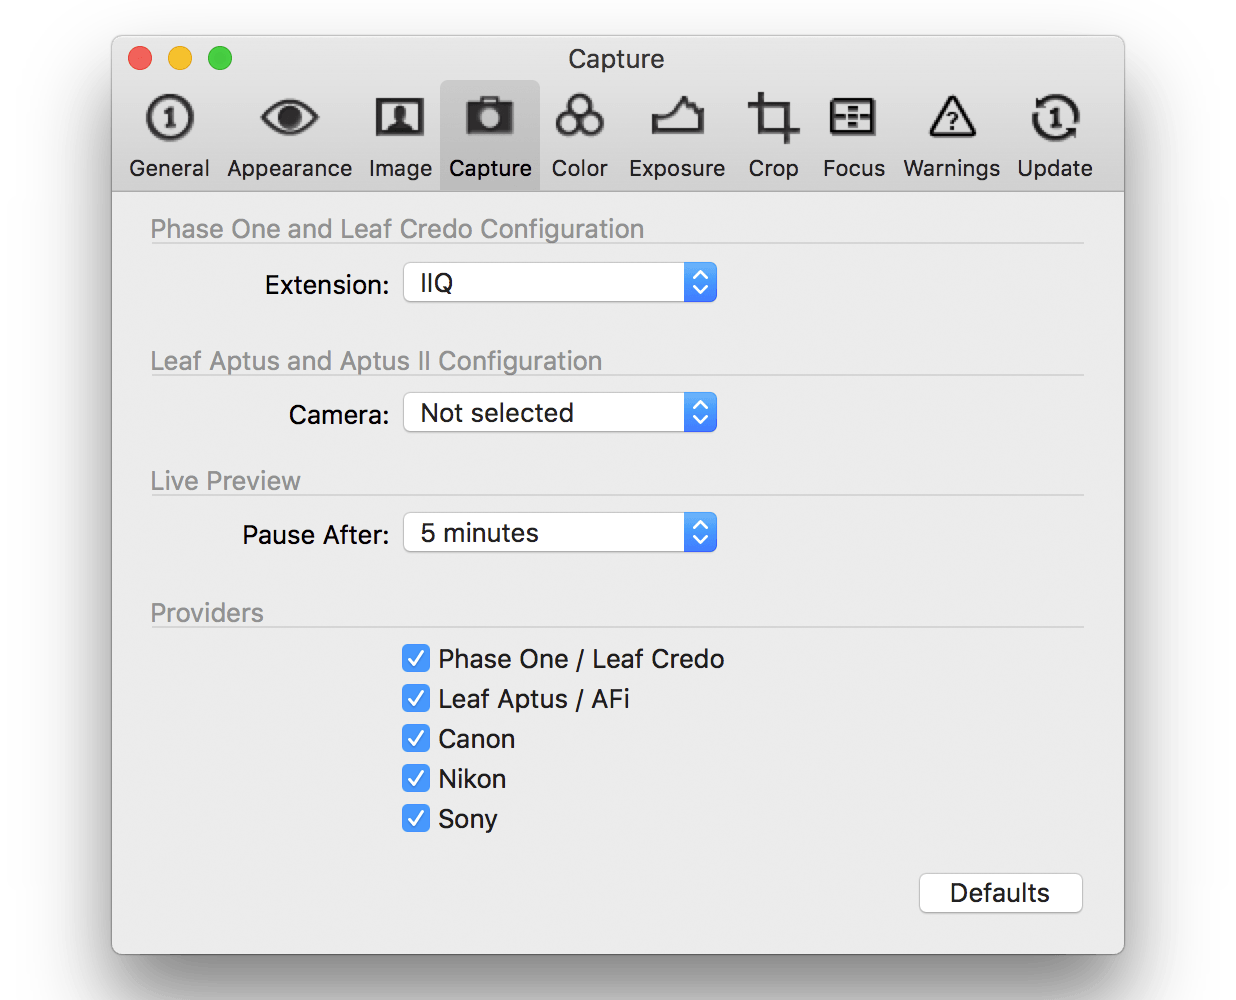
The Capture tab contains four sections: Phase One and Leaf Credo Configuration, Leaf Aptus and Aptus II Configuration, Live Preview, and Providers.
Phase One and Leaf Credo Configuration
When you tether with a Phase One or Leaf Credo digital back you can set the file extension to either IIQ or TIF. There is no image quality affected by either choice. The default is IIQ but some software show the built-in JPEG file only when you select the TIF extension.
The advice here is to leave it to the default IIQ option unless you notice somehow that you need otherwise.
Leaf Aptus and Aptus II Configuration
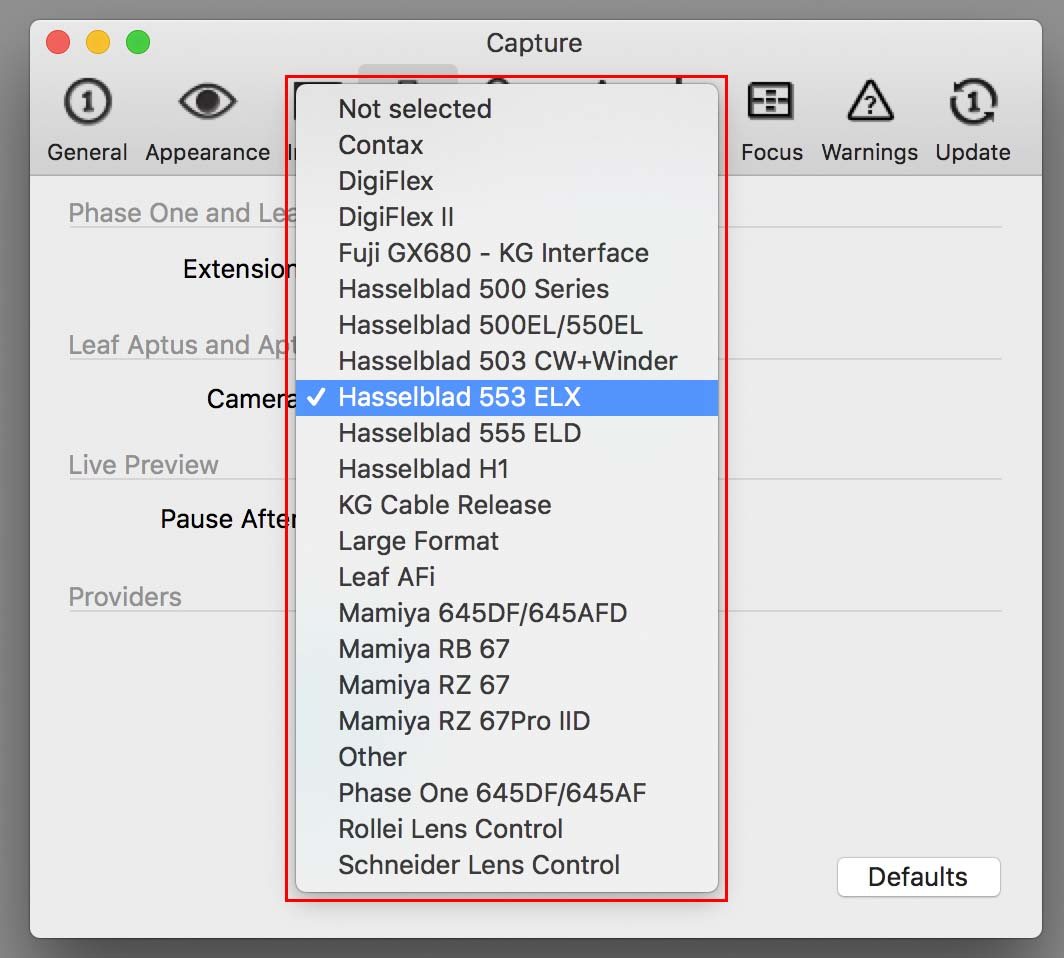
When shooting with older Leaf Aptus and Aptus II digital backs it is important that Capture One knows what camera you use because of the kind of shutter that the camera uses.
The list contains mechanical cameras. Selecting the proper camera helps in determining what the actual moment of exposure is.
Live Preview
Live Preview or viewing the actual image as seen through the camera lens from Capture One is a great tool. The drawback is that the camera heats up. To prevent overheating the Live View section lets you configure when Capture One automatically ends Live View after a predefined period: the Pause After setting. Here you can set that period from 30 seconds to 20 minutes, with 5 minutes as the default.
Providers
In the list of Providers, you see the names of camera brands Capture One Pro can tether with. Connecting a camera and switching it on will automatically connect it to Capture One Pro if running.
In case you like to prevent the connection, you can turn the provider off. A reason to do this can be that you use a different program to connect to your camera either for tethering, live view or download of images. To prevent Capture One from interfering that process, uncheck the provider.
Clearing all checkboxes effectively disables tethering capabilities of Capture One Pro. Changing one or more providers requires you to restart Capture One before the change to take effect.
Please note that Capture One Pro (for Sony) and Capture One DB have a similar but shorter list of Providers. All Capture settings do not apply to Capture One Express (for Sony). For more information on the different running modes, please refer to Capture One 8 Modes.
Color Tab
The Color tab in the Capture One Preferences is about color management. This tab is extinct on Capture One Express (for Sony). On this tab, you see three sections: Transform, Monitor, and Color Wheels Layout.
Transform
In the Transform section, you set the Rendering Intent that Capture One uses on output. The default is Perceptual and should actually never be altered.
The only occasion you select a different rendering intent is when you have an output profile, from a print lab or offset press, that explicitly needs another intent.
Monitor
With this rather new feature, you calibrate your Eizo ColorGraphics monitor with a built-in measuring device right from within Capture One. Just click on the button Calibrate EIZO and follow the instruction on screen.
Color Wheels Layout
Capture One Pro 10.1 introduced this section. It is for the colorist that use video grading applications with the Vectorscope color wheels. The default setting is Standard, the option is Vectorscope. The selected setting shows an extra circle around the color wheel in this screen.
The setting affects the color wheels of the Color Balance and the Color Editor tools.
The color wheel orientation named Vectorscope has red at 12 o’clock, while the Apple system RGB layout positions red at 3 o’clock. No difference in functionality, just layout.
Exposure Tab
The Exposure tab of the Preferences in Capture One is very crowded. On this tab, you see quite a number of sliders, a drop-down list, checkboxes and numerical fields.
There is a lot to explain and I am sure you will get more from Capture One after reading this part.
Exposure Warning
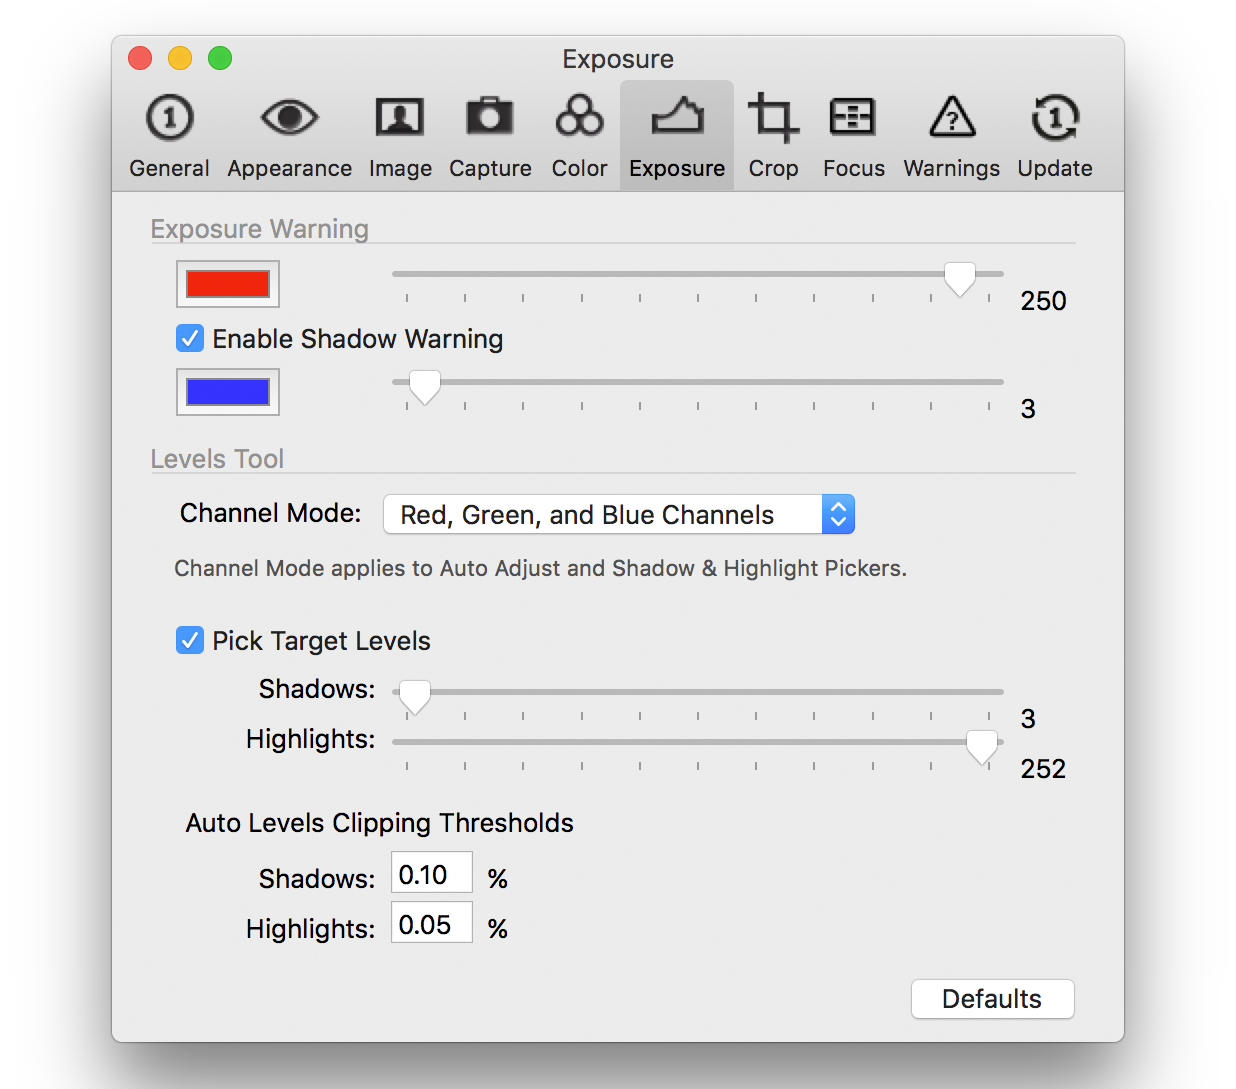
In the Exposure Warning section, you see two sliders, for Highlight and Shadow Warning respectively. At the left of each slider, you see a color selection box. Last but not least there is a checkbox. I highlighted the two parts in the screenshot below.
The top slider sets the threshold for the Highlight Warning. This means that you determine the level that will activate the warning. From the color box, you can change the contrast color. For example, when making photographs of a red Ferrari you best change this to green!
Of course, the Exposure Warning must be switched on first from the View menu, the toolbar or with a keyboard shortcut. In the Before/After comparison you see the result of this switch.
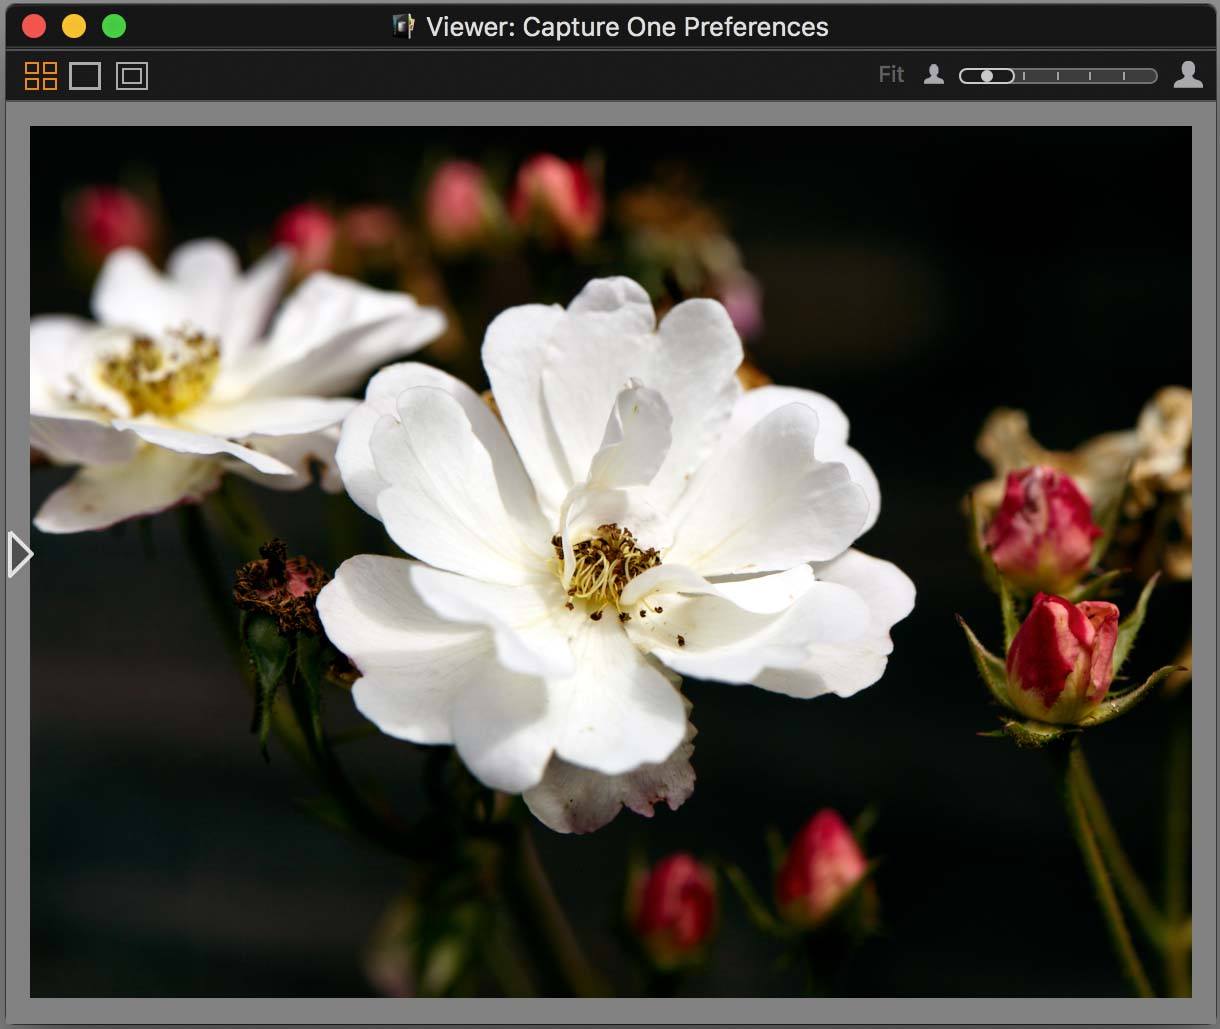
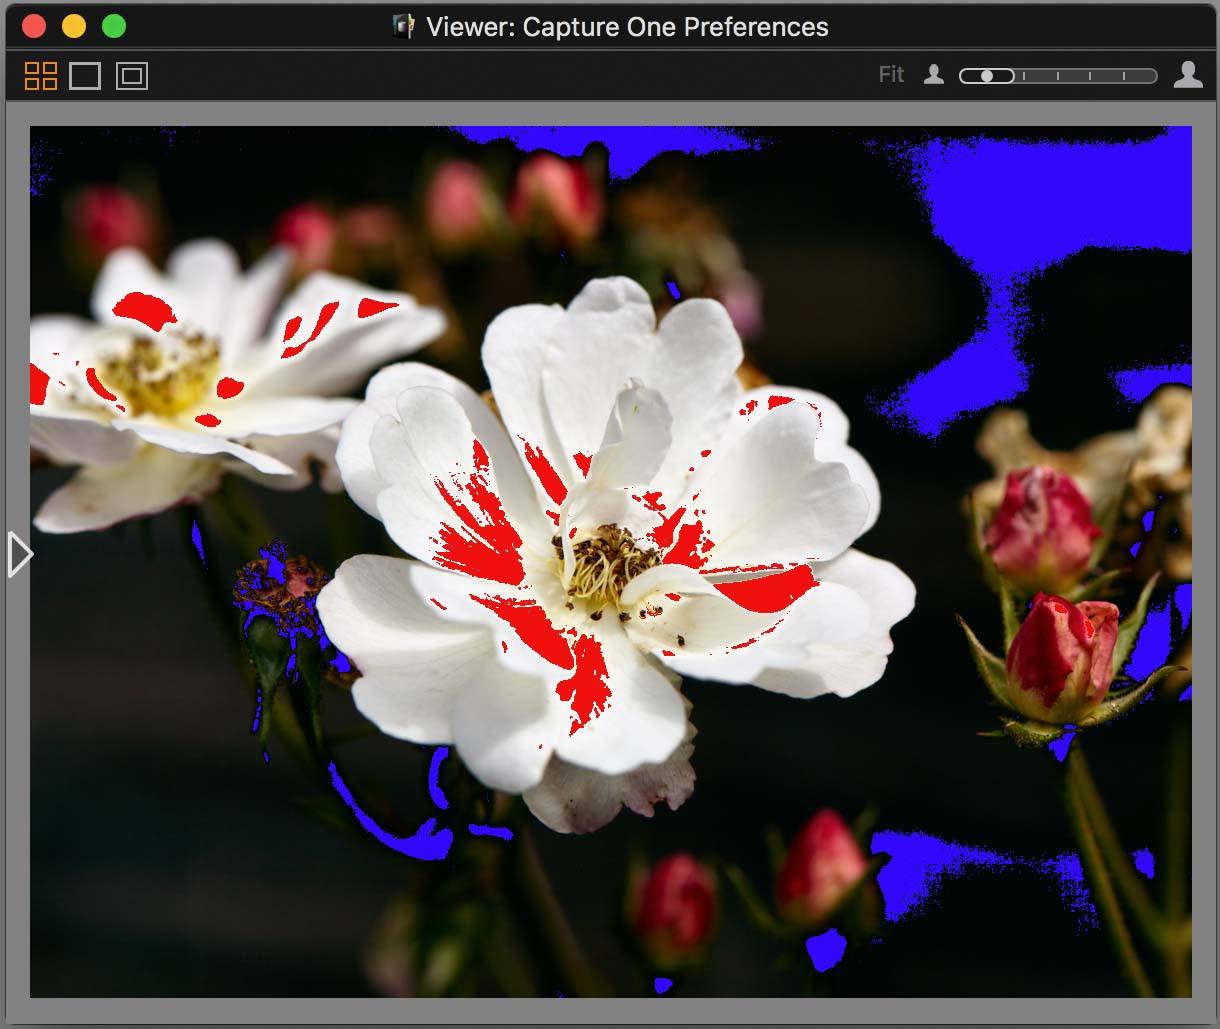
The second slider is for the Shadow Warning. I had this enabled in the flower image above. Setting the threshold with the slider affects the warning in a similar way as the Highlight Warning.
Please note that both Exposure Warnings work for all channels of the image. Once a single channel, for example, red, hits or exceeds the threshold, the warning color appears for that area in the preview.
Also, note that the Exposure Warnings are only visible in the Viewer and not on the thumbnails in the Browser.
Levels Tool
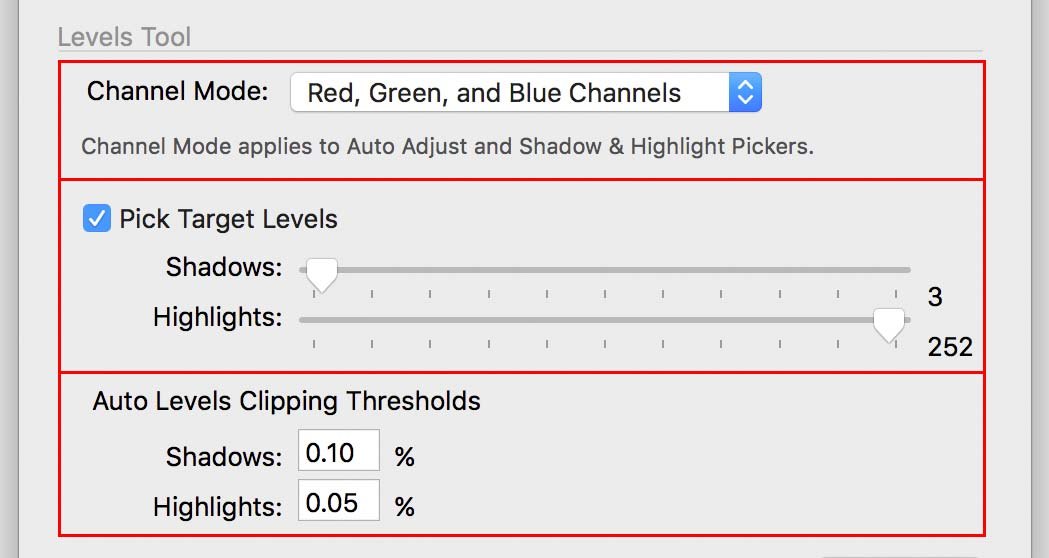
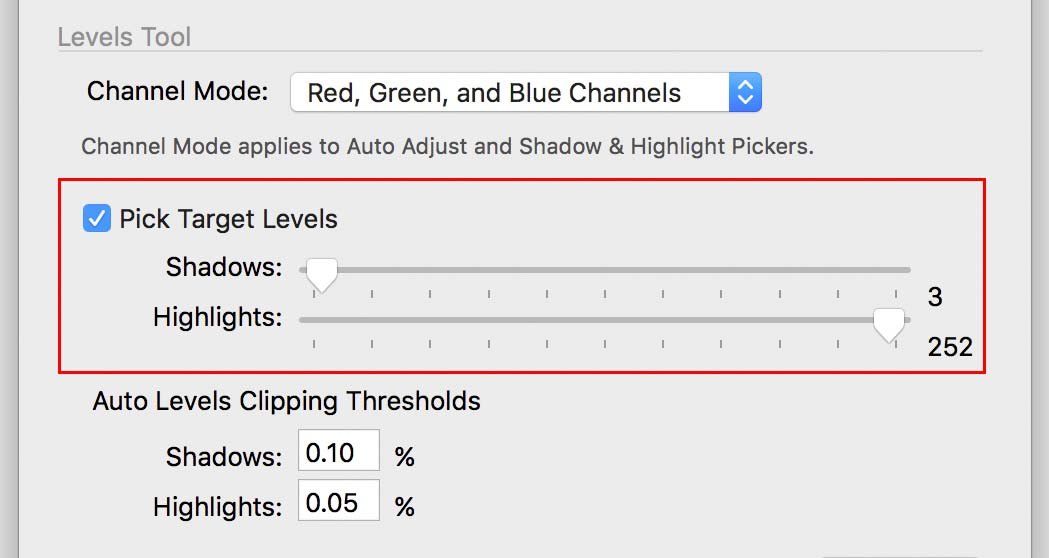
We can divide the Levels Tool section into three parts: Channel Mode, Target Levels, and Clipping Thresholds. It is important to be able to distinguish these parts to be able to understand their meaning.
The Levels tool is a very important and versatile tool in Capture One Pro. To be able to get the best results out of it you might want to dig into these Preference settings.
If you are not yet familiar with the Levels tool, there are a lot of tutorials and Presets here that can help.
Channel Mode
Open the drop-down list and see the two options:
- RGB Channel
- Red, Green, and Blue Channels
Also, note the small text below the list which says Channel Mode applies to Auto Adjust and Shadow & Highlight Pickers.
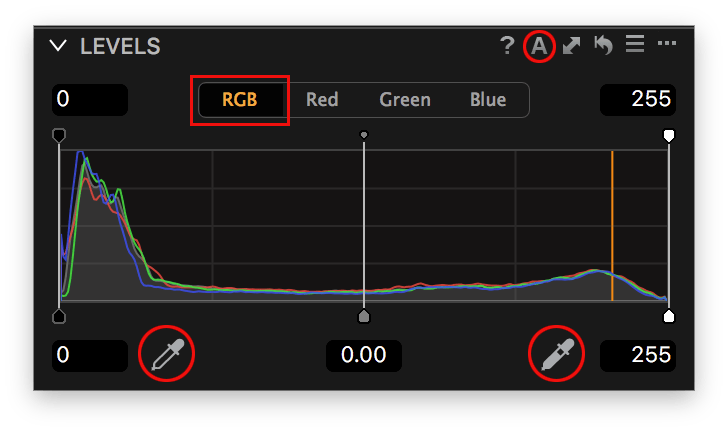
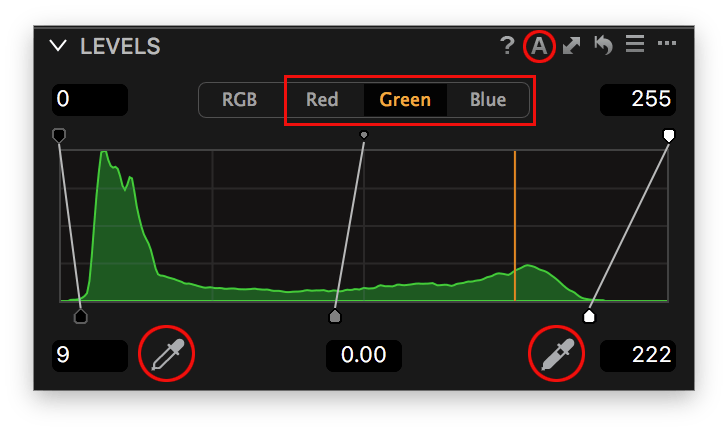
The Levels tool has four tabs, one for each channel: RGB, Red, Green, and Blue. With the Channel Mode selector, you either choose the RGB channel, or the respective three channels Red, Green, and Blue.
The selected Channel Mode affects how Auto Adjust and both the Shadow & Highlight pickers work.
Note
When you select the advanced Red, Green, and Blue Channels as Channel Mode, automatic adjustments are calculated individually for each channel. This can induce a color shift or eradicates it. Personally I use this advanced mode a lot since it was introduced in Capture One Pro.
Pick Target Levels
Where the Channel Mode and related automatic adjustments affect the input Levels only, you can, in addition, tell Capture One what your preferred Target Level is. This defines how dark the darkest shadow will be and how bright the brightest highlight on output.
We already learned in the previous section that you can pick your Shadow and Highlight point with the respective picker. This affects the input level only, by default.
However, you can have Capture One automatically adjust the Shadow and Highlight Target point when you use the picker for the Shadow and Highlight point.
First, enable the Pick Target Levels option in Preferences with the checkbox. Next, set your Target Levels for both the Shadows and Highlight.
Now, back you the Levels tool, enable one of the pickers and click in the image. You will notice that in addition to the base Level the Target Level is set as well. Note that this works in both Channel Modes.
Please note that the Pick Target Levels setting is often confused with the Exposure Warning settings. Remember that the Exposure Warning settings are just a warning, not an image adjustment. However, consider aligning both the Target Levels with the Exposure Warning thresholds.
Auto Levels Clipping Thresholds
The last settings on the Exposure tab, Levels tool section is fairly new, so Capture One diehard beware!
With the Auto Levels Clipping Thresholds, you can fine-tune how the Levels’ Auto Adjust works. The Auto Adjust calculates the Shadow and Highlight points of your image with a predefined amount of clipping.
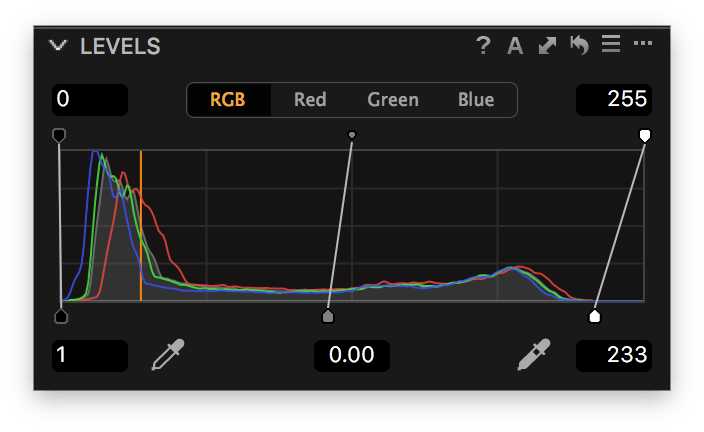
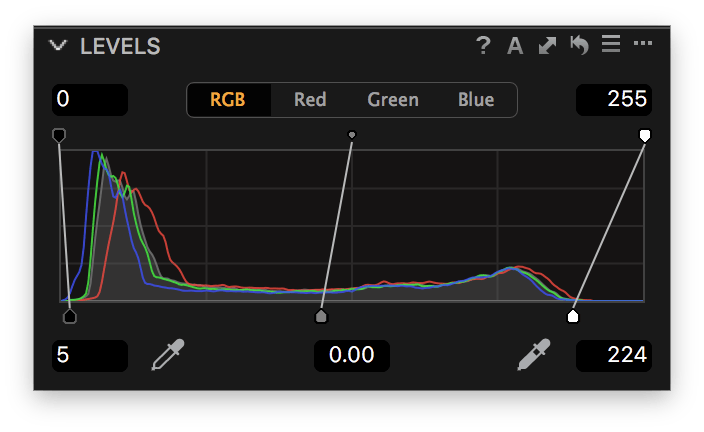
To demonstrate this I have done an Auto Adjust with the clipping set at 0.00% and set at 0.20% for both settings. Notice the different Shadow and Highlight points.
To Be Continued
Preferences Part 2 on Capture One ends here. Want more? Please continue reading in Preferences Part 3 or revert to Preferences Part 1.
Thank you
For reading. Please feel free to leave a comment. Like us on Facebook or subscribe to our newsletter to stay informed about new blogs.
Best Regards,
Image Alchemist












> The small disadvantage is that a larger preview generates a slightly bigger preview file.
Those slightly bigger preview files add up to significantly bigger catalog files. Capture One doesn’t have an option to store the preview cache outside of the catalog file (or outside of a session folder), but there’s an easy fix (macOS only): https://www.packafoma.com/blog/2018/10/29/how-to-move-capture-one-preview-cache-to-external-drive/
Hi,
great that you provide such information! That’s highly appreciated. I am new to Capture One Pro (Version 22). I am struggling a bit with the way C1 handles Metadata. I have ticked the box “Prefer Embedded XMP over Embedded IPTC”. But when I synchronise the Metadata nothing will be embedded into the file but an XMP-file is created for RAW and JPG as well. So, what is the use of this box when sidecar files are created?
Thank you.
Dirk
Hi Dirk,
I understand your confusion. In this post, I did not explicitly mention that the checkbox settings refer to *reading* metadata. Capture one will always *write* metadata to XMP files. Sync is read & write. Load is read. Note that I have a series of posts about metadata in Capture One. You can start reading here: https://imagealchemist.net/using-metadata-in-capture-one/
Best, Paul Steunebrink / Image Alchemist