Sessions In-Depth
In my earlier blogs Sessions Explained and Sessions Continued you may have become familiar with Sessions Folders, Albums, and Favorites. As an experienced user of Capture One Pro Sessions, you like to know your behind-the-scenes stuff, the nitty-gritty details, and the not-so-obvious things. Welcome, you’ve come to the right place. You find here more on session templates, how to move sessions, how to open sessions and what the session and sidecar files are about. Not for the faint of heart. So, get ready for Sessions In-Depth!
Sessions In-Depth
Up to Capture One Pro 7, you could make a Session with your preferred settings like Session Folders, Session Favorites, and Session Albums and copy and rename that Session each time you needed a new Session. This was a kind of template substitute or workaround.
Session Template
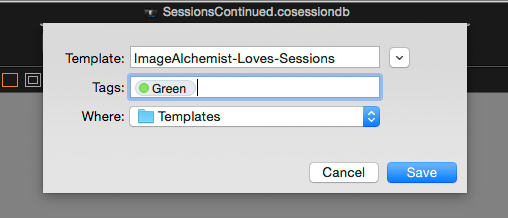
Since Capture One 8 you now have officially a template feature for Sessions (and Catalogs too). You can use the template when you create a new Session and you will find what you stored in your template back in your new Session. This is a great time saver!
Creating a template from an existing Session is as straightforward as it can be. You can use any Session, store it as a template and see it listed the next time you create a new Session. When you create a template, Capture One only stores the Session Folders, Session Albums and Session Favorites, and no image or image adjustment.
As each template is a distinct template file, you can create as many templates as you like and you can easily copy them to another machine to maintain your workflow on all your machines.
Move It
One of the great features of a Session is that you can easily move it to another location without breaking any links to folders, favorites, files, and adjustments. You lose no information. That is great for archiving or working with two computers: one for during the shoot, one for editing, for example.
That is always and automatically the case as long as all your folders are inside the main Session folder. No problem!
Open Sesame!
There are several ways to open a Session. First, if the session was recently used with Capture One, it can be found in the File menu > Open Recent list in Capture One.
The second option, from within Capture One, is to use the Open command. Next, browse to the Session folder you like to open and select the Session file in it, the one with the extension .cosessiondb.
The third option is very similar to the one I just mentioned but typically a more in-depth method to open a Session. You open the Finder (Mac) or Explorer (Windows). Next, browse to the Session main folder, locate the Session file and double-click it. This will start Capture One and open that Session.
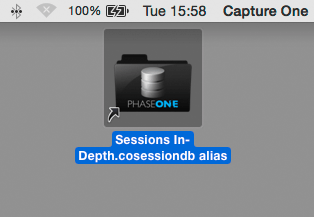
Another tip, this time from the awesome-tips-department, is to place an alias or shortcut on your desktop (or elsewhere). Create the alias from the Session file mentioned above. Double-click on the alias and Capture One Pro will start with that session. Magic!
You can also open older Sessions, back to Capture One 4, in the same three ways. Note that older session can have a different file extension like .col50, .col45, and .col.
Open these older Session files on the same platform, Mac or Windows, only. The current Capture One extension for Sessions, .cosessiondb, is cross-platform compatible.
Organize Your Images
By now you are familiar with the term session file, named “<session_name>.cosessiondb”. Curious what Capture One stores in that file?
The Session database file contains information about Albums and Smart Albums, Session Favorites, the capture name for tethered shooting among others. Note that Capture One stores no image adjustments inside this database file in case you lose it or you have to create it again.
Meaning of Subfolders and Sidecar Files
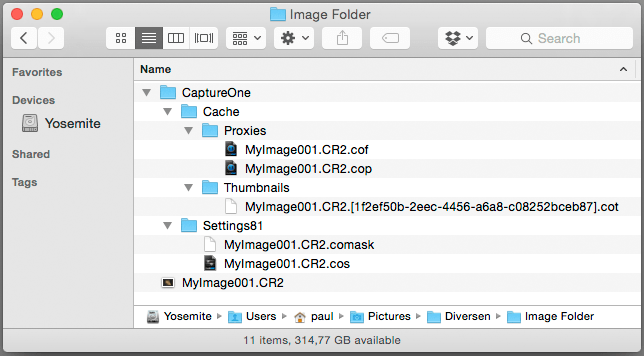
A distinct feature of Capture One Pro is that the program never writes to the original (raw) file. Instead, it creates a few files for each image file you open from a Session to allow the program to work with your images. These files, sometimes referred to as sidecar files, are stored in the CaptureOne subfolder inside the image folder.
To be precise, there is a specific subfolder structure with specific sidecar files. The image below shows the folders and files of a single image file MyImage001.CR2, which resides in a folder named Image Folder.
You have the following folders and files in /Image Folder/CaptureOne:
- /Cache/Proxies/*.cop and *.cof
- /Cache/Thumbnails/*.cot
- /Settings81/*.cos and .comask
The sidecar files are maintained by Capture One, which means that when you move or delete an image from within Capture One, the sidecar files related to that image are moved or deleted as well. What are the different subfolders and files Capture One creates for each image? Which contains the adjustments I made and which can safely be discarded?
Rule of Thumb
What to keep, what not (optional)
- Everything in the ../CaptureOne/Cache folder you can safely discard as Capture One will generate them the next time it opens that folder
- Everything in the ../CaptureOne/Settings81 folder contains your adjustments and you like to keep this folder and its contents.
Some notes on Settings
The Settings folder has a number added, currently 81, referring to Capture One 8.1. This reflects the version of Capture One since the last database change. You can open a folder of images you opened with an earlier version of Capture One, and with a different folder name like Settings70, Settings50, Settings45, or just Settings. This is no problem and the contents will automatically migrate to the new folder.
Besides the .cos (Capture One Settings) files in this folder you can come across .comask, .lcc, and .icm files. They also relate to adjustments and contain additional and specific information for the .cos file like layer masks, an LCC profile and a custom ICC profile for that image.
Stay Clear
… and get your Session file verified. This easy task is done from the File menu, you can prevent disaster or solve it anyway. Can not guarantee success (who can?) but worth knowing and practicing. Precise how-to: File menu > Verify Catalog or Session…
Sessions In-Depth Ends
With Sessions In-Depth this series about sessions ends. Hope it will help you get you sorted in your sessions related questions. Stay tuned for more topics!
Thank You
For reading. Please feel free to leave a comment. Like us on Facebook or subscribe to our newsletter to stay informed about new blogs.
Best Regards,
Image Alchemist








Thanks for the insights about sessions. I am trying to figure the best way to use C1 with the workflow I had developed with Aperture.
My practice had been to import my image files into folders by date , and then using a referenced library in Aperture start a project and import the images as referenced images. I would name the project something like Alaska Trip.
By separating the image folders from the Aperture library i felt it facilitated backing up.
I also store my image files on a variety of mirrored external drives. When I travel i keep the files on a small portable external drive (now a thunderbolt sad.) When I get home I transfer the files to a larger desktop external drive and manage the processing from that drive after first exporting the Aperture project as a library and then opening that library on the desktop and pointing Aperture to the new location of the files.
Fundamentally my images are stored by date, and my post processing is done in projects with friendly names related to the topic or event.
I had thought the C1 catalog format would work best for that approach, but I think I will try the session approach as well. that may actually be more direct.
I am glad i discovered your web site. (After noticing the reference to it in your signature in response to a question I asked in the C1 forums).
Interesting that you are trying sessions after working with Aperture. Maybe it works for you. Hope I can enlighten your path in the search for the workflow that fits best.
Thanks for all your tips! I was wondering if you could list a step by step way of creating the session template. I tried various ways but failed 🙁
How-to create a session template: 1) in a session, create your favorites, (smart) albums and folders; 2) create a template via File > Save as Template and give it a name. That’s it. Next, when you create a new session, provide a name and select the template in the New Session dialog. Hope this helps.
Best, Paul
IA, having recently found your site, I am completely blown away by your knowledge and helpful manner. My story is similar to Peter’s above. As I am not a Pro and my photography is an obsessive hobby cataloging my family and travels; I have found that the Catalog structure, using Albums and Smart Albums works nicely. However, the initial workflow for ingesting and deleting raw files is not the best in Catalogs. I have tried FastRaw Viewer, which is very nice, but after reading your blogs about Sessions, I wonder if setting up a ‘dummy’ Session to do this initial process will provide the flexibility that I am looking for. My keepers will be imported and referenced into my Catalogs and the rejects will go to trash. My only concern, if I am correct, is that I have enough space on my local drive to handle all of the files I am ‘importing’ into my Sessions folder. I want to keep the files on my memory card until I am confident that my work has been properly imported. Am I on the right track here? Thank you.
Hi Jon, I think you are doing great with your workflow of combining sessions with catalogs. Regarding your concerns on storage space I suggest to keep images in session on your local drive, but for catalogs that is not necessary. An external drive will do for catalogs as well. Hope this helps your workflow.
Thank you very much for your kind comments on the website.
Best, Paul
Have looked everywhere I can think of and tried same in Capture One Pro 10 but cannot find out how to delete a session. Deleting all session albums doesn’t do it so what’s the secret? (Hard delete through Explorer just leaves ! for the four “magic” session folders.) Help!
Hi, you can delete a Session (or Catalog) from Explorer (Windows) or Finder (Mac). Just delete the main Session folder which also deletes the 4 session subfolders, all images and adjustments.
The exclamation marks for the Session Favorites you see may tell you that you made folders of one session a Favorite in another session you just deleted.
Best, Paul Steunebrink / Image Alchemist
Thanks but I mean really get rid of – no exclamation marks for missing folders, no in the recent files list, no in the drop down list of sessions list giving blah blah maybe moved or deleted?
Never mind. Sorta figured it out. Clear all items. BUT then one has to find and reload all “good” sessions, If it weren’t for the processing engine, I’d look elsewhere since the data management aspects of Capture One are a mess.
I work exclusively in Sessions, C1P v.10.2. Recently I created a new session and neglected (my fault) to import my images into that Session. I simply began editing by opening the images directly from the file tree. At some point, after editing some 250 images, the adjustments became “disconnected” from their respective images. Now in C1P I see the original images (.arw) but no adjustments applied.
I can locate the .cos files using Finder, but how do I re-connect them with their images?
RAW file location = /Raw Archive/ARW/2017/Charleston
.cos file location = /Raw Archive/ARW/2017/Charleston/CaptureOne/Settings100
Any help will be greatly appreciated!
Oldan
Hi Oldan, you actually did nothing wrong when working with a session but access your images through the folder tree in the System Folders section. And you .cos files are in the right subfolder to your images. Try to copy the image folder with all contents to an internal folder and open it in Capture One. Also create a new session.
Best, Paul Steunebrink / Image Alchemist
SOLVED: Process detailed below.
First of all, re-read “Sessions In-Depth” even if you think you understand it! This can be confusing…
1. Create a new folder named “Recovery” (or any name of your choice).
2. Using a file manager, copy the RAW files from the failed Session’s folder into the “Recovery” folder.
3. Open a new Session using “…/Recovery” as the location for the Session. This will create a new sub-folder also with the name”Recovery.” This sub-folder will have the standard C1P Capture/Output/Selects/Trash folders to be used in the new Session.
4. Copy the folder named “CaptureOne” from the failed Session’s folder to the top level “…/Recovery” folder. The copy process will include the subfolders “Cache” and “Settingsxxx” and their file contents. These files contain the adjustments previously made to the RAW images.
5. Double-click on the “.cosessiondb” file to open the new Session. The adjustments will magically re-associate with their respective RAW images.
6. The new file structure should look something like this:
…Recovery/CaptureOne/Cache
/Settingsxxx
…Recovery/Recovery/Capture
/Recovery.cosessiondb
/Output
/Sellects
/Trash
Good luck!