Catalogs In-Depth (part 1)
In this third and last post Catalogs In-Depth in a series on catalogs, we will cover some not-so-everyday topics, but are considered nice- or need-to-know anyway. In case you are not sure you touched base in this topic sufficiently, two earlier posts will get you started before you jump into deeper water: Catalogs Explained (level-1) and Catalogs Continued (level-2) are ready for you to digest first.

Catalogs In-Depth
If you frequently make new catalogs you will love the template function. Did you know you can lock the catalog or that it could happen unintentionally? How about special imports like Sessions, Catalogs or Libraries, or export a part of your catalog as a new Catalog?
You know about referenced and fully managed images, but can you change one into the other? Linked to that, you sometimes need to relocate moved images. Or you have a folder that is filled with new images after import and wants the catalog to keep in sync.
And last but not least, how about tethering to a catalog, using a hot folder and some special collection properties?
Part 1 and Part 2
Due to a large number of topics, I decided to split this post into two parts. This is part 1 and here you find part 2. There is also a link to part 2 at the end of this post. Ready for Catalogs In-Depth? Go!
Time For A Template
Do you make new Catalogs regularly? Do you make the same User Collections each time in the new Catalog? Then a Catalog Template is for you. The template mantra is simple: make once, use forever.
Each template is stored as a separate template file, and you can make as many as you like but you probably need just a few. Okay, here is how it works.
First, you create your template from File menu > Save as Template, give it a sensible name, and store it in the default Templates folder. Note that Session Templates are stored in the same folder but with a different extension, so you won’t be bothered in the next step.
You can use your current catalog or you prepare one for the purpose of creating a template. Your focus is the user collections like (smart) albums, groups, and projects. Only these objects are saved in the template, while all images and imports are neglected.
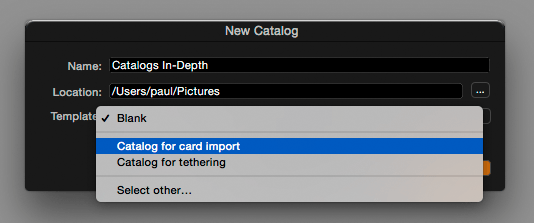
Next, create a new Catalog. Give it a name as usual, and select a location. Next, in the Template field, open the drop-down list, select your template, and click OK. Now, in the new Catalog, find your User Collections ready to go!
Lock Your Catalog
From the File menu > Lock Catalog, you can lock your catalog. This makes the Catalog read-only and allows multiple users to access the catalog concurrently from a shared volume. A locked Catalog shows its locked status after the Catalog name at the top of the main window. You can unlock the Catalog again from the File menu in the same way you locked it.
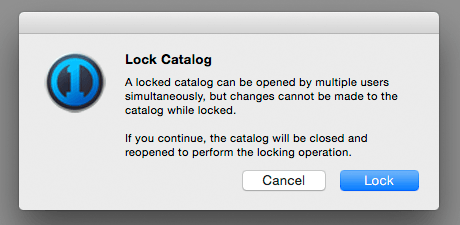
Note that all other users must have closed the Catalog from their workstations and that you are the last one using the catalog before you can unlock it. There are no password options for locking and unlocking. It is a really basic feature.
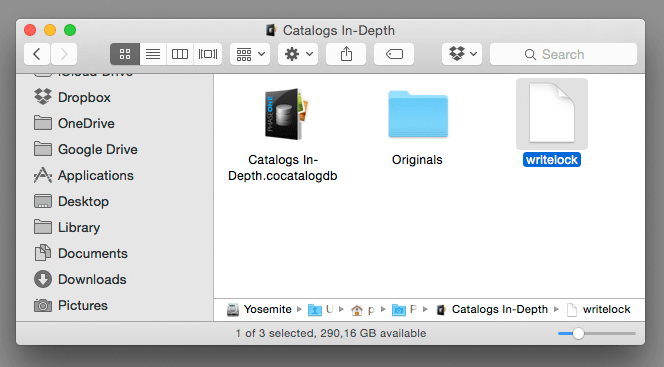
Responsible for the locking is a file in the Catalog folder. The file has no contents, it is the name that does the trick: 0.readlock. To review the file, see the instructions below for the writelock.
Writelock
Another way of locking a Catalog is when you normally open a Catalog. It can not be accessed and opened by another user (assuming the Catalog is on a shared volume and accessible by multiple users). Responsible for this is another file in the catalog folder: writelock
This file is deleted when you close the Catalog. However, in the unfortunate event of an application crash, the catalog is not gracefully closed and the writelock file may not be removed.
Next time you open the Catalog you get a warning that it is already in use! How to solve: open the Catalog folder from Finder, right-click on it and select Show Package Contents and remove the writelock file.
As you can see, we really go in-depth with Catalogs. Let’s continue with special imports.
Make Your Import Special
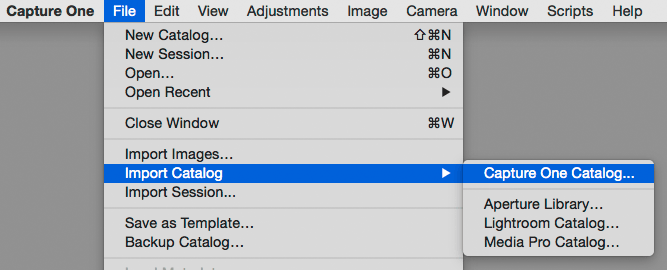
When you run Capture One with a Catalog you have more import options apart from the standard Import Images function: Import Catalog and Import Session. You can find both in the File menu.
The bottom-line of these import options is that they not only import images but the Catalog or Session structure as well. The Import Catalog option allows you to import four different catalog/library types: a Capture One catalog, an Aperture library, a Lightroom catalog, and a Media Pro catalog.
Please note that the Aperture library import is available on the Mac version only, for obvious reasons.
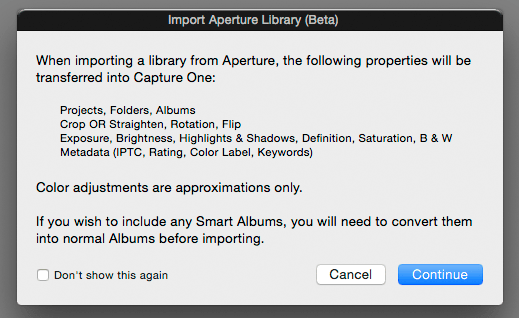
The import process is rather straightforward. You get an Open dialog where you can browse to your catalog or library file and click Open or Import (the text on the button varies). Note that when you import an Aperture library or Lightroom catalog, you might get a beta version warning with a description of supported features.
One important rule here is that Capture One needs access to the original image files during import as it builds its own previews and links to the images. So-called offline images are skipped during the import.
This means that in case you have images offline on disconnected external storage, make sure you connect the storage device before you start the import.
No PSD Import
Another potential issue to note is that the catalog/library you import might support file types that Capture One does not. The (in)famous PSD file type comes to mind, as an example (update: PSD is supported in later versions) and grayscale images like scans. You get a summary after import, but no details are reported on skipped files.
All imported catalogs and libraries are represented as a Group in your user collections section of the Library tool in Capture One’s catalog. Below that Group object, you will find your original catalog structure. Note that whether images are imported as referenced or fully managed depends on how the original image was stored in the originating catalog/library.
Import Session
The Import Session option allows you to import an entire Session as a Project in your Capture One catalog. Again, the process is rather straightforward.
After you select File > Import Session, you get an Open dialog where you can browse to your Session and click the Import button. Please note that you need to browse into the Session folder, and select the Session file with the .cosessiondb extension.
Users with older sessions that have a session file extension *.col*, are advised to open these sessions in Capture One 8 first, as a Session, to have it upgraded to a Capture One 8 session, and close it. Next, import the Session into your catalog for the best result.
Note that Capture One 4 Sessions can not be opened at all in Capture One Pro 8, but from Capture One 5 onwards it is no problem and the Session will be migrated to a Capture One Pro 8 session.
A Session is imported as a Project in your User Collections and the images are referenced. See my example in the image above where I imported a session named Barcelona 2006. Inside the project, you find three Groups, one for Session Folders, one for Session Albums, and one Group for Session Favorites. Note that Session Folders and Session Favorites are migrated to Albums in your Catalog. Session Albums are retained as being either a regular Album or a Smart Album in your session. In case your Session does not contain Albums or Favorites, the respective Groups are not created when you import the Session into the Catalog.
Make Your Exports Special Too
Now, with Capture One Pro 8, you can export any collection as a Catalog. Select any User or Catalog Collection, and go to File menu > Export as Catalog. Select your location in the dialog and click the Export as Catalog button. After the export is completed, you get a confirmation message.
Note the Include originals checkbox in the dialog. This affects referenced images only. The checkbox, when set, will store the referenced images inside the Catalog folder of the new Catalog you create. In other words, make the images fully managed. As you might understand, when you export a collection with fully managed images to a new catalog, this checkbox does not have any effect.
With the Import Catalog > Capture One catalog and Export as Catalog commands you have flexibility in your catalog management. It allows you to split and merge catalogs.
End Of Part 1, More In Part 2
You have come to the end of Catalogs In-Depth, part 1. Please continue reading in part 2 to get more in-depth knowledge of Catalogs. Or get earlier blogs on catalogs at Catalogs Explained (level-1) and Catalogs Continued (level-2).
Thank you
For reading. Please feel free to leave a comment. Like us on Facebook or subscribe to our newsletter to stay informed about new blogs.
Best Regards,
Image Alchemist




Leave a Reply
Want to join the discussion?Feel free to contribute!