Capture One Pro 9.2 Review
This Capture One Pro 9.2 review shows that the focus is on workflow improvements like image selection and keyboard shortcuts. It improves on GPU hardware acceleration and performance on 4K/5K displays. Processed TIFFs and JPEGs now show correct colors when imported. As usual, this release supports the latest cameras and lenses.
Capture One Pro 9.2 Review
What already started with Capture One Pro 9.1 (see review) has now been expanded further. To understand the different features, it is important to make a distinction between generic selections and context-sensitive selections.
Generic selection
These can be applied in every situation, independent from the context like the selected collection or rating. You find those new features in the Edit main menu. I make a list first and explain their purpose next.
New options are:
- Edit menu > Select …
- Primary Variant Only / Deselect Primary Variant
- Previous Set / Next Set
- By > Filename List (added option)
- Collection with 4 options:
- Previous Collection
- Next Collection
- Step Out / Collapse
- Step In / Expand
And now an explanation of what it does and how you benefit.
Select Primary Variant Only / Deselect Primary Variant
Imagine that you have several variants selected. One is the Primary Variant, the remaining images are ‘the other selected’ variants. This concept affects actions like copying adjustments, deleting or processing.

In the example above all variants are selected, and one is the Primary Variant. To quickly separate the Primary from the other selected variants you now have two options to end up with the Primary only or the opposite all but the Primary. I show you below in a kind of before-after comparison.


Select Previous Set / Select Next Set
Again two new commands in the Edit menu. Imagine you have four images selected and review them in Multi-View mode. This is a Set.


Now, with the new commands, you go the previous or next set, moving the same amount of images at a time. Note that you can move forth and backward within a set with the usual commands.
Select By > Filename List
The Select By command was new in version 9.1 for Rating and Color Tag. Now with version 9.2, you can make a selection by Filename List. Imagine that a customer orders a number of images like “11, 156, 14, 5” in an email.
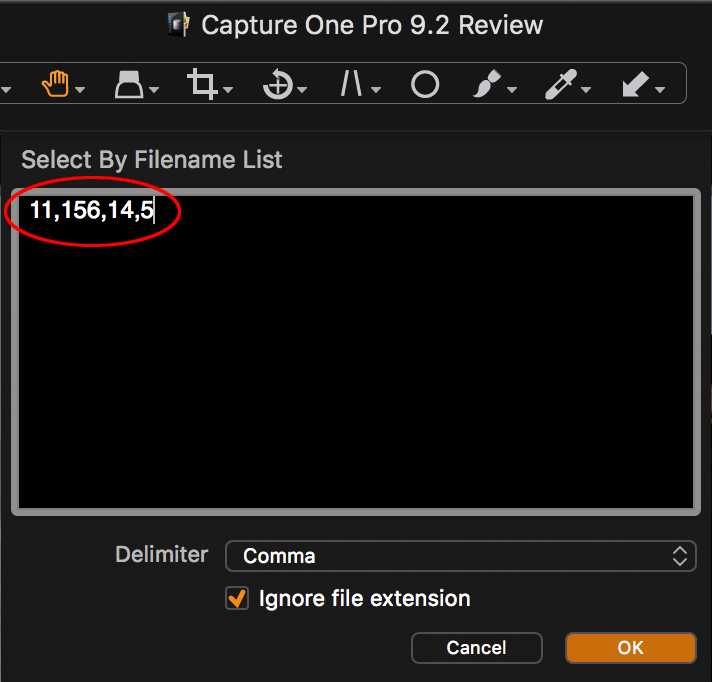
You copy and paste that list in the Select By Filename List dialog, select a delimiter and press OK. Capture One Pro selects the images for processing or any other task. Note that you do not have to list the exact file name but you have to select the correct collection which contains the images first.
Select Collection
Where the previously discussed commands allow you to select images in a collection in different ways, there are also new commands to select a collection. Note that you do not need to go to the Library tool anymore when browsing collections.
There are four commands under the Edit menu > Select Collection. First, you can go to a Previous or Next Collection. In a list of collections like Recent Imports or your Albums in the User Collections section of a catalog, you can quickly browse through the list. It is obvious that shortcuts are essential here.
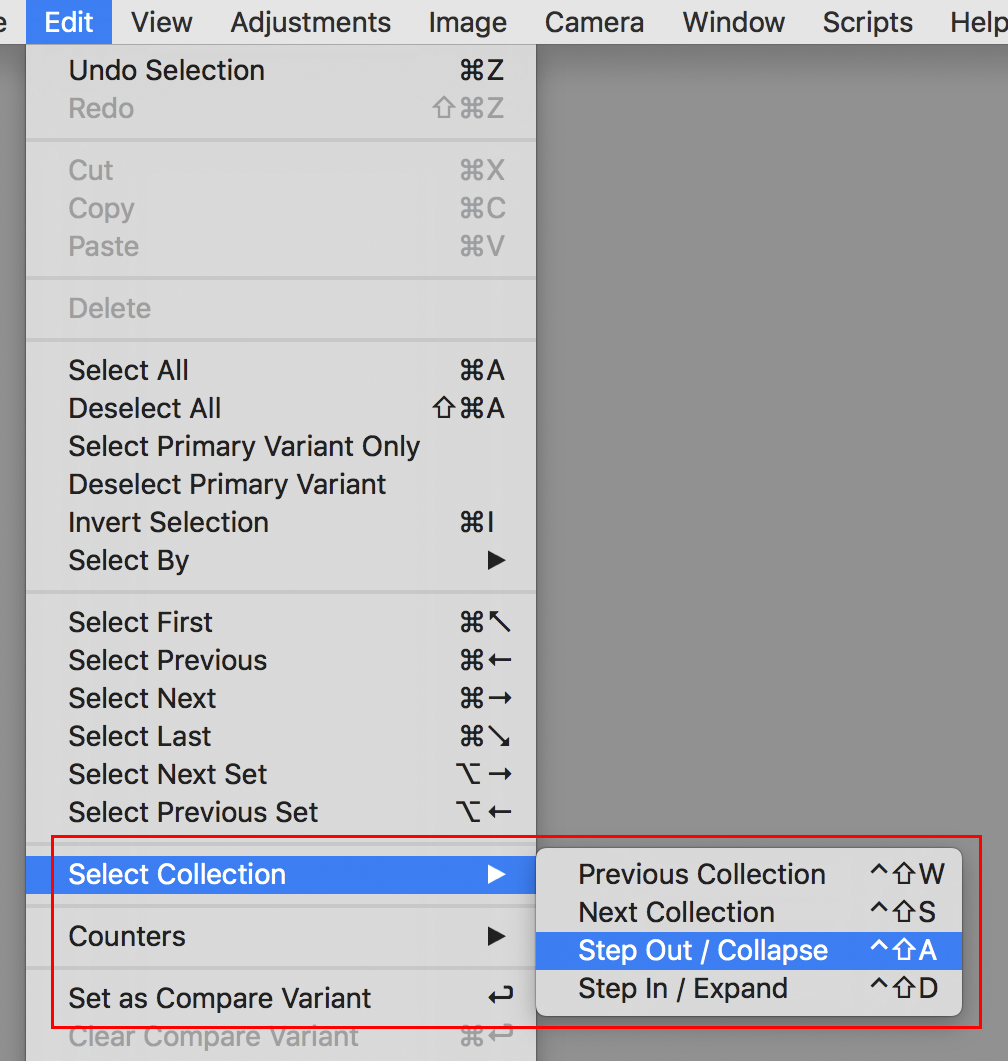
The two other commands are a combination of Step Out versus Step In and Collapse versus Expand. These commands make sense in a hierarchy of collections like in the screenshot below.
The Step Out / Step In commands allow you to switch between levels (top-level versus sublevel) in a hierarchy, but the hierarchical list of collections remains expanded. With the Collapse / Expand commands you can take care of whether you like a hierarchy of collections expanded or not.
Note that the default shortcuts have a logic, using key A and D (horizontal). and W and S (vertical) on a Querty keyboard. Obviously you have to try this out yourself before it starts making sense.
Context-Sensitive Selection
The working of these commands is dependent on the context like Rating and Color Tag. As a result, you find these selection options by right-clicking on a thumbnail. This way the status of the image can be taken into account.
New options are
- thumbnail (right-click) > Select By Same > Variant Position (added option)
- thumbnail (right-click) > Create Albums From > Selection (added option)
And now an explanation of what it does and how you benefit.
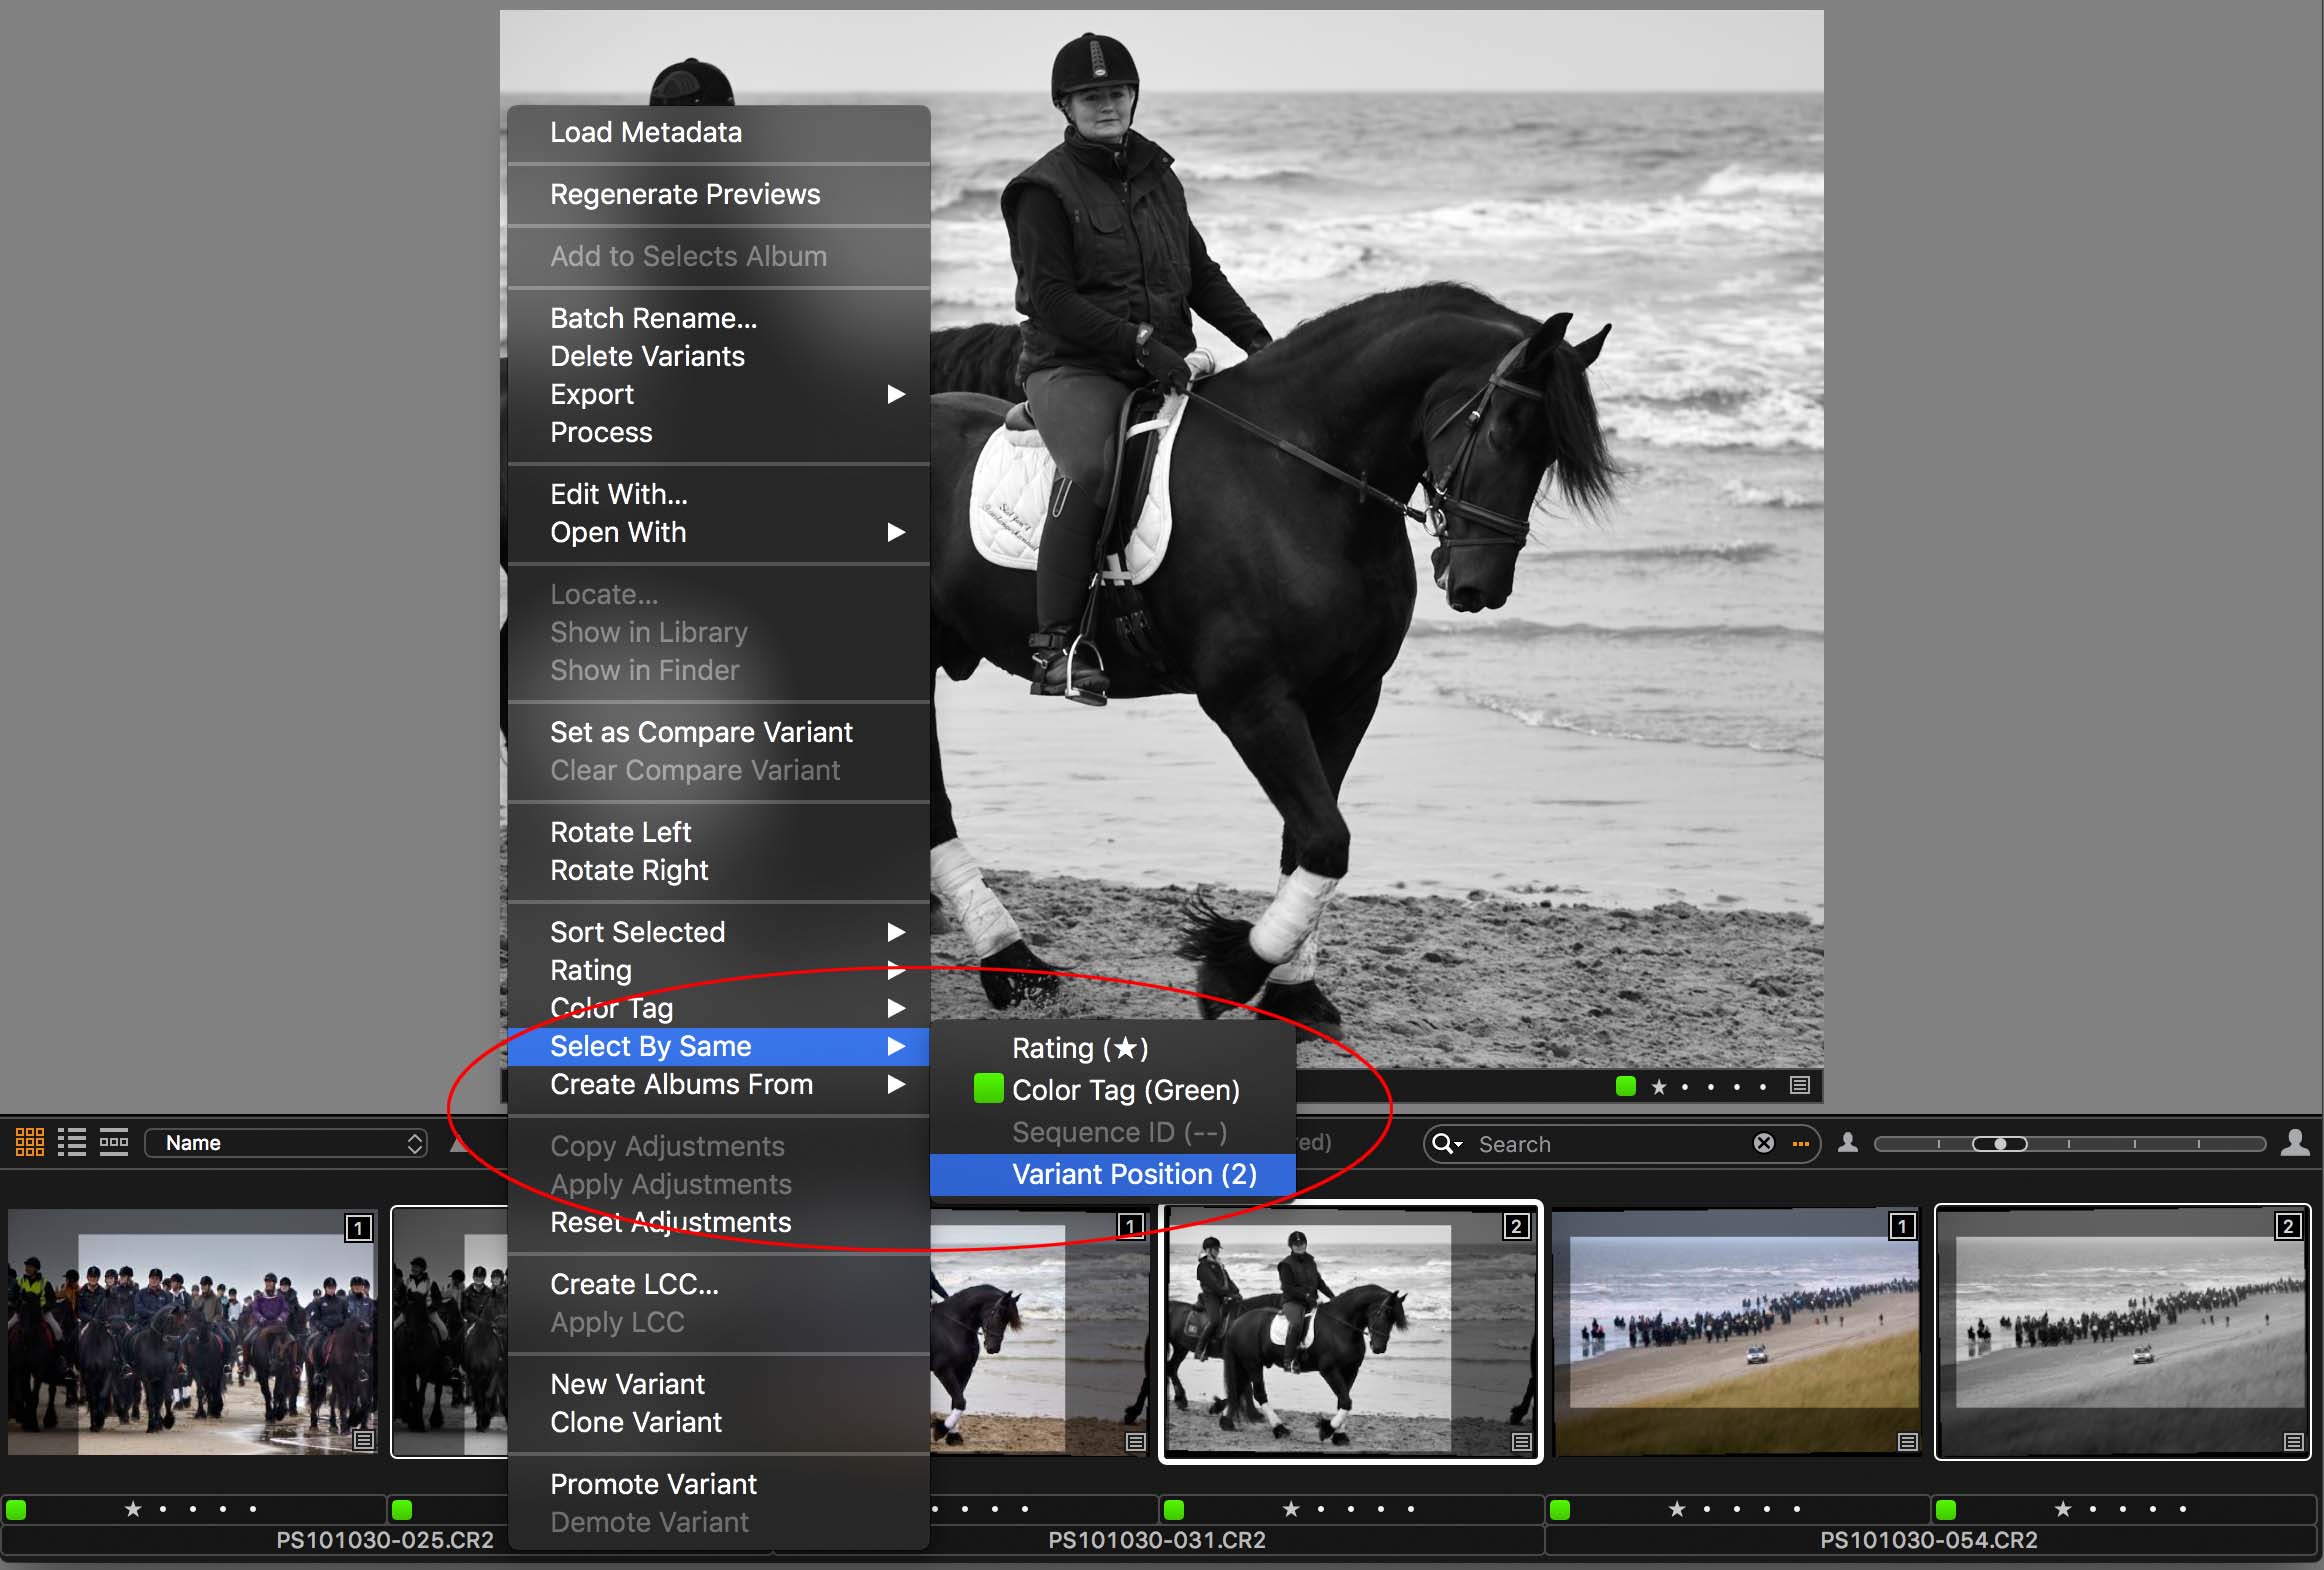
Select By Same > Variant Position
The Select By Same command allows you to quickly select other variants in the same collection based on common property. Already available were Rating, Color Tag, and Sequence ID (Phase One XF system only). New is the ability to select by the same Variant Position.
Imagine you have selected a few images and used the Clone Variant command to create for each variant a second variant. Next, you immediately enabled Black & White. Now all second variants are B&W images. Last, you start editing them individually but do not change the variant position.
To process them in one go, you like to select all B&W variants again. You select one B&W variant. Next, use the Select By Same > Variant Position command to select all B&W variants in that collection because they are all in the same variant position. Last, you set a specific output folder for them to collect all B&W images separately from the rest (optional step).
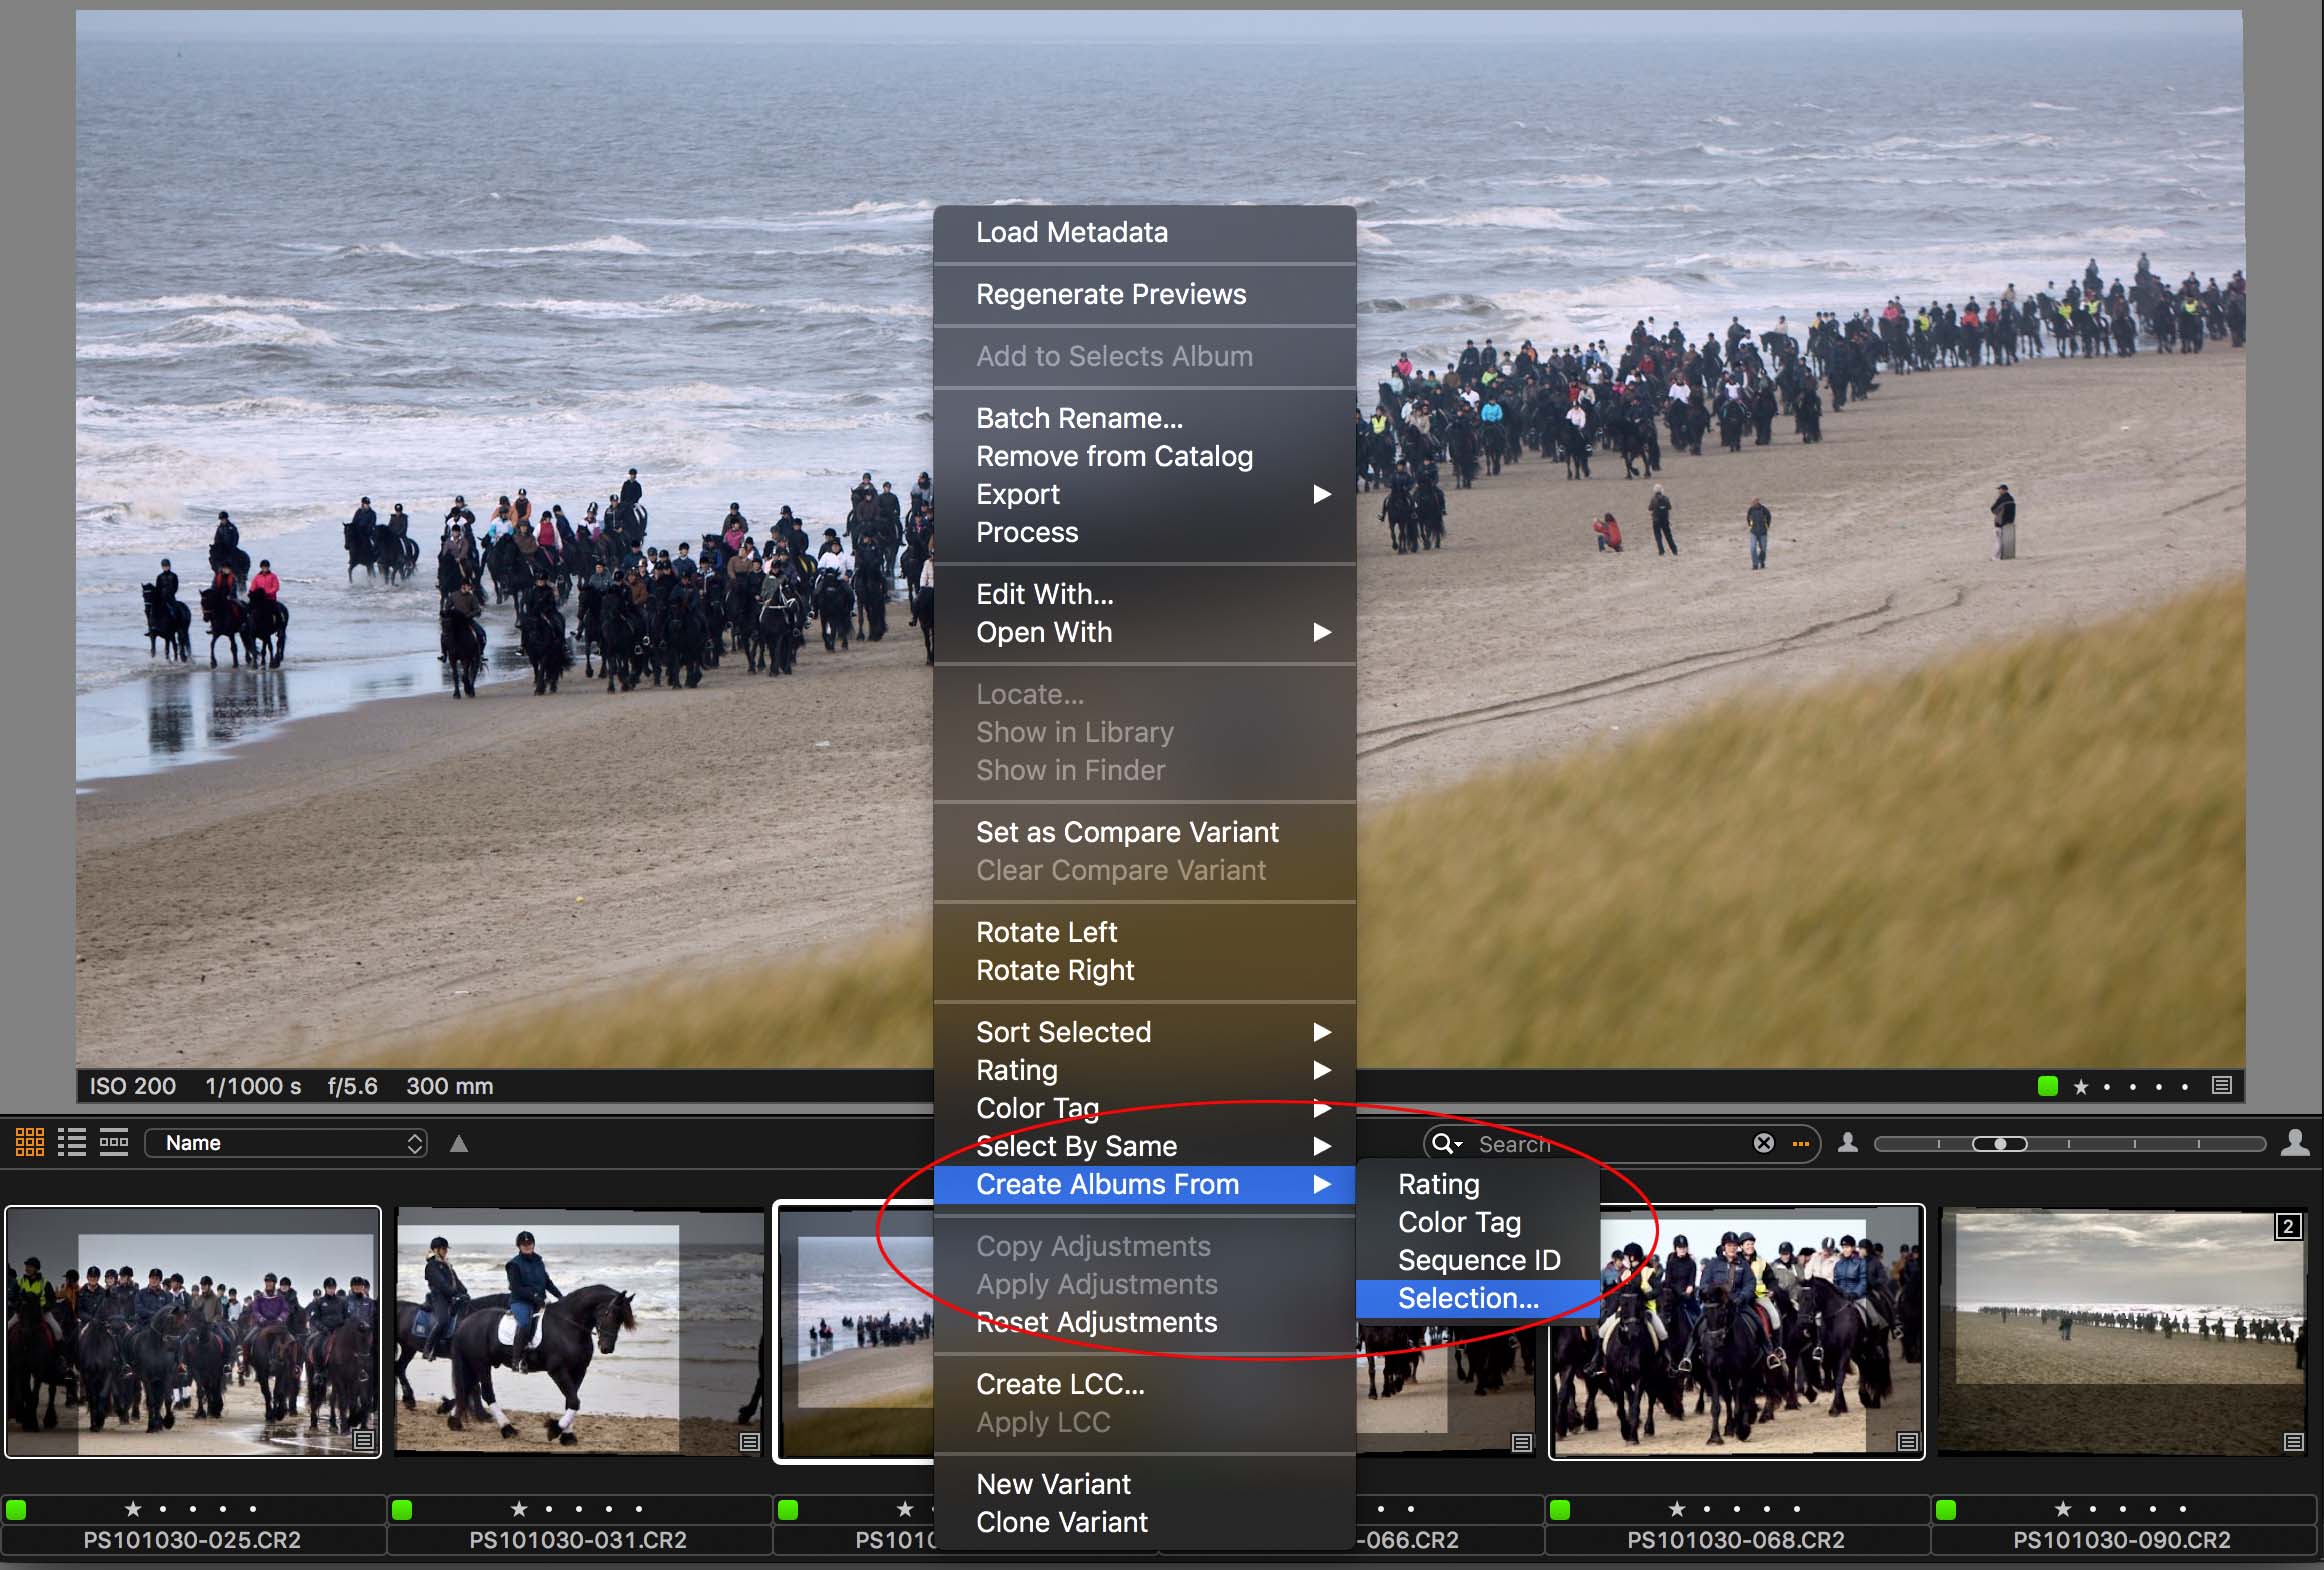
Create Albums From > Selection
We already had the ability to create an album selected images based on their Rating, Color Tag, or Sequence ID. What actually was missing was the most obvious option: an Album with images I selected.
And that is exactly what this new command does do for you. Select your images, give the command (right-click one image) and choose to Create Albums From > Selection. Next, you are asked to give a name to the new Album. Optional you can make the new Album the selected collection.
Keyboard Shortcuts Improvements
Are you a keyboard aficionado? Then this update is for you! Up to Capture One Pro 9.0, you could only create and change keyboard shortcuts for menu items, with a few exceptions.
Capture One Pro 9.1 added tools like Exposure, White Balance and so on. This allows you to control the different sliders with the keyboard and change existing shortcuts. You can find these shortcuts under the Other section in the Edit Keyboard Shortcuts dialog.
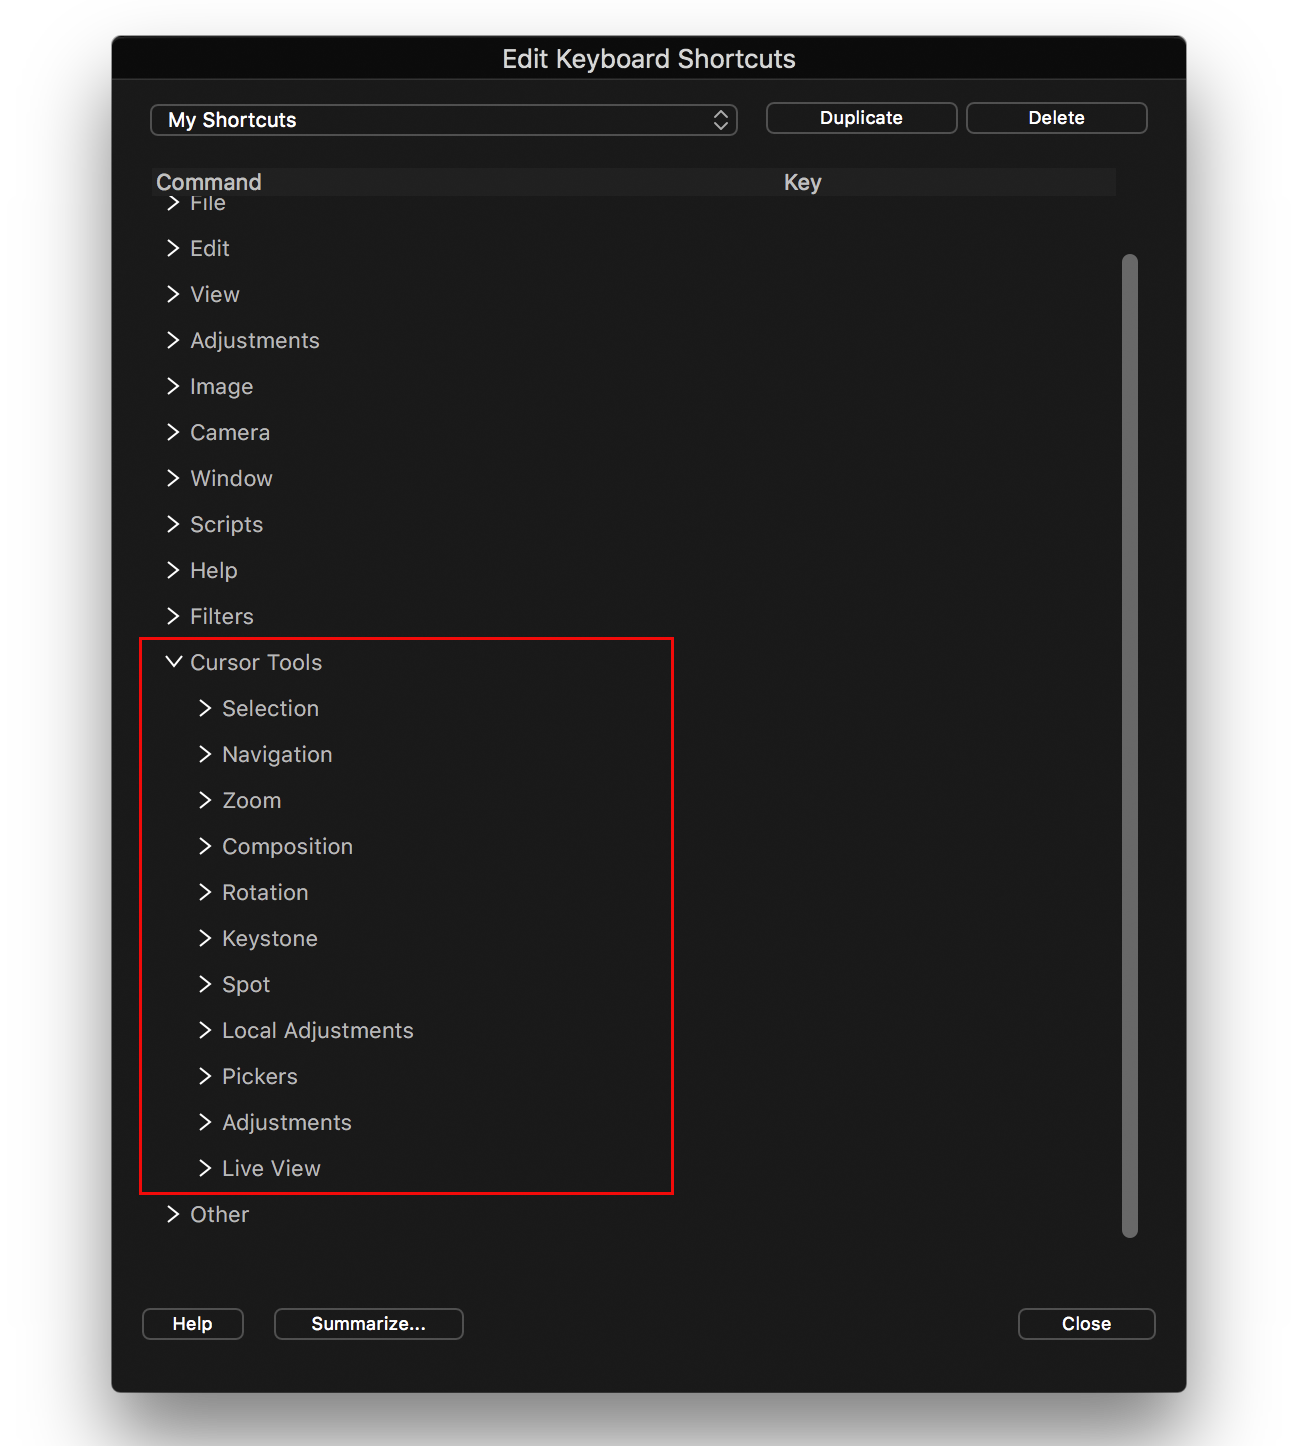
Version 9.2 expands on this by adding the Cursor Tools section. As the name says you can find the cursor tools listed and their default keyboard key. You can now change them and fill in the gaps for cursor tools without default shortcuts.
On Mac, you can find Keyboard Shortcuts in the Capture One 9 menu, on Windows in the Edit menu.
Tip
Create a new duplicate set if you like to use the new features, even if you already have a custom set. This ensures that the new items are included in your custom set.
Tip
Browse through cursor tools with the same shortcut with the Shift-key pressed.
Create Mask Layer In Batch
Again an improvement in an improvement. Capture One Pro 9.0 allows you to create a mask layer for local adjustments based on a color sample in the Color Editor. This now works in batch. You can find the command in the action menu of the tool (three dots top right):
This means that in a series of selected images a mask is created on all variants individually – each variant a different mask – but based on the selected color of the Primary Variant. This works best in a series of images like product shots, portraits (skin tone) or landscape.
In the example below I sampled the purple flower in the Primary Variant (top left). Next, selected another three images. In the next step, I created a Masked Layer from Selection as explained below. Now all four images have a layer mask that is based on the color sample of the Primary Variant. When I display (after image) the red color mask you notice all masks are unique in shape.
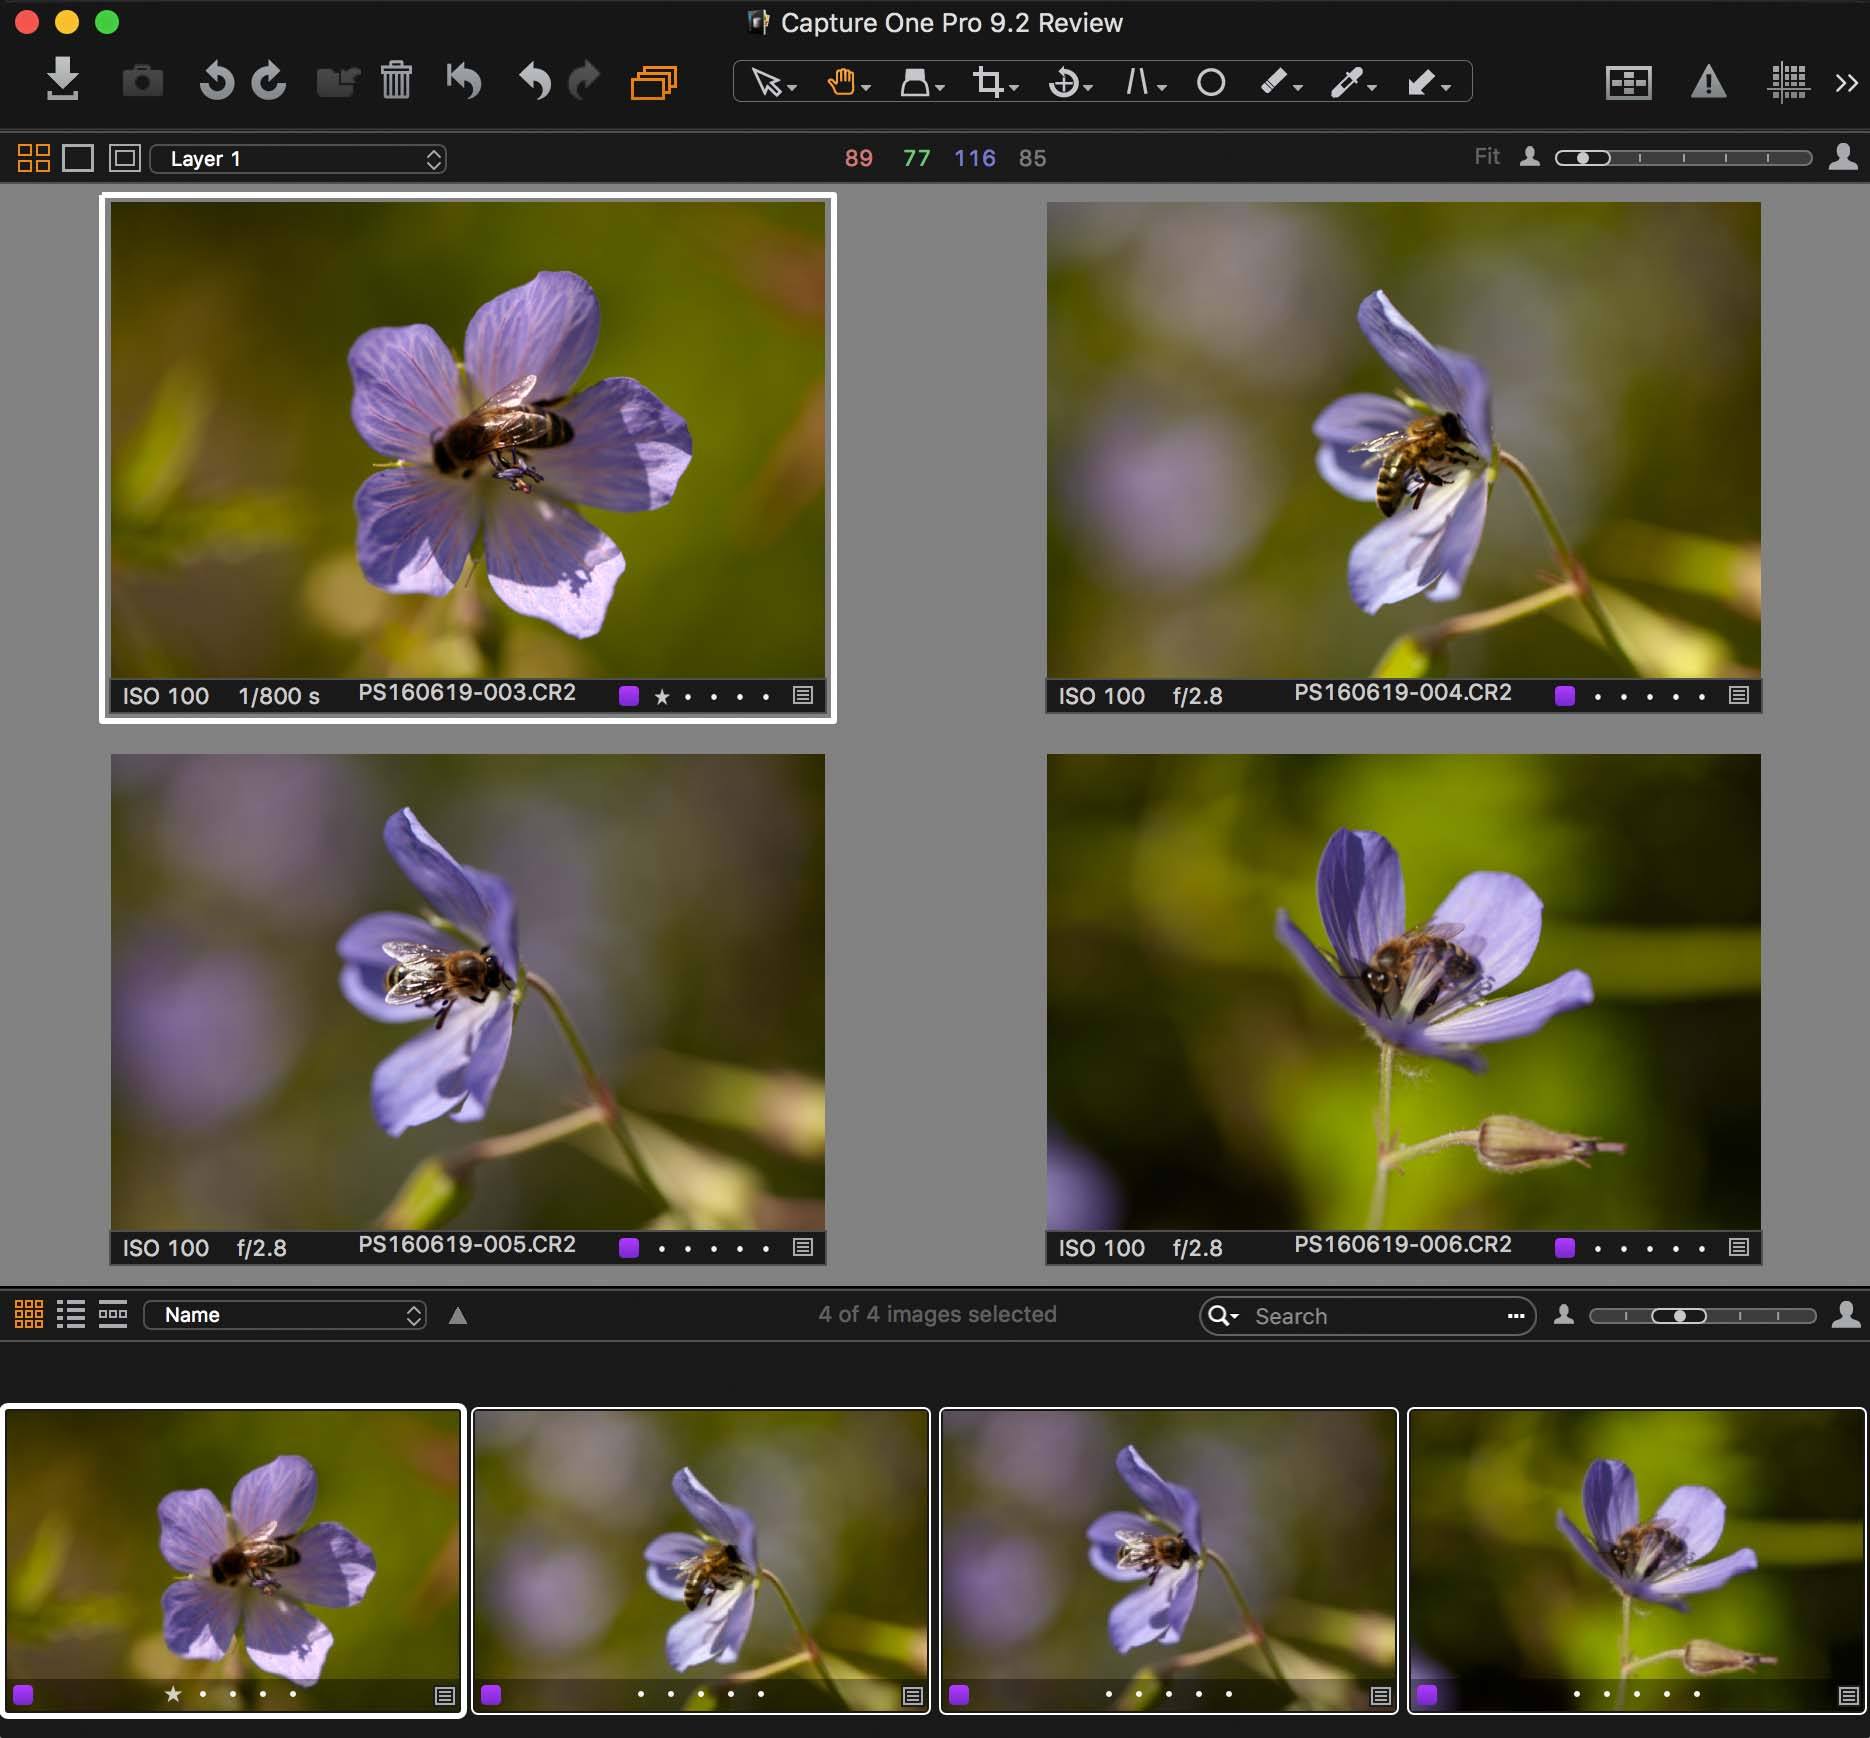
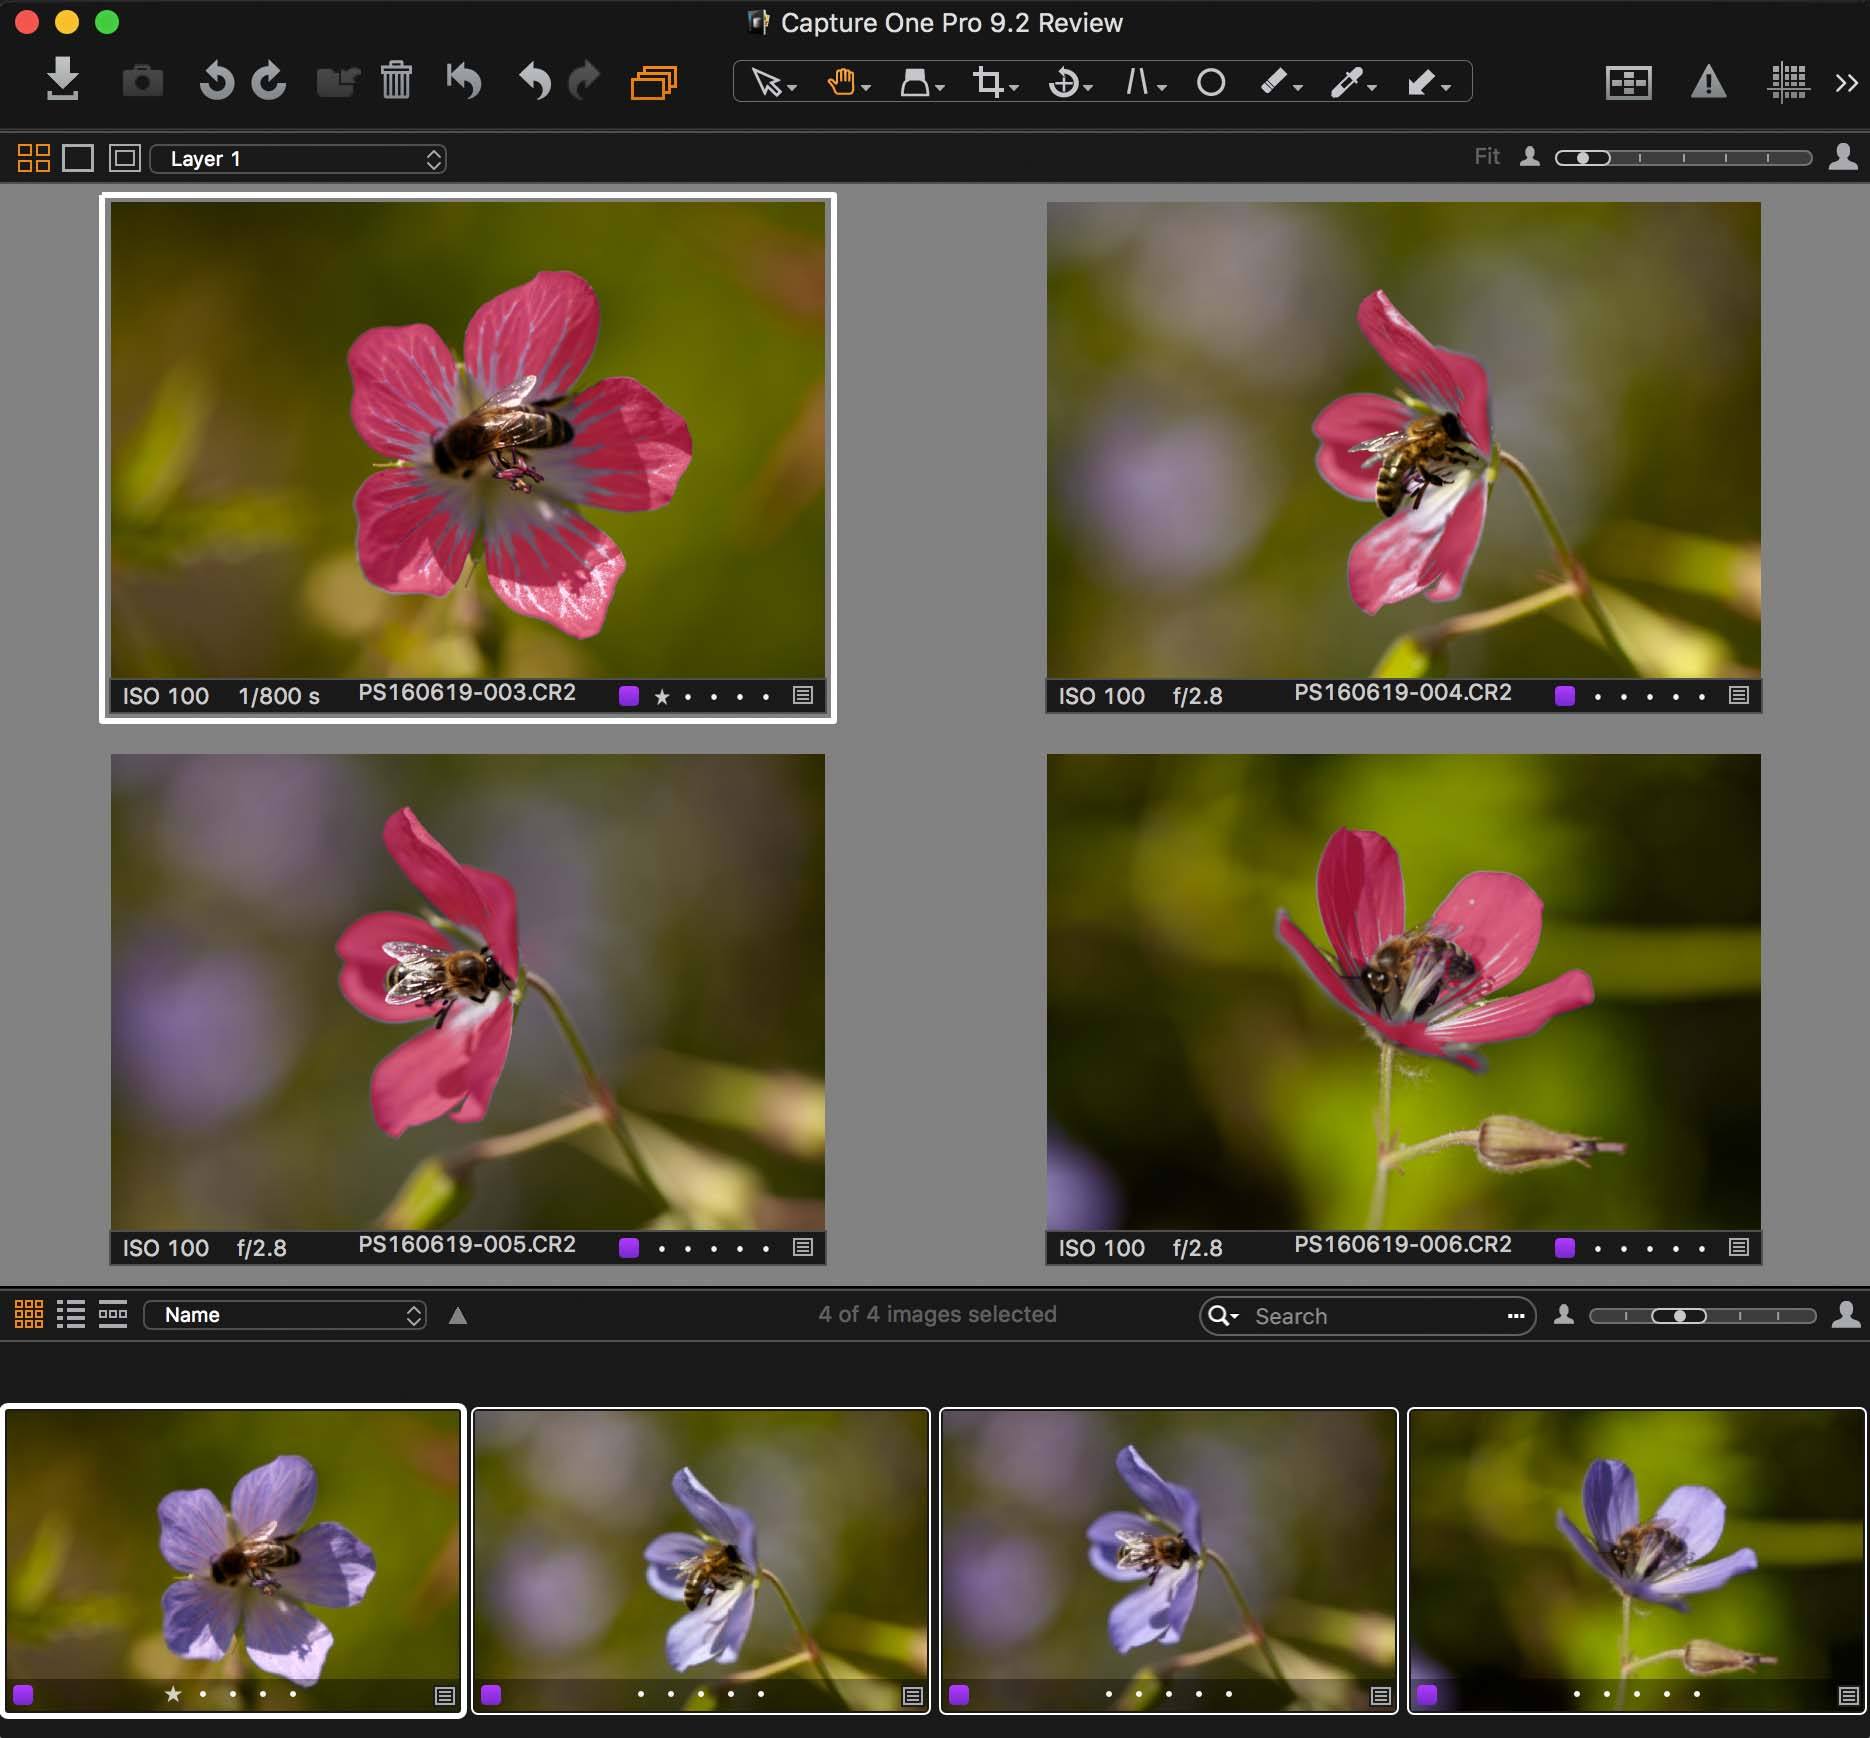
Please note that as mentioned the mask is created based on the selected color sample of the Primary Variant. In case you are not familiar with the concept of Variants you are advised to read Capture One Variants.
TIFF Rendering
The popular ’roundtrip’ feature – officially named Edit With… – allows you to process a raw file, open it in an image editor like Photoshop and add the processed file automatically to the session or catalog.
A problem was that the color of the processed TIFF or JPEG file in Capture One Pro did sometimes not match the preview of the raw file. This was caused by improper handling of the color space of the processed file.
This has been corrected, which makes the roundtrip feature even more attempting.
GPU and High-Density Display Support
In a system with multiple GPU acceleration is optimized in the sense that the slower GPU will not slow down the faster GPU. Capture One Pro 9.2 now uses each at their own strength.

In addition display performance of the iMac with a 4K or 5K displays is also slightly improved.
Round Trip With Helicon Focus
Helicon Focus, free with a Phase One XF system, is a focus stacking software program. It allows you to merge images made with a range of different focus settings. This produces images with a huge depth of field.
You can, of course, use it with any camera system.
The improved round trip with Helicon Focus means that when you export a series of images into Helicon Focus you get a single file into your session or catalog without hassle.
Note that you need Helicon Focus 6.7.1 or later in combination with Capture One Pro 9.2 for this to work as mentioned.
More Cameras And Lenses
The Capture One Pro 9.2 update is also a maintenance update with over 400 bug fixes. New camera file formats are supported. Added to the collection are camera Pentax K-1, Nikon D500 and Canon EOS M10, G5x, G7x Mk II, and G9x.
Ten new lenses are added to the lens correction database with lenses from Canon, Sony, and Panasonic.
You can find the details in the release notes from the Phase One download page.
Overview By Phase One On YouTube
Phase One has made a brief overview of a movie on YouTube. You can view it directly from the link below.
https://youtu.be/AbfoXI9Ya-U
Free Update, New Trial Period
Preceding this release are Capture One Pro 9.1 and the initial release Capture One Pro 9. The links point you to the respective reviews.
The 9.2 update is free of charge if you already have a license for Capture One Pro 9. There is a 30-day trial period. If you have run a trial of Capture One Pro 9 before then this update reset the trial period.
Thank you
For reading. Please feel free to leave a comment. Like us on Facebook or subscribe to our newsletter to stay informed about new blogs.
Best Regards,
Image Alchemist







Just installed 9.2 and I was very happy with the lens profile for the SEL28/2.0. And boy, this lens really needs correction! Now I don’t need to switch back to Lightroom.
Really disappointing to see that the Fuji X-Pro2 users once again have been left behind. The missing lens correction makes the SW unusable.
Paul,
Your description of the Batch “Create Mask Layer” is clear and concise.
I had worked out how it works just before coming here after I remembered you had described it.
The thing is …. once you have have you batch of masked variants, how can you most effectively make use of them when editing?
With a batch still active I edited on variant (Edit All variants does not seem to apply but I may be wrong) and then copied from one of the two selected (I assume more than two would also work) then “Applied”. Both variants seemed to be correctly adjusted. Great.
However each had only one layer – created as part of the batch process.
I assume there are operational restrictions – like the batch still has to be “live” and the layers created must always be at the same position in the player stack or must be the only ones currently applied – or something similar – if the feature is to work reliably.
Can you tell us anything about that? Or is it experimentation time?
In some situations this could be an incredibly powerful concept if it operation has been well thought through.
Grant
Hi Grant, besides the batch creation of layer masks from the Color Editor, there is no additional batch editing feature. Would be nice, I agree.
Best regards, Paul Steunebrink / Image Alchemist