Filter and Search in Capture One
You can filter and search images in Capture One by its metadata. Metadata includes star-rating and color tags, EXIF and IPTC data, and keywords. Capture One offers a comprehensive set of tools to help you find and select any subset of images in even the most extensive collection.
Filter And Search In Capture One
When you work with images in Capture One, you almost always work with a selection of our pictures. It starts with selecting a folder or Collection like an Album, or perhaps the All Images collection. Next, you choose one or more images by hand or filter first on criteria.
At the beginning of my workflow, I select all new images and apply a Style to them. But most of the time, I work on a subset of images in a folder or Collection. In Capture One, there are several ways to create a subset, each with its specific purpose and strengths.
Most of the Filter and Search features in Capture One rely on the use and existence of metadata. If you added metadata earlier in your workflow, this is your moment to reap your benefits.
Brief Overview
- Rating and Color Tagging
most used type of metadata; how and where you can apply them; keyboard shortcuts; copy rating - Filtering
with the Filter tool; it is both a search for one or more criteria and a hiding tool; Global Filters; combining Filters - Search
one or more words in the Search field of the Filters tool or the Browser; the Search tool searches in any metadata field - Advanced Search
with its dialog, one or multiple criteria, search presets (built-in and custom), hand-made rules, search groups - Albums and Smart Albums
create one from an Advanced Search; a Smart Album is a saved search; an Album reflects a particular moment in time.
More on Metadata
With this post, I focus on the user who is already using metadata. I have more posts on metadata to cover this vast area from different angles.
- Using Metadata In Capture One
covering metadata in general, and the Metadata tool in particular - Using Keywords In Capture One
discussing the use of keywords; includes both the Keywords and Keyword Library tools - Sync Metadata between Photo Mechanic and Capture One
looking into a metadata workflow with a tool outside Capture One - Geotagging Your Images
showing different tools and workflows to geotag your images - Filter And Search Your Images in Capture One
this post; about rating and tagging, filtering, and searching images
Rating And Color Tagging
Star rating and color tagging are common ways to structure a series of images. Capture One offers both methods, separate or combined.
Ratings and tags are metadata. You often can rate images already in your camera or with other software, before you open the photos in Capture One. In general, Capture One recognizes the rating.
The same is valid for color tags. Be aware, however, that the color is not standardized and may differ between programs.
For a metadata workflow with multiple programs, please reference Sync Metadata between Photo Mechanic and Capture One.
You can copy and apply Ratings and Color Tags via the Adjustments Clipboard. Please note that you must always select the metadata items manually on the clipboard before you use them to another image. This workflow is by design to prevent mistakes.
Rating
Rating is often the first thing to do after importing your photos or after a shoot. It helps you to categorize your images with a range from 1 to 5 stars and none. Which do you like most, which less? In Capture One, you have several ways to rate your images.
You can rate images individually from the:
- Viewer label
with your mouse - Browser label
with your mouse - Metadata tool
Basic section > Rating, with your mouse
You can rate images both individually and collectively (to multiple selected images):
- menu Adjustments > Rating
- Keyboard shortcuts
by default, the numerical keys 0-5 correspond to a 0-5 star rating
Please note that you enable the Edit All Selected Variants toggle from the Image menu or the toolbar to rate multiple selected images.
After rating your images, you can quickly filter or select those with the same rating inside a collection. The Select menu and keyboard shortcuts let you choose on a single Rating. With the Filters tool, you can filter on multiple ratings as well. I discuss the Filters tools later in this post.
Color Tagging
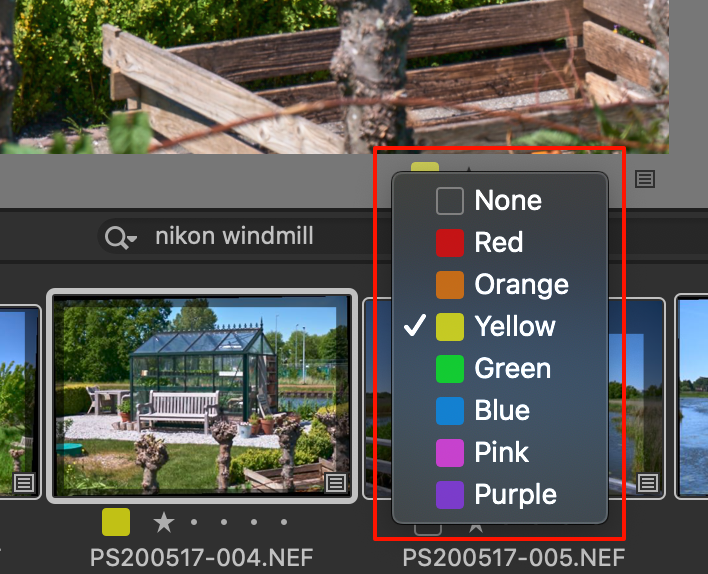
With Color Tags, you have a choice between seven colors and none. Some photographers use color tags for best (green), medium (yellow), mediocre, or worse (red). Others use tags for grouping images after type, sort, topic, or for a purpose like a print, web.
I often color tag subsequent images in a panorama or series. It acts as a reminder to adjust them similar or identical. For the next scenery in a series, I use the next available color.
You can color tag your images both individually and per group of selected images, just as with star Rating.
And also, like Rating, you use the Select menu, keyboard shortcuts, or the Filters tool to select images with a specific Color Tag.
Filter Your Images
Filtering your images in Capture One is more natural than Search, and the next step in your workflow after applying Rating, Color Tags, and other metadata. A Filter shows the images according to the filter criteria and hides all other photos in the current Collection.
Be aware, however, that the Filters tool on the Library tool tab is not your only filter. The collection you choose and any Global Filter you apply also affect the images in your Browser.
Simply put, the order is:
- Collection > (Global) Filters >> images in your Browser
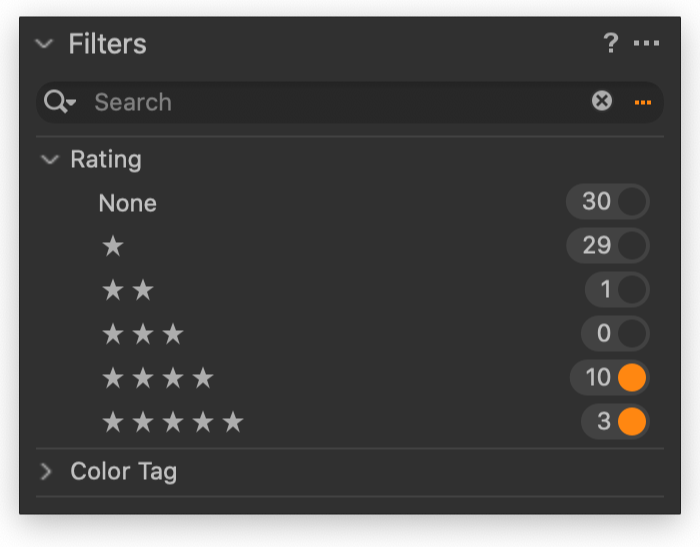
In the Filters tool, you see several Filters listed, starting with Rating and Color Tag. Each Filter displays the number of images for that filter.
Click on a Filter, and it becomes active. Click again, and you deactivate the Filter. Capture One displays the images for the active Filter, while it hides all other photos.
Notes
Please note that the Filters tool works on the selected Collection in the Library, that is the images you see in the Browser. Without any Filter applied, you see all photos of the Collection in the Browser.
The selected Collection determines the values next to filter criteria in the Filters tool. Filters and Global Filters affect what you see in the Browser.
Combining Filters
You can combine multiple filters. On macOS, use Cmd+click to activate a subsequent filter. On Windows, you use Ctrl+click. You can combine Filters of the same kind, like 4- and 5-star Ratings. Or you combine different types of Filters, like 5-star Rating and green Color Tag.
When you combine the same kind of filters, the images you see in the Browser add up. In my example, I see all photos with both a 4- and 5-star Rating.
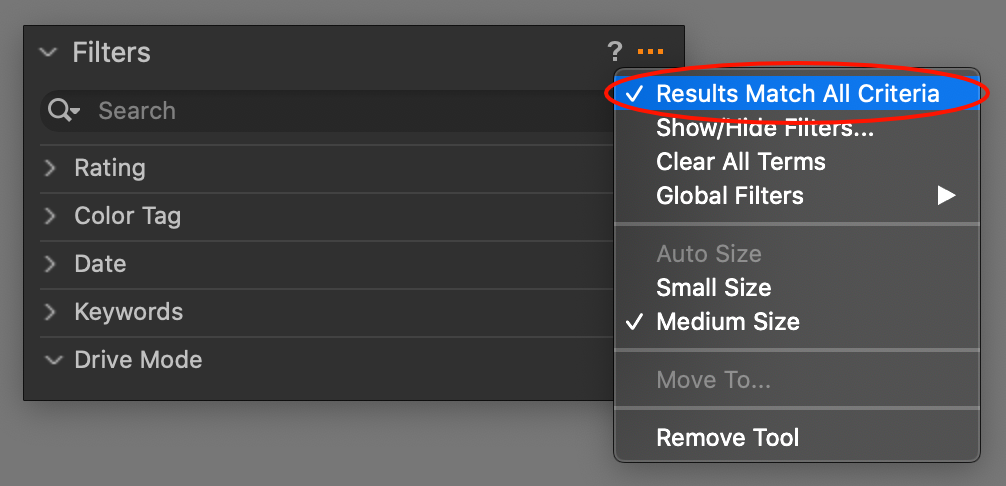
When combining two or more different kinds of Filters – for example, Rating and Color Tag – the story can have a completely different outcome. There are two possibilities. Let’s take our example of 5-star Rating and green Color Tag. The differences have to do with the state of the Results Match All Criteria toggle.
- The Browser displays all images with a 5-star Rating and the green Color Tag; note there can be an overlap of images that have both properties, but only one feature (rating or color tag) is sufficient for display. The Results Match All Criteria toggle is disabled.
- The Browser limits the displayed images to only those who have both properties, the rating, and the color tag. The Results Match All Criteria toggle is enabled.
As you see, the Filters tool is quite smart. Now, let’s add more Filters.
More Filters
By default, the Filters tool shows you the Filters for Rating, Color Tag, Date, Keywords, and Place. Next, open the action menu (3-dots) > Show/Hide Filters. Here, you find a list of all Filters, and you can add what you need, or remove what you do not need.
Note that there is a Filter for each kind of metadata.
Global Filters
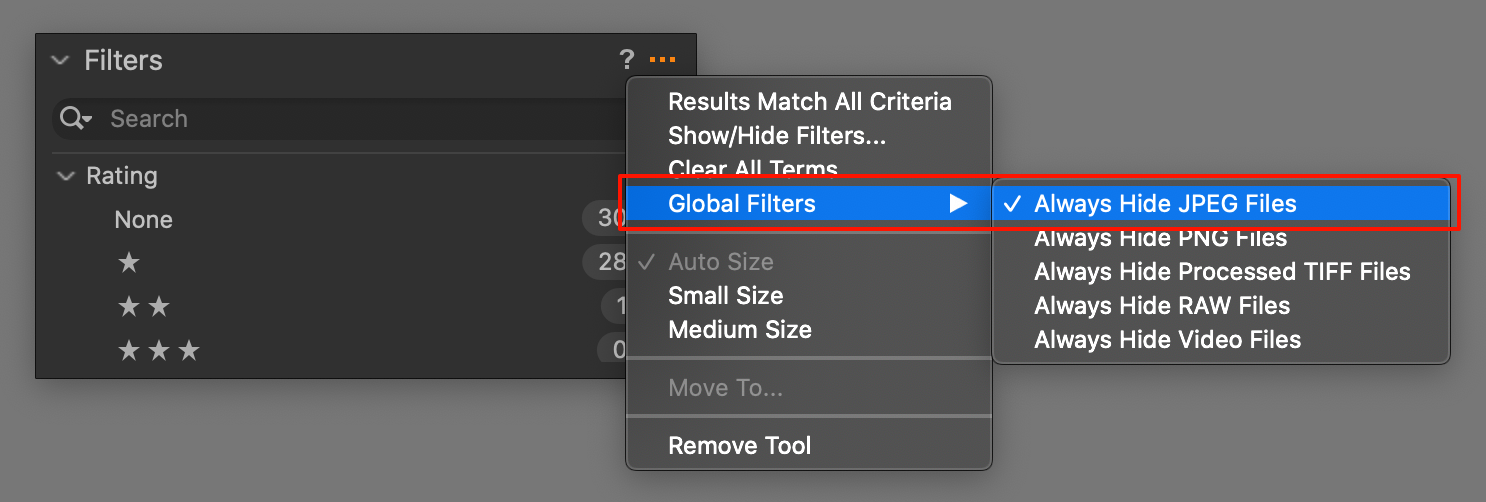
While in the action menu of the Filters tool, please notice the Global Filters section. You can access the Global Filters from the View menu as well. Global Filters are powerful, and it is easy to forget that you have set one.
Note that Global Filters are also useful in the Import Images dialog. This feature is beneficial in suppressing a file type you do not want to import anyway.
Filter and Search indicator
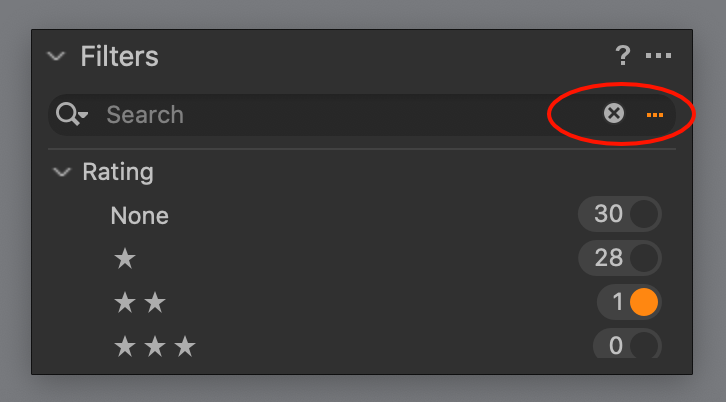
The Search field in both the Filters tool and Browser has an indicator that a Filter, Search, or Advanced Search is active. Notice the X-symbol and the three colored dots in the screenshot below.
You can click on the X-symbol to delete any active Filter or Search. Click on the three colored dots to open the Advanced Search dialog.
This indicator does not appear when a Global Filter is active. There is no indicator for a Global Filter other than opening the list of Global Filters and look for checkmarks.
The same applies when you delete any Filter or Search with the X-symbol. It does not affect an active Global Filter.
Search and Advanced Search
After selecting a Collection, applying a Global Filter, or a Filter in the Filters tool, you can further narrow your search for a specific image or set of images in Capture One.
The Search feature is your next step, optionally followed by Advanced Search. I discuss both below. To put it in one line:
- Collection > (Global) Filters > (Advanced) Search >> Browser
Just for clarity, you may skip any Filter, and directly search.
Search
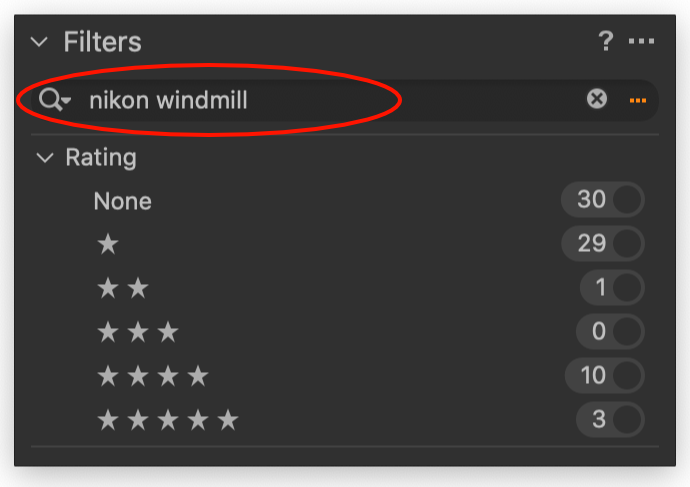
You find the Search tool in both the Browser and the Filters tool. Just enter a keyword or any metadata term in the text box.
You can enter multiple terms, separated by a space, and Capture One will show all images that apply to each of the words. Phrases that contain a space character, you use quotes, like “image alchemist.”
Search is a quick and easy solution but may not be precise enough for you. If you want more control over your search, shift gear and continue with Advanced Search.
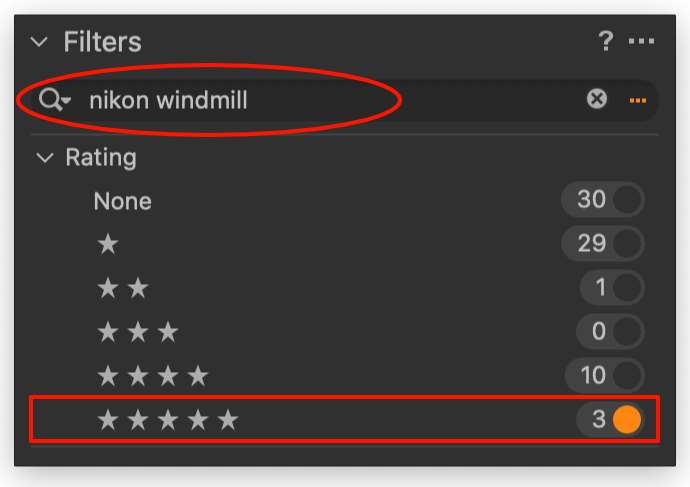
Note that you can combine a Filter with Search terms. In that case, the resulting images reflect both rules, based on the Results Match All Criteria setting in the Filters tool, as mentioned earlier.
Advanced Search
You open the Advanced Search from both the Browser and the Filters tool where you did your Search. Look for the 3-dots at the right in the Search field, and the Advanced Search dialog opens.
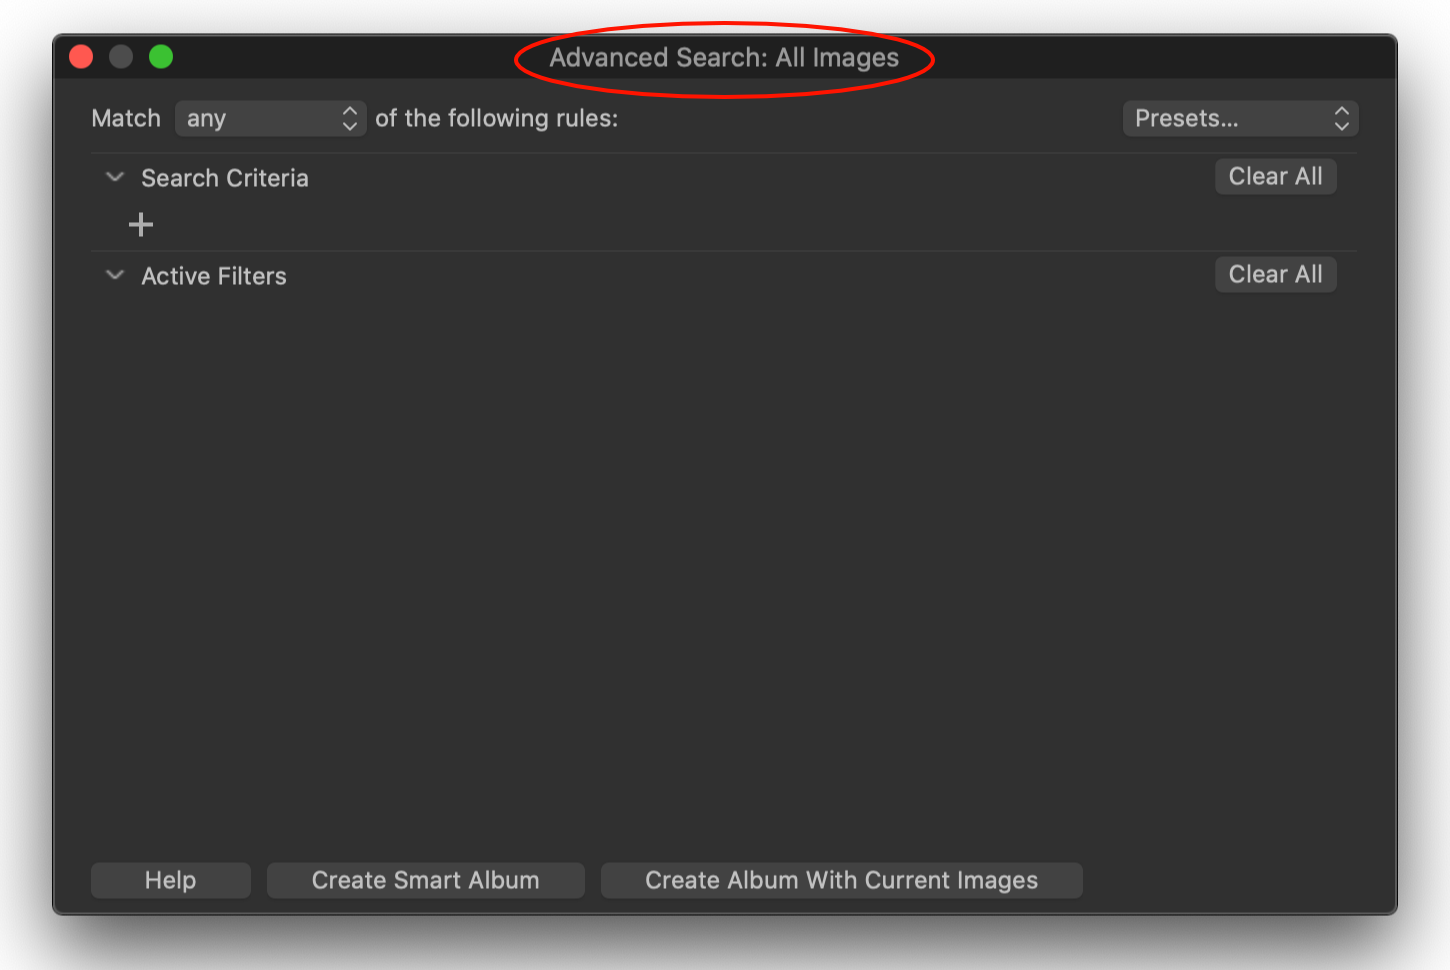
Alternatively, you can use the menu Edit > Advanced Search or the keyboard shortcut. This command opens an empty Advanced Search dialog like the one above. Notice the name of the selected Collection in the title of the dialog.
In case you had an active Search or Filters enabled, you see them back in the Advanced Search dialog. If not, the dialog is empty, waiting for you to enter search conditions.
Explaining The Advanced Search Dialog
The last step in using a Filter and Search in Capture One is the Advanced Search.
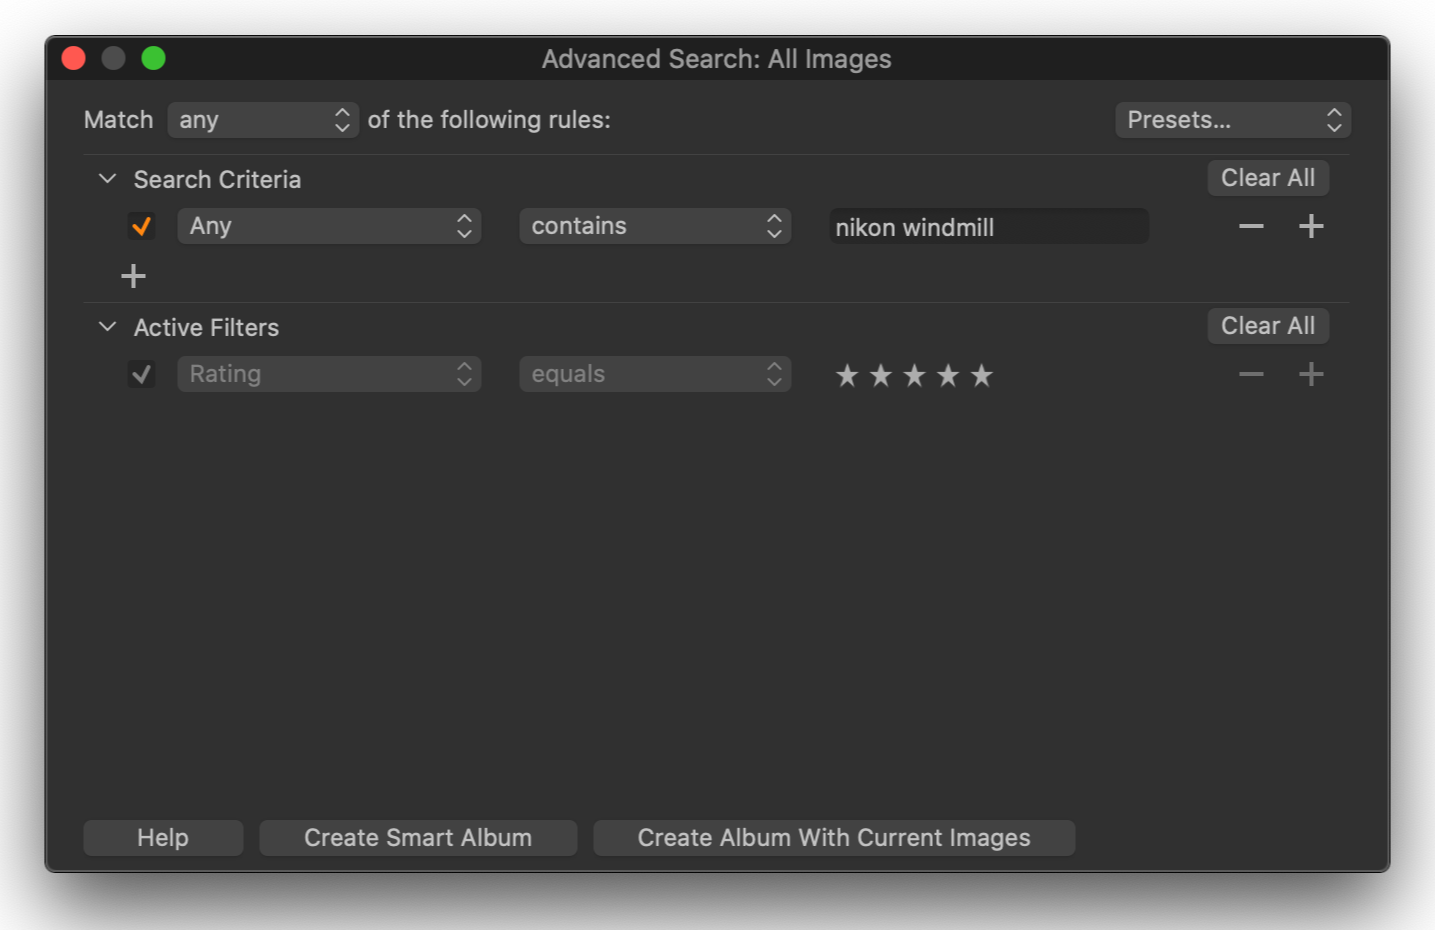
At first glance, the Advanced Search dialog in Capture One is not that complicated or advanced, for that matter. Enter a rule in the Search Criteria section, and you notice the effect immediately in the Browser.
Note that you can continue working with your images with the Advanced Search dialog open. You can change any rule in that dialog on the fly and work with another selection of images.
Note that you also can disable/enable a rule with the orange checkmark in front of it.
Search Conditions
A search criterion has three parts:
- the kind of data you search for like a keyword or a date
- the operator like contains, equals, larger than
- the value like the keyword, date, or name
Here are a few examples of search criteria. The number between parenthesis refer to numbers above. You do not type them.
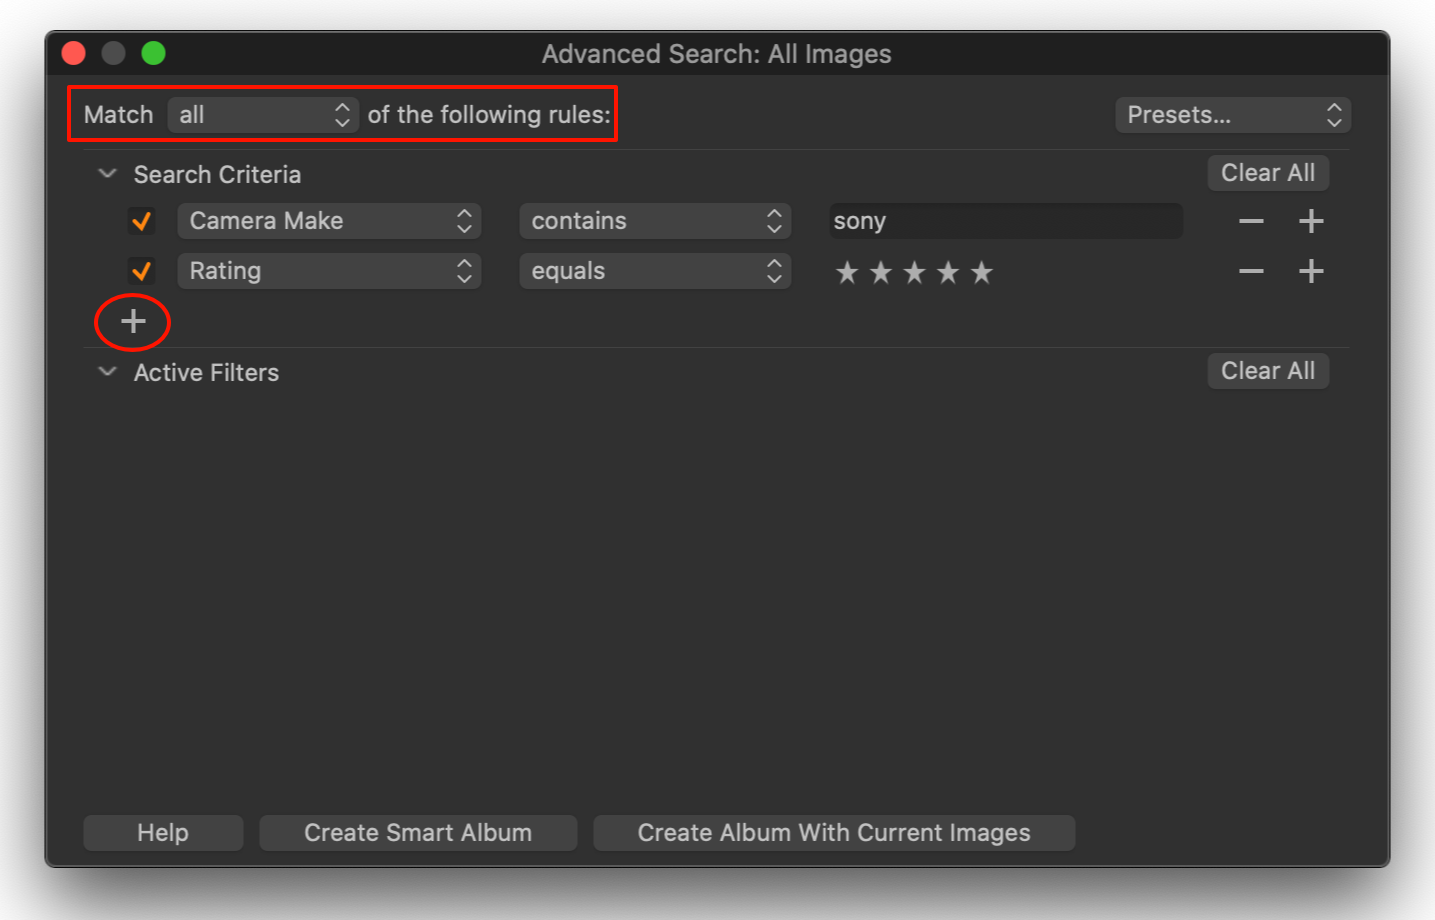
- (1) Camera Make > (2) contains > (3) sony
- Rating > equals > 5 stars
- Color Tag > is > green
Multiple rules
You can add second and consecutive rules for more specific searches. Use the plus (+) sign at the left.
Like with multiple Filters that have a Results Match All Criteria toggle, the Advanced Search dialog has a similar setting. Notice at the top left corner the line Match any/all of the following rules.
A drop-down list lets you choose between any or all. As with the Filters toggle, the all option is the most restrictive, forcing Capture One to display only those images that comply with all the rules.
Search presets
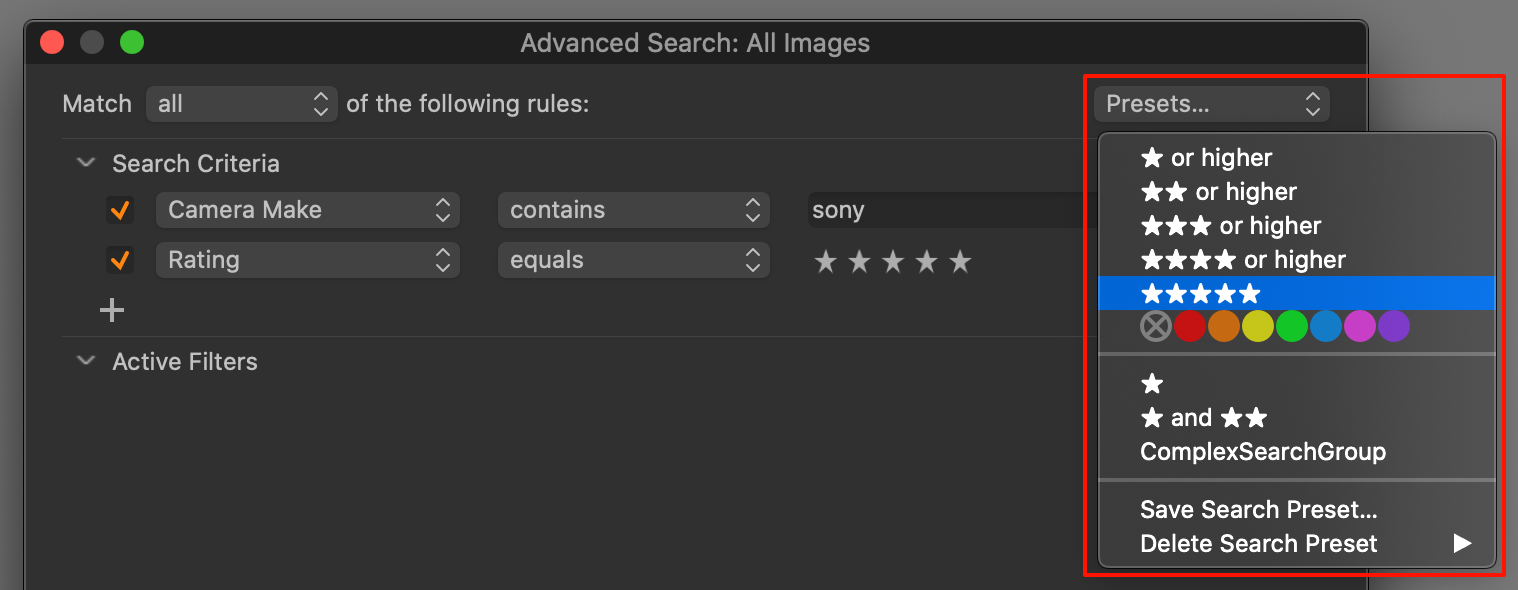
In the top-right corner of the Advanced Search dialog, you see the Presets… drop-down list. Here you find some built-in Search Presets and the ability to save more.
Whether you have a simple or more complex search with many rules, saving them as a Search Presets makes them quick and easy to retrieve for future use. Note that when you apply a Search Presets, you replace any existing rule with rules from that Preset.
Search groups
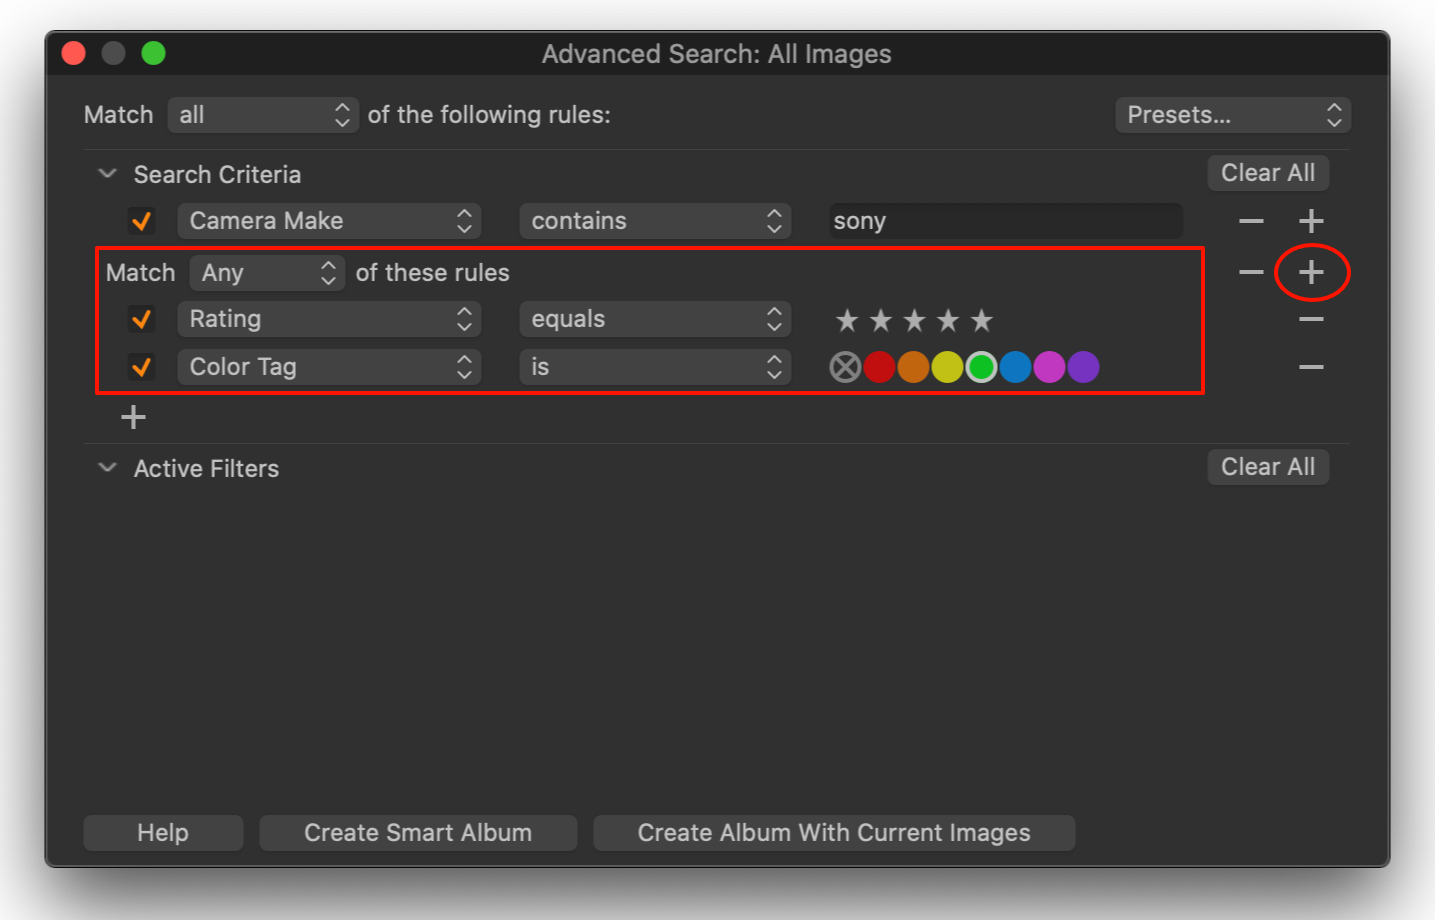
As I explained earlier, you can determine whether any or all rules must match in a search with multiple rules. However, imagine that you need any for a few rules and all for others. You can achieve this with Search Groups.
In the example below, you see a Search Group with two rules for Rating and Color Tag. The Match rules setting is Any. This option means that Capture One finds and displays both the 5-star images and the green color tag.
On top of that result is the rule that the Camera Make contains sony. Now, this rule is applied against the outcome of the Search Group with the matching rule all.
As soon as you create a rule from a Search Preset or after clicking on the plus (+) sign, that rule has a minus (-) and plus (+) sign at the right.
That plus (+) sign at the right creates a new Search Group. Each Search Group has its Match any/all rules selector.
Create Albums
At the bottom of the Advanced Search dialog, there are two exciting options:
- Create Smart Album
- Create Album With Current Images
With the Smart Album option, you save the search rules into a Smart Album. If more (or fewer) images apply to these rules later, Capture One automatically updates the Smart Album.
The Album With Current Images option saves the current result of the search into an Album. An Album’s contents only change when you manually add images to it or remove from it.
This comment finishes the Filter and Search in Capture One, and also a five post series on metadata. I hope you enjoyed it.
Thank you
For reading. Please feel free to leave a comment. Like us on Facebook or subscribe to our newsletter to stay informed about new blogs.
Best Regards,
Image Alchemist












Leave a Reply
Want to join the discussion?Feel free to contribute!